react嵌套路由

来源:https://www.cnblogs.com/gxp69/archive/2020/04/16/12711412.html
-Advertisement-
Play Games

1、結構目錄 2、路由配置文件,參照的vue-router config.js import Login from '../view/Login.js'; import System from '../view/System.js'; import Bus from '../view/Bus.js' ...
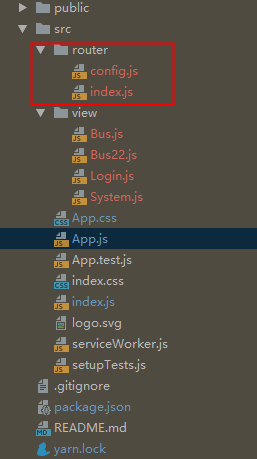

1、結構目錄

2、路由配置文件,參照的vue-router

config.js

import Login from '../view/Login.js';
import System from '../view/System.js';
import Bus from '../view/Bus.js';
import Bus22 from '../view/Bus22.js';

const routes = [
  {
    path: "/",
    component: Login,
    exact: true,
  },
  {
    path: "/system",
    component: System,
    auth:true,
    routes: [
      {
        path: "/system/bus",
        component: Bus,
        exact: true,
        auth:true,
      },
      {
        path: "/system/bus22",
        component: Bus22,
        exact: true,
        auth:true,
      },
    ]
  }
];
export default routes;

3、路由主體,使用react-router-dom,詳細文檔裡面也有其它的例子和API

import routes from './config';
import React, {Component} from 'react';
import {
  BrowserRouter as Router,
  Switch,
  Route,
  Redirect,
} from "react-router-dom";

/*一級路由*/
class First extends Component {
  render() {
    return (
      <Router>
        <Switch>
          {routes.map((route, i) => {
              if (route.auth) {//根據配置是否檢測登錄
                return (
                  <PrivateRoute key={i} path={route.path}>
                    <route.component/>
                  </PrivateRoute>
                )
              } else {
                return (<RouteWithSubRoutes key={i} {...route} />)
              }
            }
          )}
        </Switch>
      </Router>
    );
  }
}
/*二級路由*/
class SystemRouter extends Component {
  render() {
    return (
        <Switch>
          {routes[1].routes.map((route, i) => {
            if (route.auth) {//根據配置是否檢測登錄
              return (
                <PrivateRoute  key={i} path={route.path}>
                  <route.component/>
                </PrivateRoute>
              )
            } else {
              return (<RouteWithSubRoutes key={i} {...route} />)
            }
          })}
        </Switch>
    );
  }
}

export {
  First, SystemRouter
};
// A special wrapper for <Route> that knows how to
// handle "sub"-routes by passing them in a `routes`
// prop to the component it renders.
/*開放路由*/
function RouteWithSubRoutes(route) {
  return (
    <Route
      exact={route.exact}
      path={route.path}
      render={props => (
        // pass the sub-routes down to keep nesting
        <route.component {...props} routes={route.routes}/>
      )}
    />
  );
}
/*登錄檢測路由*/
function PrivateRoute({children, ...rest}) {
  let isAuthenticated = sessionStorage.auth;
  return (
    <Route
      {...rest}
      render={({location}) =>
        isAuthenticated ? (
          children
        ) : (
          <Redirect
            to={{
              pathname: "/",
              state: {from: location}
            }}
          />
        )
      }
    />
  );
}

4、一級路由的使用,在App.js

import React from 'react';
import './App.css';
import {First} from './router/index';

function App() {
  return (
    <First/>
  );
}

export default App;

5、二級路由的使用,在一級路由的組件文件中,本例是System.js

import React,{Component} from 'react';
import {SystemRouter} from '../router/index';
import {
  withRouter
} from "react-router-dom";
import { Menu, Icon } from 'antd';

const { SubMenu } = Menu;
class System extends Component  {
  componentDidMount() {

  }

  handleClick = e => {
    this.props.history.push(e.key)
  };
  render() {
    return (
      <div>
        <header>
          嵌套路由
        </header>
        <Menu
          onClick={this.handleClick}
          style={{ width: 256,float:'left' }}
          defaultSelectedKeys={['1']}
          defaultOpenKeys={['sub1']}
          mode="inline"
        >
          <SubMenu
            key="sub1"
            title={
              <span>
              <Icon type="mail" />
              <span>Navigation One</span>
            </span>
            }
          >
            <Menu.Item key="/system/bus">bus</Menu.Item>
            <Menu.Item key="/system/bus22">bus22</Menu.Item>
          </SubMenu>
      
        </Menu>
        <SystemRouter  style={{ float:'left' }}/>
      </div>
    );
  }
}
export default withRouter(System);

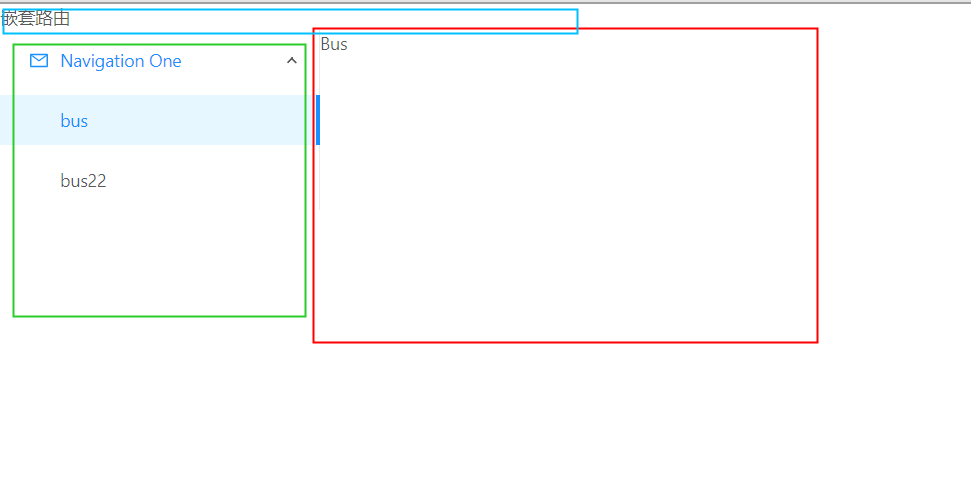
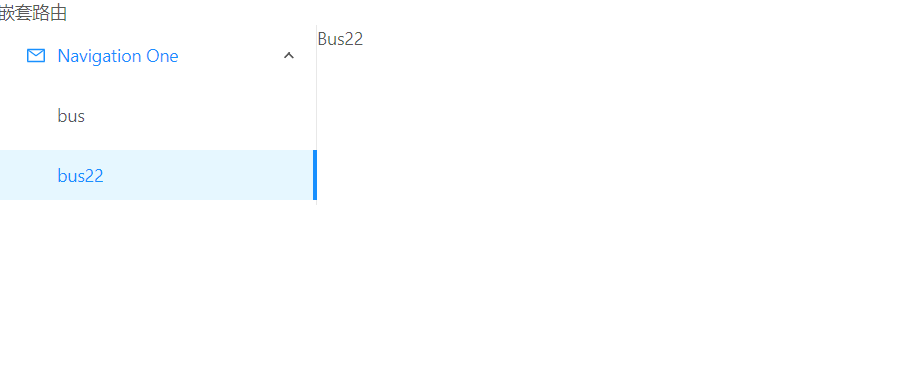
最後來倆效果圖,頁面分三部分,頭部、左側導航、右側內容,切換時只有右側內容變化。


您的分享是我們最大的動力!

-Advertisement-
Play Games
更多相關文章
  • "概述" "antd pro table" "antd pro table 的主要部分" "表格顯示的配置(綠色框內)" "檢索的配置(紅色框內)" "是否顯示檢索部分" "檢索的內容是如何生效的" "工具欄的配置(黃色框內)" "表格操作信息(藍色框內)" 概述 如果用 react 開發前端, 建 ...
  • <template> <div class="hello"> <div v-for="(list, index) in merge" :key="index" class="box" :id="`box-${index}`"> <h1>{{list.tittle}}</h1> <ul :id="`i ...
  • 引自官方文檔 在微信小程式中存在一類特殊的組件,該類組件是由客戶端創建的原生組件。這些組件有: camera canvas input(僅在focus時表現為原生組件) live-player live-pusher map textarea video 由於原生組件脫離在 WebView 渲染流程 ...
  • Bootstrap4 輪播 菜鳥教程上的案例 <div id="demo" class="carousel slide" data-ride="carousel"> <!-- 指示符 --> <ul class="carousel-indicators"> <li data-target="#dem ...
  • 跟異國他鄉的朋友們微信聊天的時候,經常面臨時差的問題。每次想要確定對方現在是幾點,總是要口算一下,有時忘記具體時差,或者涉及跨天,還得打開瀏覽器查一下,很不方便。有什麼方法可以把朋友們所在城市的時間集中起來隨時供自己查看呢?於是想到了微信小程式。找了找市面上的時間小程式,不是功能太雜就是小廣告太多,... ...
  • Bootstrap4 麵包屑導航(Breadcrumb) <ul class="breadcrumb"> <li class="breadcrumb-item"><a href="#">item1</a></li> <li class="breadcrumb-item"><a href="#">it ...
  • Bootstrap4 卡片 <div class="card"> <div class="card-body">卡片</div> </div> 卡片頭部,內容,底部 <div class="card"> <div class="card-header">卡片頭部</div> <div class=" ...
  • 最近用力軟的框架覺得框架在佈局這塊不是很友好特別是對像css不是很好的程式員來說,大部分大家都是後端程式員。 所以決定集成一個和力軟敏捷框架風格比較一致的佈局插件進來 插件ce-layout ,下載地址https://gitee.com/program_cat/ce-layout @{ ViewDa ...
一周排行
    -Advertisement-
    Play Games
  • 示例項目結構 在 Visual Studio 中創建一個 WinForms 應用程式後,項目結構如下所示: MyWinFormsApp/ │ ├───Properties/ │ └───Settings.settings │ ├───bin/ │ ├───Debug/ │ └───Release/ ...
  • [STAThread] 特性用於需要與 COM 組件交互的應用程式,尤其是依賴單線程模型(如 Windows Forms 應用程式)的組件。在 STA 模式下,線程擁有自己的消息迴圈,這對於處理用戶界面和某些 COM 組件是必要的。 [STAThread] static void Main(stri ...
  • 在WinForm中使用全局異常捕獲處理 在WinForm應用程式中,全局異常捕獲是確保程式穩定性的關鍵。通過在Program類的Main方法中設置全局異常處理,可以有效地捕獲並處理未預見的異常,從而避免程式崩潰。 註冊全局異常事件 [STAThread] static void Main() { / ...
  • 前言 給大家推薦一款開源的 Winform 控制項庫,可以幫助我們開發更加美觀、漂亮的 WinForm 界面。 項目介紹 SunnyUI.NET 是一個基於 .NET Framework 4.0+、.NET 6、.NET 7 和 .NET 8 的 WinForm 開源控制項庫,同時也提供了工具類庫、擴展 ...
  • 說明 該文章是屬於OverallAuth2.0系列文章,每周更新一篇該系列文章(從0到1完成系統開發)。 該系統文章,我會儘量說的非常詳細,做到不管新手、老手都能看懂。 說明:OverallAuth2.0 是一個簡單、易懂、功能強大的許可權+可視化流程管理系統。 有興趣的朋友,請關註我吧(*^▽^*) ...
  • 一、下載安裝 1.下載git 必須先下載並安裝git,再TortoiseGit下載安裝 git安裝參考教程:https://blog.csdn.net/mukes/article/details/115693833 2.TortoiseGit下載與安裝 TortoiseGit,Git客戶端,32/6 ...
  • 前言 在項目開發過程中,理解數據結構和演算法如同掌握蓋房子的秘訣。演算法不僅能幫助我們編寫高效、優質的代碼,還能解決項目中遇到的各種難題。 給大家推薦一個支持C#的開源免費、新手友好的數據結構與演算法入門教程:Hello演算法。 項目介紹 《Hello Algo》是一本開源免費、新手友好的數據結構與演算法入門 ...
  • 1.生成單個Proto.bat內容 @rem Copyright 2016, Google Inc. @rem All rights reserved. @rem @rem Redistribution and use in source and binary forms, with or with ...
  • 一:背景 1. 講故事 前段時間有位朋友找到我,說他的窗體程式在客戶這邊出現了卡死,讓我幫忙看下怎麼回事?dump也生成了,既然有dump了那就上 windbg 分析吧。 二:WinDbg 分析 1. 為什麼會卡死 窗體程式的卡死,入口門檻很低,後續往下分析就不一定了,不管怎麼說先用 !clrsta ...
  • 前言 人工智慧時代,人臉識別技術已成為安全驗證、身份識別和用戶交互的關鍵工具。 給大家推薦一款.NET 開源提供了強大的人臉識別 API,工具不僅易於集成,還具備高效處理能力。 本文將介紹一款如何利用這些API,為我們的項目添加智能識別的亮點。 項目介紹 GitHub 上擁有 1.2k 星標的 C# ...