
跟我學SpringCloud | 第三篇:服務的提供與Feign調用 上一篇,我們介紹了註冊中心的搭建,包括集群環境嚇註冊中心的搭建,這篇文章介紹一下如何使用註冊中心,創建一個服務的提供者,使用一個簡單的客戶端去調用服務端提供的服務。 本篇文章中需要三個角色,分別是服務的提供者,服務的消費者,還有一 ...
跟我學SpringCloud | 第三篇:服務的提供與Feign調用
上一篇,我們介紹了註冊中心的搭建,包括集群環境嚇註冊中心的搭建,這篇文章介紹一下如何使用註冊中心,創建一個服務的提供者,使用一個簡單的客戶端去調用服務端提供的服務。
本篇文章中需要三個角色,分別是服務的提供者,服務的消費者,還有一個是上一篇文章的主角——註冊中心Eureka(使用單機版本即可,本篇的示例也會使用單機版本的Eureka)。
整體流程為:
- 先啟動註冊中心Eureka
- 啟動服務的提供者將提供服務,並將服務註冊到註冊中心Eureka上
- 啟動服務的消費者,在註冊中心中找到服務並完成消費
1. 服務提供者
1. pom.xml
<?xml version="1.0" encoding="UTF-8"?>
<project xmlns="http://maven.apache.org/POM/4.0.0" xmlns:xsi="http://www.w3.org/2001/XMLSchema-instance"
    xsi:schemaLocation="http://maven.apache.org/POM/4.0.0 http://maven.apache.org/xsd/maven-4.0.0.xsd">
    <modelVersion>4.0.0</modelVersion>
    <parent>
        <groupId>org.springframework.boot</groupId>
        <artifactId>spring-boot-starter-parent</artifactId>
        <version>2.1.6.RELEASE</version>
        <relativePath/> <!-- lookup parent from repository -->
    </parent>
    <groupId>com.springcloud</groupId>
    <artifactId>producer</artifactId>
    <version>0.0.1-SNAPSHOT</version>
    <name>producer</name>
    <description>Demo project for Spring Boot</description>

    <properties>
        <java.version>1.8</java.version>
        <spring-cloud.version>Greenwich.SR1</spring-cloud.version>
    </properties>

    <dependencies>
        <dependency>
            <groupId>org.springframework.boot</groupId>
            <artifactId>spring-boot-starter-web</artifactId>
        </dependency>
        <dependency>
            <groupId>org.springframework.cloud</groupId>
            <artifactId>spring-cloud-starter-netflix-eureka-client</artifactId>
        </dependency>

        <dependency>
            <groupId>org.springframework.boot</groupId>
            <artifactId>spring-boot-starter-test</artifactId>
            <scope>test</scope>
        </dependency>
    </dependencies>

    <dependencyManagement>
        <dependencies>
            <dependency>
                <groupId>org.springframework.cloud</groupId>
                <artifactId>spring-cloud-dependencies</artifactId>
                <version>${spring-cloud.version}</version>
                <type>pom</type>
                <scope>import</scope>
            </dependency>
        </dependencies>
    </dependencyManagement>

    <build>
        <plugins>
            <plugin>
                <groupId>org.springframework.boot</groupId>
                <artifactId>spring-boot-maven-plugin</artifactId>
            </plugin>
        </plugins>
    </build>

</project>
2. 配置文件application.yml
server:
  port: 8080
spring:
  application:
    name: spring-cloud-producer
eureka:
  client:
    service-url:
      defaultZone: http://localhost:8761/eureka/
3. 啟動類ProducerApplication.java
增加@EnableEurekaClient,如果是其他註冊中心可以使用註解@EnableDiscoveryClient來進行服務的註冊
package com.springcloud.producer;

import org.springframework.boot.SpringApplication;
import org.springframework.boot.autoconfigure.SpringBootApplication;
import org.springframework.cloud.netflix.eureka.EnableEurekaClient;

@SpringBootApplication
@EnableEurekaClient
public class ProducerApplication {

    public static void main(String[] args) {
        SpringApplication.run(ProducerApplication.class, args);
    }

}
4. Controller
package com.springcloud.producer.controller;

import org.springframework.web.bind.annotation.RequestMapping;
import org.springframework.web.bind.annotation.RequestParam;
import org.springframework.web.bind.annotation.RestController;

/**
 * Created with IntelliJ IDEA.
 *
 * @Date: 2019/7/2
 * @Time: 0:02
 * @email: [email protected]
 * Description:
 */
@RestController
public class HelloController {
    @RequestMapping("/hello")
    public String hello(@RequestParam String name) {
        return "hello "+name+",producer is ready";
    }
}
先在可以先啟動上一篇當中單機版的Eureka,再啟動我們剛寫好的producer服務提供者,啟動成功後,訪問鏈接http://localhost:8761/,可以看到我們的的服務提供者producer已經成功註冊在註冊中心上了。
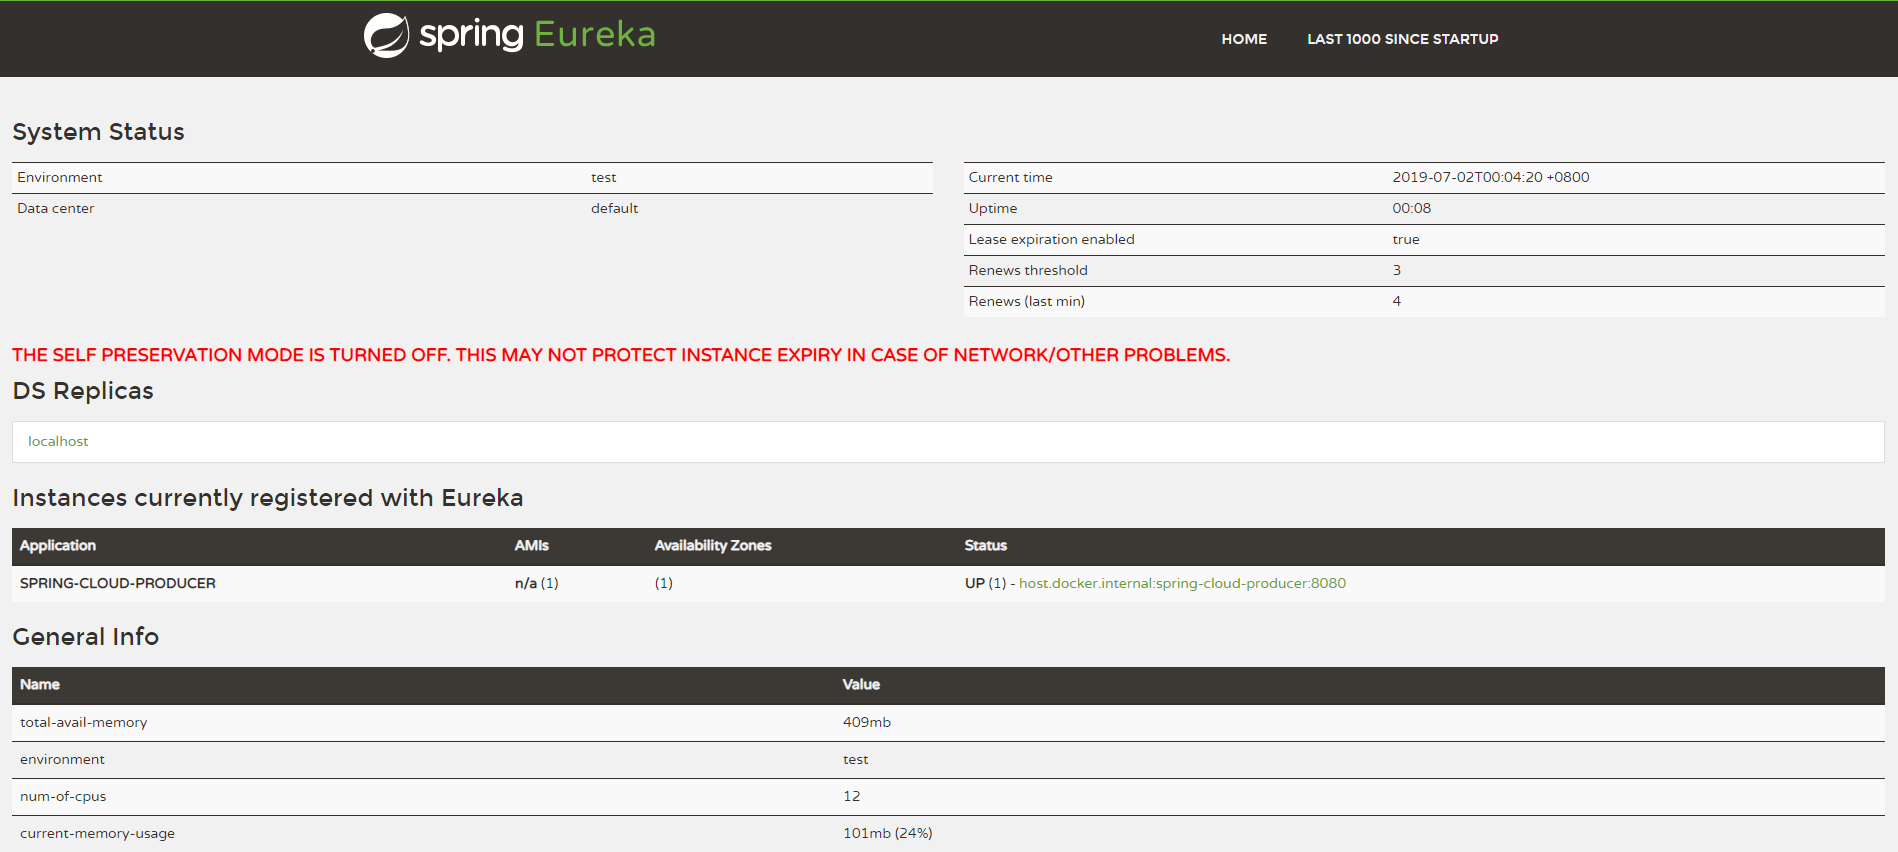
至此,服務的提供者已經配置完成。
2. 服務消費者
1. pom.xml
<?xml version="1.0" encoding="UTF-8"?>
<project xmlns="http://maven.apache.org/POM/4.0.0" xmlns:xsi="http://www.w3.org/2001/XMLSchema-instance"
    xsi:schemaLocation="http://maven.apache.org/POM/4.0.0 http://maven.apache.org/xsd/maven-4.0.0.xsd">
    <modelVersion>4.0.0</modelVersion>
    <parent>
        <groupId>org.springframework.boot</groupId>
        <artifactId>spring-boot-starter-parent</artifactId>
        <version>2.1.6.RELEASE</version>
        <relativePath/> <!-- lookup parent from repository -->
    </parent>
    <groupId>com.springcloud</groupId>
    <artifactId>consumers</artifactId>
    <version>0.0.1-SNAPSHOT</version>
    <name>consumers</name>
    <description>Demo project for Spring Boot</description>

    <properties>
        <java.version>1.8</java.version>
        <spring-cloud.version>Greenwich.SR1</spring-cloud.version>
    </properties>

    <dependencies>
        <dependency>
            <groupId>org.springframework.cloud</groupId>
            <artifactId>spring-cloud-starter-netflix-eureka-client</artifactId>
        </dependency>
        <dependency>
            <groupId>org.springframework.boot</groupId>
            <artifactId>spring-boot-starter-web</artifactId>
        </dependency>
        <dependency>
            <groupId>org.springframework.cloud</groupId>
            <artifactId>spring-cloud-starter-openfeign</artifactId>
        </dependency>

        <dependency>
            <groupId>org.springframework.boot</groupId>
            <artifactId>spring-boot-starter-test</artifactId>
            <scope>test</scope>
        </dependency>
    </dependencies>

    <dependencyManagement>
        <dependencies>
            <dependency>
                <groupId>org.springframework.cloud</groupId>
                <artifactId>spring-cloud-dependencies</artifactId>
                <version>${spring-cloud.version}</version>
                <type>pom</type>
                <scope>import</scope>
            </dependency>
        </dependencies>
    </dependencyManagement>

    <build>
        <plugins>
            <plugin>
                <groupId>org.springframework.boot</groupId>
                <artifactId>spring-boot-maven-plugin</artifactId>
            </plugin>
        </plugins>
    </build>

</project>
spring-boot-starter-web: 這個包是通用的web開發包,裡面包含了spring-web、spring-webmvc等包
spring-cloud-starter-openfeign: 這個包是springcloud對於Feign的封裝,Feign是一個聲明式的Web服務客戶端。它支持Feign本身的註解、JAX-RS註解以及SpringMVC的註解。Spring Cloud集成Ribbon和Eureka以在使用Feign時提供負載均衡的http客戶端。
2. 配置文件application.yml
server:
  port: 8081
spring:
  application:
    name: spring-cloud-consumers
eureka:
  client:
    service-url:
      defaultZone: http://localhost:8761/eureka/
3. 啟動類ConsumersApplication.java
同上,增加@EnableEurekaClient,如果是其他註冊中心可以使用註解@EnableDiscoveryClient來進行服務的註冊
package com.springcloud.consumers;

import org.springframework.boot.SpringApplication;
import org.springframework.boot.autoconfigure.SpringBootApplication;
import org.springframework.cloud.netflix.eureka.EnableEurekaClient;
import org.springframework.cloud.openfeign.EnableFeignClients;

@SpringBootApplication
@EnableEurekaClient
@EnableFeignClients
public class ConsumersApplication {

    public static void main(String[] args) {
        SpringApplication.run(ConsumersApplication.class, args);
    }

}
@EnableFeignClients: 這個註解是通知SpringBoot在啟動的時候,掃描被 @FeignClient 修飾的類,@FeignClient這個註解在進行遠程調用的時候會用到。
4. Feign遠程調用
Feign是一個聲明式Web Service客戶端。使用Feign能讓編寫Web Service客戶端更加簡單, 它的使用方法是定義一個介面,然後在上面添加註解,同時也支持JAX-RS標準的註解。Feign也支持可拔插式的編碼器和解碼器。Spring Cloud對Feign進行了封裝,使其支持了Spring MVC標準註解和HttpMessageConverters。Feign可以與Eureka和Ribbon組合使用以支持負載均衡。
創建一個remote介面
package com.springcloud.consumers.remote;

import org.springframework.cloud.openfeign.FeignClient;
import org.springframework.web.bind.annotation.RequestMapping;
import org.springframework.web.bind.annotation.RequestParam;

/**
 * @Author: shiyao.wei
 * @Date: 2019/7/2 11:14
 * @Version: 1.0
 * @Desc:
 */
@FeignClient(name= "spring-cloud-producer")
public interface HelloRemote {
    @RequestMapping(value = "/hello")
    String hello(@RequestParam(value = "name") String name);
}- name:遠程服務名,及spring.application.name配置的名稱
- 此類中的方法和遠程服務中contoller中的方法名和參數需保持一致
5. web層調用遠程介面 Controller
package com.springcloud.consumers.controller;

import com.springcloud.consumers.remote.HelloRemote;
import org.springframework.beans.factory.annotation.Autowired;
import org.springframework.web.bind.annotation.PathVariable;
import org.springframework.web.bind.annotation.RequestMapping;
import org.springframework.web.bind.annotation.RestController;

/**
 * @Author: shiyao.wei
 * @Date: 2019/7/2 11:25
 * @Version: 1.0
 * @Desc:
 */
@RestController
public class HelloController {
    @Autowired
    HelloRemote helloRemote;

    @RequestMapping("/hello/{name}")
    public String index(@PathVariable("name") String name) {
        return helloRemote.hello(name);
    }
}
現在,一個最簡單的服務註冊和調用的例子就完成了。
3. 測試
簡單調用
順次啟動eureka、producer、consumer三個項目
啟動成功後,先在瀏覽器輸入http://localhost:8080/hello?name=springcloud
可以看到頁面顯示:hello springcloud,producer is ready
證明我們的producer已經正常啟動,提供的服務也正常
接下來,我們測試服務消費者,在瀏覽器中輸入:http://localhost:8081/hello/spring
可以看到頁面顯示:hello spring,producer is ready
說明客戶端已經成功的通過feign調用了遠程服務hello,並且將結果返回到了瀏覽器。
負載均衡
將上面的producer複製一份,修改名稱為producer2,修改pom.xml中的<name></name>為producer2,修改其中的Controller:
package com.springcloud.producer.controller;

import org.springframework.web.bind.annotation.RequestMapping;
import org.springframework.web.bind.annotation.RequestParam;
import org.springframework.web.bind.annotation.RestController;

/**
 * Created with IntelliJ IDEA.
 *
 * @Date: 2019/7/2
 * @Time: 0:02
 * @email: [email protected]
 * Description:
 */
@RestController
public class HelloController {
    @RequestMapping("/hello")
    public String hello(@RequestParam String name) {
        return "hello "+name+",producer2 is ready";
    }
}
修改application.yml配置文件啟動埠為8082
啟動我們剛複製好的producer2,這時可以看一下註冊中心Eureka,我們現在已經有兩個producer服務了。

這時我們再去訪問:http://localhost:8081/hello/spring
第一次返回結果:hello spring,producer is ready
第二次返回結果:hello spring,producer2 is ready
連續刷新頁面,兩個結果會交替出現,說明註冊中心提供了服務負載均衡功能。將服務數提高到N個,會發現測試結果一樣,請求會自動輪詢到每個服務端來處理。
好了,現在可以將代碼打包扔到Github上去了,歡迎大家前往Github騷擾:)

