一、打開谷歌控制台:https://console.developers.google.com/apis 二、點擊創建憑據,如下圖,填寫項目地址等 三、創建好客戶端ID和秘鑰後,填寫對應的項目網址和登錄頁網址 四、修改OAuth同意屏幕網站首頁地址和隱私政策網址 五、代碼部分如下: ...
一、打開谷歌控制台:https://console.developers.google.com/apis
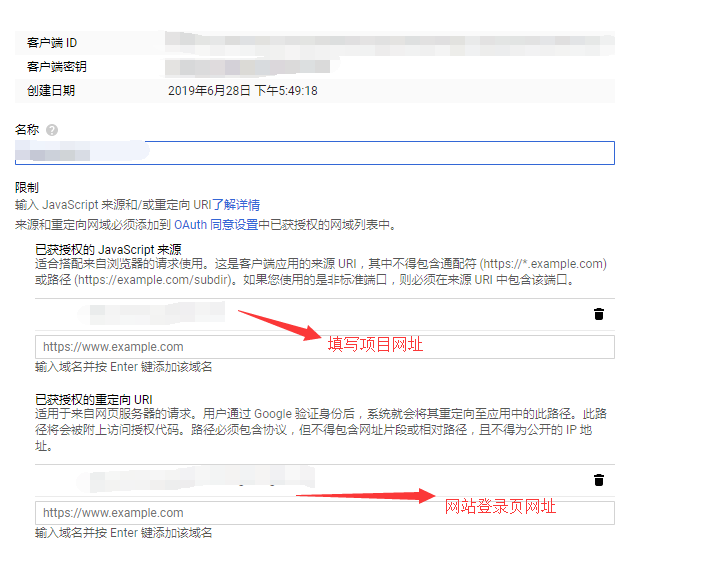
二、點擊創建憑據,如下圖,填寫項目地址等

三、創建好客戶端ID和秘鑰後,填寫對應的項目網址和登錄頁網址

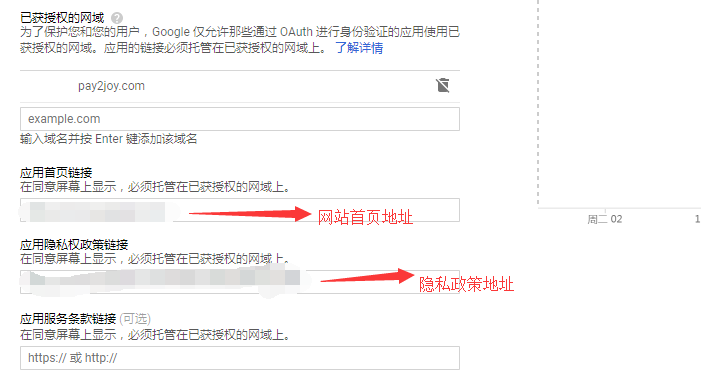
四、修改OAuth同意屏幕網站首頁地址和隱私政策網址

五、代碼部分如下:
<script src="https://apis.google.com/js/api:client.js"></script>function google_login() {
        var googleUser = {};
            gapi.load('auth2', function(){
                // Retrieve the singleton for the GoogleAuth library and set up the client.
                auth2 = gapi.auth2.init({
                    client_id: '申請得到的客戶端ID', //客戶端ID
                    cookiepolicy: 'single_host_origin',
                    scope: 'profile' //可以請求除了預設的'profile' and 'email'之外的數據
                });
                attachSignin(document.getElementById('google_button')); //點擊google登錄的按鈕
            });

    }

    function attachSignin(element) {
        auth2.attachClickHandler(element, {},
            function(googleUser) {
                var profile = auth2.currentUser.get().getBasicProfile();
                console.log('ID: ' + profile.getId());
                console.log('Full Name: ' + profile.getName());
                console.log('Given Name: ' + profile.getGivenName());
                console.log('Family Name: ' + profile.getFamilyName());
                console.log('Image URL: ' + profile.getImageUrl());
                console.log('Email: ' + profile.getEmail());
            }, function(error) {
                console.log(JSON.stringify(error, undefined, 2));
            });
    }


