
場景 點擊撥打電話按鈕,跳轉到撥打電話頁面 點擊發送簡訊按鈕,跳轉到發送簡訊頁面 註: 博客: https://blog.csdn.net/badao_liumang_qizhi 關註公眾號 霸道的程式猿 獲取編程相關電子書、教程推送與免費下載。 實現 將佈局改為LinearLayout,並通過an ...
場景
點擊撥打電話按鈕,跳轉到撥打電話頁面
點擊發送簡訊按鈕,跳轉到發送簡訊頁面
註:
博客:
https://blog.csdn.net/badao_liumang_qizhi
關註公眾號
霸道的程式猿
獲取編程相關電子書、教程推送與免費下載。
實現
將佈局改為LinearLayout,並通過android:orientation="vertical">設置為垂直佈局,然後添加id屬性。
然後添加兩個按鈕,並設置Id屬性與顯示文本。
<?xml version="1.0" encoding="utf-8"?>
<LinearLayout xmlns:android="http://schemas.android.com/apk/res/android"
    xmlns:app="http://schemas.android.com/apk/res-auto"
    xmlns:tools="http://schemas.android.com/tools"
    android:layout_width="match_parent"
    android:layout_height="match_parent"
    android:orientation="vertical"
    tools:context=".IntentActivity">

    <Button
        android:id="@+id/call"
        android:text="撥打電話"
        android:layout_width="wrap_content"
        android:layout_height="wrap_content"/>

    <Button
        android:id="@+id/send"
        android:text="發送簡訊"
        android:layout_width="wrap_content"
        android:layout_height="wrap_content"/>

</LinearLayout>
然後來到Activity,首先通過ID獲取者兩個Button
        Button buttonCall = (Button) findViewById(R.id.call);
        Button buttonSend = (Button) findViewById(R.id.send);
又因為這兩個Button的點擊事件監聽器差不多,所有抽離出一個公共的點擊事件監聽器對象。
View.OnClickListener listener = new View.OnClickListener() {
        @Override
        public void onClick(View v) {
            Intent intent = new Intent();
            //將view強轉為Button
            Button button = (Button) v;
            //根據button的id
            switch(button.getId()){
                //如果是撥打電話按鈕
                case R.id.call:
                    //設置Action行為屬性
                    intent.setAction(intent.ACTION_DIAL);
                    //設置數據 後面123456789是預設要撥打的電話
                    intent.setData(Uri.parse("tel:123456789"));
                    startActivity(intent);
                    break;
                case R.id.send:
                    //設置行為為 發送簡訊
                    intent.setAction(intent.ACTION_SENDTO);
                    //設置發送至 10086
                    intent.setData(Uri.parse("smsto:10086"));
                    //設置簡訊的預設發送內容
                    intent.putExtra("sms_body","公眾號:霸道的程式猿");
                    startActivity(intent);
                    break;
            }
        }
    };
然後在OnCreate中對按鈕設置點擊事件監聽器。
完整示例代碼
package com.badao.relativelayouttest;

import androidx.appcompat.app.AppCompatActivity;

import android.content.Intent;
import android.net.Uri;
import android.os.Bundle;
import android.view.View;
import android.widget.Button;

public class IntentActivity extends AppCompatActivity {

    @Override
    protected void onCreate(Bundle savedInstanceState) {
        super.onCreate(savedInstanceState);
        setContentView(R.layout.activity_intent);
        Button buttonCall = (Button) findViewById(R.id.call);
        Button buttonSend = (Button) findViewById(R.id.send);
        buttonCall.setOnClickListener(listener);
        buttonSend.setOnClickListener(listener);
    }

    View.OnClickListener listener = new View.OnClickListener() {
        @Override
        public void onClick(View v) {
            Intent intent = new Intent();
            //將view強轉為Button
            Button button = (Button) v;
            //根據button的id
            switch(button.getId()){
                //如果是撥打電話按鈕
                case R.id.call:
                    //設置Action行為屬性
                    intent.setAction(intent.ACTION_DIAL);
                    //設置數據 後面123456789是預設要撥打的電話
                    intent.setData(Uri.parse("tel:123456789"));
                    startActivity(intent);
                    break;
                case R.id.send:
                    //設置行為為 發送簡訊
                    intent.setAction(intent.ACTION_SENDTO);
                    //設置發送至 10086
                    intent.setData(Uri.parse("smsto:10086"));
                    //設置簡訊的預設發送內容
                    intent.putExtra("sms_body","公眾號:霸道的程式猿");
                    startActivity(intent);
                    break;
            }
        }
    };
}
因為用到了打電話和發動簡訊,所以需要聲明這兩個許可權,打開AndroidMainfest.xml
    <!--添加打電話許可權-->
    <uses-permission android:name="android.permission.CALL_PHONE"/>
    <!--添加發送簡訊許可權-->
    <uses-permission android:name="android.permission.SEND_SMS"/>
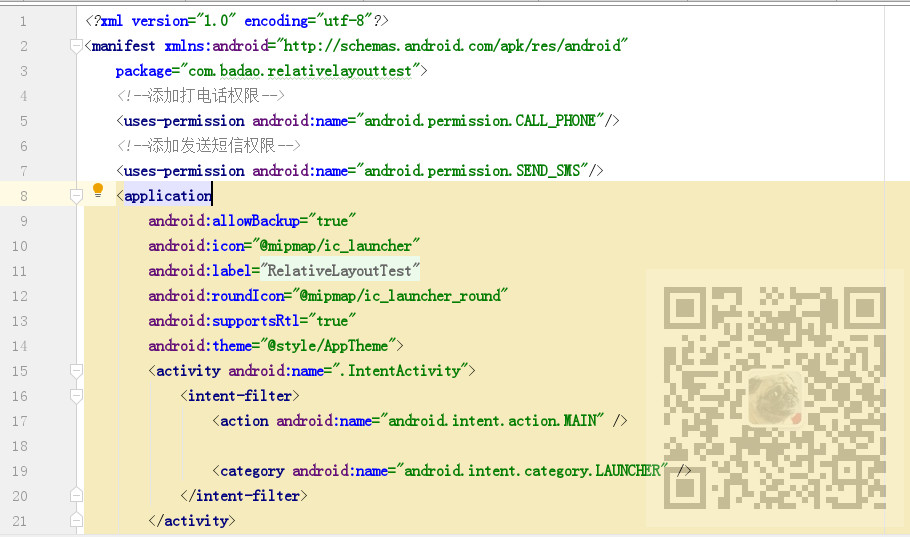
添加位置如下


