
一、TodoList 1.1安裝依賴 安裝相關依賴: 1.2配置虛擬伺服器 【第一步:安裝依賴】 【第二步:json-server的伺服器啟動】 啟動需要json文件作為支撐,新建data.json文件做服務數據: 最終沒有使用webpack-dev-server模擬伺服器 配置webpack.co ...
一、TodoList
1.1安裝依賴
安裝相關依賴:
npm install --save-dev webpack
npm install --save-dev babel-loader babel-core babel-preset-es2015
npm install --save-dev vue-loader
npm install --save-dev css-loader
npm install --save-dev vue-template-compiler
npm install --save-dev stylus stylus-loader
npm install --save vue
npm install --save vuex
1.2配置虛擬伺服器
【第一步:安裝依賴】
npm install -g json-server
【第二步:json-server的伺服器啟動】
啟動需要json文件作為支撐,新建data.json文件做服務數據:
{
    "mapList" : [
        {"id":1 ,"title" : "吃飯", "done" : false},
        {"id":2 ,"title" : "睡覺", "done" : false},
        {"id":3 ,"title" : "做飯", "done" : false},
        {"id":4 ,"title" : "掃地", "done" : false}
    ]
}
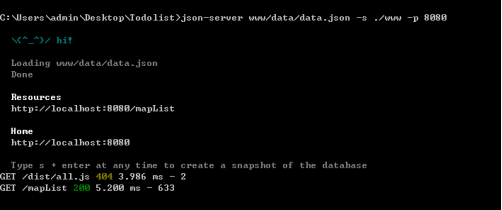
啟動命令json-server命令:
json-server 數據文件路徑 -s 靜態化目錄 -p 8080

json-server www/data/data.json -s ./www -p 8080
-s是 --static
-p是 --port
最終沒有使用webpack-dev-server模擬伺服器
配置webpack.config.js文件:
const path = require('path');
const {VueLoaderPlugin} = require('vue-loader');  //最新版webpack需要引入插件

module.exports = {
     //程式的入口文件
     entry: "./www/app/app.js",

     //程式的出口(打包的文件)
     output : {
        //打包文件輸出的路徑
        path : path.resolve(__dirname, "www/dist"),
        //打包文件的名稱
        filename : "all.js",
        // publicPath:"/public" //這是對webpack-dev-server的配置,配置虛擬路徑
     },
     //讓webpack監聽變化,自動打包
     watch : true,
     mode : "development",
     //配置webpack的模塊插件
     module:{
        //關於模塊的配置規則
        rules : [
            {
                //模塊規則(配置 loader、解析器等選項)
                test : /\.js$/,  //解析的時候匹配到的都是js文件
                include: [
                  path.resolve(__dirname, "www/app")    //翻譯什麼文件夾
                ],
                exclude: [
                  path.resolve(__dirname, "node_modules") //不翻譯什麼文件夾
                ],
                loader : "babel-loader",
                options : {
                    presets : ["es2015"]
                }
            },
            {
                test: /\.vue$/,
                include: [
                  path.resolve(__dirname, "www/app")    //翻譯什麼文件夾
                ],
                exclude: [
                  path.resolve(__dirname, "node_modules") //不翻譯什麼文件夾
                ],
                loader: 'vue-loader',
                options :{
                    loaders : {
                        stylus:'vue-style-loader!css-loader!stylus-loader'
                    }
                }
            },
            {
                test:/\.css$/,
                use: ['vue-style-loader','css-loader']
            }
            // {
            //     test: /\.styl(us)?$/,
            //     use: [
            //         'vue-style-loader',
            //         'css-loader',
            //         'stylus-loader'
            //     ]
            // }
        ]
     },
     resolve: {
        alias: { //配置別名
          'vue$': 'vue/dist/vue.esm.js' // 用 webpack 1 時需用 'vue/dist/vue.common.js'
        }
     },
     //最新版webpack需要引入插件
     plugins : [
        new VueLoaderPlugin()
     ]
}
【第三步:訪問介面】
獲取所有的數據:GET
增加數據:POST
得到某一條數據:GET
刪除某一條:DELETE
更新原始數據:PUT (更新條目的所有的屬性)、PATH(更新條目的某一個屬性)
自帶分頁:page(第幾頁)limit(每頁有多少條)
http://localhost:8080/mapList          返回.json文件所有數據(數組)
http://localhost:8080/mapList/1        返回id=1的數據,採用這種路徑風格id必須為小寫(數組)
http://localhost:8080/mapList/?Name=lst  返回Name=lst的用戶數據(數組)
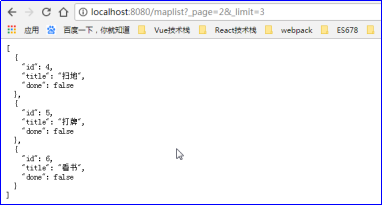
分頁查詢:參數為 _start, _end, _limit,並可添加其它參數篩選條件,如:
http://localhost:8080/mapList?_start=6&_limit=3
http://localhost:8080/mapList?_start=3&_end=6

排序:參數為_sort, _order
http://localhost:8080/mapList?_sort=id&_order=asc
http://localhost:8080/mapList?_sort=user,views&_order=desc,asc

操作符:_gte, _lte, _ne, _like
_gte大於,_lte小於, _ne非, _like模糊查詢,q關鍵詞查詢
http://127.0.0.1:8080/mapList/?q=吃
1.3 TodoList
查詢數據
相關步驟:
在created生命周期中發出一個GETALL的非同步命令,去actions裡面發非同步請求。
App.vue
<script>
    export default {
        created(){
            this.$store.dispatch("GETALL");
        }
    }
</script>
main.js
import Vue from "vue";
import Vuex from "vuex";
import App from "./App.vue";
Vue.use(Vuex);

const store = new Vuex.Store({
    state : {
        todos : []
    },
    mutations: {
        GETALL(state,payload){
            // state.todos.push(payload)
            state.todos = payload;
        }
    },
    actions :{
        async GETALL({commit}){
            //請求資料庫中的數據,然後存儲到state的todos中
            var data = await fetch("/maplist").then(data=>data.json());
            //發出commit()命令,並且將參數當載荷傳遞過去
            commit("GETALL", data);
        }
    }
});

new Vue({
    el : "#app",
    store,
    render:(h)=>h(App)
})
非同步請的數據回調成功後,將數據以載荷的形式發送到mutations,再去修改state 的數據
state全局倉庫有了數據,就可以在App.vue進行迴圈渲染。
App.vue
<template>
    <div>
        <ul>
            <li v-for="item in todos">
                {{item.title}}
            </li>
        </ul>
    </div>
</template>
<script>
    export default {
        created(){
            this.$store.dispatch("GETALL");
        },
        computed : {
            todos(){
                return this.$store.state.todos
            }
        }
    }
</script>
下一步:需要將li標簽拆分成組件:
App.vue
<template>
    <div>
        <ul>
           <li is="TodoLi" v-for="item in todos" :item="item"></li>
        </ul>
    </div>
</template>
<script>
    import TodoLi from "./components/TodoLi.vue";
    export default {
        created(){
            this.$store.dispatch("GETALL");
        },
        computed : {
            todos(){
                return this.$store.state.todos
            }
        },
        components:{
            TodoLi
        }
    }
</script>
TodoLi.vue
<template>
     <li>{{item.title}}</li>
</template>
<script>
    export default {
        props : ["item"]
    }
</script>
刪除數據
接下來寫增刪改查業務,推薦先寫刪除,因為刪除值需要id
TodoLi.vue
<template>
     <li>
         <span>{{item.title}}</span>
         <button @click="del(item.id)">刪除</button>
    </li>
</template>
<script>
    export default {
        props : ["item"],
        methods:{
            del(id){
                this.$store.dispatch("DEL", {id})
            }
        }
    }
</script>
const store = new Vuex.Store({
    state : {
        todos : []
    },
    mutations: {
        GETALL(state,payload){
            // state.todos.push(payload)
            state.todos = payload;
        },
        DEL(state, payload){
            // 根據id刪除state的數據
            state.todos = state.todos.filter(item=>{
                return item.id != payload.id;
            })
        }
    },
    actions :{
        async GETALL({commit}){
            //請求資料庫中的數據,然後存儲到state的todos中
            var data = await fetch("/maplist").then(data=>data.json());
            //發出commit()命令,並且將參數當載荷傳遞過去
            commit("GETALL", data);
        },
        async DEL({commit},payload){
            //向伺服器發出刪除請求,刪除data.json中的數據
            var data = await fetch("/maplist/" + payload.id, {
                method:"DELETE",
            }).then(data => data.json());
            commit("DEL", payload); //刪除全局state倉庫的數據
        },
    }
});
新增業務
App.vue
<template>
    <div>
        <div>
            <input type="text" v-model.trim="txt">
            <button @click="add">新增</button>
        </div>
        <ul>
           <li is="TodoLi" v-for="item in todos" :item="item"></li>
        </ul>
    </div>
</template>
<script>
    import TodoLi from "./components/TodoLi.vue";
    export default {
        data(){
            return {
                txt : ''
            }
        },
        methods :{
            add(){
                if(this.txt == '') return;
                //發出新增的非同步請求
                this.$store.dispatch(ADD, {id: new Date() - 0, title:this.txt, done:false})
            this.txt = ""
            }
        },
        components:{
            TodoLi
        }
    }
</script>
main.js
actions : {
    //新增數據
    async ADD({ commit }, payload) {
        //向data.json文件中插入數據
        var data = await fetch("/maplist/", {
            method: "POST",
            headers:{'Content-type' : 'application/json'},
            body: JSON.stringify(payload)
        }).then(data => data.json());
        commit("ADD", data); //新增數據到state,影響視圖更新
    }
},
mutations : {
    ADD(state, payload) {
        state.todos.push(payload);
    }
}
修改數據
TodoLi.vue
<template>
     <li>
         <span v-if="!isShow" @dblclick="showInput">{{item.title}}</span>
         <input type="text" v-if="isShow" v-model="item.title" @blur="hideInput(item)" v-focus>
         <button @click="del(item.id)">刪除</button>
    </li>
</template>
<script>
    export default {
        props : ["item"],
        data(){
            return{
                isShow:false
            }
        },
        methods:{
            del(id){
                this.$store.dispatch("DEL", {id})
            },
            showInput(){
                //雙擊顯示input
                this.isShow = !this.isShow;
            },
            hideInput(item){
                console.log(item)
                //失去焦點隱藏input,並且發送CAHNGETITLE命令修改title內容
                this.isShow = !this.isShow;
                this.$store.dispatch("CHANGETITLE",item)
            }
        },
        directives:{
            //自定義組件指令,自動獲取焦點
            focus :{
                inserted(el){
                    el.focus();
                }
            }
        }
    }
</script>
main.js
const store = new Vuex.Store({
    state : {
        todos : []
    },
    mutations: {
        CHANGETITLE(state, payload) {
            // 寫法1
            // state.todos.forEach(item=>{
            //     if (item.id == payload.id){
            //         item.title = payload.title;
            //     }
            // })
            // 寫法2
            state.todos = state.todos.map(item => {
                if(item.id == payload.id) {
                    return payload
                }
                return item;
            })
        }
    },
    actions :{
        //修改請求
        async CHANGETITLE({commit}, payload) {
            var data = await fetch("/maplist/" + payload.id, {
                method: "PATCH",
                headers: { 'Content-Type': 'application/json' },
                body: JSON.stringify(payload)
            }).then(data => data.json());

            commit("CHANGETITLE", data); //雖然實現了修改,但是為了完整性還是寫上
        },
    }
});
修改任務事件:當前任務是否做了,需要一個覆選框
todoli.vue
<li>
    <input type="checkbox" v-model="item.done" ref="cbox" @click="changeDone(item)">
<spanv-if="!isShowInput"@dblclick="showInput" :class="{cur:item.done}">{{item.title}}</span>
</li>
<script>
methods:{
changeDone(item){
       console.log(this.$refs.cbox.checked);
       // 這裡使用的是ref鉤子 這樣能得到 覆選框的狀態
       // 提交的時候 只需要提交 id  覆選框的狀態就行了
       this.$store.dispatch("CHANGEDONE",{
          id : item.id,
          done : this.$refs.cbox.checked
       })
}
}
</script>
<style>
    .cur{text-decoration: line-through;}
</style>
app.js修改done和修改title的方式方法都一樣,只要改方法名即可。
const store = new Vuex.Store({
    mutations:{
        CHANGEDONE(state, payload){
            state.todos = state.todos.map(item => {
                if(item.id == payload.id){
                    return payload
                }
                return item
            })
        }
    },
actions:{
        async CHANGEDONE({commit},payload){
            var data = await fetch("/mapList/" + payload.id,{
                "method" : 'PATCH',
                "headers":{
                    'Content-Type':"application/json"
                },
                body:JSON.stringify({done:payload.done})
            }).then(res => res.json());
            commit("CHANGEDONE",data)
        },
    }
});
篩選按鈕:計算已做未做事項
篩選按鈕:計算已做未做事項
app.js
const store = new Vuex.Store({
    state:{
        todos:[]
    },
    mutations:{
        ...
    },
    actions:{
        ...
    },
    getters:{
        yizuo:function(state){
            return state.todos.filter(item => {
                return item.done == true //true表示已做
            })
        },
        weizuo:function(state){
            return state.todos.filter(item => {
                return item.done == false //false表示未做
            })
        }
    }
});
App.vue
<template>
    <div>
        <div>
            <input type="text" v-model.trim="txt">
            <button @click="add">新增</button>
        </div>
        <ul>
            <li v-for="item of todos" is="TodoLi" :item="item"></li>
        </ul>
        <div>
                全部:{{$store.state.todos.length}}個事項<br>
                已做:{{$store.getters.yizuo.length}}個完成事項<br>
                未做:{{$store.getters.weizuo.length}}個代辦事項<br>
        </div>
        <div>
            <button @click="all">查看全部</button>
            <button @click="yizuo">查看已做</button>
            <button @click="weizuo">查看未做</button>
        </div>
    </div>
</template>
<script>
import todoli from './components/TodoLi.vue'
export default {
    data() {
        return {
            txt: '',
            state: 'all'
        }
    },
    computed: {
        todos() {
            if(this.state == 'all'){
                return this.$store.state.todos
            }else if(this.state == 'yizuo'){
                return this.$store.getters.yizuo
            }else if(this.state == 'weizuo'){
                return this.$store.getters.weizuo
            }

        }
    },
    methods: {
        all() {
            this.state = 'all'
        },
        yizuo() {
            this.state = 'yizuo'
        },
        weizuo() {
            this.state = 'weizuo'
        }
    }
}
</script>
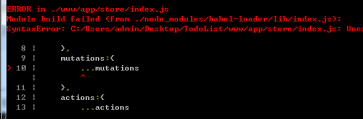
所有業務都已經完成,但是由於組件和數據太亂,下麵開始拆分store。
二、拆分store
我們都知道vuex是vue用來集中管理狀態的容器(管理全局的狀態),實現不同組件之間相互的數據訪問。我們說一下vuex拆分store以及多模塊管理。如果一個項目非常大的話狀態就會非常的多,如果不進行分類處理,所有的狀態都維護在一個state裡面的話,狀態管理就會變得非常的混亂,這樣非常不利於項目的後期維護。現在前端推崇模塊化開發,為的就是提高開發效率和維護效率,避免重覆工作。那麼vuex是怎麼樣解決這個問題的呢?這個時候我們今天要講的主角modules就要閃亮登場了。
第一步:將main.js中的store拆分到一個js文件中。
export const storeObj = {
    state:{
        ...
    },
    mutations:{
        ...
    },
    actions:{
       ...
    },
    getters:{
        ...
    }
}
將store中的index.js在main.js中引入
import {storeObj} from "./store/index.js";
const store = new Vuex.Store(storeObj);
第二步:拆分state、mutations、actions、getters
給他們分別創建單獨的js文件,預設暴露
export default {

}
可以將我們定義的這些對象加入到Vuex的store中
在store中index.js用import引入:


import state from "./state.js";
import mutations from "./mutations.js";
import actions from "./actions.js";
import getters from "./getters.js";

export const storeObj = {
    state:{
        ...state
    },
    mutations:{
        ...mutations
    },
    actions:{
        ...actions
    },
    getters:{
        ...getters
    }
}
示例代碼
由於沒裝翻譯“...”對象解構語法,會報錯:
npm install --svae-dev babel-plugin-transform-object-rest-spread
配置webpack.config.js
{
    test: /\.js?$/,  //解析的時候匹配到的都是js
    loader: "babel-loader",
    //翻譯字典
    options: {
        presets: ["es2015","ES2015"],
        plugins: ["transform-object-rest-spread"]
    }
},
配置完成後就可以識別“...”解構了。
至此,還沒拆完,使用常量代替mutations集合actions的type名字
新建一個types.js文件,在裡面存常量(大寫字母的方法)
註意:把這些常量放到單獨的文件中可以讓你的代碼合作者對整個app包含mutation和actions一目瞭然。
用不用常量代替取決於你--在需要多人協作的大型項目中,這會很有幫助,但是如果你不喜歡,完全可以不這麼做。
export const GETALL = "GETALL";
export const DEL = "DEL";
export const ADD = "ADD";
export const CHANGETITLE = "CHANGETITLE";
export const CHANGEDONE = "CHANGEDONE";
暴露常量的名字後,分別在mutations和actions的js文件中使用這些來代替:
mutations.js
import {GETALL,DEL,ADD,CHANGETITLE,CHANGEDONE} from "./types.js";
export default {
    [GETALL](state, payload) {

    },
    [DEL](state, payload) {

    },
    [ADD](state, payload) {

    },
    [CHANGETITLE](state, payload) {

    },
    [CHANGEDONE](state, payload) {

    }
}
actions.js
import {GETALL,DEL,ADD,CHANGETITLE,CHANGEDONE} from "./types.js";
export default {
    async [GETALL]({ commit }) {

    },
    async [DEL]({ commit }, payload) {

    },
    async [ADD]({ commit }, payload) {

    },
    async [CHANGETITLE]({ commit }, payload) {

    },
    async [CHANGEDONE]({ commit }, payload) {

    }
}
註意:上方mutations和actions中的[types.ADD]寫法,因為types.ADD是一個對象,所以不能直接當做函數名來寫,需要用到ES2015風格的計算屬性命名功能來使用一個常量作為函數名,才能使用。
https://vuex.vuejs.org/zh/guide/mutations.html
三、非同步請求數據(跨域)
3.1 Ajax不能跨域
比如在Apache中演示:
<html>
<head>
    <title>Document</title>
</head>
<body>
    <script src="jquery-3.3.1.min.js"></script>
    <script>
        $.get("http://127.0.0.88/a.txt" , function(data){
            console.log(data);
        });
    </script>
</body>
</html>
試圖在127.0.0.1


