
版權聲明:本文為HaiyuKing原創文章,轉載請註明出處! 前言 在較新版本的Android Studio中新建項目預設使用 ConstraintLayout進行佈局的。 ConstraintLayout是一個允許您以靈活的方式定位和調整小部件的ViewGroup。 註意: ConstraintL ...
版權聲明:本文為HaiyuKing原創文章,轉載請註明出處!
前言
在較新版本的Android Studio中新建項目預設使用 ConstraintLayout進行佈局的。
ConstraintLayout是一個允許您以靈活的方式定位和調整小部件的ViewGroup。
註意: ConstraintLayout作為支持庫提供,您可以在API級別9(Gingerbread)開始的Android系統上使用。
開發者指南梳理
以下內容參考《ConstraintLayout開發者指南》
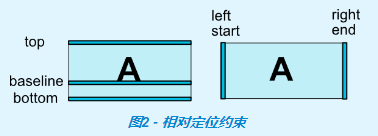
一、相對定位【Relative positioning】
相對定位是在ConstraintLayout中創建佈局的基本構建塊之一。這些約束允許您將指定的控制項(源控制項)相對於另一個控制項(目標控制項)進行定位。您可以在水平和垂直軸上約束控制項:
- 水平方向: left、right、start、end
- 垂直方向: top、bottom、text baseline
備註:start,end,left,right的區別
1、其中left/right代表一種絕對的對齊,start/end表示基於閱讀順序的對齊。
說到閱讀順序又不得不提目前存在的主要閱讀方式: 從左向右(LTR)和從右向左(RTL);
當使用left/right的時候,無論是LTR還是RTL,總是左/右對齊的;而使用start/end,如閱讀順序是從左到右(LTR)的國家,start在左邊,在閱讀順序是從右到左(RTL)的國家(比如阿拉伯),start在右邊。
2、當minSdkVersion>=17時,建議使用start/end來代替left/right;
當minSdkVersion<17時,舊的平臺不支持RTL(從右到左--Right To Left),start/end屬性是未知的,會被忽略,所以需要同時使用start/end和left/right。
以下是可用約束屬性的列表
- app:layout_constraintLeft_toLeftOf
- app:layout_constraintLeft_toRightOf
- app:layout_constraintRight_toLeftOf
- app:layout_constraintRight_toRightOf
- app:layout_constraintTop_toTopOf
- app:layout_constraintTop_toBottomOf
- app:layout_constraintBottom_toTopOf
- app:layout_constraintBottom_toBottomOf
- app:layout_constraintBaseline_toBaselineOf
- app:layout_constraintStart_toEndOf
- app:layout_constraintStart_toStartOf
- app:layout_constraintEnd_toStartOf
- app:layout_constraintEnd_toEndOf
用法解析:
1、上面的約束屬性一般寫在源控制項上;
2、約束屬性引用的id或者parent代表目標控制項;
3、約束屬性含義解讀:將源控制項的指定側約束到目標控制項的其中一側。
比如:app:layout_constraintLeft_toLeftOf——當前源控制項的左側被約束(constraintLeft)到目標控制項的左側(toLeftOf)
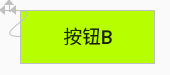
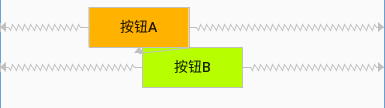
例子1:將按鈕B定位在按鈕A的右側,意味著系統將嘗試讓雙方共用相同的位置。
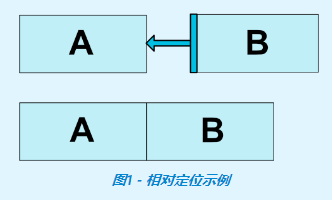
<Button
        android:id="@+id/buttonA"
        app:layout_constraintLeft_toLeftOf="parent"
        app:layout_constraintTop_toTopOf="parent" />
<Button
        android:id="@+id/buttonB"
        app:layout_constraintLeft_toRightOf="@id/buttonA"/>
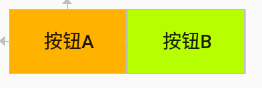
例子2:按鈕A和按鈕B文本基線對齊,且按鈕B在按鈕A右側
<?xml version="1.0" encoding="utf-8"?>
<android.support.constraint.ConstraintLayout xmlns:android="http://schemas.android.com/apk/res/android"
    xmlns:app="http://schemas.android.com/apk/res-auto"
    xmlns:tools="http://schemas.android.com/tools"
    android:layout_width="match_parent"
    android:layout_height="match_parent"
    tools:context=".MainActivity"
    android:padding="8dp">

    <Button
        android:id="@+id/buttonA"
        android:layout_width="100dp"
        android:layout_height="40dp"
        android:text="按鈕A"
        android:background="#ffb300"
        app:layout_constraintLeft_toLeftOf="parent"
        app:layout_constraintTop_toTopOf="parent" />

    <Button
        android:id="@+id/buttonB"
        android:layout_width="50dp"
        android:layout_height="20dp"
        android:text="按鈕B"
        android:background="#b7ff00"
        app:layout_constraintBaseline_toBaselineOf="@id/buttonA"
        app:layout_constraintLeft_toRightOf="@id/buttonA"
        />

</android.support.constraint.ConstraintLayout>
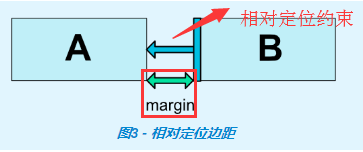
二、外邊距【Margins】
如果設置了邊距,則它們將應用於相應的約束(如果存在約束),系統將邊距強製為目標和源邊之間的空間。
什麼叫邊距應用於相應的約束(如果存在約束)?可以簡單理解為android:layout_marginLeft和app:layout_constraintLeft_toLeftOf、app:layout_constraintLeft_toRightOf配合使用才會生效!保證設置邊距的方向(left\right\top\bottom\start\end)和相對定位約束的源控制項的方向(left\right\top\bottom\start\end)一致!剩下的以此類推!見例子2。
以下是佈局邊距屬性的列表:
- android:layout_marginStart
- android:layout_marginEnd
- android:layout_marginLeft
- android:layout_marginTop
- android:layout_marginRight
- android:layout_marginBottom
用法解析:
1、一般寫在源控制項上;
2、約束屬性含義解讀:當前控制項(源控制項)的指定側距離與其具有約束關係的控制項(目標控制項)的其中一側的空間值;
3、屬性值必須是大於或者等於0;
4、當目標控制項設置為可見性為gone的時候,源控制項的邊距仍有效;
例子1:將按鈕B定位在按鈕A的右側,並且設置相距8dp
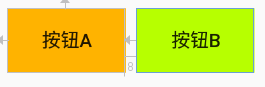
<Button
        android:id="@+id/buttonA"
        app:layout_constraintLeft_toLeftOf="parent"
        app:layout_constraintTop_toTopOf="parent" />
<Button
        android:id="@+id/buttonB"
        app:layout_constraintLeft_toRightOf="@id/buttonA"
        android:layout_marginLeft="8dp"/>
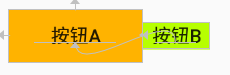
例子2:按鈕B和按鈕A文本基線對齊,且按鈕B的左側和按鈕A的左側對齊,且邊距為8dp
<?xml version="1.0" encoding="utf-8"?>
<android.support.constraint.ConstraintLayout xmlns:android="http://schemas.android.com/apk/res/android"
    xmlns:app="http://schemas.android.com/apk/res-auto"
    xmlns:tools="http://schemas.android.com/tools"
    android:layout_width="match_parent"
    android:layout_height="match_parent"
    tools:context=".MainActivity"
    android:padding="8dp">

    <Button
        android:id="@+id/buttonA"
        android:layout_width="100dp"
        android:layout_height="40dp"
        android:text="按鈕A"
        android:background="#ffb300"
        app:layout_constraintLeft_toLeftOf="parent"
        app:layout_constraintTop_toTopOf="parent" />

    <Button
        android:id="@+id/buttonB"
        android:layout_width="50dp"
        android:layout_height="20dp"
        android:text="按鈕B"
        android:background="#b7ff00"
        app:layout_constraintBaseline_toBaselineOf="@id/buttonA"
        app:layout_constraintLeft_toLeftOf="@id/buttonA"
        android:layout_marginLeft="8dp"
        />

</android.support.constraint.ConstraintLayout>
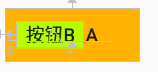
如果去掉app:layout_constraintLeft_toLeftOf屬性的話,設置的邊距值是無效的,效果如下:

<Button
        android:id="@+id/buttonA"
        android:layout_width="100dp"
        android:layout_height="40dp"
        android:text="按鈕A"
        android:background="#ffb300"
        app:layout_constraintLeft_toLeftOf="parent"
        app:layout_constraintTop_toTopOf="parent" />

    <Button
        android:id="@+id/buttonB"
        android:layout_width="50dp"
        android:layout_height="20dp"
        android:text="按鈕B"
        android:background="#b7ff00"
        app:layout_constraintBaseline_toBaselineOf="@id/buttonA"
        android:layout_marginLeft="8dp"
        />
例子3:按鈕A隱藏的情況下,按鈕B在按鈕A右側,且邊距為8dp【此時按鈕B的外邊距8dp仍是有效的】
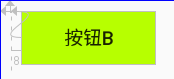
<Button
        android:id="@+id/buttonA"
        app:layout_constraintLeft_toLeftOf="parent"
        app:layout_constraintTop_toTopOf="parent"
        android:visibility="gone"/>

<Button
        android:id="@+id/buttonB"
        app:layout_constraintLeft_toRightOf="@id/buttonA"
        android:layout_marginLeft="8dp"
        />
三、連接到GONE控制項時的邊距【Margins when connected to a GONE widget】
當約束目標控制項的可見性為View.GONE時,可以配合使用以下屬性設置不同邊距值:
- app:layout_goneMarginStart
- app:layout_goneMarginEnd
- app:layout_goneMarginLeft
- app:layout_goneMarginTop
- app:layout_goneMarginRight
- app:layout_goneMarginBottom
和android:layout_MarginLeft等的區別就在於,當目標控制項隱藏(GONE)的時候,android:layout_MarginLeft設置的外邊距值還生效,而app:layout_goneMarginLeft設置的外邊距值則會失效!
例子1:按鈕A隱藏的情況下,按鈕B在按鈕A右側,且邊距為8dp【此時按鈕B的外邊距8dp是無效的】
<?xml version="1.0" encoding="utf-8"?>
<android.support.constraint.ConstraintLayout xmlns:android="http://schemas.android.com/apk/res/android"
    xmlns:app="http://schemas.android.com/apk/res-auto"
    xmlns:tools="http://schemas.android.com/tools"
    android:layout_width="match_parent"
    android:layout_height="match_parent"
    tools:context=".MainActivity"
    android:padding="8dp">

    <Button
        android:id="@+id/buttonA"
        android:layout_width="100dp"
        android:layout_height="40dp"
        android:text="按鈕A"
        android:background="#ffb300"
        app:layout_constraintLeft_toLeftOf="parent"
        app:layout_constraintTop_toTopOf="parent"
        android:visibility="gone"/>

    <Button
        android:id="@+id/buttonB"
        android:layout_width="100dp"
        android:layout_height="40dp"
        android:text="按鈕B"
        android:background="#b7ff00"
        app:layout_constraintLeft_toRightOf="@id/buttonA"
        app:layout_goneMarginLeft="8dp"
        />

</android.support.constraint.ConstraintLayout>
四、可見性行為【Visibility behavior】
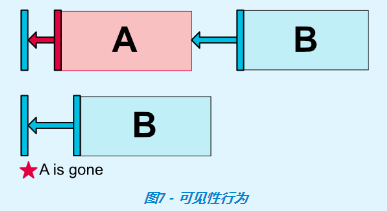
一般情況下,A控制項設置 GONE屬性後,A控制項就不會出現在佈局中了,B控制項對A控制項的android:layout_MarginXXX屬性也就沒有作用了。但是 ConstraintLayout 能對已經設置 GONE屬性的控制項進行特殊處理。當A控制項設置 GONE之後,A控制項相當於變成了一個點,B控制項相對於對A的約束仍然是起作用的,B控制項的android:layout_MarginXXX屬性還是有作用的。
- 對於gone的控制項,它們的尺寸將被視為零(基本上,它們將被解析為一個點);
- 如果已gone的控制項對其他控制項有約束,他們仍然會受到尊重,但已gone的控制項任何邊距都會等於零;
有時候,B控制項是不希望相對於隱藏控制項A的屬性還起作用。這時候可以用到上面提到的app:layout_goneMarginXXX屬性。
例子1:按鈕A隱藏後,按鈕A的外邊距失效,均等於0
初始狀態:
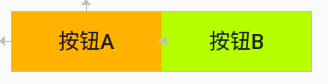
<?xml version="1.0" encoding="utf-8"?>
<android.support.constraint.ConstraintLayout xmlns:android="http://schemas.android.com/apk/res/android"
    xmlns:app="http://schemas.android.com/apk/res-auto"
    xmlns:tools="http://schemas.android.com/tools"
    android:layout_width="match_parent"
    android:layout_height="match_parent"
    tools:context=".MainActivity"
    android:padding="8dp"
    >
    <Button
        android:id="@+id/buttonA"
        android:layout_width="100dp"
        android:layout_height="40dp"
        android:text="按鈕A"
        android:background="#ffb300"
        app:layout_constraintLeft_toLeftOf="parent"
        app:layout_constraintTop_toTopOf="parent"
        />
    <Button
        android:id="@+id/buttonB"
        android:layout_width="100dp"
        android:layout_height="40dp"
        android:text="按鈕B"
        android:background="#b7ff00"
        app:layout_constraintLeft_toRightOf="@id/buttonA"
        />
</android.support.constraint.ConstraintLayout>
設置按鈕A的外邊距值為5dp:
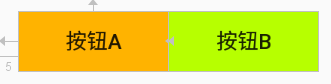
<Button
        android:id="@+id/buttonA"
        app:layout_constraintLeft_toLeftOf="parent"
        app:layout_constraintTop_toTopOf="parent"
        android:layout_marginLeft="5dp"
        />
<Button
        android:id="@+id/buttonB"
        app:layout_constraintLeft_toRightOf="@id/buttonA"
        />
設置按鈕A隱藏狀態GONE(可以發現按鈕A的外邊距5dp失效了):
    <Button
        android:id="@+id/buttonA"
        app:layout_constraintLeft_toLeftOf="parent"
        app:layout_constraintTop_toTopOf="parent"
        android:layout_marginLeft="5dp"
        android:visibility="gone"
        />
    <Button
        android:id="@+id/buttonB"
        app:layout_constraintLeft_toRightOf="@id/buttonA"
        />
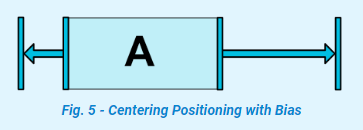
五、居中定位【Centering positioning】
水平居中(parent表示相對於父節點):
app:layout_constraintLeft_toLeftOf="parent"
app:layout_constraintRight_toRightOf="parent"
垂直居中(parent表示相對於父節點):
app:layout_constraintTop_toTopOf="parent"
app:layout_constraintBottom_toBottomOf="parent"
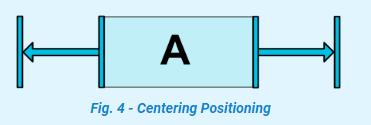
上圖是水平居中的示意圖。
ConstraintLayout是如何處理“相反”的約束,比如下麵的代碼,除非ConstraintLayout恰好具有Button與之完全相同的大小,否則兩個約束不能同時滿足;在這種情況下發生的事情是,約束的作用就像是相反的力量將控制項拉平; 這樣控制項最終將在父容器中居中。這同樣適用於垂直約束。
例子1:按鈕A水平居中
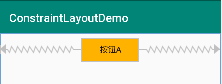
<?xml version="1.0" encoding="utf-8"?>
<android.support.constraint.ConstraintLayout xmlns:android="http://schemas.android.com/apk/res/android"
    xmlns:app="http://schemas.android.com/apk/res-auto"
    xmlns:tools="http://schemas.android.com/tools"
    android:layout_width="match_parent"
    android:layout_height="match_parent"
    tools:context=".MainActivity"
    android:padding="8dp"
    >
    <Button
        android:id="@+id/buttonA"
        android:layout_width="100dp"
        android:layout_height="40dp"
        android:text="按鈕A"
        android:background="#ffb300"
        app:layout_constraintLeft_toLeftOf="parent"
        app:layout_constraintRight_toRightOf="parent"
        />
</android.support.constraint.ConstraintLayout>
例子2:按鈕B居中在按鈕A中(如果按鈕A和按鈕B大小一致,那麼按鈕B就會和按鈕A重疊)
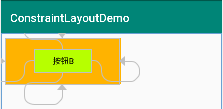
<?xml version="1.0" encoding="utf-8"?>
<android.support.constraint.ConstraintLayout xmlns:android="http://schemas.android.com/apk/res/android"
    xmlns:app="http://schemas.android.com/apk/res-auto"
    xmlns:tools="http://schemas.android.com/tools"
    android:layout_width="match_parent"
    android:layout_height="match_parent"
    tools:context=".MainActivity"
    android:padding="8dp"
    >

    <Button
        android:id="@+id/buttonA"
        android:layout_width="200dp"
        android:layout_height="80dp"
        android:text="按鈕A"
        android:background="#ffb300"

        />

    <Button
        android:id="@+id/buttonB"
        android:layout_width="100dp"
        android:layout_height="40dp"
        android:text="按鈕B"
        android:background="#b7ff00"
        app:layout_constraintLeft_toLeftOf="@id/buttonA"
        app:layout_constraintRight_toRightOf="@id/buttonA"
        app:layout_constraintTop_toTopOf="@id/buttonA"
        app:layout_constraintBottom_toBottomOf="@id/buttonA"
        />
</android.support.constraint.ConstraintLayout>
五、偏差【Bias】
遇到這種相反的約束時的預設設置是使控制項居中(也就是預設偏差50%); 但是您可以使用偏差屬性調整定位以使一側偏向另一側:
可以使用的屬性:
- layout_constraintHorizontal_bias(水平偏差,取值範圍:0.0~1.0)
- layout_constraintVertical_bias(垂直偏差,取值範圍:0.0~1.0)
所以,可以得知,偏差屬性是需要和“反約束”屬性一起使用的。那麼什麼是“反約束”屬性呢?個人簡單理解為下麵的是反約束屬性(僅供參考):
- app:layout_constraintLeft_toLeftOf【反約束屬性】
- app:layout_constraintLeft_toRightOf
- app:layout_constraintRight_toLeftOf
- app:layout_constraintRight_toRightOf【反約束屬性】
- app:layout_constraintTop_toTopOf【反約束屬性】
- app:layout_constraintTop_toBottomOf
- app:layout_constraintBottom_toTopOf
- app:layout_constraintBottom_toBottomOf【反約束屬性】
- app:layout_constraintBaseline_toBaselineOf
- app:layout_constraintStart_toEndOf
- app:layout_constraintStart_toStartOf【反約束屬性】
- app:layout_constraintEnd_toStartOf
- app:layout_constraintEnd_toEndOf【反約束屬性】
例子1:按鈕A水平居偏移30%,按鈕B水平居中
<?xml version="1.0" encoding="utf-8"?>
<android.support.constraint.ConstraintLayout xmlns:android="http://schemas.android.com/apk/res/android"
    xmlns:app="http://schemas.android.com/apk/res-auto"
    xmlns:tools="http://schemas.android.com/tools"
    android:layout_width="match_parent"
    android:layout_height="match_parent"
    tools:context=".MainActivity"
    android:padding="8dp"
    >

    <Button
        android:id="@+id/buttonA"
        android:layout_width="100dp"
        android:layout_height="40dp"
        android:text="按鈕A"
        android:background="#ffb300"
        app:layout_constraintLeft_toLeftOf="parent"
        app:layout_constraintRight_toRightOf="parent"
        app:layout_constraintHorizontal_bias="0.3"
        />

    <Button
        android:id="@+id/buttonB"
        android:layout_width="100dp"
        android:layout_height="40dp"
        android:text="按鈕B"
        android:background="#b7ff00"
        app:layout_constraintTop_toBottomOf="@id/buttonA"
        app:layout_constraintLeft_toLeftOf="parent"
        app:layout_constraintRight_toRightOf="parent"
        />
</android.support.constraint.ConstraintLayout>
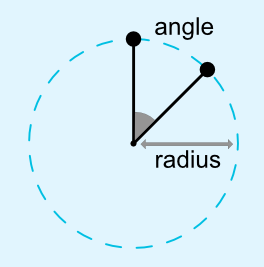
六、圓形定位(1.1中增加)【Circular positioning (Added in 1.1)】
您可以以角度和半徑距離約束控制項中心相對於另一個控制項中心。這允許您將控制項放在圓上(如下圖所示)。

可以使用以下屬性:
- app:layout_constraintCircle :引用的另一個控制項(目標控制項)ID值
- app:layout_constraintCircleRadius :源控制項的中心到其他控制項(目標控制項)中心的距離
- app:layout_constraintCircleAngle :源控制項應該處於哪個角度(以度為單位,從0到360)
例子1、按鈕B在按鈕A的30度角半徑為100dp的位置上
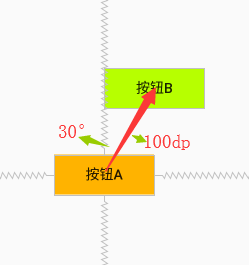
<?xml version="1.0" encoding="utf-8"?>
<android.support.constraint.ConstraintLayout xmlns:android="http://schemas.android.com/apk/res/android"
    xmlns:app="http://schemas.android.com/apk/res-auto"
    xmlns:tools="http://schemas.android.com/tools"
    android:layout_width="match_parent"
    android:layout_height="match_parent"
    tools:context=".MainActivity"
    android:padding="8dp"
    >

    <Button
        android:id="@+id/buttonA"
        android:layout_width="100dp"
        android:layout_height="40dp"
        android:text="按鈕A"
        android:background="#ffb300"
        app:layout_constraintLeft_toLeftOf="parent"
        app:layout_constraintRight_toRightOf="parent"
        app:layout_constraintTop_toTopOf="parent"
        app:layout_constraintBottom_toBottomOf="parent"
        />

    <Button
        android:id="@+id/buttonB"
        android:layout_width="100dp"
        android:layout_height="40dp"
        android:text="按鈕B"
        android:background="#b7ff00"
        app:layout_constraintCircle="@id/buttonA"
        app:layout_constraintCircleRadius="100dp"
        app:layout_constraintCircleAngle="30"
        />
</android.support.constraint.ConstraintLayout>
七、尺寸約束【Dimensions constraints】
7.1、ConstraintLayout上的最大、最小尺寸約束【Minimum dimensions on ConstraintLayout】
你可以給ConstraintLayout設置以下最大、最小尺寸約束:
- android:minWidth 設置佈局的最小寬度
- android:minHeight 設置佈局的最小高度
- android:maxWidth 設置佈局的最大寬度
- android:maxHeight 設置佈局的最大高度
當 ConstraintLayout寬高設置為 wrap_content時,以上屬性可以起作用。
按照字面的理解是在ConstraintLayout佈局控制項上設置這些屬性,而不是控制項上(比如Button、TextView等)設置這些屬性。可能這些屬性更適合用在ConstraintLayout佈局控制項上吧。普通控制項上也是可以使用的,但是有問題。
例子1:文本A所在的ConstraintLayout區域設置最小寬高,文本B所在的ConstraintLayout區域設置最大寬高
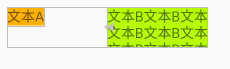
<?xml version="1.0" encoding="utf-8"?>
<android.support.constraint.ConstraintLayout xmlns:android="http://schemas.android.com/apk/res/android"
    xmlns:app="http://schemas.android.com/apk/res-auto"
    xmlns:tools="http://schemas.android.com/tools"
    android:layout_width="match_parent"
    android:layout_height="match_parent"
    tools:context=".MainActivity"
    android:padding="8dp"
    >
    <android.support.constraint.ConstraintLayout
        android:id="@+id/buttonALayout"
        android:layout_width="wrap_content"
        android:layout_height="wrap_content"
        android:minWidth="100dp"
        android:minHeight="40dp">

        <TextView
            android:id="@+id/textA"
            android:layout_width="wrap_content"
            android:layout_height="wrap_content"
            android:text="文本A"
            android:background="#ffb300"
            />

    </android.support.constraint.ConstraintLayout>

    <android.support.constraint.ConstraintLayout
        android:id="@+id/buttonBLayout"
        android:layout_width="wrap_content"
        android:layout_height="wrap_content"
        android:maxWidth="100dp"
        android:maxHeight="40dp"
        app:layout_constraintLeft_toRightOf="@id/buttonALayout">

        <TextView
            android:id="@+id/textB"
            android:layout_width="wrap_content"
            android:layout_height="wrap_content"
            android:text="文本B文本B文本B文本B\n文本B文本B文本B文本B\n文本B文本B文本B文本B"
            android:background="#b7ff00"
            />

    </android.support.constraint.ConstraintLayout>

</android.support.constraint.ConstraintLayout>
例子2:直接設置文本A的最小寬高,設置文本B的最大寬高【問題:文本B的展現不符合預期】
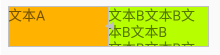
<?xml version="1.0" encoding="utf-8"?>
<android.support.constraint.ConstraintLayout xmlns:android="http://schemas.android.com/apk/res/android"
    xmlns:app="http://schemas.android.com/apk/res-auto"
    xmlns:tools="http://schemas.android.com/tools"
    android:layout_width="match_parent"
    android:layout_height="match_parent"
    tools:context=".MainActivity"
    android:padding="8dp"
    >
    <TextView
        android:id="@+id/textA"
        android:layout_width="wrap_content"
        android:layout_height="wrap_content"
        android:minWidth="100dp"
        android:minHeight="40dp"
        android:text="文本A"
        android:background="#ffb300"
        />

    <TextView
        android:id="@+id/textB"
        android:layout_width="wrap_content"
        android:layout_height="wrap_content"
        android:maxWidth="100dp"
        android:maxHeight="40dp"
        android:text="文本B文本B文本B文本B\n文本B文本B文本B文本B\n文本B文本B文本B文本B"
        android:background="#b7ff00"
        app:layout_constraintLeft_toRightOf="@id/textA"
        />

</android.support.constraint.ConstraintLayout>
例子3:按鈕A設置最小寬高,按鈕B設置最大寬高(註意:Button控制項系統預設設置了最小寬高:比如寬88dp,高48dp,去style.xml中AppTheme的父主題裡面查看)
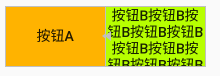
<?xml version="1.0" encoding="utf-8"?>
<android.support.constraint.ConstraintLayout xmlns:android="http://schemas.android.com/apk/res/android"
    xmlns:app="http://schemas.android.com/apk/res-auto"
    xmlns:tools="http://schemas.android.com/tools"
    android:layout_width="match_parent"
    android:layout_height="match_parent"
    tools:context=".MainActivity"
    android:padding="8dp"
    >
    <Button
        android:id="@+id/buttonA"
        android:layout_width="wrap_content"
        android:layout_height="wrap_content"
        android:minWidth="100dp"
        android:minHeight="60dp"
        android:text="按鈕A"
        android:background="#ffb300"
        />

    <Button
        android:id="@+id/buttonB"
        android:layout_width="wrap_content"
        android:layout_height="wrap_content"
        android:maxWidth="100dp"
        android:maxHeight="60dp"
        android:text="按鈕B按鈕B按鈕B按鈕B按鈕B按鈕B按鈕B按鈕B按鈕B按鈕B按鈕B按鈕B"
        android:background="#b7ff00"
        app:layout_constraintLeft_toRightOf="@id/buttonA"
        />

</android.support.constraint.ConstraintLayout>
7.2、控制項尺寸約束【Widgets dimension constraints】
我們可以通過以下3種不同方式設置android:layout_width和android:layout_height屬性值指定控制項的尺寸。
- 使用指定數值(例如52dp或@dimens/toolbarheight);
- 使用wrap_content,這將要求控制項自己計算自己的大小;
- 使用0dp,相當於match_constraint(在1.1.3版本中,使用match_constraint找不到,所以還是使用0dp,註意不能使用match_parent,有些地方0dp和match_parent是不一樣的)
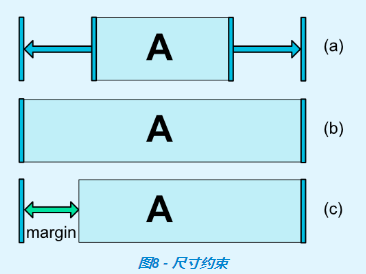
上圖中,(a)是wrap_content,(b)是0dp,如果設置了邊距,則在計算中將考慮它們(圖8,(c)中的0dp。
重要提示: match_parent不建議用於ConstraintLayout中的控制項。可以通過使用match_constraint設置為相應的left/right或top/bottom 約束來定義類似的行為——"parent"。
但是在com.android.support.constraint:constraint-layout:1.1.3中,android:layout_width和android:layout_height屬性沒有這個match_constraint值。
7.3、wrap_content:強制約束(在1.1中添加)【WRAP_CONTENT : enforcing constraints (Added in 1.1)】
如果將維度設置為WRAP_CONTENT,則在1.1之前的版本中,它們將被視為文字維度 - 這意味著約束不會限制生成的維度。雖然通常這足夠(並且更快),但在某些情況下,您可能希望使用WRAP_CONTENT,但仍然強制執行約束以限制生成的維度。在這種情況下,您可以添加一個相應的屬性:
- app:layout_constrainedWidth=”true|false”【預設false】
- app:layout_constrainedHeight=”true|false”【預設false】
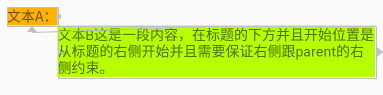
例子1:文本B在文本A的下方,並且文本B的左側約束文本A的右側,文本B的右側約束parent的右側(這樣可以保證文本全部顯示出來)
<?xml version="1.0" encoding="utf-8"?>
<android.support.constraint.ConstraintLayout xmlns:android="http://schemas.android.com/apk/res/android"
    xmlns:app="http://schemas.android.com/apk/res-auto"
    xmlns:tools


