依賴註入是一種使程式的一部分能夠訪問另一部分的系統,並且可以通過配置控制其行為。 “註入”可以理解為是“new”操作符的一種替代,不再需要使用編程語言所提供的"new"操作符,依賴註入系統管理對象的生成。 依賴註入的最大好處是組件不再需要知道如何建立依賴項。它們只需要知道如何與依賴項交互。 在Ang ...
依賴註入是一種使程式的一部分能夠訪問另一部分的系統,並且可以通過配置控制其行為。
“註入”可以理解為是“new”操作符的一種替代,不再需要使用編程語言所提供的"new"操作符,依賴註入系統管理對象的生成。
依賴註入的最大好處是組件不再需要知道如何建立依賴項。它們只需要知道如何與依賴項交互。
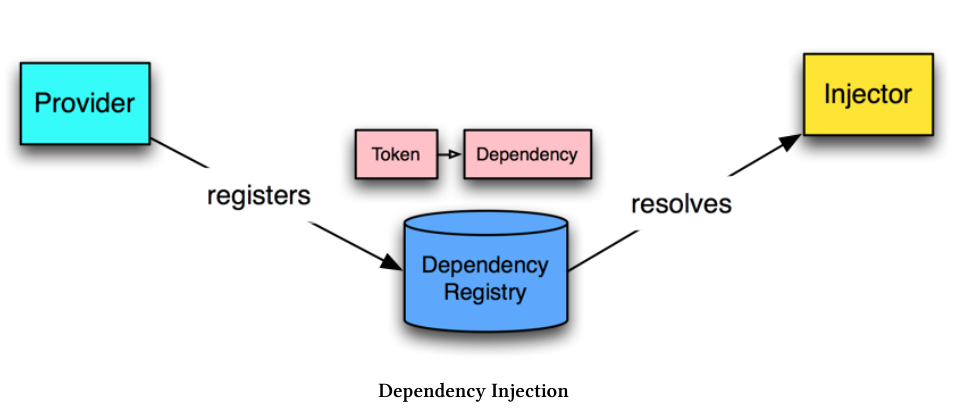
在Angular的依賴註入系統中,不用直接導入並創建類的實例,而是使用Angular註冊依賴,然後描述如何註入依賴,最後註入依賴。
依賴註入組件
為了註冊一個依賴項,需要使用依賴標記(token)與之綁定。比如,註冊一個API的URL,可以使用字元串API_URL作為其標記;如果是註冊一個類,可以用類本身作為標記。
Angular中的依賴註入系統分為三部分:
- 提供者(Provider)(也被作為一個綁定)映射一個標記到一系列的依賴項,其告知Angular如何創建一個對象並給予一個標記。
- 註入器(Injector)持有一系列綁定,並負責解析依賴項,且在創建對象的時候註入它們。
- 依賴項(Dependency)是所註入的對象。

依賴註入方式
手動方式
通過ReflectiveInjector的resolveAndCreate方法解析並創建對象,這種方式不常用。
import { Injectable } from '@angular/core';

@Injectable()
export class UserService {
  user: any;

  setUser(newUser) {
    this.user = newUser;
  }

  getUser(): any {
    return this.user;
  }
}
import {
Component,
ReflectiveInjector
} from '@angular/core';
import { UserService } from '../services/user.service';
@Component({
selector: 'app-injector-demo',
templateUrl: './user-demo.component.html',
styleUrls: ['./user-demo.component.css']
})
export class UserDemoInjectorComponent {
userName: string;
userService: UserService;
constructor() {
// Create an _injector_ and ask for it to resolve and create a UserService
const injector: any = ReflectiveInjector.resolveAndCreate([UserService]);
// use the injector to **get the instance** of the UserService
this.userService = injector.get(UserService);
}
signIn(): void {
// when we sign in, set the user
// this mimics filling out a login form
this.userService.setUser({
name: 'Nate Murray'
});
// now **read** the user name from the service
this.userName = this.userService.getUser().name;
console.log('User name is: ', this.userName);
}
}* 註意UserService類上的@Injectable()裝飾器,這說明瞭這個類是可以作為註入對象的。
NgModule方式
使用NgModule註冊將要用到的依賴項(在providers中),並用裝飾器(一般是構造器)指定哪些是正在使用的。
import { NgModule } from '@angular/core';
import { CommonModule } from '@angular/common';

// imported here
import { UserService } from '../services/user.service';

@NgModule({
  imports: [
    CommonModule
  ],
  providers: [
    UserService // <-- added right here
  ],
  declarations: []
})
export class UserDemoModule { }
import { Component, OnInit } from '@angular/core';
import { UserService } from '../services/user.service';
@Component({
selector: 'app-user-demo',
templateUrl: './user-demo.component.html',
styleUrls: ['./user-demo.component.css']
})
export class UserDemoComponent {
userName: string;
// removed `userService` because of constructor shorthand below
// Angular will inject the singleton instance of `UserService` here.
// We set it as a property with `private`.
constructor(private userService: UserService) {
// empty because we don't have to do anything else!
}
// below is the same...
signIn(): void {
// when we sign in, set the user
// this mimics filling out a login form
this.userService.setUser({
name: 'Nate Murray'
});
// now **read** the user name from the service
this.userName = this.userService.getUser().name;
console.log('User name is: ', this.userName);
}
}Providers
類標記
providers: [ UserService ]是以下方式的的簡寫:
providers: [
  { provide: UserService, useClass: UserService }
]
provide是標記,useClass是所依賴的對象。兩者為映射關係。
值標記
providers: [
  { provide: 'API_URL', useValue: 'http://my.api.com/v1' }
]
使用時需要加上@Inject:
import { Inject } from '@angular/core';

export class AnalyticsDemoComponent {
  constructor(@Inject('API_URL') apiUrl: string) {
    // works! do something w/ apiUrl
  }
}
工廠方式
綁定依賴項時還可以通過工廠方式實現更複雜的綁定邏輯,並且這種方式下可以傳入必要參數以創建所需的對象。
import { NgModule } from '@angular/core';
import { CommonModule } from '@angular/common';
import {
  Metric,
  AnalyticsImplementation
} from './analytics-demo.interface';
import { AnalyticsService } from '../services/analytics.service';

// added this ->
import {
  HttpModule,
  Http
} from '@angular/http';

@NgModule({
  imports: [
    CommonModule,
    HttpModule, // <-- added
  ],
  providers: [
    // add our API_URL provider
    { provide: 'API_URL', useValue: 'http://devserver.com' },
    {
      provide: AnalyticsService,

      // add our `deps` to specify the factory depencies
      deps: [ Http, 'API_URL' ],

      // notice we've added arguments here
      // the order matches the deps order
      useFactory(http: Http, apiUrl: string) {

        // create an implementation that will log the event
        const loggingImplementation: AnalyticsImplementation = {
          recordEvent: (metric: Metric): void => {
            console.log('The metric is:', metric);
            console.log('Sending to: ', apiUrl);
            // ... You'd send the metric using http here ...
          }
        };

        // create our new `AnalyticsService` with the implementation
        return new AnalyticsService(loggingImplementation);
      }
    },
  ],
  declarations: [ ]
})
export class AnalyticsDemoModule { }

