1、待會兒會用到RecyclerView,首先在app/build.gradle(註意有兩個build.gradle,選擇app下的那個)當中添加依賴庫,如下: 添加完之後記得點擊Sync Now進行同步。 2、開始編寫主界面,修改activity_main.xml中的代碼,如下: Recycler ...
1、待會兒會用到RecyclerView,首先在app/build.gradle(註意有兩個build.gradle,選擇app下的那個)當中添加依賴庫,如下:
1 dependencies {
2     compile fileTree(dir: 'libs', include: ['*.jar'])
3     compile 'com.android.support:appcompat-v7:24.2.1'
4     compile 'com.android.support:recyclerview-v7:24.2.1'
5     testCompile 'junit:junit:4.12'
6     androidTestCompile('com.android.support.test.espresso:espresso-core:2.2.2', {
7         exclude group: 'com.android.support', module: 'support-annotations'
8     })
9 }
添加完之後記得點擊Sync Now進行同步。
2、開始編寫主界面,修改activity_main.xml中的代碼,如下:
 1 <?xml version="1.0" encoding="utf-8"?>
 2 <LinearLayout xmlns:android="http://schemas.android.com/apk/res/android"
 3     android:id="@+id/activity_main"
 4     android:orientation="vertical"
 5     android:layout_width="match_parent"
 6     android:layout_height="match_parent"
 7     android:background="#d8e0e8"
 8     >
 9     <android.support.v7.widget.RecyclerView
10         android:id="@+id/msg_recycler_view"
11         android:layout_width="match_parent"
12         android:layout_height="0dp"
13         android:layout_weight="1"
14         />
15     <LinearLayout
16         android:layout_width="match_parent"
17         android:layout_height="wrap_content">
18         <EditText
19             android:id="@+id/input_text"
20             android:layout_width="0dp"
21             android:layout_height="wrap_content"
22             android:layout_weight="1"
23             android:hint="Type something here"
24             android:maxLines="2"
25             />
26         <Button
27             android:id="@+id/send"
28             android:layout_width="wrap_content"
29             android:layout_height="wrap_content"
30             android:text="send"
31             />
32     </LinearLayout>
33 </LinearLayout>
RecyclerView用於顯示聊天的消息內容(因為不是內置在系統SDK中的,所以需要把完整的包路徑寫出來);
放置一個EditView用於輸入消息,一個Button用於發送消息。
3、定義消息的實體類,新建Msg,代碼如下:
 1 public class Msg {
 2     public static final int TYPE_RECEIVED=0;
 3     public static final int TYPE_SENT=1;
 4     private String content;
 5     private int type;
 6     public Msg(String content,int type){
 7         this.content=content;
 8         this.type=type;
 9     }
10     public String getContent(){
11         return content;
12     }
13
14     public int getType(){
15         return type;
16     }
17 }
Msg只有兩個欄位,content表示消息的內容,type表示消息的類型(二值可選,一個是TYPE_RECRIVED,一個是TYPE_SENT)。
4、接著編寫RecyclerView子項的佈局,新建msg_item.xml,代碼如下:
 1 <?xml version="1.0" encoding="utf-8"?>
 2 <LinearLayout xmlns:android="http://schemas.android.com/apk/res/android"
 3     android:orientation="vertical"
 4     android:layout_width="match_parent"
 5     android:layout_height="wrap_content"
 6     android:padding="10dp"
 7     >
 8
 9     <LinearLayout
10         android:id="@+id/left_layout"
11         android:layout_width="283dp"
12         android:layout_height="106dp"
13         android:layout_gravity="left"
14         android:background="@drawable/zuo"
15         android:weightSum="1">
16
17         <TextView
18             android:id="@+id/left_msg"
19             android:layout_width="match_parent"
20             android:layout_height="wrap_content"
21             android:layout_gravity="center"
22             android:layout_margin="10dp"
23             />
24     </LinearLayout>
25
26     <LinearLayout
27         android:id="@+id/right_layout"
28         android:layout_width="229dp"
29         android:layout_height="109dp"
30         android:layout_gravity="right"
31         android:background="@drawable/you"
32         >
33         <TextView
34             android:id="@+id/right_msg"
35             android:layout_width="wrap_content"
36             android:layout_height="wrap_content"
37             android:layout_gravity="center"
38             android:layout_margin="10dp"
39             />
40     </LinearLayout>
41
42 </LinearLayout>
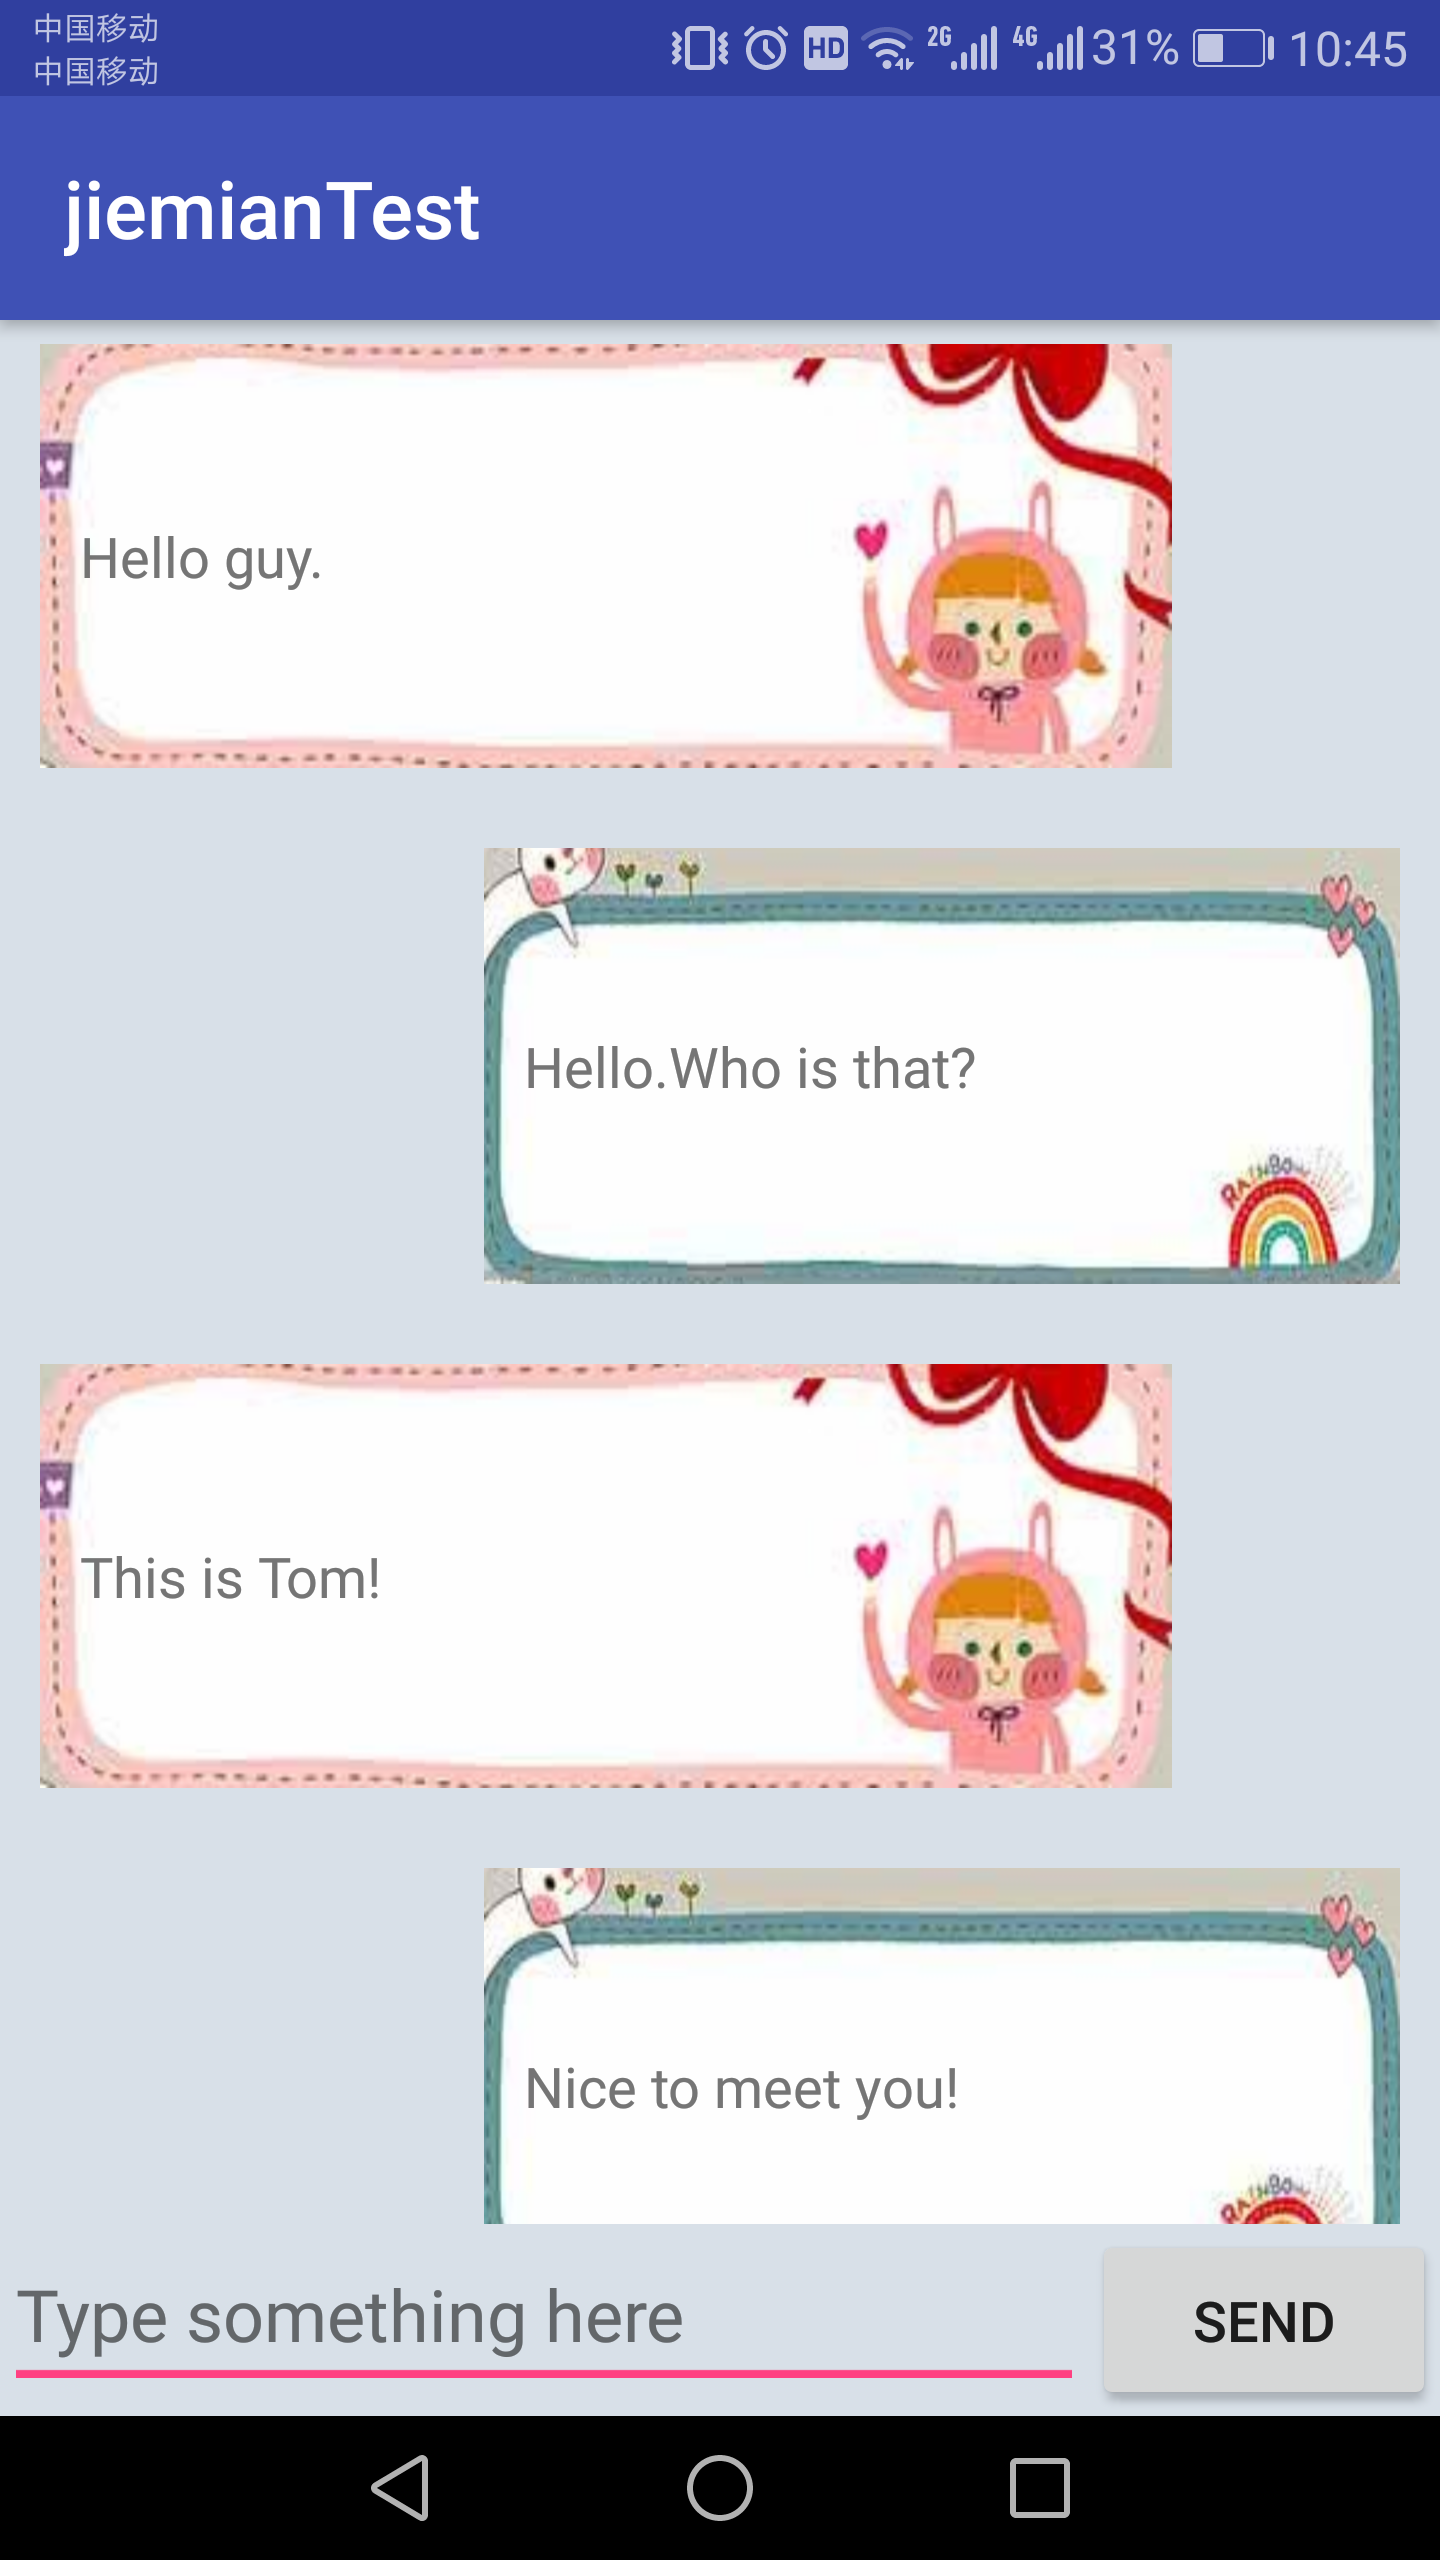
收到的消息局左對齊,發出的消息居右對齊,並用相應的圖片作為背景。
5、創建RecyclerView的適配器類,新建MsgAdapter,代碼如下:
 1 public class MsgAdapter extends RecyclerView.Adapter<MsgAdapter.ViewHolder> {
 2     private List<Msg> mMsgList;
 3     static class ViewHolder extends RecyclerView.ViewHolder{
 4         LinearLayout leftLayout;
 5         LinearLayout rightLayout;
 6         TextView leftMsg;
 7         TextView rightMsg;
 8         public ViewHolder(View view){
 9             super(view);
10             leftLayout=(LinearLayout)view.findViewById(R.id.left_layout);
11             rightLayout=(LinearLayout)view.findViewById(R.id.right_layout);
12             leftMsg=(TextView)view.findViewById(R.id.left_msg);
13             rightMsg=(TextView)view.findViewById(R.id.right_msg);
14         }
15     }
16     public MsgAdapter(List<Msg> msgList){
17         mMsgList=msgList;
18     }
19     @Override
20     public ViewHolder onCreateViewHolder(ViewGroup parent,int viewType){               //onCreateViewHolder()用於創建ViewHolder實例
21         View view= LayoutInflater.from(parent.getContext()).inflate(R.layout.msg_item,parent,false);
22         return new ViewHolder(view);                                                   //把載入出來的佈局傳到構造函數中,再返回
23     }
24     @Override
25     public void onBindViewHolder(ViewHolder Holder,int position){                     //onBindViewHolder()用於對RecyclerView子項的數據進行賦值,會在每個子項被滾動到屏幕內的時候執行
26         Msg msg=mMsgList.get(position);
27         if(msg.getType()==Msg.TYPE_RECEIVED){                                         //增加對消息類的判斷,如果這條消息是收到的,顯示左邊佈局,是發出的,顯示右邊佈局
28             Holder.leftLayout.setVisibility(View.VISIBLE);
29             Holder.rightLayout.setVisibility(View.GONE);
30             Holder.leftMsg.setText(msg.getContent());
31         }else if(msg.getType()==Msg.TYPE_SENT) {
32             Holder.rightLayout.setVisibility(View.VISIBLE);
33             Holder.leftLayout.setVisibility(View.GONE);
34             Holder.rightMsg.setText(msg.getContent());
35         }
36     }
37     @Override
38     public int getItemCount(){
39         return mMsgList.size();
40     }
41 }
6、最後修改MainActivity中的代碼,來為RecyclerView初始化一些數據,並給發送按鈕加入事件響應,代碼如下:
 1 public class MainActivity extends AppCompatActivity {
 2     private List<Msg> msgList=new ArrayList<>();
 3     private EditText inputText;
 4     private Button send;
 5     private RecyclerView msgRecyclerView;
 6     private MsgAdapter adapter;
 7
 8     @Override
 9     protected void onCreate(Bundle savedInstanceState) {
10         super.onCreate(savedInstanceState);
11         setContentView(R.layout.activity_main);
12         initMsgs();                                                         //初始化消息數據
13         inputText=(EditText)findViewById(R.id.input_text);
14         send=(Button)findViewById(R.id.send);
15         msgRecyclerView=(RecyclerView)findViewById(R.id.msg_recycler_view);
16
17         LinearLayoutManager layoutManager=new LinearLayoutManager(this);    //LinearLayoutLayout即線性佈局,創建對象後把它設置到RecyclerView當中
18         msgRecyclerView.setLayoutManager(layoutManager);
19
20         adapter=new MsgAdapter(msgList);                                    //創建MsgAdapter的實例並將數據傳入到MsgAdapter的構造函數中
21         msgRecyclerView.setAdapter(adapter);
22
23         send.setOnClickListener(new View.OnClickListener(){                 //發送按鈕點擊事件
24             @Override
25             public void onClick(View v){
26                 String content=inputText.getText().toString();              //獲取EditText中的內容
27                 if(!"".equals(content)){                                    //內容不為空則創建一個新的Msg對象,並把它添加到msgList列表中
28                     Msg msg=new Msg(content,Msg.TYPE_SENT);
29                     msgList.add(msg);
30                     adapter.notifyItemInserted(msgList.size()-1);           //調用適配器的notifyItemInserted()用於通知列表有新的數據插入,這樣新增的一條消息才能在RecyclerView中顯示
31                     msgRecyclerView.scrollToPosition(msgList.size()-1);     //調用scrollToPosition()方法將顯示的數據定位到最後一行,以保證可以看到最後發出的一條消息
32                     inputText.setText("");                                  //調用EditText的setText()方法將輸入的內容清空
33                 }
34             }
35         });
36     }
37
38     private void initMsgs(){
39         Msg msg1=new Msg("Hello guy.",Msg.TYPE_RECEIVED);
40         msgList.add(msg1);
41         Msg msg2=new Msg("Hello.Who is that?",Msg.TYPE_SENT);
42         msgList.add(msg2);
43         Msg msg3=new Msg("This is Tom!",Msg.TYPE_RECEIVED);
44         msgList.add(msg3);
45     }
46 }
運行程式,效果如下: