
之前的文章,在上面建立完config之後,UIl通過 來初始化ImageLoader對象,之後就可以用ImageLoader來載入圖片。 這裡,採用到單例模式來獲取ImageLoader對象,保證他全局初始化一次。再上面的分析中,我們可以看出單例模式的好處,創建ImageLoader對象的時候需要創 ...
之前的文章,在上面建立完config之後,UIl通過ImageLoader.getInstance().init(config.build());來初始化ImageLoader對象,之後就可以用ImageLoader來載入圖片。
這裡,採用到單例模式來獲取ImageLoader對象,保證他全局初始化一次。再上面的分析中,我們可以看出單例模式的好處,創建ImageLoader對象的時候需要創建Config,而Config裡面同樣初始化了一堆對象。如果每次用到都現初始化ImageLoader,消耗太大。我們看一下ImageLoader的init的源碼
public synchronized void init(ImageLoaderConfiguration configuration) {
        if (configuration == null) {
            throw new IllegalArgumentException(ERROR_INIT_CONFIG_WITH_NULL);
        }
        if (this.configuration == null) {
            L.d(LOG_INIT_CONFIG);
            //創建圖片載入引擎
            engine = new ImageLoaderEngine(configuration);
            this.configuration = configuration;
        } else {
            L.w(WARNING_RE_INIT_CONFIG);
        }
    }
如果該對象還沒有config,則將傳入的config賦值給this.config。並且初始化圖片載入引擎。
我們繼續看圖片載入引擎主要執行的工作。
class ImageLoaderEngine {
    /*ImageLoader載入配置*/
    final ImageLoaderConfiguration configuration;
    /*任務執行者*/
    private Executor taskExecutor;
    /*圖片緩存任務執行則*/
    private Executor taskExecutorForCachedImages;
    /*任務分配者*/
    private Executor taskDistributor;

    private final Map<Integer, String> cacheKeysForImageAwares = Collections
            .synchronizedMap(new HashMap<Integer, String>());
    private final Map<String, ReentrantLock> uriLocks = new WeakHashMap<String, ReentrantLock>();
    /*暫停*/
    private final AtomicBoolean paused = new AtomicBoolean(false);
    /*網路拒絕訪問*/
    private final AtomicBoolean networkDenied = new AtomicBoolean(false);
    /*網路慢*/
    private final AtomicBoolean slowNetwork = new AtomicBoolean(false);

    private final Object pauseLock = new Object();

    /**
     * ImageLoader引擎構造器
     * @param configuration
     */
    ImageLoaderEngine(ImageLoaderConfiguration configuration) {
        //初始化ImageLoader配置參數
        this.configuration = configuration;
        //初始化三個不同任務的執行者
        taskExecutor = configuration.taskExecutor;
        taskExecutorForCachedImages = configuration.taskExecutorForCachedImages;
        taskDistributor = DefaultConfigurationFactory.createTaskDistributor();
    }

    /** Submits task to execution pool */
    /**
     * 提交圖片載入和顯示任務到執行線程池中,進行運行
     * @param task   具體需要執行的任務
     */
    void submit(final LoadAndDisplayImageTask task) {
        taskDistributor.execute(new Runnable() {
            @Override
            public void run() {
                //從文件系統緩存中獲取圖片文件
                File image = configuration.diskCache.get(task.getLoadingUri());
                //判斷是否已經取得了圖片
                boolean isImageCachedOnDisk = image != null && image.exists();
                initExecutorsIfNeed();
                if (isImageCachedOnDisk) {
                    //如果當前圖片已經緩存在本地文件系統了,直接採用taskExecutorForCachedImages來進行執行任務
                    taskExecutorForCachedImages.execute(task);
                } else {
                    //當天圖片在本地文件系統中沒有緩存,直接採用taskExecutor來進行執行任務
                    taskExecutor.execute(task);
                }
            }
        });
    }

    /**
     * Submits task to execution pool
     * 提交圖片顯示任務並且執行 (該圖片從記憶體緩存中取得)
     */
    void submit(ProcessAndDisplayImageTask task) {
        initExecutorsIfNeed();
        taskExecutorForCachedImages.execute(task);
    }

    /**
     * 根據需要進行初始化執行者
     */
    private void initExecutorsIfNeed() {
        if (!configuration.customExecutor && ((ExecutorService) taskExecutor).isShutdown()) {
            taskExecutor = createTaskExecutor();
        }
        if (!configuration.customExecutorForCachedImages && ((ExecutorService) taskExecutorForCachedImages)
                .isShutdown()) {
            taskExecutorForCachedImages = createTaskExecutor();
        }
    }

    /**
     * 進行創建任務執行者
     * @return
     */
    private Executor createTaskExecutor() {
        return DefaultConfigurationFactory
                .createExecutor(configuration.threadPoolSize, configuration.threadPriority,
                configuration.tasksProcessingType);
    }

    /**
     * 獲取當前被載入ImageAware到圖片的地址
     * Returns URI of image which is loading at this moment into passed {@link com.nostra13.universalimageloader.core.imageaware.ImageAware}
     */
    String getLoadingUriForView(ImageAware imageAware) {
        return cacheKeysForImageAwares.get(imageAware.getId());
    }

    /**
     *
     * Associates <b>memoryCacheKey</b> with <b>imageAware</b>. Then it helps to define image URI is loaded into View at
     * exact moment.
     */
    void prepareDisplayTaskFor(ImageAware imageAware, String memoryCacheKey) {
        cacheKeysForImageAwares.put(imageAware.getId(), memoryCacheKey);
    }

    /**
     * Cancels the task of loading and displaying image for incoming <b>imageAware</b>.
     *
     * @param imageAware {@link com.nostra13.universalimageloader.core.imageaware.ImageAware} for which display task
     *                   will be cancelled
     */
    void cancelDisplayTaskFor(ImageAware imageAware) {
        cacheKeysForImageAwares.remove(imageAware.getId());
    }

    /**
     * Denies or allows engine to download images from the network.<br /> <br /> If downloads are denied and if image
     * isn't cached then {@link ImageLoadingListener#onLoadingFailed(String, View, FailReason)} callback will be fired
     * with {@link FailReason.FailType#NETWORK_DENIED}
     *
     * @param denyNetworkDownloads pass <b>true</b> - to deny engine to download images from the network; <b>false</b> -
     *                             to allow engine to download images from network.
     */
    void denyNetworkDownloads(boolean denyNetworkDownloads) {
        networkDenied.set(denyNetworkDownloads);
    }

    /**
     * Sets option whether ImageLoader will use {@link FlushedInputStream} for network downloads to handle <a
     * href="http://code.google.com/p/android/issues/detail?id=6066">this known problem</a> or not.
     *
     * @param handleSlowNetwork pass <b>true</b> - to use {@link FlushedInputStream} for network downloads; <b>false</b>
     *                          - otherwise.
     */
    void handleSlowNetwork(boolean handleSlowNetwork) {
        slowNetwork.set(handleSlowNetwork);
    }

    /**
     * Pauses engine. All new "load&display" tasks won't be executed until ImageLoader is {@link #resume() resumed}.<br
     * /> Already running tasks are not paused.
     * 暫停任務運行
     */
    void pause() {
        paused.set(true);
    }

    /**
     * Resumes engine work. Paused "load&display" tasks will continue its work.
     * 任務恢復運行
     */
    void resume() {
        paused.set(false);
        synchronized (pauseLock) {
            pauseLock.notifyAll();
        }
    }

    /**
     * 停止ImageLoader引擎,取消所有正在運行或者掛起的圖片顯示任務,並且清除內部的數據
     * Stops engine, cancels all running and scheduled display image tasks. Clears internal data.
     * <br />
     * <b>NOTE:</b> This method doesn't shutdown
     * {@linkplain com.nostra13.universalimageloader.core.ImageLoaderConfiguration.Builder#taskExecutor(java.util.concurrent.Executor)
     * custom task executors} if you set them.
     */
    void stop() {
        if (!configuration.customExecutor) {
            ((ExecutorService) taskExecutor).shutdownNow();
        }
        if (!configuration.customExecutorForCachedImages) {
            ((ExecutorService) taskExecutorForCachedImages).shutdownNow();
        }
        cacheKeysForImageAwares.clear();
        uriLocks.clear();
    }

    void fireCallback(Runnable r) {
        taskDistributor.execute(r);
    }

    ReentrantLock getLockForUri(String uri) {
        ReentrantLock lock = uriLocks.get(uri);
        if (lock == null) {
            lock = new ReentrantLock();
            uriLocks.put(uri, lock);
        }
        return lock;
    }

    AtomicBoolean getPause() {
        return paused;
    }

    Object getPauseLock() {
        return pauseLock;
    }

    boolean isNetworkDenied() {
        return networkDenied.get();
    }

    boolean isSlowNetwork() {
        return slowNetwork.get();
    }
}
上面的代碼中,核心的部分就是創建了任務執行器和圖片緩存執行器,並且在submit方法中針對提交的任務,選擇不同的執行器執行。
ImageLoader關於載入顯示圖片,有如下幾種用法,我們依次分析一下。
displayImage(), loadImage()先看loadImage()
下麵的loadImage所有的重載方法。
    public void loadImage(String uri, ImageLoadingListener listener) {
        loadImage(uri, null, null, listener, null);
    }

    public void loadImage(String uri, ImageSize targetImageSize, ImageLoadingListener listener) {
        loadImage(uri, targetImageSize, null, listener, null);
    }

    public void loadImage(String uri, DisplayImageOptions options, ImageLoadingListener listener) {
        loadImage(uri, null, options, listener, null);
    }

    public void loadImage(String uri, ImageSize targetImageSize, DisplayImageOptions options,
            ImageLoadingListener listener) {
        loadImage(uri, targetImageSize, options, listener, null);
    }
    public void loadImage(String uri, ImageSize targetImageSize, DisplayImageOptions options,
            ImageLoadingListener listener, ImageLoadingProgressListener progressListener) {
    }
不管是幾個參數的loadImage,最後都會重載下麵的方法。
public void loadImage(String uri, ImageSize targetImageSize, DisplayImageOptions options,
            ImageLoadingListener listener, ImageLoadingProgressListener progressListener) {
        checkConfiguration();
        if (targetImageSize == null) {
            targetImageSize = configuration.getMaxImageSize();
        }
        if (options == null) {
            options = configuration.defaultDisplayImageOptions;
        }

        NonViewAware imageAware = new NonViewAware(uri, targetImageSize, ViewScaleType.CROP);
        displayImage(uri, imageAware, options, listener, progressListener);
    }
如果沒有指定targetImageSize以及options就會採用config預設的提供,然後根據targetImageSize以及uri生成一個NonViewAware,最終通過displayImage來載入。
targetImageSize是一個ImageSize對象,該類是image尺寸的封裝類,config的預設值是屏幕的寬高。
options是採用config預設創建,config的預設值是faultDisplayImageOptions = DisplayImageOptions.createSimple();
這個初始化都是創建的DisplayImageOptions都是預設值,基本什麼屬性都是false或者null或者0
接下來,我們看一下NonViewAware類,NonViewAware是實現了ImageAware介面的一個類,ImageAware介面主要定義了圖片處理和顯示所需要的方法和屬性。所以NonViewAware也只是對傳入的參數進行封裝,來提供一個外部訪問的介面。
真正顯示圖片的方法都是displayImage,displayImage方法和loadImage一樣,提供了多種參數,displayImage的重載方法要多一些,因為displayImage方法有一類是接受ImageView而另一類是接受ImageAware。
下麵是無論如何都是最終調用的方法:
代碼如下:
public void displayImage(String uri, ImageAware imageAware, DisplayImageOptions options,
            ImageSize targetSize, ImageLoadingListener listener, ImageLoadingProgressListener progressListener) {
        //進行檢查ImageLoader全局相關配置
        checkConfiguration();
        if (imageAware == null) {
            throw new IllegalArgumentException(ERROR_WRONG_ARGUMENTS);
        }
        if (listener == null) {
            listener = defaultListener;
        }
        //檢查圖片顯示配置
        if (options == null) {
            options = configuration.defaultDisplayImageOptions;
        }
        //==============圖片地址為空=================
        if (TextUtils.isEmpty(uri)) {
            engine.cancelDisplayTaskFor(imageAware);
            //介面方法回調,當前圖片載入任務開始
            listener.onLoadingStarted(uri, imageAware.getWrappedView());
            //進行判斷是否給imageview添加一個空地址的資源圖片
            if (options.shouldShowImageForEmptyUri()) {
                imageAware.setImageDrawable(options.getImageForEmptyUri(configuration.resources));
            } else {
                imageAware.setImageDrawable(null);
            }
            //直接載入回調載入成功
            listener.onLoadingComplete(uri, imageAware.getWrappedView(), null);
            return;
        }
        //=============圖片地址存在=====================
        if (targetSize == null) {
            //如果圖片顯示的目標大小沒有設置的,那麼就使用預設大小尺寸即可
            targetSize = ImageSizeUtils.defineTargetSizeForView(imageAware, configuration.getMaxImageSize());
        }
        //根據地址和圖片目標尺寸信息,生成緩存key
        String memoryCacheKey = MemoryCacheUtils.generateKey(uri, targetSize);
        engine.prepareDisplayTaskFor(imageAware, memoryCacheKey);
        //開始進行載入圖片
        listener.onLoadingStarted(uri, imageAware.getWrappedView());

        //首先根據key去緩存中獲取是否還存在該圖片
        Bitmap bmp = configuration.memoryCache.get(memoryCacheKey);
        if (bmp != null && !bmp.isRecycled()) {
            //緩存中該圖片存在
            L.d(LOG_LOAD_IMAGE_FROM_MEMORY_CACHE, memoryCacheKey);
            if (options.shouldPostProcess()) {
                ImageLoadingInfo imageLoadingInfo = new ImageLoadingInfo(uri, imageAware, targetSize, memoryCacheKey,
                        options, listener, progressListener, engine.getLockForUri(uri));
                ProcessAndDisplayImageTask displayTask = new ProcessAndDisplayImageTask(engine, bmp, imageLoadingInfo,
                        defineHandler(options));
                //是否允許同步載入
                if (options.isSyncLoading()) {
                    displayTask.run();
                } else {
                    //提交進行顯示
                    engine.submit(displayTask);
                }
            } else {
                options.getDisplayer().display(bmp, imageAware, LoadedFrom.MEMORY_CACHE);
                listener.onLoadingComplete(uri, imageAware.getWrappedView(), bmp);
            }
        } else {
            //緩存中不存在該圖片 通過網路載入
            if (options.shouldShowImageOnLoading()) {
                imageAware.setImageDrawable(options.getImageOnLoading(configuration.resources));
            } else if (options.isResetViewBeforeLoading()) {
                imageAware.setImageDrawable(null);
            }
            //進行構造圖片載入任務相關的所有信息對象
            ImageLoadingInfo imageLoadingInfo = new ImageLoadingInfo(uri, imageAware, targetSize, memoryCacheKey,
                    options, listener, progressListener, engine.getLockForUri(uri));
            //分裝圖片載入和顯示任務對象 然後進行開啟執行任務
            LoadAndDisplayImageTask displayTask = new LoadAndDisplayImageTask(engine, imageLoadingInfo,
                    defineHandler(options));
            if (options.isSyncLoading()) {
                displayTask.run();
            } else {
                engine.submit(displayTask);
            }
        }
    }
具體的執行過程已經通過代碼註釋了,下麵梳理下流程。
首先,針對為null的屬性,初始化這些屬性,然後判斷傳入的uri是不是為空,如果為空,則根據options.shouldShowImageForEmptyUri來判斷是否顯示先設置好的圖片。
如果傳入的uri是存在的,則根據地址和圖片目標尺寸的信息來生成緩存key,然後執行
prepareDisplayTaskFor方法。
再根據key來判斷緩存中是否存在該圖片,如果存在,就判斷options的shouldPostProcess,如果為true就創建一個ProcessAndDisplayImageTask對象,通過圖片載入引擎來載入。如果返回的值false,則調用options.getDisplayer().display(bmp, imageAware, LoadedFrom.MEMORY_CACHE);
如果緩存不存在,則直接通過網路載入該圖片,載入的方式是構建LoadAndDisplayImageTask對象,通過圖片載入引擎來判斷。
在這裡,關於圖片的緩存相關的內容,先不分析。接下來主要分析的是圖片如何執行這兩種不同的任務的。
第一種,在有緩存的情況下,通過判斷shouldPostProcess為true來讓圖片引擎處理任務,這裡的shouldPostProcess是指在拿到bitmap之後是否進行後續的操作,判斷標準就是postProcess是否為null.
如果不為null,也就是shouldPostProcess為true,則執行下麵的代碼:
下麵,我們來看一下,圖片引擎是如何執行ProcessAndDisplayImageTask。
void submit(ProcessAndDisplayImageTask task) {
        initExecutorsIfNeed();
        taskExecutorForCachedImages.execute(task);
    }
內部直接調用taskExecutorForCachedImages去執行task,所以主要看ProcessAndDisplayImageTask的task構造。
final class ProcessAndDisplayImageTask implements Runnable {

    private static final String LOG_POSTPROCESS_IMAGE = "PostProcess image before displaying [%s]";
    /*ImageLoader引擎*/
    private final ImageLoaderEngine engine;
    private final Bitmap bitmap;
    /*ImageLoader信息封裝對象*/
    private final ImageLoadingInfo imageLoadingInfo;
    private final Handler handler;

    /**
     * 圖片處理顯示任務構造器
     * @param engine
     * @param bitmap
     * @param imageLoadingInfo
     * @param handler
     */
    public ProcessAndDisplayImageTask(ImageLoaderEngine engine, Bitmap bitmap, ImageLoadingInfo imageLoadingInfo,
            Handler handler) {
        this.engine = engine;
        this.bitmap = bitmap;
        this.imageLoadingInfo = imageLoadingInfo;
        this.handler = handler;
    }

    @Override
    public void run() {
        L.d(LOG_POSTPROCESS_IMAGE, imageLoadingInfo.memoryCacheKey);
        //獲取圖片處理器 然後取得載入的圖片
        BitmapProcessor processor = imageLoadingInfo.options.getPostProcessor();
        Bitmap processedBitmap = processor.process(bitmap);
        //封裝圖片顯示任務   其中圖片來源設置成-來自記憶體緩存
        DisplayBitmapTask displayBitmapTask = new DisplayBitmapTask(processedBitmap, imageLoadingInfo, engine,
                LoadedFrom.MEMORY_CACHE);
        //執行任務
        LoadAndDisplayImageTask.runTask(displayBitmapTask, imageLoadingInfo.options.isSyncLoading(), handler, engine);
    }
}
這邊可以看出,task內部run方法裡面,首先得到一個BitmapProcessor,然後通過該processor去處理bitmap,然後將處理後的bitmap以及其他信息封裝成了DisplayBitmapTask,然後最終還是執行了LoadAndDisplayImageTask的runTask方法
下麵將看LoadAndDisplayImageTask.runTask方法
static void runTask(Runnable r, boolean sync, Handler handler, ImageLoaderEngine engine) {
        if (sync) {
            //如果同步 任務直接運行
            r.run();
        } else if (handler == null) {
            engine.fireCallback(r);
        } else {
            //任務通過Handler分發到主線程執行
            handler.post(r);
        }
    }
這邊,直接在UI線程displayBitmapTask,後面再看displayBitmapTask的內部實現。
回到shouldPostProcess的判斷那裡,如果為false,則直接調用BitmapDisplay顯示圖片,這裡傳入的是SimpleBitmapDisplayer
再回到緩存判斷那裡,上面的代碼都是在有記憶體緩存的情況下,執行的。看一下在無記憶體緩存時,執行的細節。
//緩存中不存在該圖片 通過網路載入
            if (options.shouldShowImageOnLoading()) {
                imageAware.setImageDrawable(options.getImageOnLoading(configuration.resources));
            } else if (options.isResetViewBeforeLoading()) {
                imageAware.setImageDrawable(null);
            }
            //進行構造圖片載入任務相關的所有信息對象
            ImageLoadingInfo imageLoadingInfo = new ImageLoadingInfo(uri, imageAware, targetSize, memoryCacheKey,
                    options, listener, progressListener, engine.getLockForUri(uri));
            //分裝圖片載入和顯示任務對象 然後進行開啟執行任務
            LoadAndDisplayImageTask displayTask = new LoadAndDisplayImageTask(engine, imageLoadingInfo,
                    defineHandler(options));
            if (options.isSyncLoading()) {
                displayTask.run();
            } else {
                engine.submit(displayTask);
            }
通過源碼可以看出,首先判斷要不要進行顯示載入中的View,然後構建圖片載入信息,通過圖片載入信息構建LoadAndDisplayImageTask對象,執行去run方法。
上面,我們已經分析了其runTask方法,該方法比較簡單,這次我們看一下run方法。
public void run() {
        //如果當前狀態是暫停 當前任務直接返回
        if (waitIfPaused()) return;
        //如果當前狀態需要等待  當前任務直接返回
        if (delayIfNeed()) return;

        ReentrantLock loadFromUriLock = imageLoadingInfo.loadFromUriLock;
        L.d(LOG_START_DISPLAY_IMAGE_TASK, memoryCacheKey);
        if (loadFromUriLock.isLocked()) {
            L.d(LOG_WAITING_FOR_IMAGE_LOADED, memoryCacheKey);
        }
        //任務加鎖
        loadFromUriLock.lock();
        Bitmap bmp;
        try {
            //進行檢查任務  判斷當前要顯示的引用對象是否已經被回收了
            checkTaskNotActual();
            //先從緩存中獲取圖片
            bmp = configuration.memoryCache.get(memoryCacheKey);
            if (bmp == null || bmp.isRecycled()) {
                //進行嘗試獲取載入圖片(去文件中,文件中不存在去網路下載,然後緩存到文件)
                bmp = tryLoadBitmap();
                if (bmp == null) return; // listener callback already was fired

                checkTaskNotActual();
                checkTaskInterrupted();

                if (options.shouldPreProcess()) {
                    L.d(LOG_PREPROCESS_IMAGE, memoryCacheKey);
                    bmp = options.getPreProcessor().process(bmp);
                    if (bmp == null) {
                        L.e(ERROR_PRE_PROCESSOR_NULL, memoryCacheKey);
                    }
                }

                if (bmp != null && options.isCacheInMemory()) {
                    L.d(LOG_CACHE_IMAGE_IN_MEMORY, memoryCacheKey);
                    configuration.memoryCache.put(memoryCacheKey, bmp);
                }
            } else {
                //從緩存中獲取到圖片信息
                //設置圖片來源信息 --Memory Cache
                loadedFrom = LoadedFrom.MEMORY_CACHE;
                L.d(LOG_GET_IMAGE_FROM_MEMORY_CACHE_AFTER_WAITING, memoryCacheKey);
            }

            if (bmp != null && options.shouldPostProcess()) {
                L.d(LOG_POSTPROCESS_IMAGE, memoryCacheKey);
                bmp = options.getPostProcessor().process(bmp);
                if (bmp == null) {
                    L.e(ERROR_POST_PROCESSOR_NULL, memoryCacheKey);
                }
            }
            checkTaskNotActual();
            checkTaskInterrupted();
        } catch (TaskCancelledException e) {
            fireCancelEvent();
            return;
        } finally {
            //任務取消鎖
            loadFromUriLock.unlock();
        }
        //封裝圖片顯示任務對象
        DisplayBitmapTask displayBitmapTask = new DisplayBitmapTask(bmp, imageLoadingInfo, engine, loadedFrom);
        //進行任務運行
        runTask(displayBitmapTask, syncLoading, handler, engine);
    }
其流程圖如下:
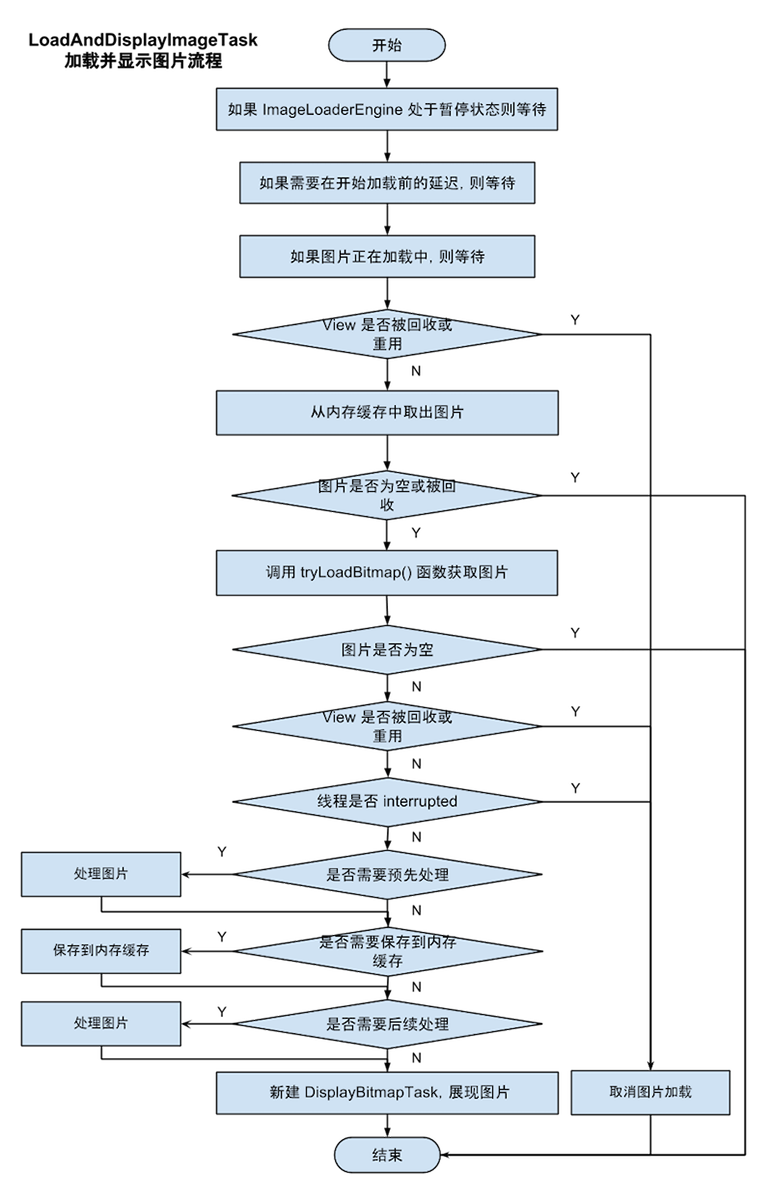
可以看到這邊,利用的圖片三級緩存,第一級是記憶體緩存,如果記憶體緩存沒有則利用二級緩存,從文件中去讀取,如果文件中有,則從文件中取出bitmap,如果沒有則從網路下載。
這邊從文件中bitmap的方法是tryLoadBitmap,下麵主要看一下這個方法
private Bitmap tryLoadBitmap() throws TaskCancelledException {
        Bitmap bitmap = null;
        try {
            //從本地文件緩存中獲取圖片
            File imageFile = configuration.diskCache.get(uri);
            if (imageFile != null && imageFile.exists() && imageFile.length() > 0) {
                L.d(LOG_LOAD_IMAGE_FROM_DISK_CACHE, memoryCacheKey);
                //文件存在設置圖片來源
                loadedFrom = LoadedFrom.DISC_CACHE;
                //檢查引用是否已經被回收了
                checkTaskNotActual();
                //圖片解碼,文件轉換成bitmap對象
                bitmap = decodeImage(Scheme.FILE.wrap(imageFile.getAbsolutePath()));
            }
            if (bitmap == null || bitmap.getWidth() <= 0 || bitmap.getHeight() <= 0) {
                L.d(LOG_LOAD_IMAGE_FROM_NETWORK, memoryCacheKey);
                //本地文件系統中圖片解碼失敗,嘗試通過網路獲取
                loadedFrom = LoadedFrom.NETWORK;
                String imageUriForDecoding = uri;
                //判斷圖片可以本地文件系統緩存以及嘗試本地文本系統緩存(網路下載圖片,下載成功圖片緩存本地文件系統)
                if (options.isCacheOnDisk() && tryCacheImageOnDisk()) {
                    //從本地文件系統緩存中獲取圖片
                    imageFile = configuration.diskCache.get(uri);
                    if (imageFile != null) {
                        imageUriForDecoding = Scheme.FILE.wrap(imageFile.getAbsolutePath());
                    }
                }

                checkTaskNotActual();
                //圖片解碼
                bitmap = decodeImage(imageUriForDecoding);

                if (bitmap == null || bitmap.getWidth() <= 0 || bitmap.getHeight() <= 0) {
                    //回調圖片解碼失敗
                    fireFailEvent(FailType.DECODING_ERROR, null);
                }
            }
        } catch (IllegalStateException e) {
            fireFailEvent(FailType.NETWORK_DENIED, null);
        } catch (TaskCancelledException e) {
            throw e;
        } catch (IOException e) {
            L.e(e);
            fireFailEvent(FailType.IO_ERROR, e);
        } catch (OutOfMemoryError e) {
            L.e(e);
            fireFailEvent(FailType.OUT_OF_MEMORY, e);
        } catch (Throwable e) {
            L.e(e);
            fireFailEvent(FailType.UNKNOWN, e);
        }
        //圖片存在 返回
        return bitmap;
}首先是從diskcache中,取出File,然後對file進行轉換。如果轉換後的bitmap為null,則從網路獲取圖片,獲取圖片的方法調用是在options.isCacheOnDisk() && tryCacheImageOnDisk() 該判斷首先判斷是否存儲在文件中,如果不存在文件中,就不執行後面的網路獲取。
private boolean tryCacheImageOnDisk() throws TaskCancelledException {
        L.d(LOG_CACHE_IMAGE_ON_DISK, memoryCacheKey);
        boolean loaded;
        try {
            //圖片下載並且保存本地
            loaded = downloadImage();
            if (loaded) {
                int width = configuration.maxImageWidthForDiskCache;
                int height = configuration.maxImageHeightForDiskCache;
                if (width > 0 || height > 0) {
                    L.d(LOG_RESIZE_CACHED_IMAGE_FILE, memoryCacheKey);
                    //根據尺寸大小配置 進行圖片縮放和保存
                    resizeAndSaveImage(width, height); // TODO : process boolean result
                }
            }
        } catch (IOException e) {
            L.e(e);
            loaded = false;
        }
        return loaded;
    }
downloadImage是執行網路請求的方法,其內部通過BaseImageDownloader進行下載,其內部的網路庫是HttpURLConnection,下載後的圖片,根據設定的文件存儲的最大寬高,進行縮放與保存。
這樣,就在文件緩存中緩存了圖片,在回到上面LoadAndDisplayTask的run方法,在得到bitmap之後,就會判斷是否要 對bitmap進行預處理,預處理完的bitmap全部會緩存到記憶體緩存中。上面的操作都是建立在bitmap中記憶體緩存中取沒有取出來的情況,如果取出來就直接得到bitmap,然後從bitmap判斷是否進行後續的處理。
這裡,簡單說一下 preProcessor以及postProcessor,preProcessor是指對圖片進行預處理,比如加水印,如果加水印的圖片都會緩存到記憶體,postProcessor是對取出的bitmap做一些後續的操作,操作後將顯示出來。
最後得到的Bitmap會封裝成DisplayBitmapTask,調用上面提到的runtask方法,進行處理。
這樣,到此,發起圖片獲取需求,到圖片經過記憶體緩存,文件緩存,網路獲取後得到,然後再通過Handler回到UI線程的流程就分析完畢了。
其實,整個流程非常的簡單,清晰。只不過在考慮到了多種情況,使得代碼看上去很多。
下麵,將分析圖片載入框架最重要的一部分,緩存的設計。


