
國內文章 【音視頻通話】使用asp.net core 8+vue3 實現高效音視頻通話 https://www.cnblogs.com/1996-Chinese-Chen/p/18384394 該文章描述了使用SRS實現音視頻通話和共用桌面的經驗。從最初使用nginx的RTMP到研究SRS和ZLMe ...
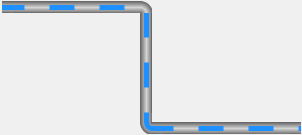
C#用戶控制項之流動管道
如何繪製一個動態的流動管道(FlowPipe)?
分兩步繪製
- 定義屬性;
- 畫布重繪;
主要技能:
- 管道的繪製(漸變色矩形)
  /// <summary>
  /// 畫漸變色矩形的方法
  /// </summary>
  /// <param name="g">畫布</param>
  /// <param name="brush">畫刷</param>
  /// <param name="pen">筆</param>
  /// <param name="rectangle">矩形</param>
  private void PaintRectangle(Graphics g, Brush brush, Pen pen, Rectangle rectangle)
  {
      //填充矩形
      g.FillRectangle(brush, rectangle);

      switch (this.pipeStyle)
      {
          case PipeStyle.Horizontal:
              g.DrawLine(pen, rectangle.X, rectangle.Y, rectangle.X + rectangle.Width, rectangle.Y);
              g.DrawLine(pen, rectangle.X, rectangle.Y + rectangle.Height - 1, rectangle.X + rectangle.Width, rectangle.Height);
              break;
          case PipeStyle.Vertical:
              g.DrawLine(pen, rectangle.X, rectangle.Y, rectangle.X, rectangle.Y + rectangle.Height);
              g.DrawLine(pen, rectangle.X + rectangle.Width - 1, rectangle.Y, rectangle.X + rectangle.Width - 1, rectangle.Height);
              break;
          default:
              break;
      }
  }
- 管道的繪製(漸變色半圓)
/// <summary>
/// 畫漸變色半圓的方法
/// </summary>
/// <param name="g">畫布</param>
/// <param name="colorBlend"></param>
/// <param name="p"></param>
/// <param name="rect"></param>
/// <param name="startAngle"></param>
/// <param name="sweepAngle"></param>
private void PaintEllipse(Graphics g, ColorBlend colorBlend, Pen p, Rectangle rect, float startAngle, float sweepAngle)
{
    //第一步:創建GPI路徑
    GraphicsPath path = new GraphicsPath();
    path.AddEllipse(rect);

    //第二步:漸變色填充
    PathGradientBrush brush = new PathGradientBrush(path);
    brush.CenterPoint = new Point(rect.X + rect.Width / 2, rect.Y + rect.Height / 2);
    brush.InterpolationColors = colorBlend;

    //第三步:繪製管道
    g.FillPie(brush, rect, startAngle, sweepAngle);

    //第四步:繪製邊線
    g.DrawArc(p, rect, startAngle, sweepAngle);
}
- 流動條的繪製(用筆的虛線)
//畫虛線,關鍵用筆和路徑來畫
Pen pen = new Pen(this.flowColor, this.flowWidth);
pen.DashStyle = DashStyle.Custom;
pen.DashPattern = new float[]
{
    flowLength,flowLengthGap
};
pen.DashOffset = this.startOffset;
g.DrawPath(pen, path);

 //流動條路徑
 GraphicsPath path = new GraphicsPath();

 //虛線路徑—左邊、中間、右邊
 switch (this.pipeTurnLeft)
 {
     case PipeTurn.Up:
         path.AddArc(new Rectangle(this.Height / 2, this.Height / 2 * (-1) -1, this.Height, this.Height), 181.0f, -91.0f);
         break;
     case PipeTurn.Down:
         path.AddArc(new Rectangle(this.Height / 2, this.Height / 2, this.Height, this.Height), 180.0f, 90.0f);
         break;
     default:
         path.AddLine(-1, this.Height / 2, this.Height+1, this.Height / 2);
         break;
 }
-
關鍵理解:繪製的橢圓、線(Rectangle)<x,y【圓切矩形相對於控制項原點<左上角>的坐標】,寬,高,開始角度,掃描角度>理解了就好畫了
path.AddArc(new Rectangle(this.Height / 2, this.Height / 2, this.Height, this.Height), 180.0f, 90.0f);
path.AddLine(-1, this.Height / 2, this.Height+1, this.Height / 2); -
可以流動的關鍵要素
     //流動條流動速度(刷新速度)
     this.myTimer = new Timer();
     myTimer.Interval = 50;
     this.myTimer.Tick += MyTimer_Tick; ;

 }

 #region 定時迴圈
 private void MyTimer_Tick(object sender, EventArgs e)
 {
     this.startOffset = this.startOffset - this.moveSpeed;

     if (this.startOffset > this.flowLength + this.flowLengthGap || this.startOffset < (this.flowLength + this.flowLengthGap) * (-1))
     { this.startOffset = 0; }
     this.Invalidate();
 }

 #endregion
1.定義屬性
- 管道的(兩端轉向、樣式、邊沿顏色、中間顏色、激活)
- 流動條的(速度、長度、寬度、間隙、顏色)
//屬性示例:按照示例添加以上各種屬性
private float moveSpeed = 0.3f;
[Browsable(true)]
[Category("佈局_G")]
[Description("流動條速度,負數為反向")]  //屬性說明
public float MoveSpeed
{
    get { return moveSpeed; }
    set
    {
        this.moveSpeed = value;
        this.Invalidate();  //重繪
    }
}
2.畫布重繪
【管道分為左、中、右三部分。先畫管道(矩形):左、中、右;再畫流動條(虛線):左、中、右】
//矩形畫刷
LinearGradientBrush linearGradientBrush = new LinearGradientBrush(new Point(0, 0), new Point(0, this.Height), pipeColorEdge, pipeColorEdge);
linearGradientBrush.InterpolationColors = colorBlend;

//繪製左部分
switch (this.pipeTurnLeft)
{
    case PipeTurn.Up:
        this.PaintEllipse(g, colorBlend, p, new Rectangle(0, this.Height * (-1)-1, this.Height * 2, this.Height * 2), 90.0f, 90.0f);
        break;
    case PipeTurn.Down:
        this.PaintEllipse(g, colorBlend, p, new Rectangle(0, 0, this.Height * 2, this.Height * 2), 180.0f, 90.0f);
        break;
    default:
        this.PaintRectangle(g, linearGradientBrush, p, new Rectangle(-1, 0, this.Height+1, this.Height));
        break;
}

//繪製右部分
switch (this.pipeTurnRight)
{
    case PipeTurn.Up:
        this.PaintEllipse(g, colorBlend, p, new Rectangle(this.Width - this.Height * 2, this.Height * (-1)-1, this.Height * 2, this.Height * 2), 0.0f, 90.0f);
        break;
    case PipeTurn.Down:
        this.PaintEllipse(g, colorBlend, p, new Rectangle(this.Width - this.Height * 2, 0, this.Height * 2, this.Height * 2), 270.0f, 90.0f);
        break;
    default:
        this.PaintRectangle(g, linearGradientBrush, p, new Rectangle(this.Width - this.Height, 0, this.Height, this.Height));
        break;
}

//繪製中間
if (this.Width > this.Height * 2)
{
    this.PaintRectangle(g, linearGradientBrush, p, new Rectangle(this.Height - 1, 0, this.Width - this.Height * 2 + 2, this.Height));
}
//流動條路徑
GraphicsPath path = new GraphicsPath();

//虛線路徑—左邊
switch (this.pipeTurnLeft)
{
    case PipeTurn.Up:
        path.AddArc(new Rectangle(this.Height / 2, this.Height / 2 * (-1) -1, this.Height, this.Height), 181.0f, -91.0f);
        break;
    case PipeTurn.Down:
        path.AddArc(new Rectangle(this.Height / 2, this.Height / 2, this.Height, this.Height), 180.0f, 90.0f);
        break;
    default:
        path.AddLine(-1, this.Height / 2, this.Height+1, this.Height / 2);
        break;
}

//虛線路徑—中間
if (this.Width > this.Height * 2)
{
    path.AddLine(this.Height, this.Height / 2, this.Width - this.Height -1, this.Height / 2);
}

//虛線路徑—右邊
switch (this.pipeTurnRight)
{
    case PipeTurn.Up:
        path.AddArc(new Rectangle(this.Width - 1 - this.Height * 3 / 2, -this.Height / 2-1 , this.Height, this.Height), 88f, -91.0f);
        break;
    case PipeTurn.Down:
        path.AddArc(new Rectangle(this.Width - 1 - this.Height * 3 / 2, this.Height / 2, this.Height, this.Height), 270.0f, 90.0f);
        break;
    default:
        path.AddLine(this.Width - this.Height, this.Height / 2, this.Width , this.Height / 2);
        break;
}

//畫虛線,關鍵用筆和路徑來
Pen pen = new Pen(this.flowColor, this.flowWidth);
pen.DashStyle = DashStyle.Custom;
pen.DashPattern = new float[]
{
    flowLength,flowLengthGap
};
pen.DashOffset = this.startOffset;
g.DrawPath(pen, path);
格式都是一樣的,掌握關鍵代碼,肝就對了。


