
經過前幾篇文章的講解,初步瞭解ASP.NET Core MVC項目創建,啟動運行,以及命名約定,創建控制器,視圖,模型,接收參數,傳遞數據ViewData,ViewBag,路由,頁面佈局,wwwroot和客戶端庫,Razor語法,EnityFrameworkCore與資料庫,HttpContext,... ...
隨著技術的發展,ASP.NET Core MVC也推出了好長時間,經過不斷的版本更新迭代,已經越來越完善,本系列文章主要講解ASP.NET Core MVC開發B/S系統過程中所涉及到的相關內容,適用於初學者,在校畢業生,或其他想從事ASP.NET Core MVC 系統開發的人員。
經過前幾篇文章的講解,初步瞭解ASP.NET Core MVC項目創建,啟動運行,以及命名約定,創建控制器,視圖,模型,接收參數,傳遞數據ViewData,ViewBag,路由,頁面佈局,wwwroot和客戶端庫,Razor語法,EnityFrameworkCore與資料庫,HttpContext,Request,Response,Session,序列化,文件上傳,自動映射,Html輔助標簽,模型校驗等內容,今天繼續講解ASP.NET Core MVC 中鑒權、授權基礎等相關內容,僅供學習分享使用。

概述
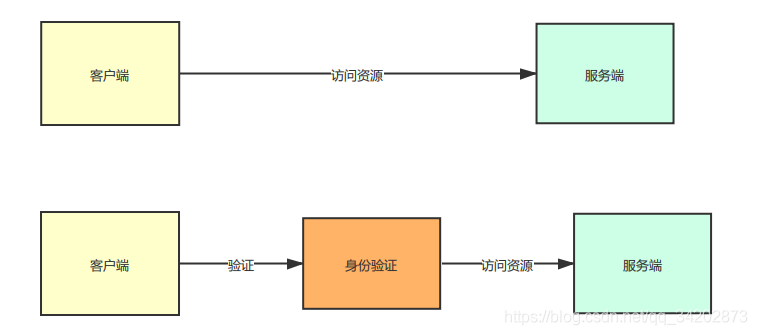
在實際開發中,大部分的程式都是要進行身份驗證,才能進行訪問,沒有身份驗證的訪問,那麼安全性就得不到保證,很容易被加以利用和攻擊。身份驗證就等於在應用程式中,增加了一層防護網。示意圖如下所示:
什麼是鑒權,授權?
鑒權,又叫身份驗證,確定用戶身份的過程。
授權,確定用戶是否有權訪問資源的過程。
在 ASP.NET Core 中,身份驗證由身份驗證服務 IAuthenticationService 負責,而它供身份驗證中間件使用。 身份驗證服務會使用已註冊的身份驗證處理程式來完成與身份驗證相關的操作。 與身份驗證相關的操作示例包括:
- 對用戶進行身份驗證。
- 在未經身份驗證的用戶試圖訪問受限資源時作出響應。
已註冊的身份驗證處理程式及其配置選項被稱為“方案”。身份驗證負責提供 ClaimsPrincipal 進行授權,以針對其進行許可權決策。
關於鑒權,授權,可以通過以下示例說明:

鑒權是一個承上啟下的一個環節,上游它接受授權的輸出,校驗其真實性後,然後獲取許可權(permission),這個將會為下一步的許可權控製做好準備。

鑒權授權基本步驟
在ASP.NET Core MVC程式中,要使用鑒權,授權功能,可參考以下步驟。
1. 添加鑒權服務
首先鑒權服務,本示例採用cookie的方式進行身份驗證,Program.cs啟動類中,添加鑒權服務,如下所示:
 1 //添加鑒權服務
 2 builder.Services.AddAuthentication(options =>
 3 {
 4     options.DefaultScheme = CookieAuthenticationDefaults.AuthenticationScheme;
 5
 6 }).AddCookie(CookieAuthenticationDefaults.AuthenticationScheme, options =>
 7 {
 8     options.LoginPath = "/Login/Index";
 9     options.LogoutPath = "/Login/Logout";
10 });
註意,添加服務時,指定了預設的schema。以及在在沒有授權時,需要跳轉的登錄的頁面。
2. 添加鑒權,授權中間件
在Program.cs啟動類中,添加身份驗證和授權中間件,以便在客戶端訪問時進行驗證。
1 //使用鑒權
2 app.UseAuthentication();
3 //使用授權
4 app.UseAuthorization();
3. 添加Authorize許可權控制
在需要進行許可權控制的地方【如:Cotroller,Action ,Razor頁面】,添加Authorize特性,如Home控制器,如下所示:
 1 namespace DemoCoreMVC.Controllers
 2 {
 3     [Authorize]
 4     public class HomeController : Controller
 5     {
 6         private readonly ILogger<HomeController> _logger;
 7
 8         public HomeController(ILogger<HomeController> logger)
 9         {
10             _logger = logger;
11         }
12
13         public IActionResult Index()
14         {
15             var username = HttpContext.Session.GetString("username");
16             ViewBag.Username = username;
17             return View();
18         }
19
20         public IActionResult Privacy()
21         {
22             return View();
23         }
24
25     }
26 }
如此,添加Authorize特性後,在訪問Home/Index首頁時,如下沒有鑒權,則會跳轉到登錄頁面。
4. 鑒權
在用戶登錄後,通過HttpContext.SignInAsync進行鑒權,並設置ClaimsPrincipal。如下所示:
 1 namespace DemoCoreMVC.Controllers
 2 {
 3     public class LoginController : Controller
 4     {
 5         public IActionResult Index()
 6         {
 7             return View();
 8         }
 9
10         public async  Task<IActionResult> Login()
11         {
12             var username = Request.Form["username"];
13             var password = Request.Form["password"];
14             if(username=="admin" && password == "abc123")
15             {
16                 HttpContext.Session.SetString("username", username);
17             }
18             var claimsIdentity = new ClaimsIdentity(CookieAuthenticationDefaults.AuthenticationScheme);
19             claimsIdentity.AddClaim(new Claim(ClaimTypes.Name,username));
20             claimsIdentity.AddClaim(new Claim(ClaimTypes.Role,"Admin"));
21             var claimPrincipal = new ClaimsPrincipal(claimsIdentity);
22             await HttpContext.SignInAsync(claimPrincipal);
23             return Redirect("/Home");
24         }
25
26         public async Task<IActionResult> Logout()
27         {
28             await HttpContext.SignOutAsync();
29             return Redirect("/Login");
30         }
31     }
32 }
在示例中,設置了ClaimTypes為Name和Role兩個內容,可以為後續授權使用。
5. 測試
在啟動時,由於沒有進行身份驗證,所以預設Home/Index跳轉到了Login頁面,當輸入密碼登錄後,即可進行正常跳轉,如下所示:
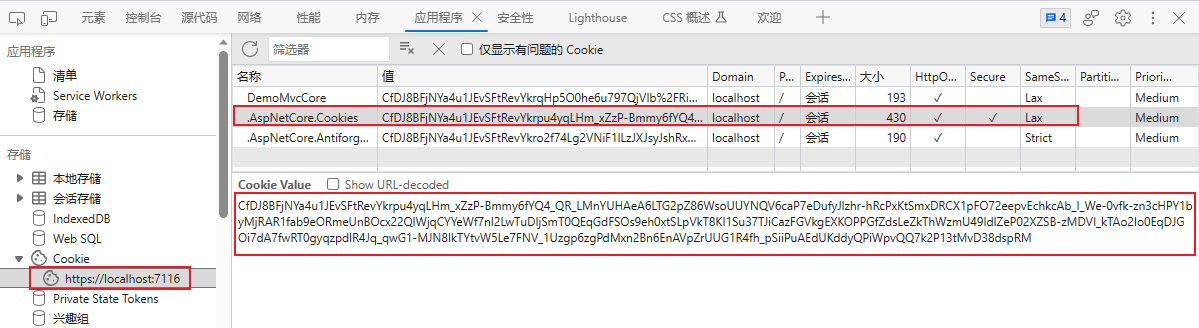
且通過F12查看開發者工具,發現多了一個Cookie信息,這就是在後續訪問的時候,都會帶上作為憑證的驗證信息。如下所示:
授權區分
在實際應用中,經常遇到有些功能是管理員許可權才有,有些許可權普通角色也可以查看。
則可以在Authorize特性中加以區分,[Authorize(Roles ="Admin,SuperAdmin")]。Authorize特性共有以幾個屬性可以設置:
 1 namespace Microsoft.AspNetCore.Authorization
 2 {
 3     //
 4     // 摘要:
 5     //     Specifies that the class or method that this attribute is applied to requires
 6     //     the specified authorization.
 7     [AttributeUsage(AttributeTargets.Class | AttributeTargets.Method, AllowMultiple = true, Inherited = true)]
 8     public class AuthorizeAttribute : Attribute, IAuthorizeData
 9     {
10         //
11         // 摘要:
12         //     Initializes a new instance of the Microsoft.AspNetCore.Authorization.AuthorizeAttribute
13         //     class.
14         public AuthorizeAttribute();
15         //
16         // 摘要:
17         //     Initializes a new instance of the Microsoft.AspNetCore.Authorization.AuthorizeAttribute
18         //     class with the specified policy.
19         //
20         // 參數:
21         //   policy:
22         //     The name of the policy to require for authorization.
23         public AuthorizeAttribute(string policy);
24
25         //
26         // 摘要:
27         //     Gets or sets the policy name that determines access to the resource.
28         public string? Policy { get; set; }
29         //
30         // 摘要:
31         //     Gets or sets a comma delimited list of roles that are allowed to access the resource.
32         public string? Roles { get; set; }
33         //
34         // 摘要:
35         //     Gets or sets a comma delimited list of schemes from which user information is
36         //     constructed.
37         public string? AuthenticationSchemes { get; set; }
38     }
39 }
以上就是ASP.NET Core MVC 從入門到精通之鑒權授權基礎的全部內容。
 作者:小六公子
出處:http://www.cnblogs.com/hsiang/
本文版權歸作者和博客園共有,寫文不易,支持原創,歡迎轉載【點贊】,轉載請保留此段聲明,且在文章頁面明顯位置給出原文連接,謝謝。
關註個人公眾號,定時同步更新技術及職場文章

