
SpringCloud系列教程 | 第五篇:熔斷監控Hystrix Dashboard和Turbine Springboot: 2.1.6.RELEASE SpringCloud: Greenwich.SR1 如無特殊說明,本系列教程全採用以上版本 Hystrix dashboard是一款針對Hys ...
SpringCloud系列教程 | 第五篇:熔斷監控Hystrix Dashboard和Turbine
Springboot: 2.1.6.RELEASE
SpringCloud: Greenwich.SR1
如無特殊說明,本系列教程全採用以上版本
Hystrix-dashboard是一款針對Hystrix進行實時監控的工具,通過Hystrix Dashboard我們可以在直觀地看到各Hystrix Command的請求響應時間, 請求成功率等數據。但是只使用Hystrix Dashboard的話, 你只能看到單個應用內的服務信息, 這明顯不夠。我們需要一個工具能讓我們彙總系統內多個服務的數據並顯示到Hystrix Dashboard上, 這個工具就是Turbine。
1. Hystrix Dashboard
創建一個新的項目hystrix-dashboard,延用上一篇文章提到的eureka和producer兩個項目。
1. hystrix-dashboard pom.xml 依賴包管理
<?xml version="1.0" encoding="UTF-8"?>
<project xmlns="http://maven.apache.org/POM/4.0.0" xmlns:xsi="http://www.w3.org/2001/XMLSchema-instance"
    xsi:schemaLocation="http://maven.apache.org/POM/4.0.0 http://maven.apache.org/xsd/maven-4.0.0.xsd">
    <modelVersion>4.0.0</modelVersion>
    <parent>
        <groupId>org.springframework.boot</groupId>
        <artifactId>spring-boot-starter-parent</artifactId>
        <version>2.1.6.RELEASE</version>
        <relativePath/> <!-- lookup parent from repository -->
    </parent>
    <groupId>com.springcloud</groupId>
    <artifactId>hystrix-dashboard</artifactId>
    <version>0.0.1-SNAPSHOT</version>
    <name>hystrix-dashboard</name>
    <description>Demo project for Spring Boot</description>

    <properties>
        <java.version>1.8</java.version>
        <spring-cloud.version>Greenwich.SR1</spring-cloud.version>
    </properties>

    <dependencies>
        <dependency>
            <groupId>org.springframework.boot</groupId>
            <artifactId>spring-boot-starter-actuator</artifactId>
        </dependency>
        <dependency>
            <groupId>org.springframework.boot</groupId>
            <artifactId>spring-boot-starter-web</artifactId>
        </dependency>
        <dependency>
            <groupId>org.springframework.cloud</groupId>
            <artifactId>spring-cloud-starter-netflix-eureka-client</artifactId>
        </dependency>
        <dependency>
            <groupId>org.springframework.cloud</groupId>
            <artifactId>spring-cloud-starter-netflix-hystrix</artifactId>
        </dependency>
        <dependency>
            <groupId>org.springframework.cloud</groupId>
            <artifactId>spring-cloud-starter-netflix-hystrix-dashboard</artifactId>
        </dependency>
        <dependency>
            <groupId>org.springframework.cloud</groupId>
            <artifactId>spring-cloud-starter-openfeign</artifactId>
        </dependency>

        <dependency>
            <groupId>org.springframework.boot</groupId>
            <artifactId>spring-boot-starter-test</artifactId>
            <scope>test</scope>
        </dependency>
    </dependencies>

    <dependencyManagement>
        <dependencies>
            <dependency>
                <groupId>org.springframework.cloud</groupId>
                <artifactId>spring-cloud-dependencies</artifactId>
                <version>${spring-cloud.version}</version>
                <type>pom</type>
                <scope>import</scope>
            </dependency>
        </dependencies>
    </dependencyManagement>

    <build>
        <plugins>
            <plugin>
                <groupId>org.springframework.boot</groupId>
                <artifactId>spring-boot-maven-plugin</artifactId>
            </plugin>
        </plugins>
    </build>

</project>
前面介紹過的包我這裡不再多說,講幾個前面沒有見過的包:
- actuator: 這個包是用來做服務監控的,很多監控相關的功能都會用到這個包,具體的內容我這裡先不講,後面會專門有一篇來講這個。
- hystrix-dashboard: 這個是今天的主角,hystrix-dashboard幫我們封裝好了hystrix的監控面板。
2. 啟動類 HystrixDashboardApplication.java
package com.springcloud.hystrixdashboard;

import com.netflix.hystrix.contrib.metrics.eventstream.HystrixMetricsStreamServlet;
import org.springframework.boot.SpringApplication;
import org.springframework.boot.autoconfigure.SpringBootApplication;
import org.springframework.boot.web.servlet.ServletRegistrationBean;
import org.springframework.cloud.client.circuitbreaker.EnableCircuitBreaker;
import org.springframework.cloud.netflix.eureka.EnableEurekaClient;
import org.springframework.cloud.netflix.hystrix.dashboard.EnableHystrixDashboard;
import org.springframework.cloud.openfeign.EnableFeignClients;
import org.springframework.context.annotation.Bean;

@SpringBootApplication
@EnableEurekaClient
@EnableFeignClients
@EnableHystrixDashboard
@EnableCircuitBreaker
public class HystrixDashboardApplication {

    public static void main(String[] args) {
        SpringApplication.run(HystrixDashboardApplication.class, args);
    }

    @Bean
    public ServletRegistrationBean getServlet(){
        HystrixMetricsStreamServlet streamServlet = new HystrixMetricsStreamServlet();
        ServletRegistrationBean registrationBean = new ServletRegistrationBean(streamServlet);
        registrationBean.setLoadOnStartup(1);
        registrationBean.addUrlMappings("/hystrix.stream");
        registrationBean.setName("HystrixMetricsStreamServlet");
        return registrationBean;
    }

}
啟動類添加啟用Hystrix Dashboard和熔斷器
註意: 各位看官這裡一定要註意,我在這裡註冊了HystrixMetricsStreamServlet,在springboot1.x版本下,這裡是無需註冊的,在2.x版本後,這裡才需要註冊HystrixMetricsStreamServlet,並且顯示的給出訪問路徑。
3. 配置文件
server:
  port: 8081
spring:
  application:
    name: spring-cloud-hystrix-dashboard
eureka:
  client:
    service-url:
      defaultZone: http://localhost:8761/eureka/
feign:
  hystrix:
    enabled: true
4. 測試
又到了測試時間,我們先把昨天的eureka和producer CV到今天的工作目錄下,順次啟動服務,HystrixDashboard最後啟動,啟動完成後我們訪問:http://localhost:8081/hystrix,將會看到如下界面:
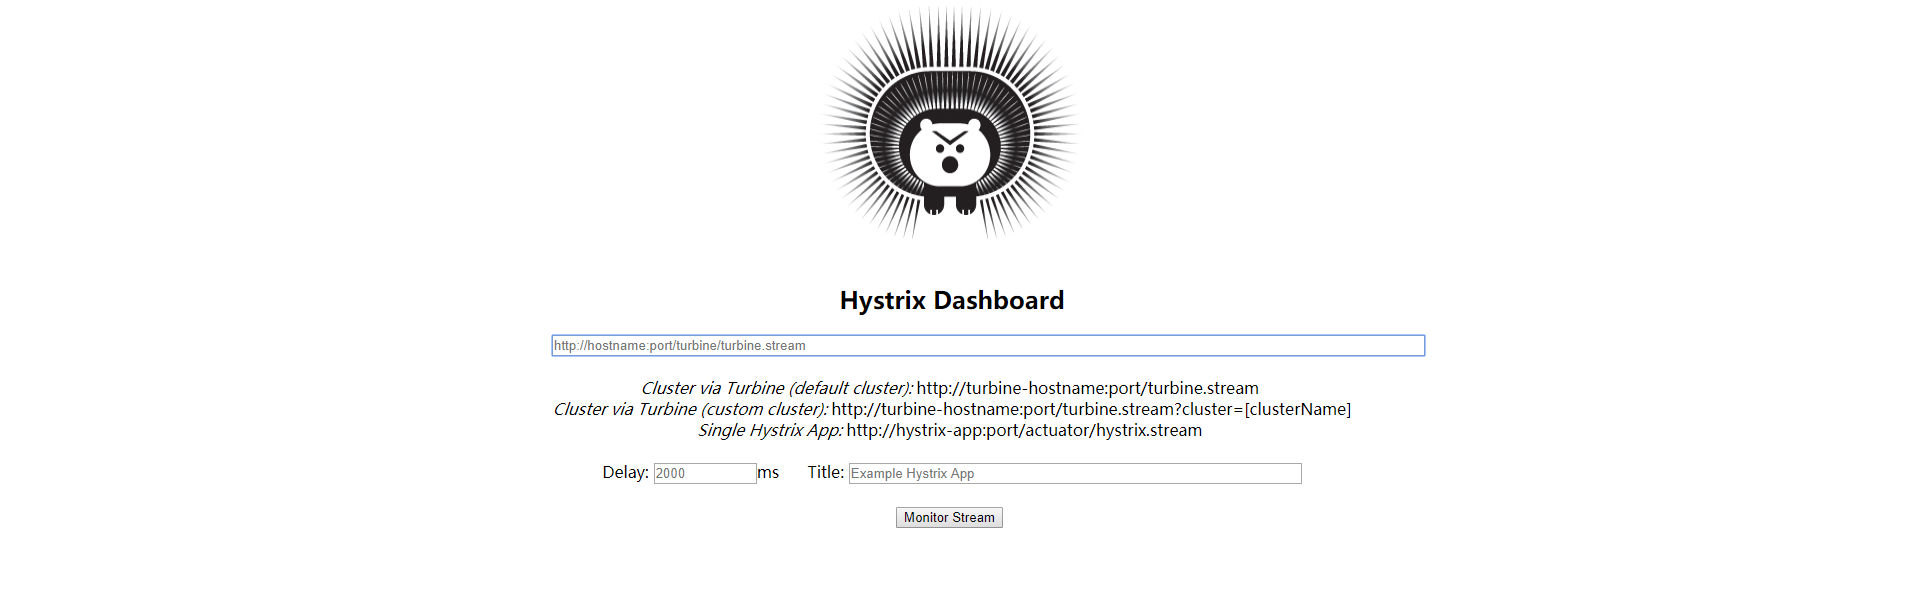
圖中會有一些提示:
Cluster via Turbine (default cluster): http://turbine-hostname:port/turbine.stream
Cluster via Turbine (custom cluster): http://turbine-hostname:port/turbine.stream?cluster=[clusterName]
Single Hystrix App: http://hystrix-app:port/hystrix.stream
大致大概意思就是如果查看預設集群使用第一個url,查看指定集群使用第二個url,單個應用的監控使用最後一個,我們暫時只演示單個應用的所以在輸入框中輸入: http://localhost:8081/hystrix.stream ,輸入之後點擊 monitor,進入頁面。
如果沒有請求會先顯示Loading ...,訪問http://localhost:8081/hystrix.stream 也會不斷的顯示ping。
我們請求一下昨天用過的鏈接:http://localhost:8081/hello/spring。
馬上就能看到統計信息了。
可以再訪問一下http://localhost:8081/hystrix.stream,顯示如下:
ping:

data: {"type":...}

data: {"type":...}
說明已經返回了監控的各項結果.
到了監控頁面就會顯示如下圖所示:
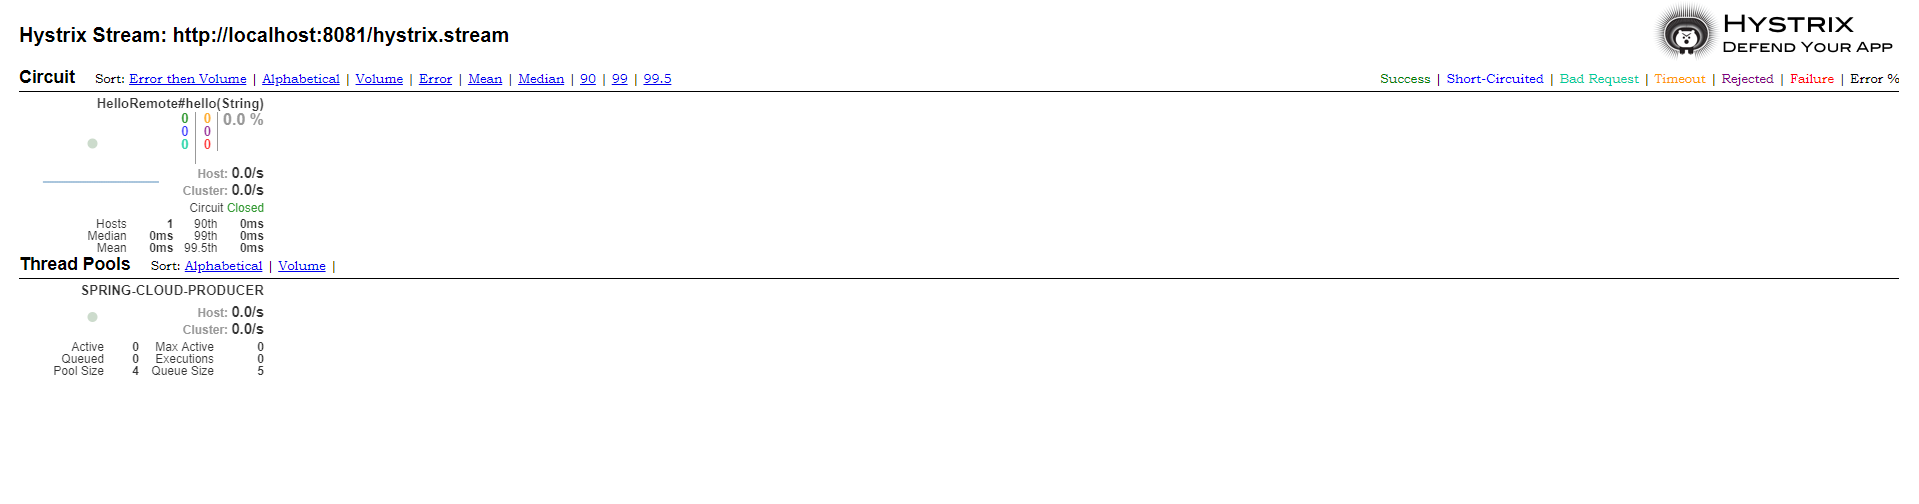
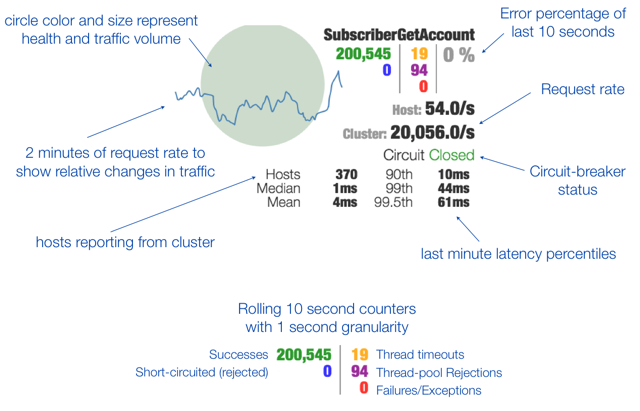
其實就是http://localhost:8081/hystrix.stream返回結果的圖形化顯示,Hystrix Dashboard Wiki上詳細說明瞭圖上每個指標的含義,如下圖:
到此單個應用的熔斷監控已經完成。
2. Turbine
在複雜的分散式系統中,相同服務的節點經常需要部署上百甚至上千個,很多時候,運維人員希望能夠把相同服務的節點狀態以一個整體集群的形式展現出來,這樣可以更好的把握整個系統的狀態。 為此,Netflix提供了一個開源項目(Turbine)來提供把多個hystrix.stream的內容聚合為一個數據源供Dashboard展示。
1. Turbine pom.xml
<?xml version="1.0" encoding="UTF-8"?>
<project xmlns="http://maven.apache.org/POM/4.0.0" xmlns:xsi="http://www.w3.org/2001/XMLSchema-instance"
    xsi:schemaLocation="http://maven.apache.org/POM/4.0.0 http://maven.apache.org/xsd/maven-4.0.0.xsd">
    <modelVersion>4.0.0</modelVersion>
    <parent>
        <groupId>org.springframework.boot</groupId>
        <artifactId>spring-boot-starter-parent</artifactId>
        <version>2.1.6.RELEASE</version>
        <relativePath/> <!-- lookup parent from repository -->
    </parent>
    <groupId>com.springcloud</groupId>
    <artifactId>turbine</artifactId>
    <version>0.0.1-SNAPSHOT</version>
    <name>turbine</name>
    <description>Demo project for Spring Boot</description>

    <properties>
        <java.version>1.8</java.version>
        <spring-cloud.version>Greenwich.SR1</spring-cloud.version>
    </properties>

    <dependencies>
        <dependency>
            <groupId>org.springframework.boot</groupId>
            <artifactId>spring-boot-starter-actuator</artifactId>
        </dependency>
        <dependency>
            <groupId>org.springframework.cloud</groupId>
            <artifactId>spring-cloud-starter-netflix-hystrix-dashboard</artifactId>
        </dependency>
        <dependency>
            <groupId>org.springframework.cloud</groupId>
            <artifactId>spring-cloud-starter-netflix-turbine</artifactId>
        </dependency>

        <dependency>
            <groupId>org.springframework.boot</groupId>
            <artifactId>spring-boot-starter-test</artifactId>
            <scope>test</scope>
        </dependency>
    </dependencies>

    <dependencyManagement>
        <dependencies>
            <dependency>
                <groupId>org.springframework.cloud</groupId>
                <artifactId>spring-cloud-dependencies</artifactId>
                <version>${spring-cloud.version}</version>
                <type>pom</type>
                <scope>import</scope>
            </dependency>
        </dependencies>
    </dependencyManagement>

    <build>
        <plugins>
            <plugin>
                <groupId>org.springframework.boot</groupId>
                <artifactId>spring-boot-maven-plugin</artifactId>
            </plugin>
        </plugins>
    </build>

</project>
2. 配置文件
server:
  port: 8888
spring:
  application:
    name: hystrix-dashboard-turbine
turbine:
  app-config: node01,node02
  aggregator:
    cluster-config: default
  cluster-name-expression: new String("default")
  combine-host-port: true
eureka:
  client:
    service-url:
      defaultZone: http://localhost:8761/eureka/
- turbine.appConfig: 配置Eureka中的serviceId列表,表明監控哪些服務
- turbine.aggregator.clusterConfig: 指定聚合哪些集群,多個使用”,”分割,預設為default。可使用http://.../turbine.stream?cluster={clusterConfig之一}訪問
- turbine.clusterNameExpression: 1. clusterNameExpression指定集群名稱,預設表達式appName;此時:turbine.aggregator.clusterConfig需要配置想要監控的應用名稱;2. 當clusterNameExpression: default時,turbine.aggregator.clusterConfig可以不寫,因為預設就是default;3. 當clusterNameExpression: metadata[‘cluster’]時,假設想要監控的應用配置了eureka.instance.metadata-map.cluster: ABC,則需要配置,同時turbine.aggregator.clusterConfig: ABC
3. 啟動類
啟動類添加@EnableTurbine,激活對Turbine的支持
package com.springcloud.turbine;

import org.springframework.boot.SpringApplication;
import org.springframework.boot.autoconfigure.SpringBootApplication;
import org.springframework.cloud.netflix.hystrix.dashboard.EnableHystrixDashboard;
import org.springframework.cloud.netflix.turbine.EnableTurbine;

@SpringBootApplication
@EnableHystrixDashboard
@EnableTurbine
public class TurbineApplication {

    public static void main(String[] args) {
        SpringApplication.run(TurbineApplication.class, args);
    }

}
4. 創建消費者集群
將昨天的消費者copy2份到今天的文件路徑下,修改名稱為consumers-node01,consumers-node02
增加依賴包
<dependency>
    <groupId>org.springframework.cloud</groupId>
    <artifactId>spring-cloud-starter-netflix-hystrix-dashboard</artifactId>
</dependency>
啟動類增加HystrixMetricsStreamServlet註冊
package com.springcloud.consumers;

import com.netflix.hystrix.contrib.metrics.eventstream.HystrixMetricsStreamServlet;
import org.springframework.boot.SpringApplication;
import org.springframework.boot.autoconfigure.SpringBootApplication;
import org.springframework.boot.web.servlet.ServletRegistrationBean;
import org.springframework.cloud.netflix.eureka.EnableEurekaClient;
import org.springframework.cloud.openfeign.EnableFeignClients;
import org.springframework.context.annotation.Bean;

@SpringBootApplication
@EnableEurekaClient
@EnableFeignClients
public class ConsumersApplication {

    public static void main(String[] args) {
        SpringApplication.run(ConsumersApplication.class, args);
    }

    @Bean
    public ServletRegistrationBean getServlet(){
        HystrixMetricsStreamServlet streamServlet = new HystrixMetricsStreamServlet();
        ServletRegistrationBean registrationBean = new ServletRegistrationBean(streamServlet);
        registrationBean.setLoadOnStartup(1);
        registrationBean.addUrlMappings("/actuator/hystrix.stream");
        registrationBean.setName("HystrixMetricsStreamServlet");
        return registrationBean;
    }
}
註意: 這裡註冊的HystrixMetricsStreamServlet訪問路徑是"/actuator/hystrix.stream",這是因為Turbine預設訪問的是這個路徑。
兩個配置文件大家自行修改啟動埠號,spring.application.name分別修改為node01和node02
5. 測試
現在依次啟動註冊中心,兩個消費者和Turbine,順次訪問兩個消費者,並訪問 http://localhost:8888/turbine.stream, 會返回和上面一樣的一穿ping的信息。
並且會不斷刷新以獲取實時的監控數據,說明和單個的監控類似,返回監控項目的信息。
進行圖形化監控查看,輸入:http://localhost:8888/hystrix,返回酷酷的小熊界面,輸入: http://localhost:8888/turbine.stream,然後點擊 Monitor Stream ,可以看到出現了倆個監控列表(這是理論情況)
註意,這裡本地環境無法測試成功,本地環境只能顯示一個服務,Turbine日誌中會報錯
你的主機中的軟體中止了一個已建立的連接。
原因目前不明,已經在github上提Issues。

