JQuery --- 第三期 (jQuery事件相關)

来源:https://www.cnblogs.com/cnmoti/archive/2019/04/24/10762293.html
-Advertisement-
Play Games

個人學習筆記 1.JQuery事件綁定 2.JQuery事件解綁 3.JQuery事件冒泡和預設行為和事件的自動觸發 4.JQuery自定義事件 5.JQuery事件的命名空間 6.JQuery事件委托 7.JQuery事件委托練習 8.JQuery的事件移入和移出 9.移入移出練習一 10.移入移 ...


個人學習筆記

1.JQuery事件綁定

<!DOCTYPE html>
<html lang="en">
<head>
    <meta charset="UTF-8">
    <title>JQuery事件綁定</title>
    <script src="../jquery-1.12.4.js"></script>
        <script>
                $(function () {
                    alert("hello");
                    //  JQuery中有兩種綁定方式
                    /**
                     * 1. eventName(fn)
                     * 編碼效率略高,但是部分時間JQuery沒有實現,所以不能實現
                     * 可以為元素綁定多個相同或不相同的事件,事件之間不會相互覆蓋
                     */
                    $(".button1").click(function () {
                        alert("click1");
                    });
                    $(".button1").click(function () {
                        alert("click2");
                    });
                    $(".button2").mouseenter(function () {
                        alert("mouseenter");
                    });
                    $(".button2").mouseleave(function () {
                        alert("mouseleave");
                    });
                    /**
                     * 2. on(eventName,fn)
                     *  編碼效率略低,但是所有js事件都可以添加
                     *  可以為元素綁定多個相同或不相同的事件,事件之間不會相互覆蓋
                     */
                    $(".button3").on("click",function () {
                        alert("click3");
                    });
                    $(".button3").on("click",function () {
                        alert("click4");
                    });
                    $(".button4").on("mouseenter",function () {
                        alert("mouseenter");
                    });
                    $(".button4").on("mouseleave",function () {
                        alert("mouseleave");
                    });
                });
        </script>
</head>
<body>
<button class="button1">按鈕1</button>
<button class="button2">按鈕2</button>
<button class="button3">按鈕3</button>
<button class="button4">按鈕4</button>
</body>
</html>

2.JQuery事件解綁

<!DOCTYPE html>
<html lang="en">
<head>
    <meta charset="UTF-8">
    <title>事件解綁</title>
    <script src="../jquery-1.12.4.js"></script>
        <script>
                $(function () {

                    function click1() {
                        alert("click1");
                    };
                    function click2() {
                        alert("click2");
                    };
                    function mouseenter1() {
                        alert("mouseenter");
                    };
                    function mouseleave1() {
                        alert("mouseleave");
                    };

                    $(".button1").click(click1);
                    $(".button1").click(click2);
                    $(".button2").mouseenter(mouseenter1);
                    $(".button2").mouseleave(mouseleave1);
                    //移除事件
                    /**
                     * 適用off方法進行事件移除
                     * 如果不傳遞任何參數,則會移除全部事件
                     */
                    $(".button2").off();
                    /**
                     * 如果傳遞一個參數,則會移除這一類事件
                     */
                    $(".button1").off("click");
                    /**
                     * 如果傳遞兩個參數,則會移除這類事件的某個事件
                     */
                    $(".button1").off("click",click1);

                });
        </script>
</head>
<body>
<button class="button1">按鈕1</button>
<button class="button2">按鈕2</button>
</body>
</html>

3.JQuery事件冒泡和預設行為和事件的自動觸發

<!DOCTYPE html>
<html lang="en">
<head>
    <meta charset="UTF-8">
    <title>JQuery事件冒泡和預設行為和事件的自動觸發</title>
    <style>
        *{
            margin: 0;
            padding: 0;
        }
        .father{
            width: 200px;
            height: 200px;
            background: green;
        }
        .son{
            width: 100px;
            height: 100px;
            background: blue;
        }
    </style>
        <script src="../jquery-1.12.4.js"></script>
        <script>
                $(function () {
                    /*
                    什麼是事件冒泡
                    怎樣阻止事件冒泡
                    什麼是預設行為
                    怎樣阻止預設行為
                     */
                    $(".father").click(function () {
                        alert("father");
                    });
                    $(".son").click(function (event) {
                        alert("son");
                        // return false;//阻止事件冒泡 方法一
                        // event.stopPropagation();//阻止事件冒泡 方法二
                    });
                    $(".a").click(function (event) {
                        alert("阻止跳轉!");
                        // return false;//阻止預設事件 方法一
                        event.preventDefault();
                    });
                    $(".sub").click(function (event) {
                        alert("阻止跳轉!");
                        // return false;//阻止預設事件 方法一
                        event.preventDefault();
                    });
                    /**
                     * 自動觸發事件,方法一,觸發事件的同時會觸發冒泡事件或者預設行為
                     * 特別的,當想將a標簽設置自動觸發和觸發預設事件的時候,需要在a中將a的內容進行包裹,然後觸發a的內容
                     */
                    $(".son").trigger("click");
                    /**
                     * 自動觸發事件,方法二,觸發事件的同時不會觸發冒泡事件或者預設行為
                     */
                    $(".son").triggerHandler("click");
                });
        </script>
</head>
<body>
<div class="father">
    <div class="son"></div>
</div>
<a href="http://www.baidu.com" class="a">我是百度</a>
<form action="http://www.taobao.com">
    <input type="text">
    <input type="submit" class="sub">
</form>
</body>
</html>

4.JQuery自定義事件

<!DOCTYPE html>
<html lang="en">
<head>
    <meta charset="UTF-8">
    <title>JQuery自定義事件</title>
        <script src="../jquery-1.12.4.js"></script>
        <script>
                $(function () {
                    /**
                     * 自定義事件必須滿足兩個條件
                     *      1.事件必須是通過on綁定的
                     *      2.事件必須通過trigger來觸發(必須設置為trigger方式的自動觸發)
                     */
                    $("button").on("myClick", function () {
                        alert("myClick");
                    });
                    $("button").trigger("myClick");
                });
        </script>
</head>
<body>
<button>按鈕</button>
</body>
</html>

5.JQuery事件的命名空間

<!DOCTYPE html>
<html lang="en">
<head>
    <meta charset="UTF-8">
    <title>JQuery事件的命名空間</title>
        <script src="../jquery-1.12.4.js"></script>
        <script>
                $(function () {
                    /**
                     * 想要事件的命名空間有效,必須滿足兩個條件
                     *      1.事件是通過on來綁定
                     *      2.通過trigger或者triggerHandler來觸發事件
                     *
                     *      註意
                     *          1.利用trigger觸發子元素的帶命名空間的事件,那麼父元素帶相同命名空間的事件也會被觸發,而父元素
                     *              沒有帶命名空間的事件不會被觸發
                     *          2.利用trigger觸發子元素不帶命名空間的事件,那麼子元素所有相同類型的事件和父元素所有相同類型的
                     *              事件都會被觸發(不管帶不帶命名空間)
                     */
                    $("button").on("click.xw", function () {
                        alert("click1");
                    });
                    $("button").on("click.moti", function () {
                        alert("click2");
                    });
                    // $("button").trigger("click.xw");
                    $("button").trigger("click.moti");
                });
        </script>
</head>
<body>
<button>按鈕</button>
</body>
</html>

6.JQuery事件委托

<!DOCTYPE html>
<html lang="en">
<head>
    <meta charset="UTF-8">
    <title>JQuery事件委托</title>
        <script src="../jquery-1.12.4.js"></script>
        <script>
                $(function () {
                    /*
                    什麼是事件委托?
                         請別人幫忙,然後將做完的結果反饋給我們
                     */
                    $("button").click(function () {
                        $("ul").append("<li>我是新增的li</li>");
                    });
                    /**
                     * 在JQuery中,如果通過核心函數找到的元素不止一個,那麼在添加事件的時候,JQuery會遍歷所有找的元素
                     * 給所有找到的元素添加事件
                     * 找不到新增的li,無法添加事件
                     */
                    // $("ul>li").click(function () {
                    //     console.log($(this).html());
                    // });
                    /**
                     * 使用事件委托:找到一個在入口函數執行之前就有的元素來監聽動態添加元素的某些事件
                     * 有事件冒泡的原理
                     */
                    $("ul").delegate("li","click",function () {
                        console.log($(this).html());
                    });
                });
        </script>
</head>
<body>
<ul>
    <li>我是第1個li</li>
    <li>我是第2個li</li>
    <li>我是第3個li</li>
</ul>
<button>新增li</button>
</body>
</html>

7.JQuery事件委托練習

<!DOCTYPE html>
<html lang="en">
<head>
    <meta charset="UTF-8">
    <title>JQuery事件委托練習</title>
    <style>
        *{
            margin: 0;
            padding: 0;
        }
        html,body{
            width: 100%;
            height: 100%;

        }
        .mask{
            width: 100%;
            height: 100%;
            position: fixed;
            top: 0;
            left: 0;
            background: rgba(0,0,0,0.5);
        }
        .login{
            width: 400px;
            height: 300px;
            margin: 100px auto;
            background: green;
            position: relative;
        }
        .p{
            padding-top: 20%;
            font-size: 58px;
        }
        button {
            position: absolute;
            width: 50px;
            height: 30px;
            right: 0;
            top: 0;
            background: red;
        }
    </style>
        <script src="../jquery-1.12.4.js"></script>
        <script>
                $(function () {
                    $("a").click(function () {
                        var $mask = $("<div class=\"mask\">\n" +
                            "    <div class=\"login\">\n" +
                            "        <button>關閉</button>\n" +
                            "        <p class=\"p\">HELLO!</p>\n" +
                            "    </div>\n" +
                            "</div>");
                        $("body").append($mask);
                        $("body").delegate(".login>button", "click",function () {
                            $mask.remove();
                        });
                        return false;
                    });
                });
        </script>
</head>
<body>
<a href="http://www.baidu.com">點擊登錄</a>
</body>
</html>

8.JQuery的事件移入和移出

<!DOCTYPE html>
<html lang="en">
<head>
    <meta charset="UTF-8">
    <title>JQuery事件的移入和移除</title>
        <script src="../jquery-1.12.4.js"></script>
        <script>
                $(function () {
                    /*
                        1.mouseover/mouseover
                          註意:子元素被移入和移除也會觸發父元素事件
                     */
                    $(".father").mouseover(function () {
                        console.log("father被移入了");
                    });
                    $(".father").mouseover(function () {
                        console.log("father被移出了");
                    });
                    /*
                        2.mouseenter/mouseleave(推薦使用)
                          註意:子元素被移入和移除不會會觸發父元素事件
                     */
                    $(".father").mouseenter(function () {
                        console.log("father被移入了");
                    });
                    $(".father").mouseleave(function () {
                        console.log("father被移出了");
                    });
                    /**
                     * 3.hover方法
                     * 註意:子元素被移入和移除不會會觸發父元素事件
                     *   接收兩個方法參數:
                     *           第一個參數是被移入的時候執行的回調函數
                     *           第二個參數是被移出的時候執行的回調函數
                     */
                    $(".father").hover(function () {
                        console.log("father被移入了");
                    },function () {
                        console.log("father被移出了");
                    });
                    /**
                     * 接收一個方法參數:同時監聽移入和移出,執行相同的回調函數
                     */
                    $(".father").hover(function () {
                        console.log("被移入或者移出了!");
                    });
                });
        </script>
        <style>
            *{
                margin: 0;
                padding: 0;
            }
            .father{
                width: 200px;
                height: 200px;
                background: red;
            }
            .son{
                width: 100px;
                height: 100px;
                background: blue;
            }
        </style>
</head>
<body>
<div class="father">
    <div class="son"></div>
</div>
</body>
</html>

9.移入移出練習一

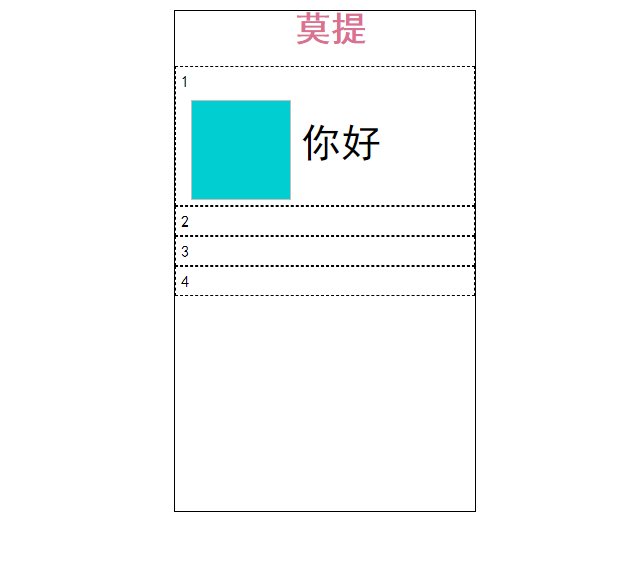
<!DOCTYPE html>
<html lang="en">
<head>
    <meta charset="UTF-8">

    <title>JQuery事件移入移出練習</title>
        <script src="../jquery-1.12.4.js"></script>
        <script>
                $(function () {
                    $("li").hover(function () {
                        $(this).addClass("current");
                    },function () {
                        $(this).removeClass("current");
                    });
                });
        </script>
    <style>
        *{
            margin: 0;
            padding: 0;
        }
        .box{
            margin: 50px auto;
            width: 300px;
            height: 500px;
            border: 1px solid #000;
        }
        .box>h1{
            font-size: 35px;
            line-height: 35px;
            color: palevioletred;
            padding-left: 120px;
        }
        ul{
            margin-top: 20px;
        }
        ul>li{
            list-style: none;
            padding: 5px 5px;
            border: 1px dashed #000;
        }
        .content>img{
            width: 100px;
            height: 100px;
            background: darkturquoise;
            float: left;
            margin-top: 10px;
            margin-right: 10px;
            margin-left: 10px;
        }
        .content>p{
            font-size: 40px;
            margin-top: 30px;
        }
        .content{
            overflow: hidden;
            display: none;
        }
        .current>div{
            display: block;
        }
    </style>
</head>
<body>
    <div class="box">
        <h1>莫提</h1>
        <ul>
            <li>1
            <div class="content">
                <img /> <p>Hello</p>
            </div>
            </li>
            <li>2
                <div class="content">
                    <img /> <p>Hello</p>
                </div>
            </li>
            <li>3
                <div class="content">
                    <img /> <p>Hello</p>
                </div>
            </li>
            <li>4
                <div class="content">
                    <img /> <p>Hello</p>
                </div>
            </li>
        </ul>
    </div>
</body>
</html>

10.移入移出練習二

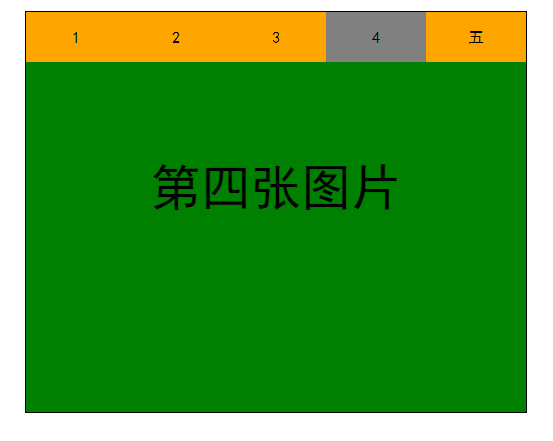
<!DOCTYPE html>
<html lang="en">
<head>
    <meta charset="UTF-8">
    <title>JQuery事件移入移出練習2</title>
        <script src="../jquery-1.12.4.js"></script>
        <script>
                /*
                    第一種方法,效果不好,推薦用第二種方法
                 */
                // $(function () {
                //     $(".nav>li").hover(function () {
                //         $(this).addClass("current");
                //         var indexIn =$(this).index();
                //         $(".content>li").eq(indexIn).addClass("show");
                //     },function () {
                //         $(this).removeClass("current");
                //          var indexOut =$(this).index();
                //         $(".content>li").eq(indexOut).removeClass("show");
                //     });
                // });

                /*
                    第二種方法,使用siblings方法,獲得沒有被選中的同級別的其他元素
                 */
                $(function () {
                    $(".nav>li").mouseenter(function () {
                        $(this).addClass("current");
                        $(this).siblings().removeClass("current");
                        $(".content>li").eq($(this).index()).addClass("show");
                        $(".content>li").eq($(this).index()).siblings().removeClass("show");
                    });
                });
        </script>
    <style>
        *{
            margin: 0;
            padding: 0;
        }
        .box{
            width: 500px;
            height: 400px;
            border: 1px solid #000;
            margin: 50px auto;
        }
        .nav>li{
            width: 100px;
            height: 50px;
            list-style: none;
            text-align: center;
            line-height: 50px;
            float: left;
            background: orange;
        }
        .nav>.current{
            background: gray;
        }
        .content>li{
            background: green;
            width: 500px;
            height: 400px;
            list-style: none;
            display: none;
        }
        .content>.show{
            display: block;
        }
        .content>li>p{
            text-align: center;
            font-size: 50px;
            line-height: 250px;
        }
    </style>
</head>
<body>
<div class="box">
    <ul class="nav">
        <li class="current">1</li>
        <li>2</li>
        <li>3</li>
        <li>4</li>
        <li>5</li>
    </ul>
    <ul class="content">
        <li class="show"><p>第一張圖片</p></li>
        <li><p>第二張圖片</p></li>
        <li><p>第三張圖片</p></li>
        <li><p>第四張圖片</p></li>
        <li><p>第五張圖片</p></li>
    </ul>
</div>
</body>
</html>

您的分享是我們最大的動力!

-Advertisement-
Play Games
更多相關文章
  • **1、margin塌陷**問題:垂直方向的父子關係的盒子使用不當會產生margin塌陷。給子級設置margin-top時,他不會相對父級一起動,只有他的margin超過父級的margin時,才會生效,但會帶著父級一起動(作者總結,官方定義自己查看)。如: ```<!DOCTYPE html><ht ...
  • 最近做項目,移動端的多文件上傳,使用input:file讀取文件 但是在移動端 設置 multiple 屬性是不起作用的,設置此屬性PC端可以多選而移動端無法多選。 我使用的解決方案是動態添加 input:file標簽。,每添加一個標簽就出發一次click事件讀取文件。然後選擇相片並且將相片顯示在頁 ...
  • 獲取元素 getElementById() getElementsByClass() getElementsByTagName getElementsByName node屬性 前、後、父、子 previousSibling nextSibling parentNode childNode chil ...
  • WordPress的打開速度慢會影響到用戶體驗和關鍵詞的穩定排名,WordPress為什麼載入慢呢?其實很簡單的,就是WordPress水土不服,用WordPress的大家都知道,WordPress是外國人開發的,在國內用肯定會卡的,今天筆者給大家整理了幾個解決各種WordPress慢的慢的問題,希 ...
  • span設置部分省略...: span{ overflow: hidden; text-overflow: ellipsis; -o-text-overflow: ellipsis; white-space:nowrap; width:240px; height:24px; display:bloc ...
  • 1,如何將JS中ajax的非同步請求改為同步? Ajax請求預設的都是非同步的 如果想同步 async設置為false就可以(預設是true) var html = $.ajax({ url: "some.PHP", async: false }).responseText; 或者在全局設置Ajax屬性 ...
  • 今天我們來摺紙飛機(可以飛出去的那種哦) 基本全用css來實現,只有一小部分的js 首先看一下飛機的構造 灰色區域為可摺疊區域 白色區域為機身 三角形由border畫出來的再經過各種平移翻轉變成上圖 寫之前再補充個知識點: 我們顏色的設置不用rgba, 用hsl() h: 色調 0- 360 0(或 ...
  • 瀏覽器支持兩種類型的漸變:線性漸變 (linear-gradient),徑向漸變 (radial-gradient) 漸變在 CSS 中屬於一種 Image 類型,可以結合 background-image 屬性使用 和圖片不同的是,漸變不需要引入,而是由代碼直接生成的,所以比圖片更高效易用 一、簡 ...
一周排行
    -Advertisement-
    Play Games
  • 移動開發(一):使用.NET MAUI開發第一個安卓APP 對於工作多年的C#程式員來說,近來想嘗試開發一款安卓APP,考慮了很久最終選擇使用.NET MAUI這個微軟官方的框架來嘗試體驗開發安卓APP,畢竟是使用Visual Studio開發工具,使用起來也比較的順手,結合微軟官方的教程進行了安卓 ...
  • 前言 QuestPDF 是一個開源 .NET 庫,用於生成 PDF 文檔。使用了C# Fluent API方式可簡化開發、減少錯誤並提高工作效率。利用它可以輕鬆生成 PDF 報告、發票、導出文件等。 項目介紹 QuestPDF 是一個革命性的開源 .NET 庫,它徹底改變了我們生成 PDF 文檔的方 ...
  • 項目地址 項目後端地址: https://github.com/ZyPLJ/ZYTteeHole 項目前端頁面地址: ZyPLJ/TreeHoleVue (github.com) https://github.com/ZyPLJ/TreeHoleVue 目前項目測試訪問地址: http://tree ...
  • 話不多說,直接開乾 一.下載 1.官方鏈接下載: https://www.microsoft.com/zh-cn/sql-server/sql-server-downloads 2.在下載目錄中找到下麵這個小的安裝包 SQL2022-SSEI-Dev.exe,運行開始下載SQL server; 二. ...
  • 前言 隨著物聯網(IoT)技術的迅猛發展,MQTT(消息隊列遙測傳輸)協議憑藉其輕量級和高效性,已成為眾多物聯網應用的首選通信標準。 MQTTnet 作為一個高性能的 .NET 開源庫,為 .NET 平臺上的 MQTT 客戶端與伺服器開發提供了強大的支持。 本文將全面介紹 MQTTnet 的核心功能 ...
  • Serilog支持多種接收器用於日誌存儲,增強器用於添加屬性,LogContext管理動態屬性,支持多種輸出格式包括純文本、JSON及ExpressionTemplate。還提供了自定義格式化選項,適用於不同需求。 ...
  • 目錄簡介獲取 HTML 文檔解析 HTML 文檔測試參考文章 簡介 動態內容網站使用 JavaScript 腳本動態檢索和渲染數據,爬取信息時需要模擬瀏覽器行為,否則獲取到的源碼基本是空的。 本文使用的爬取步驟如下: 使用 Selenium 獲取渲染後的 HTML 文檔 使用 HtmlAgility ...
  • 1.前言 什麼是熱更新 游戲或者軟體更新時,無需重新下載客戶端進行安裝,而是在應用程式啟動的情況下,在內部進行資源或者代碼更新 Unity目前常用熱更新解決方案 HybridCLR,Xlua,ILRuntime等 Unity目前常用資源管理解決方案 AssetBundles,Addressable, ...
  • 本文章主要是在C# ASP.NET Core Web API框架實現向手機發送驗證碼簡訊功能。這裡我選擇是一個互億無線簡訊驗證碼平臺,其實像阿裡雲,騰訊雲上面也可以。 首先我們先去 互億無線 https://www.ihuyi.com/api/sms.html 去註冊一個賬號 註冊完成賬號後,它會送 ...
  • 通過以下方式可以高效,並保證數據同步的可靠性 1.API設計 使用RESTful設計,確保API端點明確,並使用適當的HTTP方法(如POST用於創建,PUT用於更新)。 設計清晰的請求和響應模型,以確保客戶端能夠理解預期格式。 2.數據驗證 在伺服器端進行嚴格的數據驗證,確保接收到的數據符合預期格 ...