
為了防止服務消費鏈(多級服務之間的調用)上因某個服務出現故障,而導致級聯故障,進而造成整個系統不可用(簡稱為:雪崩效應),推出了熔斷、降級的處理方式:Hystrix斷路器(類似生活中電路保險絲)來解決這些潛在問題。 熔斷、降級是兩個概念,網上也有很多相關的說明,我這裡簡單通俗說明一下: 熔斷:當服務 ...
為了防止服務消費鏈(多級服務之間的調用)上因某個服務出現故障,而導致級聯故障,進而造成整個系統不可用(簡稱為:雪崩效應),推出了熔斷、降級的處理方式:Hystrix斷路器(類似生活中電路保險絲)來解決這些潛在問題。
熔斷、降級是兩個概念,網上也有很多相關的說明,我這裡簡單通俗說明一下:
熔斷:當服務消費鏈上,下游服務因訪問壓力過大而出現響應變慢或失敗不可用,上游服務為了保護系統整體的可用性(避免無效重試及長時等待等情況),可以暫時切斷對下游服務的調用,直接快速返回錯誤的響應信息,當檢測到該下游服務節點調用響應正常後再恢復消費鏈路。這個過程可以通過如下圖形象說明:(圖片來自http://www.ityouknow.com/springcloud/2017/05/16/springcloud-hystrix.html,文中也有說明)
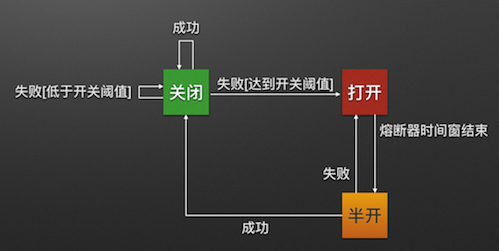
熔斷關閉狀態(Closed):服務沒有故障時,熔斷器所處的狀態,對調用方的調用不做任何限制。
熔斷開啟狀態(Open):在固定時間視窗內(Hystrix預設是10秒),介面調用出錯比率達到一個閾值(Hystrix預設為50%),會進入熔斷開啟狀態。進入熔斷狀態後,後續對該服務介面的調用不再經過網路,直接執行本地的fallback方法。
半熔斷(半開啟)狀態(Half-Open):在進入熔斷開啟狀態一段時間之後(Hystrix預設是5秒),熔斷器會進入半熔斷狀態。所謂半熔斷就是嘗試恢復服務調用,允許有限的流量調用該服務,並監控調用成功率。如果成功率達到預期,則說明服務已恢復,進入熔斷關閉狀態;如果成功率仍舊很低,則重新進入熔斷關閉狀態。
降級:降低服務標準以滿足核心重要服務正常運轉,詳情的說明請參見:https://blog.51cto.com/8132260/2133705
Hystrix是什麼,具體工作原理請參見:Netflix Hystrix斷路器簡介與工作原理
Tips:我們在項目中經常需要添加很多的maven依賴,依賴組件(或稱類庫)的名字可能各不相同,我們可以通過如下方式查詢相關的maven依賴包及其依賴包本身的內部依賴詳情
一、搭建服務消費者項目,並集成 Hystrix環境
請參見上篇《玩轉Spring Cloud之服務註冊發現(eureka)及負載均衡消費(ribbon、feign)》搭建註冊中心,服務提供者,服務消費者,本文仍然使用上篇文章中所創建的服務消費者demo項目:eurekaclientconsumer
1.1.在POM XML中添加Hystrix依賴(spring-cloud-starter-netflix-hystrix),配置如下:
<!-- 這裡dependencyManagement附帶貼出來,目的是說明如果不輸version,想實現依賴繼承,就需要這個,如果PMO中已經有則可不必再重覆添加-->
<dependencyManagement>
        <dependencies>
            <dependency>
                <groupId>org.springframework.cloud</groupId>
                <artifactId>spring-cloud-dependencies</artifactId>
                <version>${spring-cloud.version}</version>
                <type>pom</type>
                <scope>import</scope>
            </dependency>
        </dependencies>
    </dependencyManagement>

        <dependency>
            <groupId>org.springframework.cloud</groupId>
            <artifactId>spring-cloud-starter-netflix-hystrix</artifactId>
        </dependency>
1.2.採用Ribbon + Hystrix的方式,在spring boot啟動類(EurekaclientconsumerApplication)上添加@EnableHystrix,並修改遠程服務調用類(HelloService),在相應的方法中添加@HystrixCommand註解並配置相關參數,具體實現代碼如下:
//spring boot啟動類:

package cn.zuowenjun.cloud;

import org.springframework.boot.SpringApplication;
import org.springframework.boot.autoconfigure.SpringBootApplication;
import org.springframework.cloud.client.circuitbreaker.EnableCircuitBreaker;
import org.springframework.cloud.client.discovery.EnableDiscoveryClient;
import org.springframework.cloud.client.loadbalancer.LoadBalanced;
import org.springframework.cloud.netflix.hystrix.EnableHystrix;
import org.springframework.cloud.openfeign.EnableFeignClients;
import org.springframework.context.annotation.Bean;
import org.springframework.web.client.RestTemplate;

@EnableHystrix
@EnableDiscoveryClient
@SpringBootApplication
class EurekaclientconsumerApplication {

    public static void main(String[] args) {
        SpringApplication.run(EurekaclientconsumerApplication.class, args);
    }

    @LoadBalanced
    @Bean
    public RestTemplate restTemplate(){
        return  new RestTemplate();
    }

}


//HelloService:遠程服務調用類

package cn.zuowenjun.cloud.service;


import com.netflix.hystrix.contrib.javanica.annotation.HystrixCommand;
import com.netflix.hystrix.contrib.javanica.annotation.HystrixProperty;
import org.springframework.beans.factory.annotation.Autowired;
import org.springframework.beans.factory.annotation.Value;
import org.springframework.stereotype.Service;
import org.springframework.web.client.RestTemplate;

import java.util.HashMap;
import java.util.Map;

@Service
public class HelloService {

    @Autowired
    private RestTemplate restTemplate;

    @Value("${spring.application.helloServiceProvider}")
    private String  helloServiceName;

    @HystrixCommand(fallbackMethod = "multiplyFallback",
            commandProperties ={
                    @HystrixProperty(name = "execution.isolation.strategy", value = "SEMAPHORE"),
                    @HystrixProperty(name = "execution.isolation.semaphore.maxConcurrentRequests", value = "3")
            } )
    public Object multiply(int a,int b){
        String url="http://"+ helloServiceName +"/multiply/" + a +"/" + b;
        return restTemplate.getForObject(url,String.class);

//        throw new RuntimeException("consumer exception");
    }

    private  Object multiplyFallback(int x,int y,Throwable e){

        //TODO:額外增加的Throwable e,以便可以根據throwable的不同執行不同的邏輯
        Map<String,Object> result=new HashMap<String, Object>();
        result.put("from","multiply Fallback method");
        result.put("a",x);
        result.put("b",y);
        result.put("ex",e.getMessage());

        return  result;

    }


}
如上代碼,我先屏蔽掉了有關Feign的相關配置及代碼(其實可以相容並存,這裡只是為了大家好理解才去掉的),然後啟動類添加了@EnableHystrix、遠程服務類相關方法添加@HystrixCommand,並設置相關參數,其中fallbackMethod是比較重要的,它指示當出現熔斷後降級回調的方法名(註意該方法需與被標註@HystrixCommand介面方法簽名相同,但如果需要根據異常情況執行不同的降級處理邏輯則可如demo中multiplyFallback額外添加一個Throwable 參數),commandProperties是比較複雜的,可以包含很多的設置,如代碼中設置了資源隔離方式為信號量並指定併發請求數,更多參數配置說明可參見:https://blog.csdn.net/tongtong_use/article/details/78611225,資源隔離策略說明參見:https://blog.csdn.net/liuchuanhong1/article/details/73718794,有信號量、線程池兩種隔離方式,預設是線程池隔離,兩者的區別如下圖示:(圖片來源:前面給出的鏈接文章,這裡重點貼出說明)

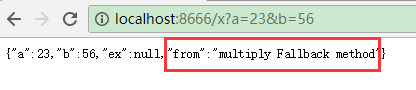
最後直接啟動運行,如訪問:http://localhost:8666/x?a=23&b=56
當註冊中心、服務提供者都正常情況下,能正常返回結果:

當註冊中心(消費者無法從註冊中心獲取服務實例信息時)或服務提供者關閉掉,模擬網路不可達,服務不可用的情況,再次請求,返回熔斷降級回調方法的結果:
1.3.採用Feign + Hystrix方式
1.3.1首先定義一個實現自被@FeignClient標註的遠程調用服務介面類(HelloRemoteService)的Hystrix降級回調實現類:HelloRemoteServiceFallbackImpl,實現介面里的相關方法,這裡的方法是與介面里的同名方法有本質不同,介面里的方法是映射請求遠程服務,而降級回調類中的方法是當介面中的同名方法調用失敗後觸發降級回調這些方法,所以這些是對應介面的降級方法。然後在遠程調用服務介面類(HelloRemoteService)的@FeignClient註解中添加相關的參數配置,其中很重要的依然是:fallback,這個是指定Hystrix降級回調實現類(即:HelloRemoteServiceFallbackImpl),最後確保spring boot啟動類上添加了@EnableFeignClients(這個是上篇就說過的,要想啟用Feign就得添加),具體代碼實現如下:
//HelloRemoteServiceFallbackImpl 降級回調實現類:
package cn.zuowenjun.cloud.service;

import org.springframework.stereotype.Component;
import org.springframework.web.bind.annotation.PathVariable;

import java.util.HashMap;
import java.util.Map;

@Component
public class HelloRemoteServiceFallbackImpl implements HelloRemoteService{

    @Override
    public Object multiply(@PathVariable("a") int x, @PathVariable("b") int y) {
        Map<String,Object> result=new HashMap<>();
        result.put("from","multiply Fallback method");
        result.put("a",x);
        result.put("b",y);

        return  result;
    }
}


//HelloRemoteService遠程調用服務類:

package cn.zuowenjun.cloud.service;


import org.springframework.cloud.openfeign.FeignClient;
import org.springframework.web.bind.annotation.PathVariable;
import org.springframework.web.bind.annotation.RequestMapping;


@FeignClient(name= "helloservice",fallback =HelloRemoteServiceFallbackImpl.class )
public interface HelloRemoteService {

    @RequestMapping("/multiply/{a}/{b}")
    Object  multiply(@PathVariable("a") int x, @PathVariable("b") int y);

}


//spring boot啟動類:
package cn.zuowenjun.cloud;

import org.springframework.boot.SpringApplication;
import org.springframework.boot.autoconfigure.SpringBootApplication;
import org.springframework.cloud.client.circuitbreaker.EnableCircuitBreaker;
import org.springframework.cloud.client.discovery.EnableDiscoveryClient;
import org.springframework.cloud.client.loadbalancer.LoadBalanced;
import org.springframework.cloud.netflix.hystrix.EnableHystrix;
import org.springframework.cloud.openfeign.EnableFeignClients;
import org.springframework.context.annotation.Bean;
import org.springframework.web.client.RestTemplate;


@EnableDiscoveryClient
@SpringBootApplication
@EnableFeignClients(basePackages = "cn.zuowenjun.cloud.service") // 如果啟動類不在根目錄需要指定basePackages,否則不需要
class EurekaclientconsumerApplication {

    public static void main(String[] args) {
        SpringApplication.run(EurekaclientconsumerApplication.class, args);
    }


}
1.3.2.Feign雖然集成了Hystrix,但預設並未開啟,需要在配置文件中顯示配置開啟,application.yml配置如下:(當然我這裡依然如1.2一樣改變了預設的資源隔離方為信號量)
server:
  port: 8666

spring:
  application:
    name: ribbonclient
    helloServiceProvider: helloservice #自定義配置,指定訪問遠程服務名稱,當然也可以寫死在代碼中

eureka:
  client:
    serviceUrl:
      defaultZone: http://localhost:8800/eureka/ #指向eureka server


feign:
  hystrix:
    enabled: true #啟用hystrix
    command:
      default:
        execution:
          isolation:
            strategy: #預設是THREAD,這裡演示改成了信號量隔離模式
              semaphore:
                maxConcurrentRequests: 3
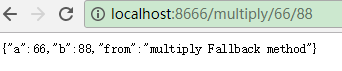
通過如上兩步即完成了Feign集成Hystrix,啟動項目,如在註冊中心、服務提供者都正常的情況下訪問:http://localhost:8666/multiply/66/88,就能得到正常結果,否則當註冊中心(消費者無法從註冊中心獲取服務實例信息時)、服務提供者任意節點出問題,則會執行降級回調方法,如下圖示:
 、
、
雖然當服務提供者不可用時,通過fallback能夠直接熔斷降級回調相關的方法,但有時如果我們需要根據不同的異常執行不同的降級處理邏輯呢,該如何辦?這個時候可以使用fallbackFactory來實現自定義的降級回調實例創建過程,從而可以在create降級回調實現類時增加額外邏輯。實現步驟是:先創建實現自FallbackFactory的自定義降級回調工廠類:HystrixClientFallbackFactory,然後@FeignClient註解的fallbackFactory參數指向HystrixClientFallbackFactory.class即可,具體實現代碼如下:
package cn.zuowenjun.cloud.service;

import feign.hystrix.FallbackFactory;
import org.springframework.stereotype.Component;

import java.util.HashMap;
import java.util.Map;

@Component
public class HystrixClientFallbackFactory implements FallbackFactory<HelloRemoteService> {

    public HelloRemoteService create(Throwable throwable) {
        //TODO:這裡可以根據throwable的不同生成不同的HelloRemoteService的Fallback的實例
        return  new HelloRemoteService() {//這裡是匿名實現介面,也可以用lambda表達式或具體的介面實現類,如:HelloRemoteServiceFallbackImpl

            @Override
            public Object multiply(int x, int y) {
                //TODO:這裡可以根據throwable的不同執行不同的邏輯
                Map<String,Object> result=new HashMap<>();
                result.put("from","multiply FallbackFactory method");
                result.put("a",x);
                result.put("b",y);
                result.put("ex",throwable.getMessage());
                return  result;
            }
        };
    }
}


package cn.zuowenjun.cloud.service;


import org.springframework.cloud.openfeign.FeignClient;
import org.springframework.web.bind.annotation.PathVariable;
import org.springframework.web.bind.annotation.RequestMapping;


//@FeignClient(name= "helloservice",fallback =HelloRemoteServiceFallbackImpl.class )
@FeignClient(name= "helloservice",fallbackFactory = HystrixClientFallbackFactory.class)
public interface HelloRemoteService {

    @RequestMapping("/multiply/{a}/{b}")
    Object  multiply(@PathVariable("a") int x, @PathVariable("b") int y);

}
最後重新啟動項目,並仍然訪問:http://localhost:8666/multiply/66/88,正常情況都是OK的,當服務提供者不可用時,則會通過HystrixClientFallbackFactory工廠類創建降級回調實現類,並執行對應的降級方法,這裡可以看到Throwable是create方法的入參,我們可以根據入參創建不同的降級回調實現類或實現不同的處理邏輯,這裡DEMO演示的降級回調結果如下圖示:

二、集成Hystrix-dashboard熔斷監控面板
如上第一部份演示效果,通過在服務消費者項目中集成Hystrix可以做到依賴隔離、熔斷、降級處理等操作,但如果沒有有效的監控途徑,那麼我們就無法及時發現問題,及早預防,及早處理,只能等到出現大量的服務熔斷降級後才知道問題,然後就是漫漫排查路。這樣顯然是不行的,故有了Hystrix Dashboard組件為我們解決這個監控的問題。集成Hystrix Dashboard很簡單,我們在第一節服務消費者項目的基礎上按照如下步驟操作,即可實現:
2.1.在POM XML中添加Hystrix Dashboard依賴、actuator依賴,具體如下:
        <dependency>
            <groupId>org.springframework.boot</groupId>
            <artifactId>spring-boot-starter-actuator</artifactId>
        </dependency>

        <dependency>
            <groupId>org.springframework.cloud</groupId>
            <artifactId>spring-cloud-starter-netflix-hystrix-dashboard</artifactId>
        </dependency>
2.2.在spring boot啟動類上再添加:@EnableHystrixDashboard註解,然後添加註冊HystrixMetricsStreamServlet的方法(servletRegistrationBean),並指定映射URL為:/actuator/hystrix.stream,如果不指定就會導致報:Unable to connect to Command Metric Stream,因為http://hystrix-app:port/actuator/hystrix.stream無法訪問404,代碼如下:(註意這裡面同時包含了使用:ribbon、FeignClient兩種消費方式)
package cn.zuowenjun.cloud;

import com.netflix.hystrix.contrib.metrics.eventstream.HystrixMetricsStreamServlet;
import org.springframework.boot.SpringApplication;
import org.springframework.boot.autoconfigure.SpringBootApplication;
import org.springframework.boot.web.servlet.ServletRegistrationBean;
import org.springframework.cloud.client.discovery.EnableDiscoveryClient;
import org.springframework.cloud.client.loadbalancer.LoadBalanced;
import org.springframework.cloud.netflix.hystrix.EnableHystrix;
import org.springframework.cloud.netflix.hystrix.dashboard.EnableHystrixDashboard;
import org.springframework.cloud.openfeign.EnableFeignClients;
import org.springframework.context.annotation.Bean;
import org.springframework.web.client.RestTemplate;

@EnableHystrixDashboard
@EnableHystrix
@EnableDiscoveryClient
@SpringBootApplication
@EnableFeignClients(basePackages = "cn.zuowenjun.cloud.service") // 如果啟動類不在根目錄需要指定basePackages,否則不需要
class EurekaclientconsumerApplication {

    public static void main(String[] args) {
        SpringApplication.run(EurekaclientconsumerApplication.class, args);
    }

    @LoadBalanced
    @Bean
    public RestTemplate restTemplate(){
        return  new RestTemplate();
    }


    @Bean(name = "hystrixRegistrationBean")
    public ServletRegistrationBean servletRegistrationBean() {
        ServletRegistrationBean registration = new ServletRegistrationBean(
                new HystrixMetricsStreamServlet(), "/actuator/hystrix.stream");
        registration.setName("HystrixMetricsStreamServlet");
        registration.setLoadOnStartup(1);
        return registration;
    }

}
完成上述2步後,重新啟動項目,然後訪問:http://localhost:8666/hystrix,出現如下畫面即為成功:
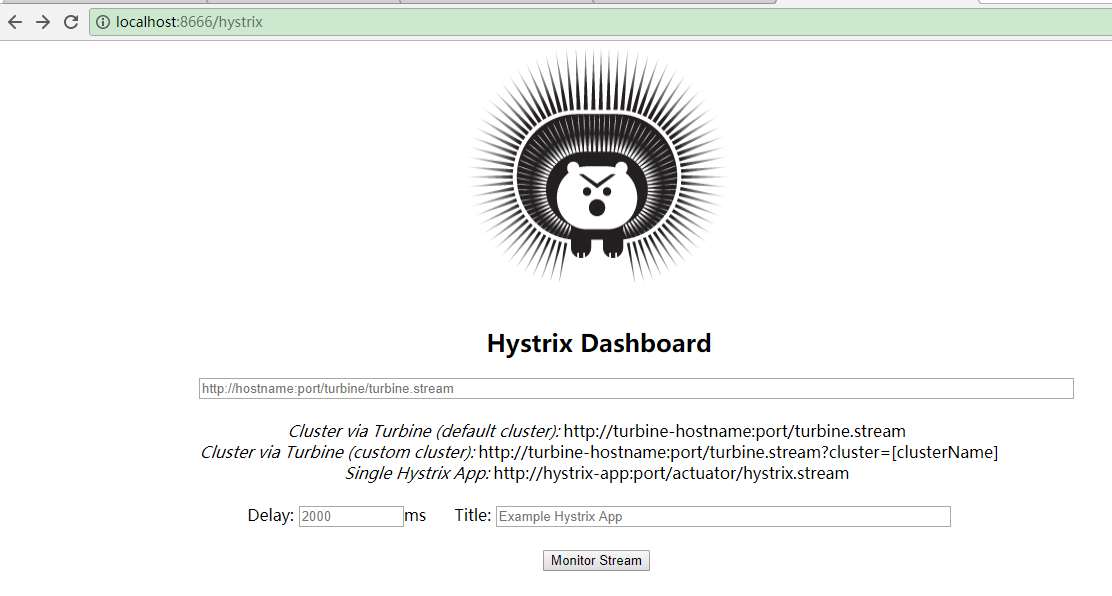
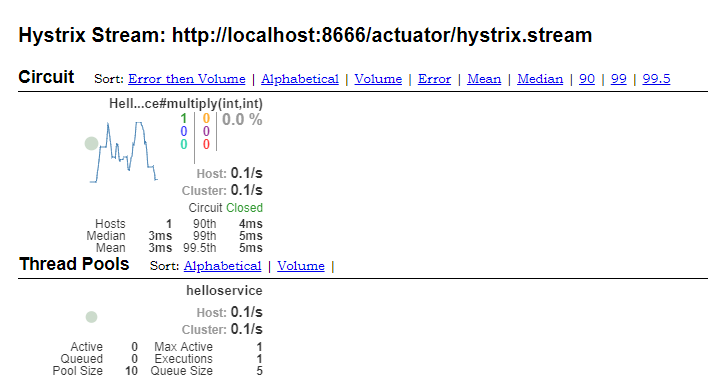
我們按照提示(查看單個服務項目),輸入:http://localhost:8666/actuator/hystrix.stream,然後點擊Monitor Stream按鈕,即可進入監控查看界面,剛進行可能沒有數據只是loading...,當通過ribbon、FeignClient兩種方式進行服務消費後(即:請求遠程服務API),則監控面板的數據會實時更新,效果如下圖示:(至於具體參數各代表什麼意思請上網查看相關資料,有很多介紹的)
2.3.除了在服務消費者項目中集成Hystrix Dashboard外,如果我們需要專門搞一個項目來查看各個服務消者,是否可以單獨搭建呢?答案是肯定的,我們可以搭建一個專門用於查詢每個項目監控數據的項目(直接使用spring initializer,然後只添加eureka client、Hystrix Dashboard即可),然後仍然按照搭建服務消費者的方式添加相關依賴,但不需要編寫服務消費代碼(比如:上文中的HelloService,HelloRemoteService),因為我們只需要保證能夠與註冊中心、服務提供者通訊並開啟Hystrix Dashboard即可。我這裡就做了一個演示DEMO,完整依賴如下:


<?xml version="1.0" encoding="UTF-8"?>
<project xmlns="http://maven.apache.org/POM/4.0.0" xmlns:xsi="http://www.w3.org/2001/XMLSchema-instance"
         xsi:schemaLocation="http://maven.apache.org/POM/4.0.0 http://maven.apache.org/xsd/maven-4.0.0.xsd">
    <modelVersion>4.0.0</modelVersion>
    <parent>
        <groupId>org.springframework.boot</groupId>
        <artifactId>spring-boot-starter-parent</artifactId>
        <version>2.1.3.RELEASE</version>
        <relativePath/> <!-- lookup parent from repository -->
    </parent>
    <groupId>cn.zuowenjun.cloud</groupId>
    <artifactId>hystrixdashboard</artifactId>
    <version>0.0.1-SNAPSHOT</version>
    <name>hystrixdashboard</name>
    <url>http://www.zuowenjun.cn</url>
    <description>Demo project for Spring Boot</description>

    <properties>
        <java.version>1.8</java.version>
        <spring-cloud.version>Greenwich.RELEASE</spring-cloud.version>
    </properties>

    <dependencies>
        <dependency>
            <groupId>org.springframework.boot</groupId>
            <artifactId>spring-boot-starter-actuator</artifactId>
        </dependency>
        <dependency>
            <groupId>org.springframework.cloud</groupId>
            <artifactId>spring-cloud-starter-netflix-eureka-client</artifactId>
        </dependency>
        <dependency>
            <groupId>org.springframework.cloud</groupId>
            <artifactId>spring-cloud-starter-netflix-hystrix-dashboard</artifactId>
        </dependency>
        <dependency>
            <groupId>org.springframework.boot</groupId>
            <artifactId>spring-boot-starter-test</artifactId>
            <scope>test</scope>
        </dependency>
    </dependencies>

    <dependencyManagement>
        <dependencies>
            <dependency>
                <groupId>org.springframework.cloud</groupId>
                <artifactId>spring-cloud-dependencies</artifactId>
                <version>${spring-cloud.version}</version>
                <type>pom</type>
                <scope>import</scope>
            </dependency>
        </dependencies>
    </dependencyManagement>

    <build>
        <plugins>
            <plugin>
                <groupId>org.springframework.boot</groupId>
                <artifactId>spring-boot-maven-plugin</artifactId>
            </plugin>
        </plugins>
    </build>

    <repositories>
        <repository>
            <id>spring-milestones</id>
            <name>Spring Milestones</name>
            <url>https://repo.spring.io/milestone</url>
        </repository>
    </repositories>

</project>
View Code
然後在spring boot啟動類添加如下代碼:
package cn.zuowenjun.cloud.dashboard;

import com.netflix.hystrix.contrib.metrics.eventstream.HystrixMetricsStreamServlet;
import org.springframework.boot.SpringApplication;
import org.springframework.boot.autoconfigure.SpringBootApplication;
import org.springframework.boot.web.servlet.ServletRegistrationBean;
import org.springframework.cloud.client.discovery.EnableDiscoveryClient;
import org.springframework.cloud.netflix.hystrix.dashboard.EnableHystrixDashboard;
import org.springframework.context.annotation.Bean;


@EnableHystrixDashboard
//@EnableDiscoveryClient
@SpringBootApplication
public class HystrixdashboardApplication {

    public static void main(String[] args) {
        SpringApplication.run(HystrixdashboardApplication.class, args);
    }


    @Bean(name = "hystrixRegistrationBean")
    public ServletRegistrationBean servletRegistrationBean() {
        ServletRegistrationBean registration = new ServletRegistrationBean(
                new HystrixMetricsStreamServlet(), "/actuator/hystrix.stream");
        registration.setName("hystrixServlet");
        registration.setLoadOnStartup(1);
        return registration;
    }

}
View Code
最後在application.yml添加如下配置即可:
server:
  port: 8999

spring:
  application:
    name: hystrixdashboard

eureka:
  client:
    serviceUrl:
      defaultZone: http://localhost:8800/eureka/ #指向eureka server


feign:
  hystrix:
    enabled: true #啟用hystrix
View Code
訪問:http://localhost:8999/hystrix,熟悉的界面又出來了,這時就可以輸入其它某個服務消費者的項目:http://localhost:8666/actuator/hystrix.stream,點擊Monitor Stream按鈕即可正常查看監控。這裡就不在貼圖了。
三、通過引入Turbine聚合熔斷監控數據以便統一集中查看
在這裡我基於上面2.3單獨搭建的監控面板項目(hystrixdashboard) 基礎上按如下簡單的幾個步驟,即完成聚合熔斷監控數據了。
3.1.在POM XML添加如下turbine依賴:
        <dependency>
            <groupId>org.springframework.cloud</groupId>
            <artifactId>spring-cloud-starter-netflix-turbine</artifactId>
        </dependency>
3.2 在spring boot啟動類上標註@EnableTurbine,並再添加註冊HystrixMetricsStreamServlet的方法(如:servletTurbineRegistrationBean),這裡映射URL為:/turbine.stream
package cn.zuowenjun.cloud.dashboard;

import com.netflix.hystrix.contrib.metrics.eventstream.HystrixMetricsStreamServlet;
import org.springframework.boot.SpringApplication;
import org.springframework.boot.autoconfigure.SpringBootApplication;
import org.springframework.boot.web.servlet.ServletRegistrationBean;
import org.springframework.cloud.client.discovery.EnableDiscoveryClient;
import org.springframework.cloud.netflix.hystrix.dashboard.EnableHystrixDashboard;
import org.springframework.cloud.netflix.turbine.EnableTurbine;
import org.springframework.context.annotation.Bean;


@EnableHystrixDashboard
@EnableDiscoveryClient
@EnableTurbine
@SpringBootApplication
public class HystrixdashboardApplication {

    public static void main(String[] args) {
        SpringApplication.run(HystrixdashboardApplication.class, args);
    }


    @Bean(name = "hystrixRegistrationBean")
    public ServletRegistrationBean servletRegistrationBean() {
        ServletRegistrationBean registration = new ServletRegistrationBean(
                new HystrixMetricsStreamServlet(), "/actuator/hystrix.stream");
        registration.setName("hystrixServlet");
        registration.setLoadOnStartup(1);
        return registration;
    }

    @Bean(name = "hystrixForTurbineRegistrationBean")
    public ServletRegistrationBean servletTurbineRegistrationBean() {
        ServletRegistrationBean registration = new ServletRegistrationBean(
                new HystrixMetricsStreamServlet(), "/turbine.stream");
        registration.setName("hystrixForTurbineServlet");
        registration.setLoadOnStartup(1);
        return registration;
    }

}
3.3.在application.yml配置中增加turbine相關的參數設置,如下:(註意我這裡是監控服務消費者【他本身也是一個服務】,如果想監控所有的服務,包含服務提供者,那麼這些項目都應該集成Hystrix Dashboard,並確保http://服務主機名:埠/actuator/hystrix.stream可正常訪問,因為turbine是通過註冊中心收集所有服務的hystrix.stream的數據)
server:
  port: 8999

spring:
  application:
    name: hystrixdashboard

eureka:
  client:
    serviceUrl:
      defaultZone: http://localhost:8800/eureka/ #指向eureka server


turbine:
  app-config: ribbonclient #指定需要監控的服務:ribbonclient,多個service以,間隔(註意監控的服務必需要先集成Hystrix Dashboard)
  cluster-name-expression: new String("default") #指定集群名稱,預設為default,當設立了多個集群時,可以在Hystrix指定集群名稱來查看監控
  combine-host-port: true #合併同一個host多個埠的數據
完成上面3個步驟後即OK,啟動項目,然後訪問:http://localhost:8999/hystrix,如果配置OK就又出現監控主界面,然後這裡根據提示輸入集群的監控查詢URL,如:http://localhost:8999/turbine.stream,然後點擊Monitor Stream按鈕即可正常查看集群中各服務的監控實時數據了。這裡就不在貼圖了。
好了本文就總結到這裡,若有不足之處歡迎指出,謝謝!
提示:本文中相關示例項目代碼已上傳GITHUB,地址如下:
https://github.com/zuowj/learning-demos/tree/master/java/demo-eurekaclientconsumer
https://github.com/zuowj/learning-demos/tree/master/java/demo-hystrixdashboard

