一 基礎環境 節點 系統版本 MySQL版本 業務IP 心跳IP Master CentOS 7.5 MySQL 5.6 192.168.88.100 192.168.77.100 Slave CentOS 7.5 MySQL 5.6 192.168.88.101 192.168.77.101 VI ...
一 基礎環境
二 架構設計
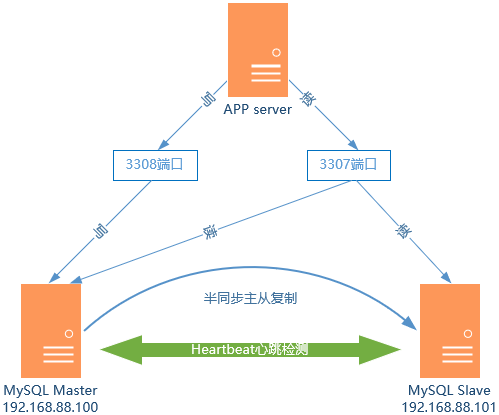 如圖所示,兩台MySQL主機採用MySQL半同步數據複製機制實現主從複製,採用不同埠實現讀寫分離,用於提高查詢性能。Heartbeat通過心跳檢測,避免單點故障,主要用於主機健康狀態檢查以及實現haproxy兩台主機之間的自動失敗切換。從而在任何一臺主機宕機時,都不會影響對外提供服務(VIP可以漂移),保持MySQL資料庫服務的高可用性。
整體架構原理:
主機Master和Slave,分別配置為MySQL半同步複製,且都啟動Heartbeat服務,但只有Master啟動haproxy服務;
通過Heartbeat啟用一個虛IP,實現Master和Slave的自動切換;
在haproxy中配置兩對frontend/backend,使用不同的埠,一個埠用於響應讀請求,另一個埠用於響應讀請求,實現讀寫分離。
註意:當frontend與backend是同一物理主機時,frontend不能綁定與backend相同的埠。
初始正常狀態下,Master上的haproxy通過寫埠將寫請求轉發至主機Master,通過讀埠將讀請求轉發給Master和Slave,實現讀負載均衡;
當主機Master異常時,Slave接管服務,此時需要:
- (1)VIP漂移到主機Slave上;
- (2)重置Slave的MySQL Slave角色,使之切換為Master;
- (3)啟動Slave上的haproxy,繼續接收應用的請求。
三 安裝MySQL
3.1 安裝MySQL
  1 [root@master ~]# yum list installed | grep mysql	#查看是否存在其他MySQL組件
  2 [root@master ~]# yum -y remove mysql*			#為避免衝突引,卸載已存在的組件
  3 [root@master ~]# yum -y install mariadb mariadb-server
  4 [root@master ~]# systemctl start mariadb.service
註意:以上操作在Slave主機上也需要執行。
3.2 初始化MySQL
  1 [root@master ~]# mysql_secure_installation		#設置root密碼
  2 [root@master ~]# systemctl restart mariadb.service
註意:以上操作在Slave主機上也需要執行。
四 配置MySQL半同步
4.1 載入插件
  1 [root@master ~]# ll /usr/lib64/mysql/plugin/		#查看插件
  2 [root@master ~]# mysql -uroot -p
  3 Enter password:
  4 MariaDB [(none)]> install plugin rpl_semi_sync_master soname 'semisync_master.so';
  5 MariaDB [(none)]> install plugin rpl_semi_sync_slave soname 'semisync_slave.so';
提示:為考慮可能出現的主從切換,需要在主從節點均添加master和slave插件。
1 MariaDB [(none)]> select * from information_schema.plugins where plugin_name like '%semi%'\G #查看載入情況
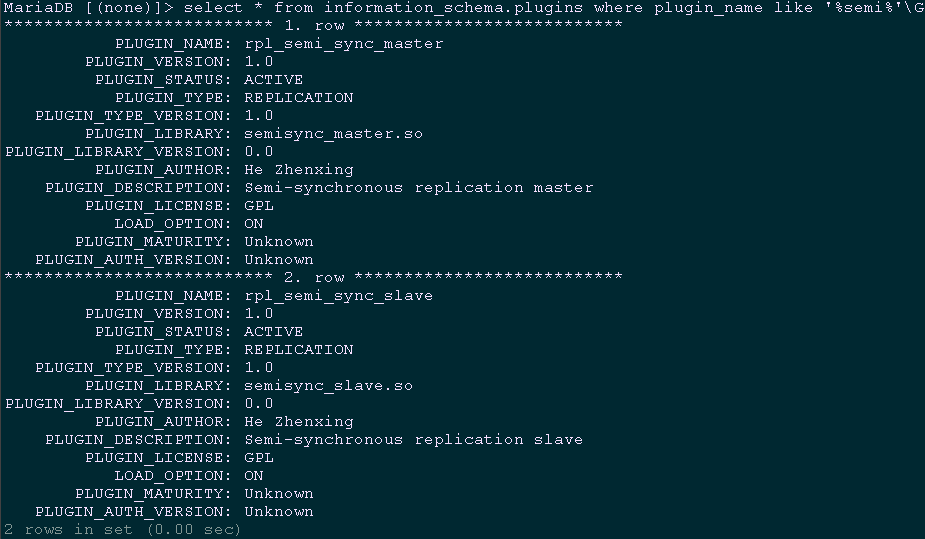 提示:主備節點都需要載入。
4.2 配置半同步複製
4.2.1 master my.cf配置
  1 [root@master ~]# vi /etc/my.cnf
  2 [mysqld]
  3 ……
  4 server-id=1				#設置主伺服器master的id
  5 log-bin=mysql-bin			#配置二進位變更日誌命名格式
  6 plugin-load=rpl_semi_sync_master=semisync_master.so
  7 rpl_semi_sync_master_enabled=1
  8 rpl_semi_sync_master_timeout=1000
4.2.2 slave my.cf配置
  1 [root@slave ~]# vi /etc/my.cnf
  2 [mysqld]
  3 ……
  4 server-id=2				#設置本伺服器slave的id
  5 log-bin=mysql-bin			#配置二進位變更日誌命名格式
  6 plugin-load=rpl_semi_sync_master=semisync_master.so
  7 rpl_semi_sync_master_enabled=1
  8
  9 read-only				#設為只讀模式,只能從master同步,不能直接寫入
4.3 master創建賬號並授權
  1 [root@master ~] mysql -uroot -p
  2 Enter password:
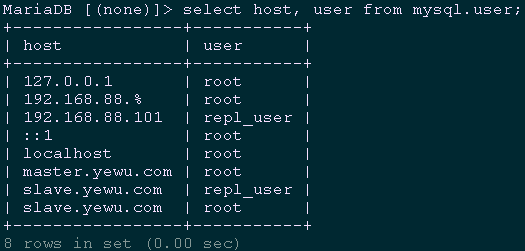
  3 MariaDB [(none)]> grant replication slave on *.* to 'repl_user'@'192.168.88.101' identified by 'x12345678';
  4 MariaDB [(none)]> grant replication slave on *.* to 'repl_user'@'slave.yewu.com' identified by 'x12345678';
  5 MariaDB [(none)]> grant all privileges on *.* to 'root'@'192.168.88.%'  identified by 'x120952576' with grant option;
  6 MariaDB [(none)]> grant all privileges on *.* to 'root'@'slave.yewu.com' identified by 'x120952576';
  7 MariaDB [(none)]> flush privileges;
  8 MariaDB [(none)]> select host, user from mysql.user;		#查看許可權
  1 [root@master ~]# systemctl restart mariadb.service
  2 [root@master ~]# mysql -uroot -p
  3 Enter password:
  4 MariaDB [(none)]> show master status;
master: file:mysql-bin.000001 position:245 提示:主備模式中,僅需要主庫授權從庫複製即可。
4.4 slave創建賬號並授權
  1 [root@slave ~] mysql -uroot -p
  2 Enter password:
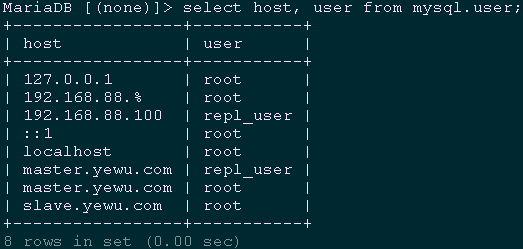
  3 MariaDB [(none)]> grant replication slave on *.* to 'repl_user'@'192.168.88.100' identified by 'x12345678';
  4 MariaDB [(none)]> grant replication slave on *.* to 'repl_user'@'master.yewu.com' identified by 'x12345678';
  5 MariaDB [(none)]> grant all privileges on *.* to 'root'@'192.168.88.%'  identified by 'x120952576' with grant option;
  6 MariaDB [(none)]> grant all privileges on *.* to 'root'@'master.yewu.com' identified by 'x120952576' with grant option;
  7 MariaDB [(none)]> select host, user from mysql.user;		#查看許可權
  1 [root@master ~]# systemctl restart mariadb.service
  2 [root@master ~]# mysql -uroot -p
  3 Enter password:
  4 MariaDB [(none)]> show master status;
master: file:mysql-bin.000001 position:245 提示:主備模式中,僅需要主庫授權從庫複製即可。
4.4 啟動同步
  1 [root@slave ~]# systemctl restart mariadb.service
  2 [root@slave ~]# mysql -uroot -p
  3 Enter password:
  4 MariaDB [(none)]> change master to master_host='192.168.88.100',
  5 master_user='repl_user',
  6 master_password='x12345678',
  7 master_log_file='mysql-bin.000001',
  8 master_port=3306,
  9 master_log_pos=245;
 10 MariaDB [(none)]> start slave;
 11 MariaDB [(none)]> show slave status\G			#查看slave狀態
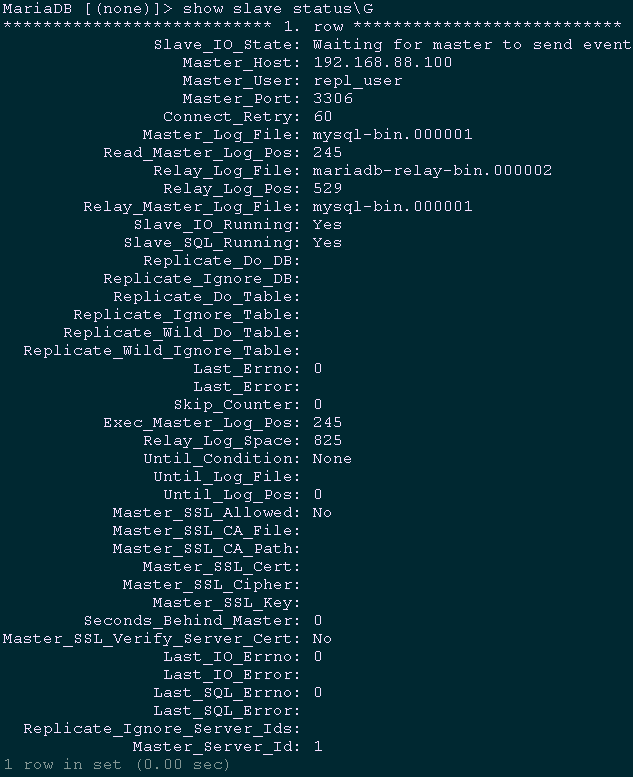 提示:
slave的I/O和SQL線程都已經開始運行,而且Seconds_Behind_Master不再是NULL。日誌的位置增加了,意味著一些事件被獲取並執行了。如果你在master上進行修改,你可以在slave上看到各種日誌文件的位置的變化,同樣,你也可以看到資料庫中數據的變化;
半同步相關概念見附錄一。
五 安裝HAProxy
5.1 下載及安裝
  1 [root@master ~]# wget http://www.haproxy.org/download/1.9/src/haproxy-1.9.0.tar.gz
  2 [root@master ~]# tar -zxvf haproxy-1.9.0.tar.gz
  3 [root@master ~]# cd haproxy-1.9.0/
  4 [root@master haproxy-1.9.0]# make TARGET=linux3100 CPU=x86_64 PREFIX=/usr/local/haprpxy
  5 #編譯uname -r #查看系統內核版本號
  6 [root@master haproxy-1.9.0]# make install PREFIX=/usr/local/haproxy
參數解釋: TARGET=linux3100:內核版本,使用uname -r可查看內核。
5.2 創建HAProxy相關配置文件
  1 [root@master ~]# mkdir /usr/local/haproxy/conf				#創建配置文件目錄
  2 [root@master ~]# mkdir -p /etc/haproxy					#創建配置文件目錄
  3 [root@master ~]# touch /usr/local/haproxy/haproxy.cfg			#創建配置文件
  4 [root@master ~]# ln -s /usr/local/haproxy/conf/haproxy.cfg /etc/haproxy/haproxy.cfg		 #添加配置文件軟連接
  5 [root@master ~]# cp -r /root/haproxy-1.9.0/examples/errorfiles /usr/local/haproxy/errorfiles #拷貝錯誤頁面
  6 [root@master ~]# ln -s /usr/local/haproxy/errorfiles /etc/haproxy/errorfiles
  7 #添加軟連接
  8 [root@master ~]# mkdir -p  /usr/local/haproxy/log			#創建日誌文件目錄
  9 [root@master ~]# touch /usr/local/haproxy/log/haproxy.log		#創建日誌文件目錄
 10 [root@master ~]# ln -s /usr/local/haproxy/log/haproxy.log /var/log/haproxy.log
 11 #添加軟連接
 12 [root@master ~]# cp /usr/local/haproxy/sbin/haproxy /usr/sbin/	#拷貝HAProxy命令
 13 [root@master ~]# cp /root/haproxy-1.7.9/examples/haproxy.init /etc/rc.d/init.d/haproxy
 14 #拷貝開機啟動文件
 15 [root@master ~]# chmod u+x /etc/rc.d/init.d/haproxy			#添加腳本執行許可權
 16 [root@master ~]# chkconfig haproxy on				#設置開機啟動
六 配置HAProxy
6.1 配置master的HAProxy
  1 [root@master ~]# vi /etc/haproxy/haproxy.cfg
  2 global
  3     log         127.0.0.1 local2        # 日誌定義級別
  4     chroot      /usr/local/haproxy      # 當前工作目錄
  5     pidfile     /var/run/haproxy.pid    # 進程id
  6     maxconn     4000                    # 最大連接數
  7     user        haproxy                 # 運行改程式的用戶
  8     group       haproxy
  9     daemon                              # 後臺形式運行
 10     stats socket /usr/local/haproxy/stats
 11
 12 defaults
 13     mode                    tcp         # haproxy運行模式(http | tcp | health)
 14     log                     global      # 採用全局定義的日誌
 15     option                  dontlognull # 不記錄健康檢查的日誌信息
 16     option                  redispatch  # serverId對應的伺服器掛掉後,強制定向到其他健康的伺服器
 17     retries                 3           # 三次連接失敗則伺服器不用
 18     timeout http-request    10s
 19     timeout queue           1m
 20     timeout client          1m          # 客戶端超時
 21     timeout server          1m          # 伺服器超時
 22     timeout http-keep-alive 10s
 23     timeout check           10s         # 心跳檢測
 24     maxconn                 600         # 最大連接數
 25
 26 listen stats                            # 配置haproxy狀態頁(用來查看的頁面)
 27     mode http
 28     bind 0.0.0.0:8888
 29     stats enable
 30     stats refresh 30s                   #設置統計頁面自動刷新的時間
 31     stats uri /stats                    #設置統計頁面url
 32     stats realm Haproxy Manager         #設置登錄HAProxy統計頁面密碼框上提示文本
 33     stats auth admin:admin              #設置登錄HAProxy統計頁面用戶名和密碼設置
 34     #stats hide-version                 #隱藏統計頁面上HAProxy的版本信息
 35 frontend  read
 36     bind *:3307                         # 監聽前端3307埠(表示任何ip訪問3307埠都會將數據輪番轉發到mysql伺服器群組中)
 37     default_backend        mysql_read   # 後端伺服器組名
 38
 39 backend mysql_read
 40     balance     roundrobin              # 使用輪詢方式調度
 41     server mysql1 192.168.88.100:3306 check port 3306 maxconn 300
 42     server mysql2 192.168.88.101:3306 check port 3306 maxconn 300
 43
 44 frontend  write
 45     bind *:3308                         # 監聽前端3308埠(表示任何ip訪問3308埠都會將數據輪番轉發到mysql伺服器群組中)
 46     default_backend        mysql_write  # 後端伺服器組名
 47
 48 backend mysql_write
 49     server mysql1 192.168.88.100:3306 check port 3306 maxconn 300
解釋: 更多的HAProxy配置可參考《002.HAProxy安裝及常見配置》; 以上配置了兩對frontend\backend: read綁定3307埠接收讀請求,其對應的backend為mysql_read,其中定義兩個台MySQL伺服器,使用輪詢策略實現讀負載均衡。 write綁定3308埠接收寫請求,其對應的backend為mysql_write,其中只定義MySQL Master,即只有它接收寫請求。
6.2 配置slave的HAProxy
  1 [root@slave ~]# vi /etc/haproxy/haproxy.cfg
  2 global
  3     log         127.0.0.1 local2        # 日誌定義級別
  4     chroot      /usr/local/haproxy      # 當前工作目錄
  5     pidfile     /var/run/haproxy.pid    # 進程id
  6     maxconn     4000                    # 最大連接數
  7     user        haproxy                 # 運行改程式的用戶
  8     group       haproxy
  9     daemon                              # 後臺形式運行
 10     stats socket /usr/local/haproxy/stats
 11
 12 defaults
 13     mode                    tcp         # haproxy運行模式(http | tcp | health)
 14     log                     global      # 採用全局定義的日誌
 15     option                  dontlognull # 不記錄健康檢查的日誌信息
 16     option                  redispatch  # serverId對應的伺服器掛掉後,強制定向到其他健康的伺服器
 17     retries                 3           # 三次連接失敗則伺服器不用
 18     timeout http-request    10s
 19     timeout queue           1m
 20     timeout client          1m          # 客戶端超時
 21     timeout server          1m          # 伺服器超時
 22     timeout http-keep-alive 10s
 23     timeout check           10s         # 心跳檢測
 24     maxconn                 600         # 最大連接數
 25
 26 listen stats                            # 配置haproxy狀態頁(用來查看的頁面)
 27     mode http
 28     bind 0.0.0.0:8888
 29     stats enable
 30     stats refresh 30s                   #設置統計頁面自動刷新的時間
 31     stats uri /stats                    #設置統計頁面url
 32     stats realm Haproxy Manager         #設置登錄HAProxy統計頁面密碼框上提示文本
 33     stats auth admin:admin              #設置登錄HAProxy統計頁面用戶名和密碼設置
 34     #stats hide-version                 #隱藏統計頁面上HAProxy的版本信息
 35 frontend  read
 36     bind *:3307                         # 監聽前端3307埠(表示任何ip訪問3307埠都會將數據輪番轉發到mysql伺服器群組中)
 37     default_backend        mysql_read   # 後端伺服器組名
 38
 39 backend mysql_read
 40     balance     roundrobin              # 使用輪詢方式調度
 41     server mysql1 192.168.88.100:3306 check port 3306 maxconn 300
 42     server mysql2 192.168.88.101:3306 check port 3306 maxconn 300
 43
 44 frontend  write
 45     bind *:3308                         # 監聽前端3308埠(表示任何ip訪問3308埠都會將數據輪番轉發到mysql伺服器群組中)
 46     default_backend        mysql_write  # 後端伺服器組名
 47
 48 backend mysql_write
 49     server mysql1 192.168.88.101:3306 check port 3306 maxconn 300
解釋: 更多的HAProxy配置可參考《002.HAProxy安裝及常見配置》; 以上配置了兩對frontend\backend: read綁定3307埠接收讀請求,其對應的backend為mysql_read,其中定義兩個台MySQL伺服器,使用輪詢策略實現讀負載均衡。 write綁定3308埠接收寫請求,其對應的backend為mysql_write,其中定義當服務切換到Slave上時,接收讀寫請求的只有192.168.88.101這台主機。
七 安裝Heartbeat
略,見《002.Heartbeat部署及httpd高可用》中的Heartbeat安裝部分。 提示:相關安裝及主機名等準備步驟參考《002.Heartbeat部署及httpd高可用》即可。八 配置Heartbeat
8.1 配置authkeys
  1 [root@master ~]# vi /usr/local/heartbeat/etc/ha.d/authkeys
  2 auth 3
  3 3 md5 Yes!
8.2 配置Heartbeat
  1 [root@master ~]# vi /usr/local/heartbeat/etc/ha.d/ha.cf
  2 logfile /var/log/ha-log			#記錄Heartbeat其他相關日誌信息
  3 logfacility     local0			#設置heartbeat的日誌,這裡用的是系統日誌
  4 keepalive 2				#設定心跳(監測)時間間隔為2秒
  5 deadtime 15				#宣告死亡時間
  6 warntime 10				#心跳延時時間
  7 initdead 60				#初始化時間
  8 udpport 694				#用於通信的UDP埠
  9 bcast   eth1				#接受廣播心跳的網卡介面
 10 ucast eth1 192.168.77.101		#置對方機器心跳檢測的IP
 11 auto_failback off			#關閉自動切回恢復正常的主節點
 12 node master.yewu.com			#集群節點的名稱,必須匹配uname -n的結果。
 13 node slave.yewu.com
 14 ping 192.168.88.1
 15 respawn hacluster /usr/local/heartbeat/libexec/heartbeat/ipfail
註意: 主機和備機之間進行心跳檢測,當備機無法檢測到主機的心跳,則開啟vip; 如果主機和備機都沒有掛掉,由於通信問題導致相互無法連接,則會出現裂腦,即主備都對外聲明瞭vip,導致數據出現故障 ,因此建議主機和備機間應該採用專門只是用於檢測心跳的網卡(網路),其他數據(業務)網路應該獨立於此心跳網路。
8.3 配置主備切換
  1 [root@master ~]# vi /root/remove_slave.sh
  2 #!/bin/sh
  3 #****************************************************************#
  4 # ScriptName: remove_slave.sh
  5 # Author: xhy
  6 # Create Date: 2018-12-22 09:58
  7 # Modify Author: xhy
  8 # Modify Date: 2018-12-22 09:58
  9 # Version:
 10 #***************************************************************#
 11 user=root
 12 password=x120952576
 13 log=/var/log/mariadb/remove_slave.log
 14 echo "`date`" >> $log
 15 rm -rf /tmp/kill.sql
 16 mysql -u$user -p$password -e "select * into outfile '/tmp/kill.sql' from (select concat('kill ',id,';') from information_schema.processlist where command='sleep' union all select 'set global read_o
 17 nly=OFF;' union all select 'stop slave;' union all select 'reset slave all;') t;"
 18 mysql -u$user -p$password < /tmp/kill.sql >> $log
 19  /bin/sed -i 's#read-only#\#read-only#' /etc/my.cnf
提示:對於CentOS7.X系統。MariaDB出於安全性考慮,不允許直接使用into outfile將sql語句輸出至文件目錄,而是採用文件目錄的子目錄,如/tmp/kill.sql會輸出至/tmp/systemd-private-1……/tmp/kill.sql。可參考如下方式關閉安全保護:
  1 # vi /usr/lib/systemd/system/mariadb.service
  2 #PrivateTmp=true
  3 PrivateTmp=false
  4 # systemctl daemon-reload
  5 # systemctl restart mariadb.service
  1 [root@master ~]# chmod 755 /root/remove_slave.sh
  2 [root@master ~]# scp /root/remove_slave.sh [email protected]:/root/
8.4 添加MySQL健康檢查
  1 [root@master ~]# vi mysql_check.sh
  2 #!/bin/sh
  3 #****************************************************************#
  4 # ScriptName: mysql_check.sh
  5 # Author: xhy
  6 # Create Date: 2018-12-20 16:40
  7 # Modify Author: xhy
  8 # Modify Date: 2018-12-20 16:40
  9 # Version:
 10 #***************************************************************#
 11 MYSQL=/usr/bin/mysql
 12 MYSQL_HOST=localhost
 13 MYSQL_USER=root
 14 MYSQL_PASSWORD=x120952576
 15 date=`date +%y%m%d-%H:%M:`
 16 echo $date
 17 $MYSQL -h $MYSQL_HOST -u $MYSQL_USER -p$MYSQL_PASSWORD -e "show status;" >/dev/null 2>&1
 18 #$mysqlclient --host=$host --port=$port--user=$user --password=$password  -e"show databases;" > /dev/null 2>&1
 19 if [ $? == 0 ]
 20 then
 21    echo " $host mysql login successfully "
 22    exit 0
 23 else
 24    echo " $host mysql login faild"
 25    /etc/init.d/heartbeat stop
 26    exit 2
 27 fi
 28 [root@master ~]# chmod 755 /root/mysql_check.sh
 29 [root@master ~]# scp /root/mysql_check.sh [email protected]:/root/
 30 [root@master ~]# crontab -e			#定時任務
 31 */1 * * * * /root/mysql_check.sh >>/var/log/mariadb/check_mysql.log
 32 [root@slave ~]# crontab -e			#定時任務
 33 */1 * * * * /root/mysql_check.sh >>/var/log/mariadb/check_mysql.log
提示:heartbeat只檢測心跳,即可檢測設備是否宕機,然後宕機後進行切換,而不會檢測上層應用,如MySQL。可手動寫入一個腳本檢測服務狀態,如MySQL。若mysql服務宕掉,則kill掉heartbeat進程從而實現故障轉移(類似keepalived)。
8.5 配置haresources
  1 root@master ~]# vi /usr/local/heartbeat/etc/ha.d/resource.d/changemysql
  2 /root/remove_slave.sh
  3 /etc/init.d/haproxy restart
  4 [root@master ~]# chmod 755 /usr/local/heartbeat/etc/ha.d/resource.d/changemysql
  5 [root@master ~]# ll /usr/local/heartbeat/etc/ha.d/resource.d/	#查看現有資源類型
  6 [root@master ~]# vi /usr/local/heartbeat/etc/ha.d/haresources
  7 master.yewu.com IPaddr::192.168.88.88/24/eth0 mariadb changemysql
  8 [root@master ~]# scp /usr/local/heartbeat/etc/ha.d/{ha.cf,haresources,authkeys} 192.168.88.101:/usr/local/heartbeat/etc/ha.d/		#將所有配置複製至slave節點
  9 [root@master ~]# scp /usr/local/heartbeat/etc/ha.d/resource.d/changemysql [email protected]:/usr/local/heartbeat/etc/ha.d/resource.d/
 10 [root@slave ~]# vi /usr/local/heartbeat/etc/ha.d/ha.cf
 11 ucast eth1 192.168.77.100		#置對方機器心跳檢測的IP
解釋:haresources中配置mariadb和changemysql,預設Heartbeat會從優先從/usr/local/heartbeat/etc/ha.d/resource.d/查找同名腳本運行,若有相應資源需要啟動可複製至此目錄,然後會從/etc/init.d/目錄下找同名(即MariaDB)運行,由於本架構採用CentOS7.X系統,需要將已編輯完成的mariadb啟動腳本(見附件)上傳至/etc/init.d/目錄; changemysql腳本用於Heartbeat實現HAProxy的切換及MySQL的主備切換。
九 啟動服務
9.1 啟動Heartbeat
在此場景中,兩個主機的heartbeat服務的啟動必須符合順序,要先啟動192.168.88.101,再啟動,192.168.88.100。 若順序相反,則當192.168.88.100獲得VIP資源,會執行本地的mysql腳本,這時將會調用/root/remove_slave.sh,重置192.168.88.100在MySQL主從中master角色,導致192.168.88.100轉換為slave節點,而VIP卻依舊存在於192.168.88.100。此時若外界訪問VIP(即訪問RS:192.168.88.100),若採用的是寫,會導致寫入從角色。 必須先後在192.168.88.101好192.168.88.100上執行以下命令:1 [root@slave ~]# systemctl start heartbeat.service 2 [root@slave ~]# systemctl enable heartbeat.service 3 [root@master ~]# service haproxy start 4 [root@master ~]# systemctl start heartbeat.service 5 [root@master ~]# systemctl enable heartbeat.service
十 驗證服務
10.1 驗證VIP
1 [root@master ~]# ifconfig

10.2 驗證進程
1 [root@master ~]# ps -ef | grep -E 'heartbeat|haproxy' | grep -v grep
 提示:192.168.88.100上有heartbeat、haproxy相關進程,以及mysql_check定時任務。
1 [root@slave ~]# ps -ef | grep -E 'heartbeat|haproxy' | grep -v grep
 提示:192.168.88.100上有heartbeat相關進程,以及mysql_check定時任務。
十一 功能測試
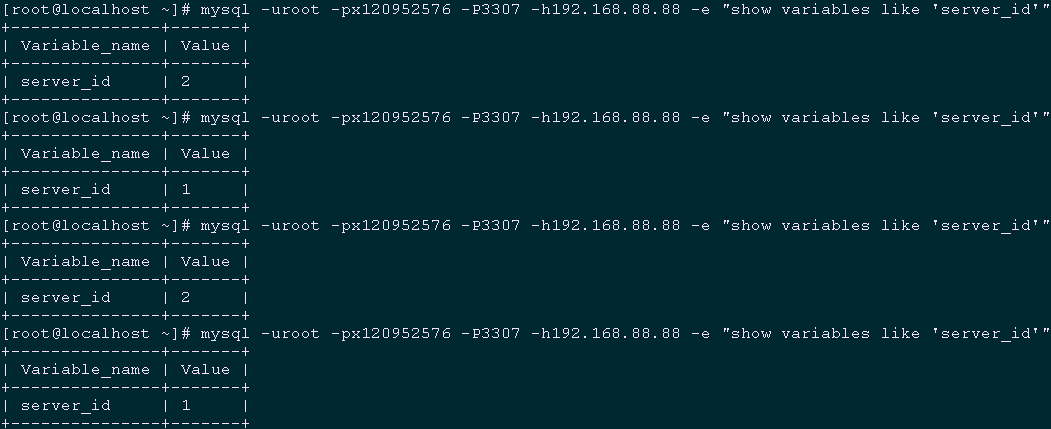
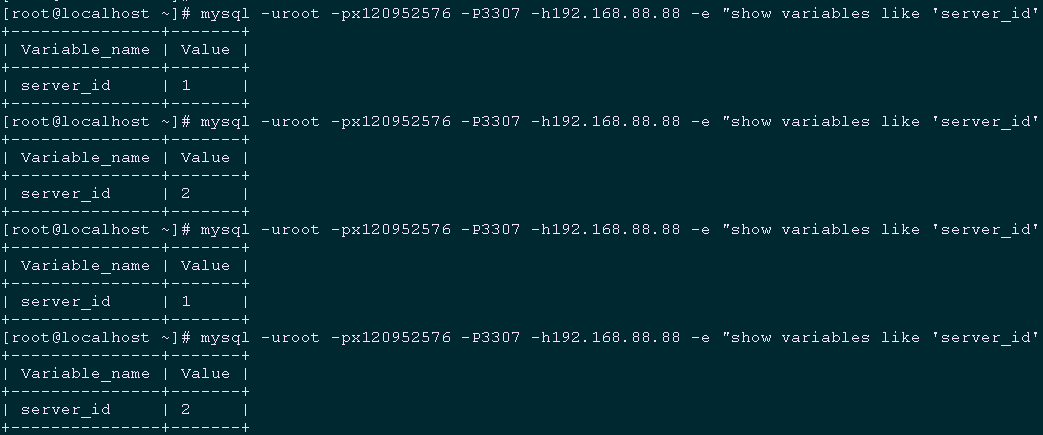
11.1 驗證3307埠的讀負載均衡轉發策略
1 [root@localhost ~]# mysql -uroot -px120952576 -P3307 -h192.168.88.88 -e "show variables like 'server_id'"
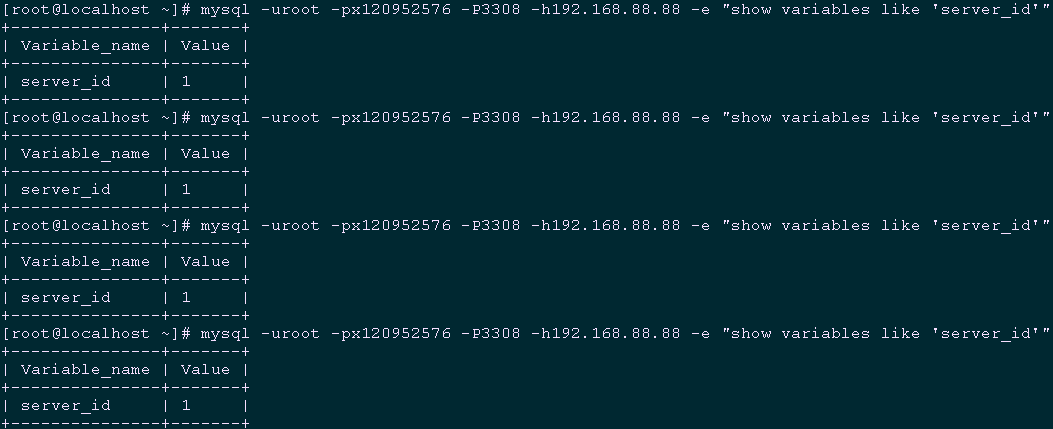
11.2 驗證3308埠的讀負載均衡轉發策略
1 [root@localhost ~]# mysql -uroot -px120952576 -P3308 -h192.168.88.88 -e "show variables like 'server_id'"
11.3 模擬從庫crash
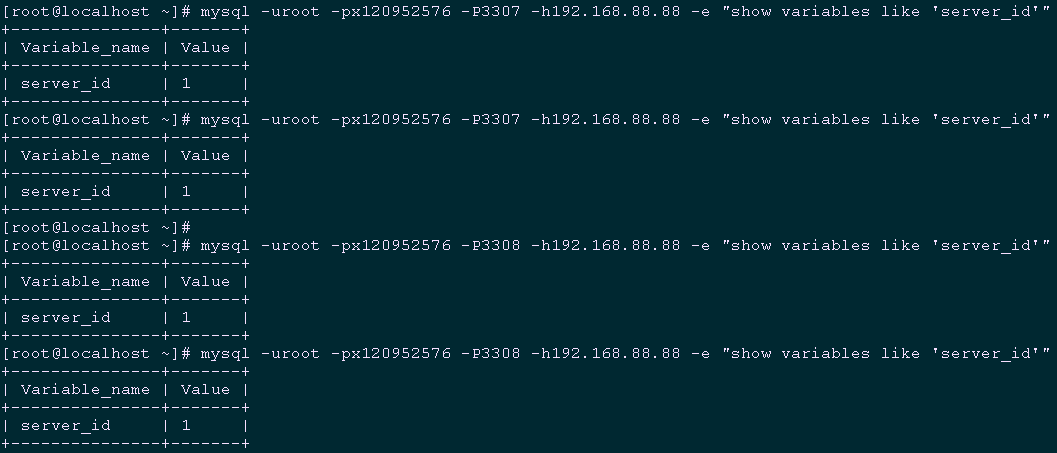
  1 [root@slave ~]# pkill -9 mysqld
  2 [root@localhost ~]# mysql -uroot -px120952576 -P3307 -h192.168.88.88 -e "show variables like 'server_id'"
  3 [root@localhost ~]# mysql -uroot -px120952576 -P3308 -h192.168.88.88 -e "show variables like 'server_id'"
  1 [root@slave ~]# systemctl start mariadb.service		#重啟從庫
  2 [root@localhost ~]# mysql -uroot -px120952576 -P3307 -h192.168.88.88 -e "show variables like 'server_id'"    #再次驗證3307埠的讀負載均衡轉發策略
11.4 模擬主庫crash
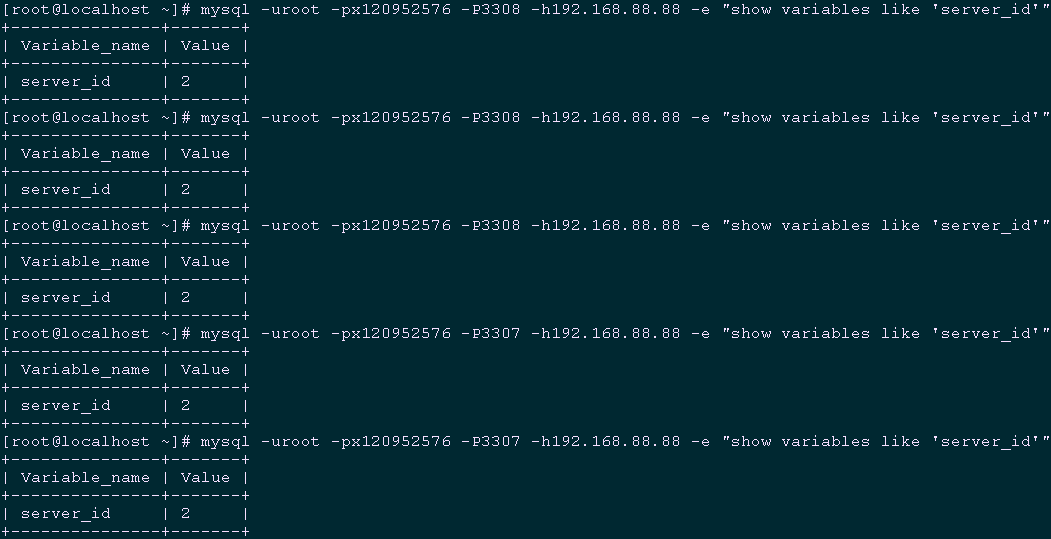
  1 [root@master ~]# pkill -9 mysqld
  2 [root@localhost ~]# mysql -uroot -px120952576 -P3308 -h192.168.88.88 -e "show variables like 'server_id'"
  3 [root@localhost ~]# mysql -uroot -px120952576 -P3307 -h192.168.88.88 -e "show variables like 'server_id'"
 高可用原理梳理:
正常情況下,對VIP讀(即3307)會被均衡分佈到後端192.168.88.100和192.168.88.101,對VIP寫(3308)只會轉發給192.168.88.100,此功能為HAProxy設置的後端側露實現;
當192.168.88.101的MySQL crash時(即從庫),VIP位於192.168.88.100,對VIP的讀(3307)和寫(3308),只會分發至192.168.88.100(即主庫);
當192.168.88.100的MySQL crash時(即主庫),由於定時任務check_mysql腳本會自動檢測到MySQL異常,從而出發Heartbeat停止,於是VIP隨之偏移至192.168.88.101(即從庫)。此時對VIP的讀(3307)和寫(3308),只會分發至192.168.88.101(即新的主庫)。


