
主要是通過定位找到需要指引的目標元素,然後再在蒙版上畫一個div,設置為白色,定位到目標元素位置。思路大概就是這樣。 圖一: 圖二: 圖三: 代碼如下: 實現效果如圖二、圖三所示。 ...
主要是通過定位找到需要指引的目標元素,然後再在蒙版上畫一個div,設置為白色,定位到目標元素位置。思路大概就是這樣。
圖一:

圖二:
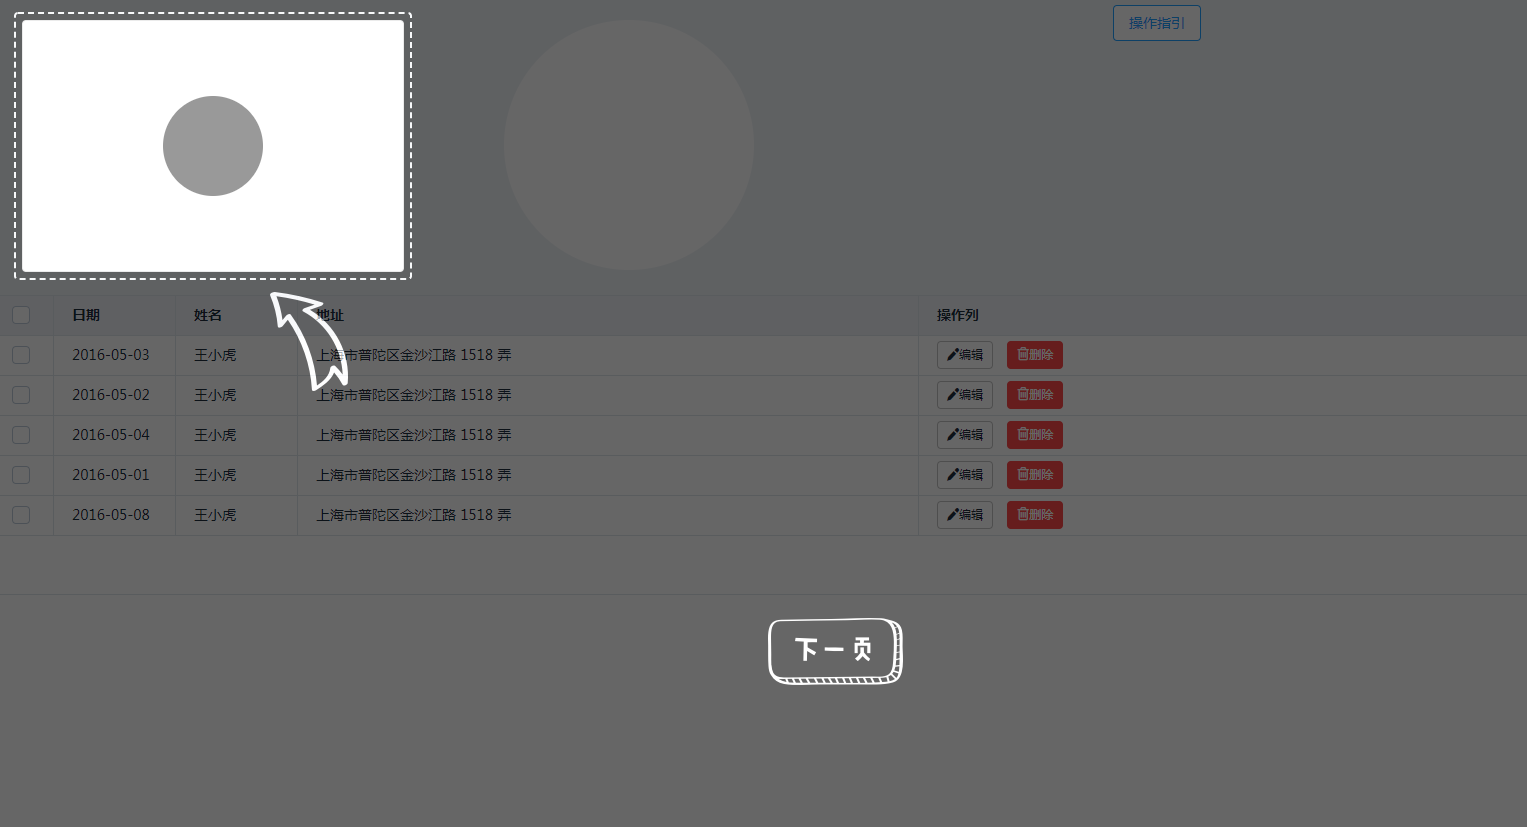
圖三:

代碼如下:
<!DOCTYPE html>
<html>
<head>
    <title></title>
    <meta charset="utf-8">
    <link rel="stylesheet" href="https://unpkg.com/[email protected]/lib/theme-default/index.css">
    <script src="https://cdn.jsdelivr.net/npm/[email protected]/dist/vue.js"></script>
    <script src="http://code.jquery.com/jquery-2.1.4.min.js"></script>
    <script src="https://unpkg.com/[email protected]/lib/index.js"></script>
    <script src="https://cdn.jsdelivr.net/npm/[email protected]"></script>
    <style>
        * {
            list-style: none;
            text-decoration: none;
            padding: 0;
            margin: 0;
        }
        .wrapper {
            width: 100%;
            height: 300px;
            background: #eef2f6;
        }
        .wrapper .arc {
            width: 250px;
            height: 250px;
            border-radius: 50%;
            background: #fff;
            transform: translate(25px, 25px);
            position: relative;
            margin-left: 100px;
            float: left;
        }
        .wrapper .content {
            width: 380px;
            height: 250px;
            float: left;
            background: #fff;
            border-radius: 4px;
            border: 1px solid #ccc;
            transform: translate(25px, 25px);
            position: relative;
        }
        .wrapper .content div{
            position: absolute;
            left: 50%;
            top: 50%;
            transform: translate(-50%, -50%);
            width: 100px;
            height: 100px;
            border-radius: 50%;
            background: #000;
        }

        .border_content {
            width: 100px;
            height: 50px;
            border: 3px dashed #000;
            border-radius: 5px;
        }

        .wrapper_mask {
            width: 100%;
            height: 100%;
            position: fixed;
            top: 0;
            left: 0;
            background: #000;
            opacity: 0.6;
            z-index: 999;
        }

        .wrapper_mask .mask_content {
            border-radius: 5px;
            width: 100%;
            height: 100%;
            background: #fff;
        }
        .mask_content_border {
            position: absolute;
            border: 2px dashed #fff;
            border-radius: 10px;
            z-index: 9999;
            box-sizing: content-box;
            transition: all 0.2s linear;
            padding:6px;
        }

        .cloneBtn {
            position: relative;
            /*z-index: 99999;*/
            right: -384px;
            top: 10px;
        }
        .mask1 .mask_content_border .arrow1{
            position: relative;
            top: 20px;
            left: 248px;
        }
        .mask_button{
            position: absolute;
            bottom: 20%;
            left: 50%;
            cursor: pointer;
        }
        /*禁止body滾動*/
        .html-body-overflow
        {
            overflow-x:hidden;
            overflow-y:hidden;
        }
    </style>
</head>
<body>
<div id="app">
    <div class="wrapper">
        <div class="content" ref="uploadReport">
            <div></div>
        </div>
        <div class="arc" ref="arc"></div>
        <el-button class="cloneBtn" @click="start">操作指引</el-button>
    </div>

    <div class="wrapper_mask" v-show="showMask" ref="wrapper_mask">
        <div class="mask1" v-if="showMaskContent == 'mask1'">
            <div class="mask_content_border" ref="maskBorder">
                <div class="mask_content" ref="maskContent"></div>
                <div class="arrow1">
                    <img src="./images/reportProject/arrow_1.png">
                </div>
            </div>
        </div>
        <div class="mask2" v-if="showMaskContent == 'mask2'">
            <div class="mask_content_border"  v-for="(item,index) in showMask2Elems"  :ref="'mask2Border'+index">
                <div class="mask_content" :ref="'mask2Content'+index"></div>
            </div>
        </div>
        <div class="mask_button" @click="nextMask()">
            <img v-if="showMaskContent != 'mask2'" src="./images/reportProject/next_page_1.png">
            <img v-if="showMaskContent == 'mask2'" src="./images/reportProject/close_btn.png">
        </div>
    </div>

    <el-table :data="data" border ref="table" :height="tableHeight" ref="table" style="width: 100%">
        <el-table-column type="selection" width="55"></el-table-column>
        <el-table-column label="日期" width="120">
            <template scope="scope">{{ scope.row.date }}</template>
        </el-table-column>
        <el-table-column prop="name" label="姓名" width="120"></el-table-column>
        <el-table-column prop="address" label="地址" show-overflow-tooltip></el-table-column>

        <el-table-column label="操作列" show-overflow-tooltip>
            <template scope="scope">
                <el-button size="small" @click="handleEdit(scope.$index, scope.row)"><i class=" el-icon-edit">編輯</i></el-button>
                <el-button size="small" type="danger" @click="handleDelete(scope.$index, scope.row)">
                    <i class="el-icon-delete2">刪除</i>
                </el-button>
            </template>
        </el-table-column>
    </el-table>


</div>
</body>
<script type="text/javascript">
    new Vue({
        el: '#app',
        data: {
            data: [
                {
                    date: '2016-05-03',
                    name: '王小虎',
                    address: '上海市普陀區金沙江路 1518 弄'
                }, {
                    date: '2016-05-02',
                    name: '王小虎',
                    address: '上海市普陀區金沙江路 1518 弄'
                }, {
                    date: '2016-05-04',
                    name: '王小虎',
                    address: '上海市普陀區金沙江路 1518 弄'
                }, {
                    date: '2016-05-01',
                    name: '王小虎',
                    address: '上海市普陀區金沙江路 1518 弄'
                }, {
                    date: '2016-05-08',
                    name: '王小虎',
                    address: '上海市普陀區金沙江路 1518 弄'
                }],
            tableHeight: 300,
            showMask: false,
            showMaskContent:'',
            showMask2Elems:[]
        },
        methods: {
            start:function(){
                this.showMask = true;
                //如果當前頁面數據比較多,出現了滾動條的話,需要禁用滾動條
                $(document.body).addClass("html-body-overflow");
                this.showMaskContent = 'mask1';
                this.getShowElemStyle();
            },
            //獲取要顯示的元素
            getShowElemStyle:function(){
                if(this.showMaskContent == 'mask1'){
                    var uploadReport = this.$refs.uploadReport;
                    //對DOM操作,需要在DOM掛載和渲染完成之後再進行,這是需要將所進行的操作放在$nextTick()中
                    this.$nextTick(function(){
                        this.setMaskContentStyle(this.$refs.maskContent,this.$refs.maskBorder,uploadReport);
                    });
                }
                if(this.showMaskContent == 'mask2'){
                    var table = this.$refs.table;
                    var el_table__body = table.$el.querySelector('.el-table__body tr');
                    var allTd = el_table__body.querySelectorAll('td');
                    //需要顯示的三個元素
                    var td1 = allTd[1];
                    var td2 = allTd[3];
                    var td3 = allTd[4].querySelectorAll('button');
                    this.showMask2Elems.push(td1,td2,td3[0]);
                    this.$nextTick(function(){
                        for(var i=0;i<this.showMask2Elems.length;i++){
                            var param1 = this.$refs['mask2Content'+i][0];
                            var param2 = this.$refs['mask2Border'+i][0];
                            this.setMaskContentStyle(param1,param2,this.showMask2Elems[i]);
                        }
                    });
                }
            },
            //元素定位
            setMaskContentStyle:function(maskContent,maskBorder,targetEle){
                //getBoundingClientRect用於獲得頁面中某個元素的左,上,右和下分別相對瀏覽器視窗的位置。
                var contentRect = targetEle.getBoundingClientRect();
                var styles = [
                    { property: 'width', distance: 'distance'},
                    { property: 'height', distance: 'distance' },
                    { property: 'left' },
                    { property: 'top' }
                ];
                var paddingWidth = 12;
                for(var i=0;i<styles.length;i++){
                    var finalDistance = 0;
                    if(styles[i].distance){
                        finalDistance = contentRect[styles[i].property];
                    }else{
                        finalDistance = contentRect[styles[i].property] - paddingWidth/2-2;
                    }
                    maskBorder.style[styles[i].property] = finalDistance + 'px';
                    var borderRadius = parseInt(this.getStyle(targetEle, 'borderRadius')) ? this.getStyle(targetEle, 'borderRadius') : '4px';
                    maskBorder.style.borderRadius = borderRadius;
                    maskContent.style.borderRadius = borderRadius;
                }
            },
            getStyle:function(el,attr){
                return el.currentStyle ? el.currentStyle[attr] : getComputedStyle(el,false)[attr];
            },
            //顯示下一個mask
            nextMask:function(){
                if(this.showMaskContent == 'mask1'){
                    this.showMaskContent = 'mask2'
                }else if(this.showMaskContent == 'mask2'){
                    this.showMask = false;
                    this.showMaskContent = 'mask1';
                    //恢復滾動條
                    $(document.body).removeClass("html-body-overflow");
                }
                this.getShowElemStyle();
            }
        }
    });
</script>
</html>
實現效果如圖二、圖三所示。


