前言 開心一刻 小白問小明:“你前面有一個5米深的坑,裡面沒有水,如果你跳進去後該怎樣出來了?”小明:“躺著出來唄,還能怎麼出來?”小白:“為什麼躺著出來?”小明:“5米深的坑,還沒有水,跳下去不死就很幸運了,殘是肯定會殘的,不躺著出來,那能怎麼出來?”小白:“假設沒死也沒殘呢?”小明:“你當我超人 ...
前言
開心一刻
小白問小明:“你前面有一個5米深的坑,裡面沒有水,如果你跳進去後該怎樣出來了?”小明:“躺著出來唄,還能怎麼出來?”小白:“為什麼躺著出來?”小明:“5米深的坑,還沒有水,跳下去不死就很幸運了,殘是肯定會殘的,不躺著出來,那能怎麼出來?”小白:“假設沒死也沒殘呢?”小明:“你當我超人了? 那也簡單,把腦子裡的水放出來就可以漂出來了。”小白:“你腦子裡有這麼多水嗎?”小明:“我腦子裡沒那麼多水我跳下去幹嘛?”
路漫漫其修遠兮,吾將上下而求索!
github:https://github.com/youzhibing
碼雲(gitee):https://gitee.com/youzhibing
springboot 1.x到2.x變動的內容還是挺多的,而2.x之間也存在細微的差別,本文不講這些差別(具體差別我也不知道,汗......),只講1.5.9與2.0.3的redis緩存配置的區別
springboot1.5.9緩存配置
工程實現
1.x系列配置應該都差不多,下麵我們看看1.5.9中,springboot集成redis的緩存實現
pom.xml

<?xml version="1.0" encoding="UTF-8"?>
<project xmlns="http://maven.apache.org/POM/4.0.0"
         xmlns:xsi="http://www.w3.org/2001/XMLSchema-instance"
         xsi:schemaLocation="http://maven.apache.org/POM/4.0.0 http://maven.apache.org/xsd/maven-4.0.0.xsd">
    <modelVersion>4.0.0</modelVersion>

    <groupId>com.lee</groupId>
    <artifactId>spring-boot159.cache</artifactId>
    <version>1.0-SNAPSHOT</version>

    <properties>
        <java.version>1.8</java.version>
    </properties>

    <parent>
        <groupId>org.springframework.boot</groupId>
        <artifactId>spring-boot-starter-parent</artifactId>
        <version>1.5.9.RELEASE</version>
    </parent>

    <dependencies>

        <dependency>
            <groupId>org.springframework.boot</groupId>
            <artifactId>spring-boot-starter-web</artifactId>
        </dependency>

        <dependency>
            <groupId>org.springframework.boot</groupId>
            <artifactId>spring-boot-starter-data-redis</artifactId>
        </dependency>

    </dependencies>
</project>
View Code
application.yml

server:
  port: 8888
spring:
  #redis配置
  redis:
    database: 0
    host: 127.0.0.1
    port: 6379
    password:
    # 連接超時時間(毫秒)
    timeout: 2000
    pool:
      # 連接池最大連接數(使用負值表示沒有限制)
      max-active: 8
      # 連接池最大阻塞等待時間(使用負值表示沒有限制)
      max-wait: -1
      # 連接池中的最大空閑連接
      max-idle: 8
      # 連接池中的最小空閑連接
      min-idle: 0
  cache:
    type: redis
cache:
  expire-time: 180
View Code
RedisCacheConfig.java

package com.lee.cache.config;

import com.fasterxml.jackson.annotation.JsonAutoDetect;
import com.fasterxml.jackson.annotation.PropertyAccessor;
import com.fasterxml.jackson.databind.ObjectMapper;
import org.springframework.beans.factory.annotation.Value;
import org.springframework.cache.CacheManager;
import org.springframework.cache.annotation.CachingConfigurerSupport;
import org.springframework.cache.annotation.EnableCaching;
import org.springframework.cache.interceptor.KeyGenerator;
import org.springframework.context.annotation.Bean;
import org.springframework.context.annotation.Configuration;
import org.springframework.data.redis.cache.RedisCacheManager;
import org.springframework.data.redis.connection.RedisConnectionFactory;
import org.springframework.data.redis.core.RedisTemplate;
import org.springframework.data.redis.core.StringRedisTemplate;
import org.springframework.data.redis.serializer.Jackson2JsonRedisSerializer;

/**
 *  必須繼承CachingConfigurerSupport,不然此類中生成的Bean不會生效(沒有替換掉預設生成的,只是一個普通的bean)
 *  springboot預設生成的緩存管理器和redisTemplate支持的類型很有限,根本不滿足我們的需求,會拋出如下異常:
 *      org.springframework.cache.interceptor.SimpleKey cannot be cast to java.lang.String
 */
@Configuration
@EnableCaching
public class RedisCacheConfig extends CachingConfigurerSupport {

    @Value("${cache.expire-time:180}")
    private int expireTime;

    // 配置key生成器,作用於緩存管理器管理的所有緩存
    // 如果緩存註解(@Cacheable、@CacheEvict等)中指定key屬性,那麼會覆蓋此key生成器
    @Bean
    public KeyGenerator keyGenerator() {
        return (target, method, params) -> {
            StringBuilder sb = new StringBuilder();
            sb.append(target.getClass().getName());
            sb.append(method.getName());
            for (Object obj : params) {
                sb.append(obj.toString());
            }
            return sb.toString();
        };
    }

    // 緩存管理器管理的緩存都需要有對應的緩存空間,否則拋異常:No cache could be resolved for 'Builder...
    @Bean
    public CacheManager cacheManager(RedisTemplate redisTemplate) {
        RedisCacheManager rcm = new RedisCacheManager(redisTemplate);
        rcm.setDefaultExpiration(expireTime);               //設置緩存管理器管理的緩存的過期時間, 單位:秒
        return rcm;
    }

    @Bean
    public RedisTemplate<String, String> redisTemplate(RedisConnectionFactory factory) {
        StringRedisTemplate template = new StringRedisTemplate(factory);
        Jackson2JsonRedisSerializer jackson2JsonRedisSerializer = new Jackson2JsonRedisSerializer(Object.class);
        ObjectMapper om = new ObjectMapper();
        om.setVisibility(PropertyAccessor.ALL, JsonAutoDetect.Visibility.ANY);
        om.enableDefaultTyping(ObjectMapper.DefaultTyping.NON_FINAL);
        jackson2JsonRedisSerializer.setObjectMapper(om);
        template.setValueSerializer(jackson2JsonRedisSerializer);
        template.afterPropertiesSet();
        return template;
    }
}
View Code
CacheServiceImpl.java

package com.lee.cache.service.impl;

import com.lee.cache.model.User;
import com.lee.cache.service.ICacheService;
import org.springframework.beans.factory.annotation.Autowired;
import org.springframework.cache.annotation.Cacheable;
import org.springframework.data.redis.core.RedisTemplate;
import org.springframework.stereotype.Service;
import org.springframework.util.StringUtils;

import java.util.ArrayList;
import java.util.List;

/**
 * 若未配置@CacheConfig(cacheNames = "hello"), 則@Cacheable一定要配置value,相當於指定緩存空間
 * 否則會拋異常:No cache could be resolved for 'Builder...
 *
 * 若@CacheConfig(cacheNames = "hello") 與 @Cacheable(value = "123")都配置了, 則@Cacheable(value = "123")生效
 *
 * 當然@CacheConfig還有一些其他的配置項,Cacheable也有一些其他的配置項
 */
@Service
public class CacheServiceImpl implements ICacheService {

    @Autowired
    private RedisTemplate<String, String> redisTemplate;

    @Override
    @Cacheable(value = "test")                                                    // key用的自定義的KeyGenerator
    public String getName() {
        System.out.println("getName, no cache now...");
        return "brucelee";
    }

    @Override
    @Cacheable(value = "user", key = "methodName + '_' + #p0", unless = "#result.size() <= 0")      // key會覆蓋掉KeyGenerator
    public List<User> listUser(int pageNum, int pageSize) {
        System.out.println("listUser no cache now...");
        List<User> users = new ArrayList<>();
        users.add(new User("zhengsan", 22));
        users.add(new User("lisi", 20));
        System.out.println("===========");
        return users;
    }

    /**
     * 緩存不是緩存管理器管理,那麼不受緩存管理器的約束
     * 緩存管理器中的配置不適用與此
     * 這裡相當於我們平時直接通過redis-cli操作redis
     * @return
     */
    @Override
    public String getUserName() {

        String userName = redisTemplate.opsForValue().get("userName");
        if (!StringUtils.isEmpty(userName)) {
            return userName;
        }

        System.out.println("getUserName, no cache now...");
        redisTemplate.opsForValue().set("userName", "userName");
        return "userName";
    }

}
View Code
上述只講了幾個主要的文件,更多詳情請點springboot159-cache
redis 怎樣保存cache
大家一定要把工程仔細看一遍,不然下麵出現的一些名稱會讓我們感覺不知從哪來的;

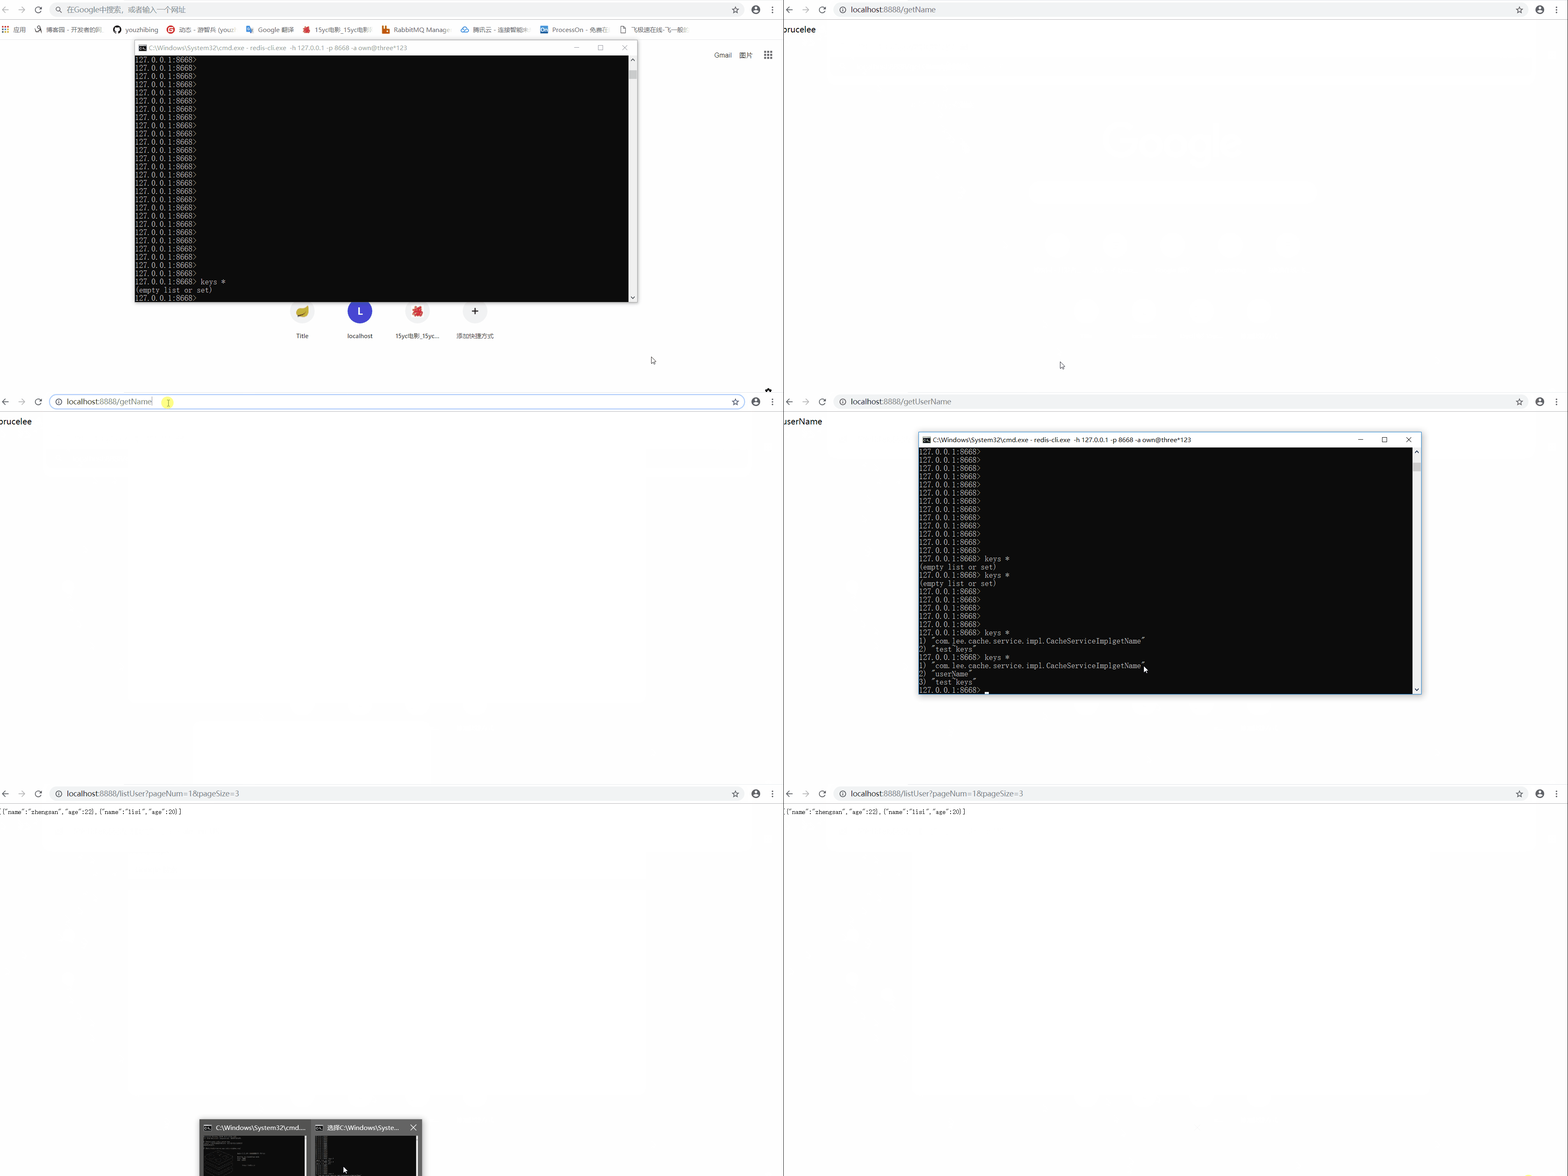
工程中的緩存分兩種:緩存管理器管理的緩存(也就是一些列註解實現的緩存)、redisTemplate操作的緩存
緩存管理器管理的緩存
會在redis中增加2條數據,一個是類型為 zset 的 緩存名~keys , 裡面存放了該緩存所有的key, 另一個是對應的key,值為序列化後的json;緩存名~keys可以理解成緩存空間,與我們平時所說的具體的緩存是不一樣的。另外對緩存管理器的一些設置(全局過期時間等)都會反映到緩存管理器管理的所有緩存上;上圖中的http://localhost:8888/getName和http://localhost:8888/listUser?pageNum=1&pageSize=3對應的是緩存管理器管理的緩存。
redisTemplate操作的緩存
會在redis中增加1條記錄,key - value鍵值對,與我們通過redis-cli操作緩存一樣;上圖中的http://localhost:8888/getUserName對應的是redisTemplate操作的緩存。
spring2.0.3緩存配置
工程實現
pom.xml

<?xml version="1.0" encoding="UTF-8"?>
<project xmlns="http://maven.apache.org/POM/4.0.0"
         xmlns:xsi="http://www.w3.org/2001/XMLSchema-instance"
         xsi:schemaLocation="http://maven.apache.org/POM/4.0.0 http://maven.apache.org/xsd/maven-4.0.0.xsd">
    <modelVersion>4.0.0</modelVersion>

    <groupId>com.lee</groupId>
    <artifactId>spring-boot-cache</artifactId>
    <version>1.0-SNAPSHOT</version>

    <parent>
        <groupId>org.springframework.boot</groupId>
        <artifactId>spring-boot-starter-parent</artifactId>
        <version>2.0.3.RELEASE</version>
    </parent>

    <dependencies>

        <dependency>
            <groupId>org.springframework.boot</groupId>
            <artifactId>spring-boot-starter-web</artifactId>
        </dependency>

        <dependency>
            <groupId>org.springframework.boot</groupId>
            <artifactId>spring-boot-starter-data-redis</artifactId>
        </dependency>
        <dependency>
            <groupId>org.apache.commons</groupId>
            <artifactId>commons-pool2</artifactId>
        </dependency>
        <dependency>
            <groupId>org.apache.commons</groupId>
            <artifactId>commons-lang3</artifactId>
        </dependency>

    </dependencies>
</project>
View Code
application.yml

server:
  port: 8889
spring:
  #redis配置
  redis:
    database: 0
    host: 127.0.0.1
    port: 6379
    password:
    lettuce:
      pool:
        # 接池最大連接數(使用負值表示沒有限制)
        max-active: 8
        # 連接池最大阻塞等待時間(使用負值表示沒有限制)
        max-wait: -1ms
        # 連接池中的最小空閑連接
        max-idle: 8
        # 連接池中的最大空閑連接
        min-idle: 0
    # 連接超時時間
    timeout: 2000ms
  cache:
    type: redis
cache:
  test:
    expire-time: 180
    name: test
  default:
    expire-time: 200
View Code
緩存定製:RedisCacheManagerConfig.java

package com.lee.cache.config;

import org.springframework.beans.factory.annotation.Value;
import org.springframework.cache.CacheManager;
import org.springframework.context.annotation.Bean;
import org.springframework.context.annotation.Configuration;
import org.springframework.data.redis.cache.RedisCacheConfiguration;
import org.springframework.data.redis.cache.RedisCacheManager;
import org.springframework.data.redis.connection.RedisConnectionFactory;
import org.springframework.data.redis.serializer.GenericJackson2JsonRedisSerializer;
import org.springframework.data.redis.serializer.RedisSerializationContext;
import org.springframework.data.redis.serializer.StringRedisSerializer;

import java.time.Duration;
import java.util.HashMap;
import java.util.HashSet;
import java.util.Map;
import java.util.Set;

/**
 * 進行緩存管理的定製
 * 可以不配置,採用springboot預設的也行
 */
@Configuration
public class RedisCacheManagerConfig {

    @Value("${cache.default.expire-time:1800}")
    private int defaultExpireTime;
    @Value("${cache.test.expire-time:180}")
    private int testExpireTime;
    @Value("${cache.test.name:test}")
    private String testCacheName;


    //緩存管理器
    @Bean
    public CacheManager cacheManager(RedisConnectionFactory lettuceConnectionFactory) {
        RedisCacheConfiguration defaultCacheConfig = RedisCacheConfiguration.defaultCacheConfig();
        // 設置緩存管理器管理的緩存的預設過期時間
        defaultCacheConfig = defaultCacheConfig.entryTtl(Duration.ofSeconds(defaultExpireTime))
                // 設置 key為string序列化
                .serializeKeysWith(RedisSerializationContext.SerializationPair.fromSerializer(new StringRedisSerializer()))
                // 設置value為json序列化
                .serializeValuesWith(RedisSerializationContext.SerializationPair.fromSerializer(new GenericJackson2JsonRedisSerializer()))
                // 不緩存空值
                .disableCachingNullValues();

        Set<String> cacheNames = new HashSet<>();
        cacheNames.add(testCacheName);

        // 對每個緩存空間應用不同的配置
        Map<String, RedisCacheConfiguration> configMap = new HashMap<>();
        configMap.put(testCacheName, defaultCacheConfig.entryTtl(Duration.ofSeconds(testExpireTime)));

        RedisCacheManager cacheManager = RedisCacheManager.builder(lettuceConnectionFactory)
                .cacheDefaults(defaultCacheConfig)
                .initialCacheNames(cacheNames)
                .withInitialCacheConfigurations(configMap)
                .build();
        return cacheManager;
    }
}
View Code
此類可不用配置,就用spring-boot自動配置的緩存管理器也行,只是在緩存的可閱讀性上會差一些。有興趣的朋友可以刪除此類試試。
CacheServiceImpl.java

package com.lee.cache.service.impl;

import com.lee.cache.model.User;
import com.lee.cache.service.ICacheService;
import org.apache.commons.lang3.StringUtils;
import org.springframework.beans.factory.annotation.Autowired;
import org.springframework.cache.annotation.CacheConfig;
import org.springframework.cache.annotation.Cacheable;
import org.springframework.data.redis.core.RedisTemplate;
import org.springframework.stereotype.Service;

import java.util.ArrayList;
import java.util.List;

/**
 * 若未配置@CacheConfig(cacheNames = "hello"), 則@Cacheable一定要配置value
 * 若@CacheConfig(cacheNames = "hello") 與 @Cacheable(value = "123")都配置了, 則@Cacheable(value = "123") 生效
 *
 * 當然@CacheConfig還有一些其他的配置項,Cacheable也有一些其他的配置項
 */
@Service
public class CacheServiceImpl implements ICacheService {

    @Autowired
    private RedisTemplate<String, String> redisTemplate;

    @Override
    @Cacheable(value = "test", key = "targetClass + '_' + methodName")
    public String getName() {
        System.out.println("getName, no cache now...");
        return "brucelee";
    }

    @Override
    @Cacheable(value = "user", key = "targetClass + ':' + methodName + '_' + #p0", unless = "#result.size() <= 0")
    public List<User> listUser(int pageNum, int pageSize) {
        System.out.println("listUser no cache now...");
        List<User> users = new ArrayList<>();
        users.add(new User("zhengsan", 22));
        users.add(new User("lisi", 20));
        return users;
    }

    /**
     * 緩存不是緩存管理器管理,那麼不受緩存管理器的約束
     * 緩存管理器中的配置不適用與此
     * 這裡相當於我們平時直接通過redis-cli操作redis
     * @return
     */
    @Override
    public String getUserName() {

        String userName = redisTemplate.opsForValue().get("userName");
        if (StringUtils.isNotEmpty(userName)) {
            return userName;
        }

        System.out.println("getUserName, no cache now...");
        redisTemplate.opsForValue().set("userName", "userName");
        return "userName";
    }

}
View Code
更多詳情請點spring-boot-cache
redis 怎樣保存cache
我們來看圖說話,看看緩存在redis中是如何保存的

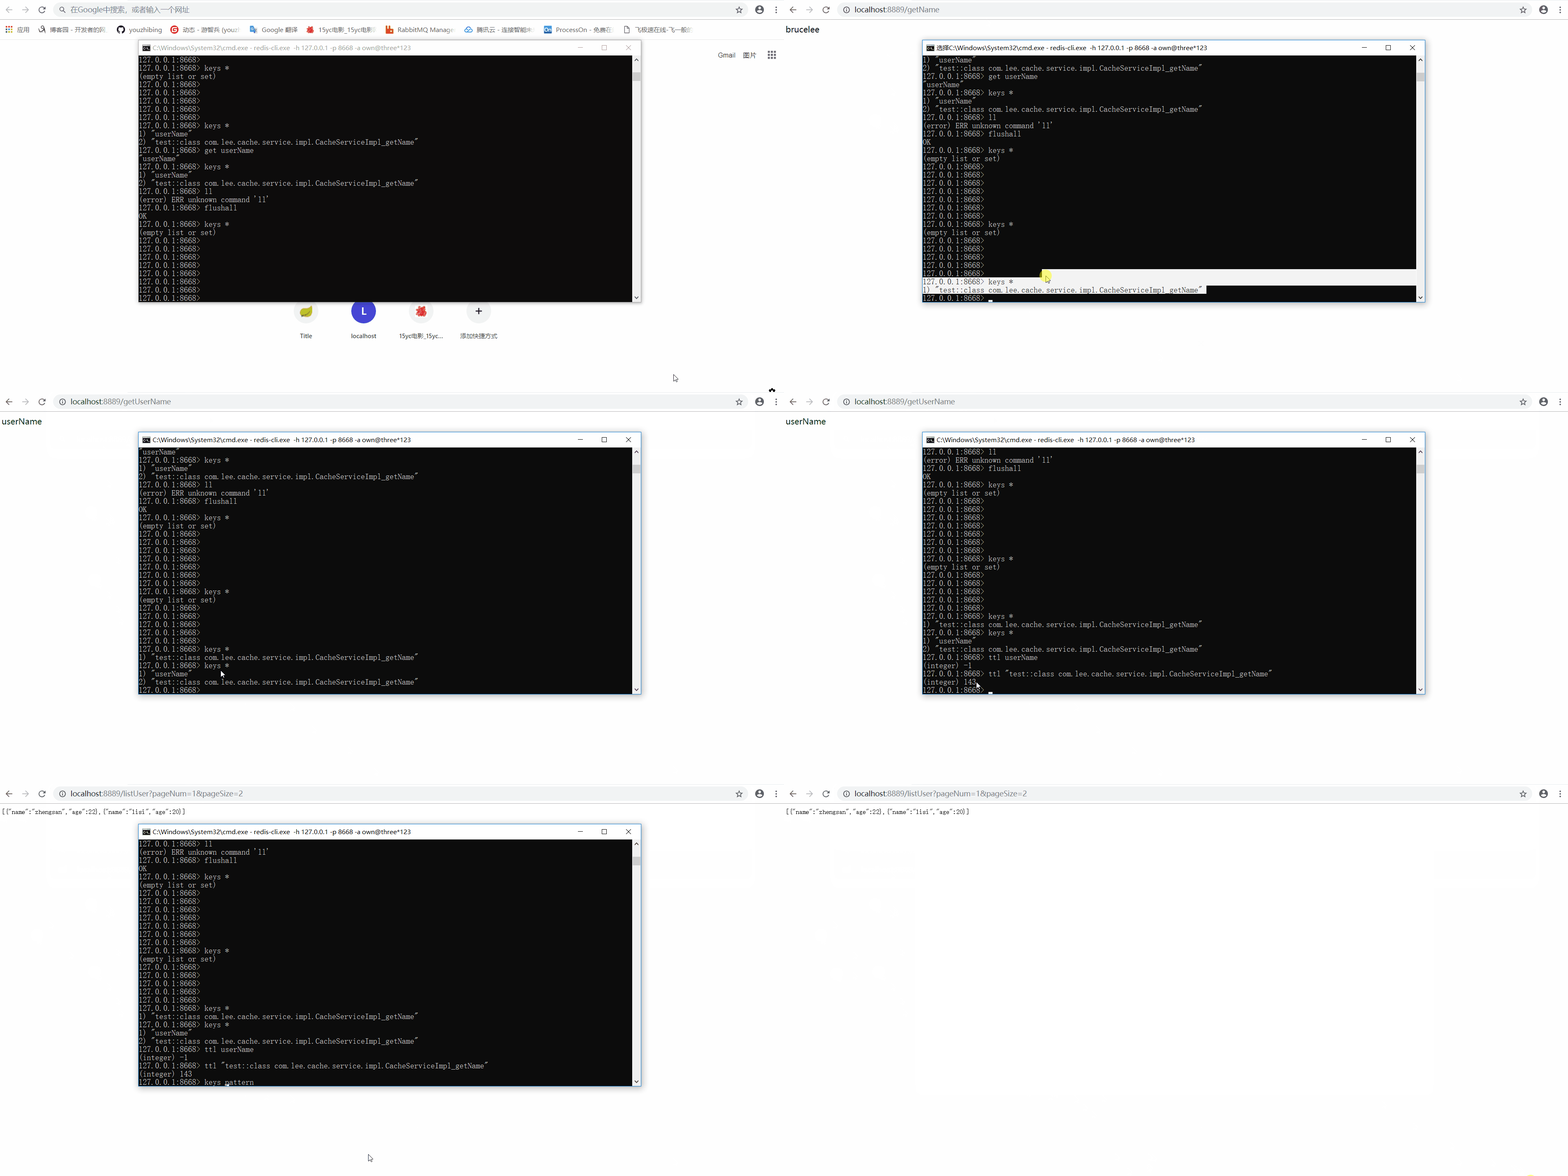
工程中的緩存分兩種:緩存管理器管理的緩存(也就是一些列註解實現的緩存)、redisTemplate操作的緩存
緩存管理器管理的緩存
會在redis中增加1條數據,key是以緩存空間開頭的字元串(緩存空間名::緩存key),值為序列化後的json;上圖中的http://localhost:8889/getName和http://localhost:8889/listUser?pageNum=1&pageSize=3對應的是緩存管理器管理的緩存。
redisTemplate操作的緩存
會在redis中增加1條記錄,key - value鍵值對,與我們通過redis-cli操作緩存一樣;上圖中的http://localhost:8889/getUserName對應的是redisTemplate操作的緩存。
總結
1、有時候我們引入spring-boot-starter-cache這個starter只是為了快速添加緩存依賴,目的是引入spring-context-support;如果我們的應用中中已經有了spring-context-support,那麼我們無需再引入spring-boot-starter-cache,例如我們的應用中依賴了spring-boot-starter-web,而spring-boot-starter-web中又有spring-context-support依賴,所以我們無需再引入spring-boot-starter-cache。
2、Supported Cache Providers,講了支持的緩存類型以及預設情況下的緩存載入方式,可以通讀下。
3、只要我們引入了redis依賴,並將redis的連接信息配置正確,springboot(2.0.3)根據我們的配置會給我們生成預設的緩存管理器和redisTemplate;我們也可以自定義我們自己的緩存管理器來替換掉預設的,只要我們自定義了緩存管理器和redisTemplate,那麼springboot的預設生成的會替換成我們自定義的。
4、緩存管理器對緩存的操作也是通過redisTemplate實現的,只是進行了統一的管理,並且能夠減少我麽的代碼量,我們可以將更多的精力放到業務處理上。
5、redis-cli -h 127.0.0.1 -p 6379 -a 123456與redis-cli -a 123456兩種方式訪問到的數據完全不一致,好像操作不同的庫一樣! 這個需要註意,有空我回頭看看這兩者到底有啥區別,有知道的朋友可以留個言。
最後緬懷一下:金庸走了,再無江湖;IG捧杯了,再無LOL!感謝IG成就了我的完美謝幕,讓我的青春少了一份遺憾,謝謝!
參考
spring boot(三):Spring Boot中Redis的使用


