
環境搭建 無人值守搭建 LNMP一鍵安裝包無人值守命令生成器 支持LAMP/LNMP/LNMPA的一鍵搭建,根據自己的需求配置好之後點擊生成就會生成腳本,然後只需簡單的複製粘貼,再去喝杯咖啡回來後即可享受已經生成好的環境。 當然前提是你要把虛擬機的網路配置好吆~一定要能夠和外網連通哦(づ ̄ 3 ̄)づ ...
環境搭建
-
無人值守搭建
支持LAMP/LNMP/LNMPA的一鍵搭建,根據自己的需求配置好之後點擊生成就會生成腳本,然後只需簡單的複製粘貼,再去喝杯咖啡回來後即可享受已經生成好的環境。
當然前提是你要把虛擬機的網路配置好吆~一定要能夠和外網連通哦(づ ̄ 3 ̄)づ
-
手動搭建【LAMP】
突然想起來,之前給一位同學錄的視頻,剛好是從虛擬機搭建到LAMP環境的配置,這邊剛好拿來用,O(∩_∩)O哈哈~
錄視頻的時候忘記關閉錄製聲音了,所以看視頻的時候未滿18歲的一定要把聲音關了,不關的請在大人陪同下觀看~
鏈接:https://pan.baidu.com/s/1RMHzve9y3XnbMe_3zeL-cg 密碼:r7yq
好了,正文開始恢復快照,開始搭建LAMP
快照環境:
IP配置完成
防火牆已關閉/selinux已關閉
LAMP包已經導入
鏡像已導入
參考文檔:
龍哥秘制~
第一步:配置本地yum源
1.掛載鏡像
1.1 直接掛載鏡像文件,前提鏡像文件已經導入,本人比較喜歡,有安全感,掛載後不要忘記查看下~
# mount -o loop CentOS-6.8-i386-bin-DVD1.iso /mnt/
# ll /mnt/
總用量 542
-r--r--r--. 2 root root 14 5月 22 2016 CentOS_BuildTag
-r--r--r--. 2 root root 212 11月 27 2013 EULA
-r--r--r--. 2 root root 18009 11月 27 2013 GPL
dr-xr-xr-x. 3 root root 2048 5月 23 2016 images
dr-xr-xr-x. 2 root root 2048 5月 22 2016 isolinux
dr-xr-xr-x. 2 root root 514048 5月 23 2016 Packages
-r--r--r--. 2 root root 1359 5月 22 2016 RELEASE-NOTES-en-US.html
dr-xr-xr-x. 2 root root 4096 5月 23 2016 repodata
-r--r--r--. 2 root root 1706 11月 27 2013 RPM-GPG-KEY-CentOS-6
-r--r--r--. 2 root root 1730 11月 27 2013 RPM-GPG-KEY-CentOS-Debug-6
-r--r--r--. 2 root root 1730 11月 27 2013 RPM-GPG-KEY-CentOS-Security-6
-r--r--r--. 2 root root 1734 11月 27 2013 RPM-GPG-KEY-CentOS-Testing-6
-r--r--r--. 1 root root 3165 5月 23 2016 TRANS.TBL
1.2 掛載光碟機/dev/cdrom,總感覺這樣掛載會少點什麼所以我一般不用這個掛載
# mount -o loop /dev/cdrom /mnt/
上面掛載都只是臨時的,一旦重啟將會消失,因為我們都想持久,所以這裡我們要轉下
2.在/opt下創建文件夾centos
# mkdir /opt/centos
3.將/mnt下的文件複製到/opt/centos下
# cp -rvf /mnt/* /opt/centos
4.將原有yum源移到備份文件夾中
# mv /etc/yum.repos.d/* /yumback
5.製作本地yum源
# vi /etc/yum.repos.d/centos.repo
[centos] #倉庫的名稱必須是獨一無二的
name=centos #對倉庫的描述
gpgcheck=0 #是否是否進行gpg(GNU Private Guard) 校驗,以確定rpm 包的來源是有效和安全的。1開啟0關閉
enabled=1 #組的可用性,1可用0不可用
baseurl=file:///opt/centos #倉庫地址支持file/ftp/url/http 我知道就這些,因為本地所以我們使用file協議即可
6.清除緩存並重新顯示所有軟體包
# yum clean all
# yum list
ps:遇到報錯可能有以下原因
1.防火牆未關閉
2.yum配置錯誤
3.具體請看報錯信息,yum的總結的文件在另一個筆記本上,但是一般都是這兩個問題~
第二步: 解壓源碼包/安裝gcc和gcc-c++
開兩個遠程視窗,一個解壓一個安裝
# yum install -y gcc gcc-c++
#編寫解壓腳本
# vi tar.sh
#!/bin/bash
ls lamp/ > list
for TAR in `cat list`

do
  tar -zxvf lamp/$TAR -C lamp/
done
rm list
# chmod 777 tar.sh

# sh tar.sh
第三步:安裝軟體包
1.安裝libxml2
1.1 安裝libxml2-devel python-devel
yum install -y libxml2-devel python-devel
1.2 進入到lamp/libxml2-2.9.1目錄下執行檢查和編譯安裝
[root@centos_6_8 ~]# cd lamp/libxml2-2.9.1
[root@centos_6_8 libxml2-2.9.1]# ./configure --prefix=/usr/local/libxml2/   #進行下一步的時候,請確定是檢查完成而不是因為錯誤停止,否則無法進行編譯安裝
[root@centos_6_8 libxml2-2.9.1]# make && make install
2.安裝libmcrypt
每一次安裝下一個軟體包的時候,都必須保證上一個軟體包是真正的安裝完成停止的,不是因為錯誤而停止的.
2.1 進入到lamp/libmcrypt-2.5.8目錄下執行檢查和編譯安裝
[root@centos_6_8 ~]# cd lamp/libmcrypt-2.5.8
[root@centos_6_8 libmcrypt-2.5.8]# ./configure --prefix=/usr/local/libmcrypt/
[root@centos_6_8 libmcrypt-2.5.8]# make && make install
2.2 進入到lamp/libmcrypt-2.5.8/libltdl/目錄下執行檢查和編譯安裝
[root@centos_6_8 libmcrypt-2.5.8]# cd libltdl/
[root@centos_6_8 libltdl]#  ./configure --enable-ltdl-install
[root@centos_6_8 libltdl]# make && make install
3.安裝mhash
[root@centos_6_8 ~]# cd lamp/mhash-0.9.9.9
[root@centos_6_8 mhash-0.9.9.9]# ./configure
[root@centos_6_8 mhash-0.9.9.9]# make && make install
4.安裝mcrypt
[root@centos_6_8 ~]# cd lamp/mcrypt-2.6.8
[root@centos_6_8 mcrypt-2.6.8]# LD_LIBRARY_PATH=/usr/local/libmcrypt/lib:/usr/local/lib ./configure --with-libmcrypt-prefix=/usr/local/libmcrypt
[root@centos_6_8 mcrypt-2.6.8]# make && make install
5.安裝zlib
[root@centos_6_8 ~]# cd lamp/zlib-1.2.3
[root@centos_6_8 zlib-1.2.3]# ./configure
[root@centos_6_8 zlib-1.2.3]# make && make install >>/root/zlib.log
6.安裝libpng
[root@centos_6_8 ~]# cd lamp/libpng-1.2.31
[root@centos_6_8 libpng-1.2.31]#  ./configure --prefix=/usr/local/libpng
[root@centos_6_8 libpng-1.2.31]# make && make install
7.安裝jpeg6
7.1 手動創建目錄
mkdir /usr/local/jpeg6
mkdir /usr/local/jpeg6/bin
mkdir /usr/local/jpeg6/lib
mkdir /usr/local/jpeg6/include
mkdir -p /usr/local/jpeg6/man/man1
7.2 進入到lamp/jpeg-6b的目錄進行編譯安裝
[root@centos_6_8 ~]# cd lamp/jpeg-6b/
[root@centos_6_8 jpeg-6b]#  ./configure --prefix=/usr/local/jpeg6/ --enable-shared --enable-static
[root@centos_6_8 jpeg-6b]# make && make install
8.安裝freetype
[root@centos_6_8 ~]# cd lamp/freetype-2.3.5
[root@centos_6_8 freetype-2.3.5]# ./configure --prefix=/usr/local/freetype/
[root@centos_6_8 freetype-2.3.5]# make && make install
9.安裝Apache
9.1 將apr-1.4.6和apr-util-1.4.1複製到httpd-2.4.7的目錄下
#cp  -rvf  lamp/apr-1.4.6  lamp/httpd-2.4.7/srclib/apr
#cp  -rvf  lamp/apr-util-1.4.1  lamp/httpd-2.4.7/srclib/apr-util
9.2 進入到lamp/pcre-8.34目錄進行編譯安裝
[root@centos_6_8 ~]# cd lamp/pcre-8.34
[root@centos_6_8 pcre-8.34]# ./configure && make && make install
9.3 進入到 lamp/httpd-2.4.7目錄進行編譯安裝
[root@centos_6_8 ~]# cd lamp/httpd-2.4.7/
[root@centos_6_8 httpd-2.4.7]#  ./configure --prefix=/usr/local/apache2/ --sysconfdir=/usr/local/apache2/etc/ --with-included-apr --enable-so --enable-deflate=shared --enable-expires=shared --enable-rewrite=shared
[root@centos_6_8 httpd-2.4.7]# make && make install
9.4 啟動測試
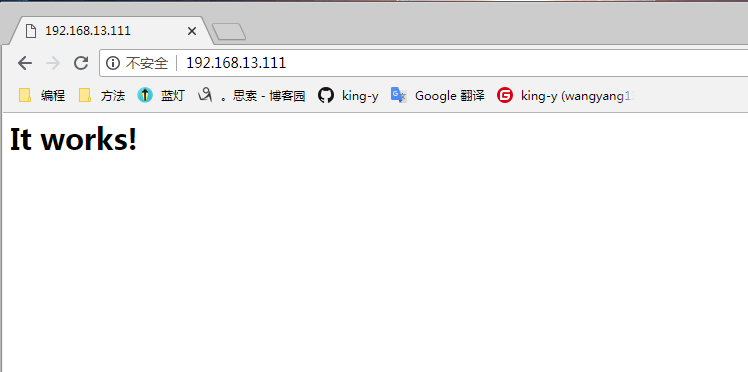
9.4.1 查看服務進程是否運行
[root@centos_6_8 ~]# /usr/local/apache2/bin/apachectl start
AH00558: httpd: Could not reliably determine the server's fully qualified domain name, using 192.168.13.111. Set the 'ServerName' directive globally to suppress this message
 [root@centos_6_8 ~]# ps aux | grep httpd
 root 8650 0.0 0.2 5196 2444 ? Ss 11:42 0:00 /usr/local/apache2//bin/httpd -k start
 daemon 8651 0.0 0.2 282928 2148 ? Sl 11:42 0:00 /usr/local/apache2//bin/httpd -k start
 daemon 8652 0.0 0.2 282928 2152 ? Sl 11:42 0:00 /usr/local/apache2//bin/httpd -k start
 daemon 8653 0.0 0.2 282928 2152 ? Sl 11:42 0:00 /usr/local/apache2//bin/httpd -k start
 root 8738 0.0 0.0 6056 760 pts/0 S+ 11:42 0:00 grep httpd
9.4.2 通過瀏覽器輸入地址訪問:http://Apache伺服器IP地址,若顯示“It works”即表明Apache正常工作
暫停一下...明天繼續...
項目導入
一鍵搭建的環境非常簡單!簡單到令人髮指啊!所以這時候請先感謝大牛給我們這些小白帶來的便利。
有條件的話,大家也可以支持下,且行且珍惜~

正片開始
第一步:
添加虛擬主機
[root@centos_6_8 ~]# lnmp vhost add
+-------------------------------------------+ | Manager for LNMP, Written by Licess | +-------------------------------------------+ | https://lnmp.org | +-------------------------------------------+ Please enter domain(example: www.lnmp.org): www.tt.com Your domain: www.tt.com Enter more domain name(example: lnmp.org *.lnmp.org): tt.com domain list: tt.com Please enter the directory for the domain: www.tt.com Default directory: /home/wwwroot/www.tt.com: Virtual Host Directory: /home/wwwroot/www.tt.com Allow Rewrite rule? (y/n) n You choose rewrite: none Allow access log? (y/n) y Enter access log filename(Default:www.tt.com.log): You access log filename: www.tt.com.log Create database and MySQL user with same name (y/n) y Enter current root password of Database (Password will not shown): ERROR 1045 (28000): Access denied for user 'root'@'localhost' (using password: YES) Enter current root password of Database (Password will not shown): OK, MySQL root password correct. Enter database name: project Your will create a database and MySQL user with same name: project Please enter password for mysql user project: 000000 Your password: 000000 Add SSL Certificate (y/n) n Press any key to start create virtul host... Create Virtul Host directory...... set permissions of Virtual Host directory...... You select the exist rewrite rule:/usr/local/nginx/conf/none.conf Test Nginx configure file...... nginx: the configuration file /usr/local/nginx/conf/nginx.conf syntax is ok nginx: configuration file /usr/local/nginx/conf/nginx.conf test is successful Reload Nginx...... Gracefully shutting down php-fpm done Starting php-fpm done Add database Sucessfully. ================================================ Virtualhost infomation: Your domain: www.tt.com Home Directory: /home/wwwroot/www.tt.com Rewrite: none Enable log: yes Database username: project Database userpassword: 000000 Database Name: project Create ftp account: no ================================================

具體添加詳解,請參考
第二步:
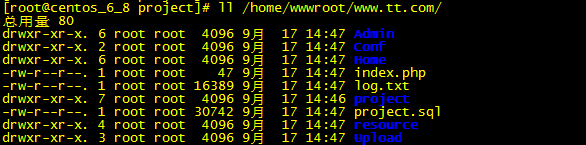
導入項目,切記Linux是嚴格區分大小寫的,如果網站文件中,大小寫不規範,有可能導致頁面不正常顯示或者不顯示,具體的稍後總結。
通過遠程工具,將項目直接放入到剛纔創建好的虛擬主機的網頁目錄下
例如:
我的網站存放目錄
/home/wwwroot/<功能變數名稱>/
目錄下文件,不要把整個文件夾放進來,不然還要配置vhost文件
第三步:
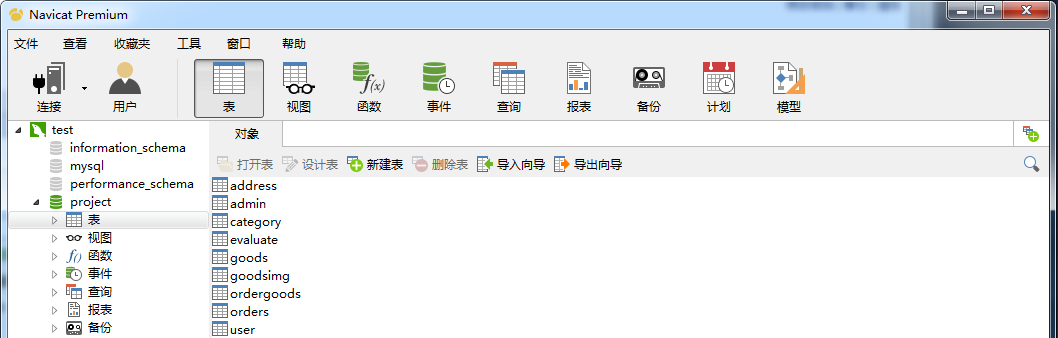
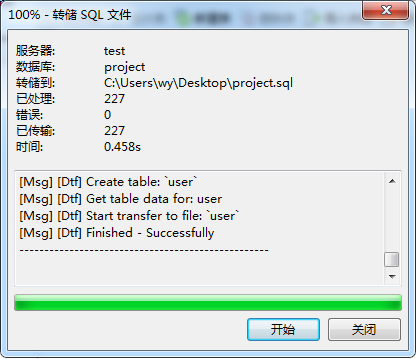
導入資料庫,導入資料庫之前請先將項目的資料庫轉為sql文件,本來不想在這多占篇幅寫如何導出的,但是為了以防萬一,還是寫出來吧
導出資料庫
1.打開wamp環境,使用Navicat Premium連上項目的資料庫
2.選擇資料庫-->右擊轉存為SQL文件-->結構數據
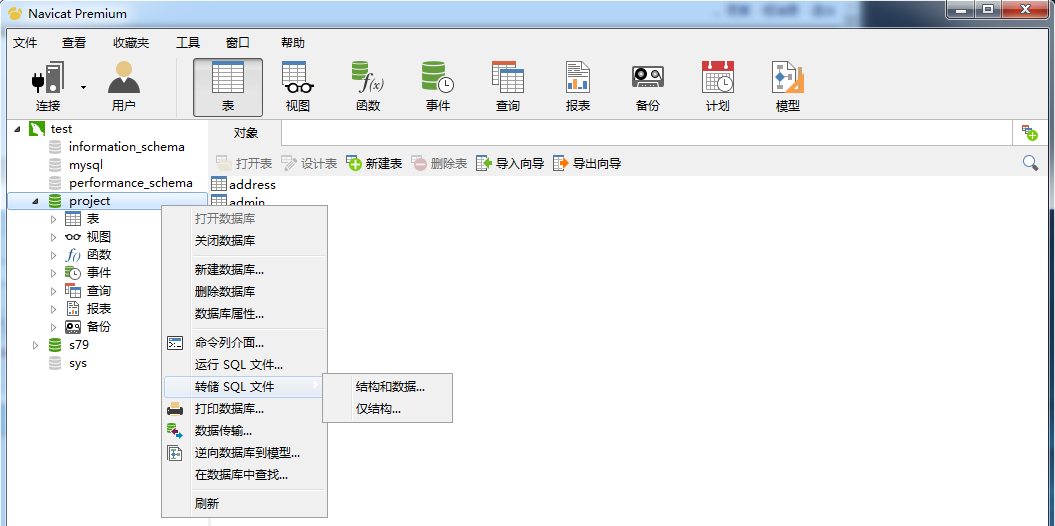
3.選擇存儲位置,然後執行
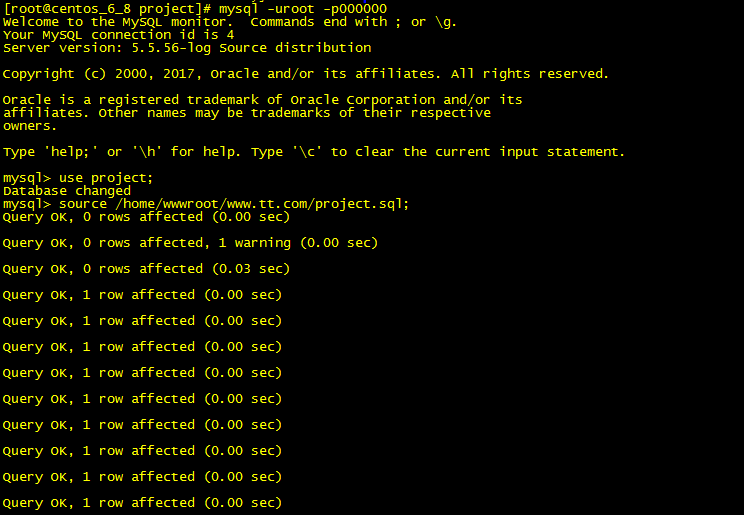
4.將SQL導入linux下
因為上面已經創建好了,資料庫所以直接進入資料庫中,然後導入數據即可
[root@centos_6_8 project]# mysql -uroot -p000000
Welcome to the MySQL monitor. Commands end with ; or \g.
  Your MySQL connection id is 4
  Server version: 5.5.56-log Source distribution

  Copyright (c) 2000, 2017, Oracle and/or its affiliates. All rights reserved.

  Oracle is a registered trademark of Oracle Corporation and/or its
  affiliates. Other names may be trademarks of their respective
  owners.

  Type 'help;' or '\h' for help. Type '\c' to clear the current input statement.

  mysql> use project;
  Database changed
  mysql> source /home/wwwroot/www.tt.com/project.sql;
  Query OK, 0 rows affected (0.00 sec)

  Query OK, 0 rows affected, 1 warning (0.00 sec)

  Query OK, 0 rows affected (0.03 sec)

  Query OK, 1 row affected (0.00 sec)

  mysql> Ctrl-C -- exit!
  Aborted
數據導入完成後,直接ctrl+c退出即可,當然不放心最好再查看下數據文件是否真的導入
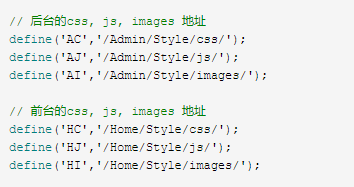
5.修改php文件中資料庫連接的配置文件
如:
資料庫的名稱/密碼,具體配置文件請根據自己的環境來
[root@centos_6_8 ~]# vi /home/wwwroot/www.tt.com/Conf/config.php
<?php

// 資料庫參數
define('DSN', 'mysql:host=localhost;dbname=project;charset=utf8');
define('USER', 'root');
define('PWD', '000000');

// 開啟session
session_start();

// 時區
date_default_timezone_set('PRC');

// 編碼
header('content-type: text/html; charset=utf-8');

// 錯誤級別
error_reporting(0);

// 每頁顯示的行數
define('ROWS', 8);

// 後臺的css, js, images 地址
define('AC','/Admin/Style/css/');
define('AJ','/Admin/Style/js/');
define('AI','/Admin/Style/images/');

// 前臺的css, js, images 地址
define('HC','/Home/Style/css/');
define('HJ','/Home/Style/js/');
define('HI','/Home/Style/images/');

include 'function.php';

include 'check.php';

include 'CCPRestSDK.php';

include 'sign.php';

?>
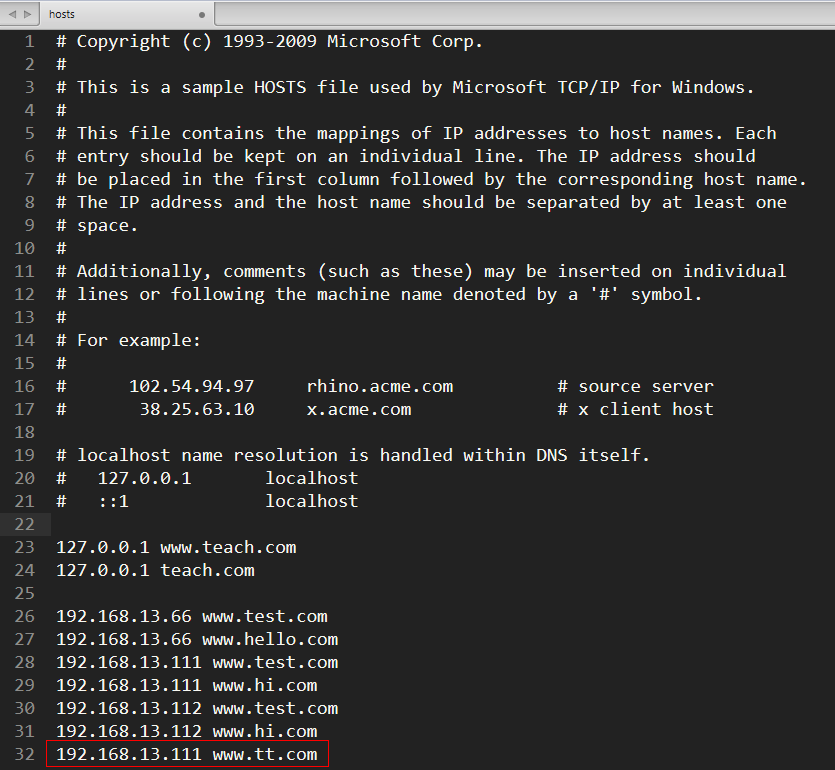
到這裡linux的配置基本完成,因為是虛擬機所以,我們要在外部window下配置hosts文件
第四步:
配置windows下的hosts文件
文件位置:
C:\Windows\System32\drivers\etc
格式:
IP 功能變數名稱
IP為虛擬機IP
功能變數名稱為虛擬主機功能變數名稱
第五步:
打開瀏覽器輸入功能變數名稱訪問

【錯誤總結】
1.配置完成,訪問後一片空白。
排查:F12--->Network--->F5--->查看請求狀態
如果請求正常,頁面未顯示或者部分不顯示有以下原因
1.mvc中control下php文件中入口文件,查看下,是不是view文件目錄大小寫搞錯了
2.頁面文件路徑錯誤,config配置文件樣式路徑
請求不正常
1.資料庫連接問題


