1. 組件介紹 組件(component),vue.js最強大的功能之一 作用:封裝可重用的代碼,通常一個組件就是一個功能體,便於在多個地方都能調用該功能體 根組件:我們實例化的Vue對象就是一個組件,且是所有組件的根組件 分類:全局組件,局部組件 註:每個組件都是Vue的實例對象 2. 全局組件 ...
1. 組件介紹
組件(component),vue.js最強大的功能之一
- 作用:封裝可重用的代碼,通常一個組件就是一個功能體,便於在多個地方都能調用該功能體
- 根組件:我們實例化的Vue對象就是一個組件,且是所有組件的根組件
- 分類:全局組件,局部組件
- 不足:跳轉時,無法傳遞參數,則無法實現同一個頁面根據不同的參數顯示不同內容
註:每個組件都是Vue的實例對象
2. 全局組件
通過Vue的靜態方法(component)定義,全可在所有組件中使用。語法如下:
<div id="app">
    <!-- 使用組件 -->
    <my-header></my-header>
</div>
<script type="text/javascript">
   //定義全局組件
   Vue.component("my-header",{
       template:"<div>我是全局組件</div>"
   })
   let app = new Vue({
        el:"#app"
  })
</script>
3. 局部組件
在父組件的 components 屬性中定義。
3.1 定義組件對象
- 組件對象名,採用駝峰法命名
- 組件對象的配置項與Vue實例的配置項相似,data 數據項除外(組件對象中,data是一個方法)
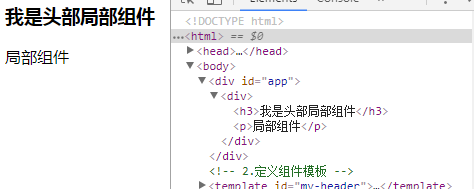
3.2 定義組件模板
組件模板中,必有一個根元素,不能直接寫h1、p、span、a等內容
3.3 註冊組件
註冊組件,組件在哪裡使用,就註冊到哪裡
3.4 使用組件
定義組件時用的駝峰法,使用時將駝峰法轉換為帕斯卡命名
<div id="app">
    <!-- 4.使用組件 -->
    <my-header></my-header>
</div>
<!-- 2.定義組件模板 -->
<template id="my-header">
    <div>
        <h3>我是頭部局部組件</h3>
        <p>{{name}}</p>
    </div>
</template>
<script type="text/javascript">
    //1.定義局部組件
    let MyHeader = {
        template:'#my-header',//組件的模板,#my-header指id為my-header的模板
        data(){
            return {
                name:"局部組件"//數據項
            }
        }
    }
    let app = new Vue({
        el:"#app",
        //3.註冊組件
        components:{
            MyHeader//將MyHeader 這個組件註冊到app根組件中
        }
  })
</script>

4. template 語法規則
組件對象的template屬性用來設置組件的模板內容,模板內容有3種寫法:
- 直接寫在字元串中
<div id="app">
    <my-header></my-header>
</div>
<script type="text/javascript">
    let MyHeader = {
        template:'<div><h1>我是頭部局部組件:{{name}}</h1></div>',
        data(){
            return {
                name:"局部組件"
            }
        }
    }
    let app = new Vue({
        el:"#app",
        components:{
            MyHeader
        }
  })
</script>
- 將模板內容寫在template標簽中(例子)
- 將模板內容寫在script標簽中
<div id="app">
    <my-header></my-header>
</div>
<script type="text/x-template" id="my-header">
    <div>
        <h3>我是頭部局部組件</h3>
        <p>{{name}}</p>
    </div>
</script>
<script type="text/javascript">
    let MyHeader = {
        template:'#my-header',
        data(){
            return {
                name:"局部組件"
            }
        }
    }
    let app = new Vue({
        el:"#app",
        components:{
            MyHeader
        }
  })
</script>
5. 組件間的相互通信
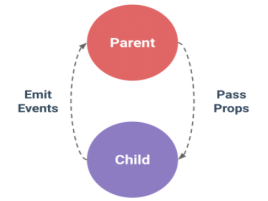
組件實例是孤立的,不可在子組件中直接用父組件中的數據(組件特性:高內聚、低耦合)
父組件通過 props 向下傳遞數據,子組件通過 emit 向上發射事件傳遞數據
5.1 父傳子
-
先在父組件中定義數據
-
在父組件的模板中,通過屬性綁定把數據綁定在子組件上,語法:子組件 :變數名=”數據項”
-
在子組件中定義props屬性,用來接收父組件傳遞的數據
-
在子組件模板中使用數據
-
在子組件的函數中使用數據
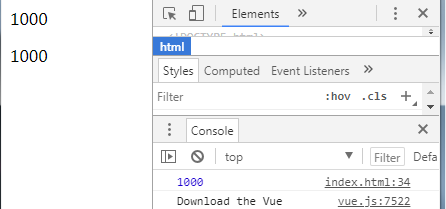
<div id="app">
    {{number}}
    <!-- 2. 把數據綁定在子組件上 -->
    <my-collapse :num="number"></my-collapse>
</div>
<template id="my-collapse">
    <div>
        <!-- 4. 在子組件中使用數據 -->
        <p>{{num}}</p>
        <p>{{Say()}}</p>
    </div>
</template>
<script type="text/javascript">
  let MyCollapse = {
    template:'#my-collapse',
    props:{
            //3. 接受父組件傳遞的數據,Numder類型約束,表示傳遞過來的數值類型
      num:{
        type:Number,
        default:0,
        required:true
      }
    },
    methods:{
            //5. 在子組件的函數中使用數據
          Say(){
             console.log(this.num)
          }
      }
   }
   let app = new Vue({
       el:"#app",
       data:{
           //1. 定義父組件的數據項
           number:1000
       },
       components:{
           MyCollapse
       }
 })
</script>

- props細節:每個數據項,都可有3個屬性進行約束
-
- type:類型約束,約束父組件給子組件傳遞的數據類型。類型包括:Object、Array、Number、String、Boolean
- default:指定預設值,若父組件未傳遞數據,可指定預設值
- required:指定該數據項是否必須傳遞
5.2 子傳父
- 在子組件中添加事件監聽,通過$emit從子組件向父組件發射一個事件
- 在父組件中接收子組件發射過來的事件,格式:<子組件 @子組件事件名=”父組件要執行的方法”>
- 在父組件中定義方法接收子組件傳遞的事件及數據
註:子組件上的事件名@addmsg不能使用駝峰法
<div id="app">
    <p>{{content}}</p>
    <!-- 3. 在父組件中接收子組件發射過來的事件 -->
    <my-collapse @addmsg="receive"></my-collapse>
</div>
<template id="my-collapse">
    <div>
        <input v-model="msg" type="" name="">
        <!-- 2. 在子組件中添加事件監聽 -->
        <button @click="sendMsg">按鈕</button>
    </div>
</template>
<script type="text/javascript">
    let MyCollapse = {
        template:'#my-collapse',
        data(){
            return {
                msg:''
            }
        },
        methods:{
            //1.從子組件向父組件發射事件,參數1:事件名;參數2:傳遞的數據
            sendMsg(){
                this.$emit("addmsg",this.msg)
            }
        }
    }
    let app = new Vue({
        el:"#app",
        data:{
            content:''
        },
        components:{
            MyCollapse
        },
        methods:{
            //4. 在父組件中定義方法接收子組件傳遞的事件及數據,參數是子組件傳遞的數據
            receive(d){
                return this.content=d
            }
        }
  })
</script>
6. 插槽 slot
插槽,即一個占位符,能在不同環境下,傳遞不同的參數,並得到不同的效果,在Vue中通過slot標簽實現
思路:先在子組件中定義一個占位符(插槽),再使用真實的內容替換這個插槽
6.1 單個插槽
當子組件模板只有一個無屬性的插槽時,父組件傳入的整個內容片段將插入到插槽所在的DOM位置,並替換掉插槽本身
    <div id="app">
        <son>
            <h3>只是標題</h3>
            <p>這是段落</p>
        </son>
    </div>
    <template id="son">
        <div>
            <slot></slot>
        </div>
    </template>
    <script type="text/javascript">
        let Son = {
            template:'#son'
        }
        let app = new Vue({
            el:'#app',
            components:{
                Son
            }
        })
    </script>

6.2 具名插槽
若有多個插槽(占位符),通過name屬性加以區分,這種插槽就是具名插槽(可更靈活的管理組件的內容)
- 先定義插槽(占位符),即將內容不確定的地方使用插槽占個位置
- 再使用插槽,即使用真實內容替換占位符
  <div id="app">
        <son>
            <h3 slot="title">這是標題</h3>
            <p slot="content">這是段落</p>
        </son>
    </div>
    <template id="son">
        <div>
            <slot name="title"></slot>
            <slot name="content"></slot>
        </div>
    </template>
7. 深入理解 Vue 實例
通過 new Vue() 獲得一個對象,即 Vue實例,Vue實例提供如下屬性、方法:
7.1 Vue實例屬性
- $el,獲取掛著 Vue 實例的元素
- $data,獲取 Vue 實例的數據項
<div id="app"></div>
<script type="text/javascript">
    let app = new Vue({
        el:'#app',
        data:{
            name:"David",
            age:20
        }
    })
    console.log(app.$el);
    console.log(app.$data);
</script>

-
$refs,獲取對DOM元素的引用
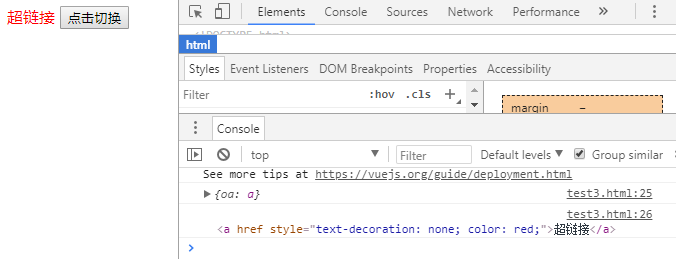
Vue 側重於數據驅動,而jQuery側重於dom,Vue提供了 $refs 屬性對dom元素進行靈活的操作,具體使用:
-
- 在元素上添加一個屬性ref:<標簽 ref=“keyword”
- 在Vue實例中,通過this.$refs獲取所有的dom引用
<div id="app">
        <a href="" ref="oa">超鏈接</a>
        <button @click="setStyle">點擊切換</button>
    </div>
    <script type="text/javascript">
        let app = new Vue({
            el:"#app",
            methods:{
                setStyle(){
                    //找到DOM節點
                    console.log(this.$refs)
                    console.log(this.$refs.oa)
                    this.$refs.oa.style.textDecoration='none'
                    this.$refs.oa.style.color='red'
                }
            }
        })
    </script>

7.2 Vue實例方法
- $mount,手動設置掛載點
  <div id="app">
        {{name}}
    </div>
    <script type="text/javascript">
        let app = new Vue({
            el:"#app",
            data:{
                name:"David"
            }
        })
        app.$mount('#app')
    </script>
- $watch,偵聽器,監聽數據項、計算屬性值的變化,一旦值變化,則自動調用$watch方法
將所有的非同步操作,都寫在watch裡面進行實現
  <div id="app">
        出生年月:
        <input v-model="birthday" type="" name=""><br>
        年齡:<p>{{age}}</p>
    </div>
    <script type="text/javascript">
        let app = new Vue({
            el:'#app',
            data:{
                birthday:'',
                age:0
            },
            watch:{
                birthday(){
                    setTimeout(()=>{
                        this.age = new Date().getFullYear()-new Date(this.birthday).getFullYear();
                    },3000)
                }
            }
        })
    </script>
8. Vue 實例的生命周期
實例化的Vue對象(根組件)以及自定義的組件對象都有生命周期,Vue 設計者為方便調試程式,提供了8個鉤子函數:
    <div id="app">
      {{name}}
    </div>
    <script type="text/javascript">
        let app = new Vue({
            data:{
                name:'David'
            },
            beforeCreate(){
                alert('beforeCreate')
            },
            created(){
                alert('created')
            },
            beforeMount(){
                alert('beforeMount')
            },
            mounted(){
                alert('mounted')
            },
            beforeUpdate(){
                alert('beforeUpdate')
            },
            updated(){
                alert('updated')
            },
            beforeDestory(){
                alert('beforeDestory')
            },
            destroyed(){
                alert('destroyed')
            }
        })
        app.$mount('#app')
        app.$destroy('name')
    </script>
生命周期函數作用:在不同的階段,做相應的工作
- created階段,初始化數據,創建數據對象
- mounted階段,使用數據項替換模板,即將數據掛載到DOM元素節點上
- updated階段,當DOM節點中的數據發生改變,在此階段進行更新
9. 動態組件
可定義多個組件,再使用 :is 屬性動態地在多個組件之間切換
語法:<component v-bind:is=”組件名”></component>
Component 相當於一個占位符,具體顯示哪個組件,通過:is指定
    <div id="app">
        <span @click="currentCom='FirstCom'">第一個</span>
        <span @click="currentCom='SecondCom'">第二個</span>
        <component :is="currentCom"></component>
    </div>
    <template id="com1">
        <div>第一個組件</div>
    </template>
    <template id="com2">
        <div>第二個組件</div>
    </template>
    <script type="text/javascript">
        let FirstCom={
            template:'#com1',
            mounted(){
                console.log("第一個被渲染")
            }
        }
        let SecondCom={
            template:'#com2',
             mounted(){
                console.log("第二個被渲染")
            }
        }
        let app = new Vue({
            el:"#app",
            data:{
                currentCom:''
            },
            components:{
                FirstCom,
                SecondCom
            }
        })
    </script>

- keep-alive 組件
無 keep-alive 組件時,每次切換組件都重新創建一次組件,使用 keep-alive後,會將創建過的組件保存在記憶體中,以後使用時直接使用,而不會每次重新創建
    <div id="app">
        <span @click="currentCom='FirstCom'">第一個</span>
        <span @click="currentCom='SecondCom'">第二個</span>
        <keep-alive>
            <component :is="currentCom"></component>
        </keep-alive>
    </div>
    <template id="com1">
        <div>第一個組件</div>
    </template>
    <template id="com2">
        <div>第二個組件</div>
    </template>
    <script type="text/javascript">
        let FirstCom={
            template:'#com1',
            mounted(){
                console.log("第一個被渲染")
            }
        }
        let SecondCom={
            template:'#com2',
             mounted(){
                console.log(


