上篇文章我們瞭解了怎麼配置struts.xml文件,以及前端控制器配置怎麼配置,,Action進階,Result結果配置,Struts2中的Servlet的API的訪問,以及怎麼獲得請求參數.今天我們在深入講解一下OGNL表達式,OGNL中的符號,和常用的攔截器,標簽庫 一,OGNL表達式 1.概述 ...
上篇文章我們瞭解了怎麼Action進階,Result結果配置,獲得請求參數.今天我們在深入講解一下OGNL中的符號,和常用的攔截器,標簽庫
1.1什麼是OGNL
OGNL是Object-Graph Navigation Language的縮寫,俗稱對象圖導航語言. 它是一種功能強大的表達式語言,通過它簡單一致的表達式語法,可以存取對象的任意屬性,調用對象的方法,遍歷整個對象的結構圖,實現欄位類型轉化等功能。
Eg: hibernate 查詢方式 : 對象導航查詢.
其實就是查詢出來了一個對象之後,通過對象裡面的getXXX() 來獲取關聯的對象。
它是一個開源項目,並不是struts發明出來的,只是struts裡面預設的表達式是使用OGNL表達式.
1.2OGNL作用
-
獲取對象的成員(支持對象方法的調用,支持對象對象屬性訪問,支持靜態方法的調用,支持集合對象操作)
-
進行運算
2.OGNL要素
OGNL 有三個核心元素 ,我們只有理解這三個核心元素,才能去更好的學習OGNL表達式
2.1表達式 (Expression)
表達式用於表示我們到底想執行什麼操作 。 比如:想獲取成員 ,直接用對象.成員名字就可以得到該成員的值
2.2 根元素 (Root)
OGNL 表述的是對象導航語言、那麼必須的指明根元素是什麼。 好比我們要在樹上找果子、必須指定到底是那一棵樹是一樣的道理。
2.3上下文 (Context)
上下文其實就是我們的那個root寄存的位置,它在記憶體當中其實就是一個Map .OGNL 有一個類專門用來表示上下文環境 叫做OGNLContext , 它其實就是一個Map.
-
EG:Map裡面存放了很多的User對象, 那麼我們必須指明是在哪一個根上面找這些user對象。
3.OGNL入門
大家在使用OGNL的時候,要在腦海中有一個想像,就是記憶體中已經有了一個對象,我們需要去操作這個對象,獲取裡面的成員,或者去調用它的某個方法。那麼表達式應該怎麼寫。這和我們的EL 表達式有異曲同工之妙,都是用於獲取對象、然後再關聯到具體的某一個成員.當然我們現在給大家在代碼裡面演示OGNL的一些用法,一般我們使用OGNL 最多的地方還是在jsp頁面上。
使用OGNL先導入兩個Jar包ognl-xxx.jar,javassist-xxx.jar
3.1表達式與根對象
/**
     * OGNL表達式和根對象: 訪問屬性
     * @throws OgnlException
     */
    @Test
    public void  fun01() throws OgnlException{
        //根對象
        User root = new User("張三", 18);
        //表達式(想得到什麼)
        String expression = "username";
        //通過Ognl方式獲得根對象中的表達式結果
        Object value = Ognl.getValue(expression , root);
        System.out.println("value="+value);

    }
-
- 訪問根對象方法
/**
         * OGNL表達式和根對象: 訪問方法
     * @throws OgnlException
     */
    @Test
    public void  fun02() throws OgnlException{
        //根對象
        User root = new User("張三", 18);
        //表達式(想得到什麼)
        String expression = "getUsername()";
        //通過Ognl方式獲得根對象中的表達式結果
        Object value = Ognl.getValue(expression , root);
        System.out.println("value="+value);

    }
-
結合上下文訪問根對象屬性
    @Test
    public void  fun03() throws OgnlException{
        User user1 = new User("張三", 18);
        User user2 = new User("李四", 19);
        //上下文
        Map<String, User> context  = new HashMap<String, User>();
        context.put("user1", user1);
        context.put("user2", user2);

        //根對象(指定user1為根對象)
        Object root = user1;

        //表達式(想得到什麼)
        String expression = "username";
        //通過Ognl方式獲得根對象中的表達式結果(獲得根對象的username的值,也就是user1的)
        Object value = Ognl.getValue(expression, context, root);
        System.out.println("value="+value);

        //獲得非根對象的值(user2的)
        expression = "#user2.username";
        value = Ognl.getValue(expression, context, root);
        System.out.println("value="+value);

    }
-
如果想要獲取user2的數據 因為user2不是根對象,所以要想取它的值,需要寫成 #key.name 。 String expression = "#user2.name"
二,ValueStack值棧
value stack : 翻譯過來是值棧的意思。
回想以前我們在學習servlet的時候,我們要想 servlet操作完成後,生成了一個集合或者對象數據, 在頁面上顯示,我們通常的做法是。把這個對象或者集合存儲在作用域裡面,然後到頁面上再取出來。
strtus 框架是對我們的servlet進行了包裝 ,它內部自己也有一套存值和取值的機制 ,這一套機制就是現在說的 值棧。

2.1 Servlet和Action的區別
-
Servlet: Servlet只會創建一次實例,以後再過來請求,不會創建實例
-
Action: Action是多例,來一次請求就創建一次實例。 創建一次Action的實例,就創建一次ActionContext實例,並且就創建出來一個值棧的實例。
2.2什麼時候創建值棧
-
請求到來的時候才會創建值棧, 當來了請求,會執行前端控制器的doFilter方法,在doFilter方法裡面,有如下代碼
prepare.createActionContext(request, response);
-
在createActionContext()這個方法內部
//從ThreadLocal裡面獲取ActionContext實例,一開始是沒有的,所以該對象是 null ActionContext oldContext = ActionContext.getContext(); if (oldContext != null) { // detected existing context, so we are probably in a forward ctx = new ActionContext(new HashMap<String, Object>(oldContext.getContextMap())); } else { //創建值棧對象 是OgnlValueStack 對象 ValueStack stack = dispatcher.getContainer().getInstance(ValueStackFactory.class).createValueStack(); //給值棧裡面的上下文區域存東西 。 存request \ response \session \application... stack.getContext().putAll(dispatcher.createContextMap(request, response, null)); //創建ActionContext的對象。 然後跟值棧關聯上 ctx = new ActionContext(stack.getContext()); }
3.值棧的內部結構
我們查看值棧的內部結構,其實是想研究值棧存值的時候,是存到了什麼地方去的。
-
值棧其實就是一個類 OgnlValueStack ,我們如果往值棧存值, 其實是存到了這個類中的兩個集合去。
CompoundRoot root; //這其實是一個集合 list transient Map<String, Object> context; //這是OGNL上下文 OGNLContext //底下還有一行代碼 context.setRoot(root); //也就是設置了OGNL上下文的根其實就是一個list集合 。 說的具體一點。 就是那個CompoundRoot對象。
我們使用OGNL表達式取值的時候,都是去上下文裡面取值。
root 區,根對象。具體類型為CompoundRoot。CompoundRoot實現了List介面,其實就是一個list集合。其實我們存值的話都是存在root區域.
context 區:上下文對象。具體類型為OgnlContext。OgnlContext內部操控的是一個Map集合,其實context區可以理解為一個Map集合。
4.獲得ValueStack
4.1通過ActionContext對象的實例獲得
由於前面創建好值棧後,讓它和ActionContext關聯上了,所以我們只要通過ActionContext去獲取它即可。
-
獲得值棧代碼
ValueStack valueStack = ActionContext.getContext().getValueStack();
4.2通過request域獲得ValueStack
在執行完我們的Action方法前,struts會把值棧往request對象裡面存起來,所以我們使用request對象即可獲取到.
在前端過濾器的doFilter()方法裡面有 execute.executeAction(request, response, mapping);這行代碼,執行Action.
具體源碼參見: Dispatcher類中的serviceAction方法 , 位於540行:request.setAttribute(ServletActionContext.STRUTS_VALUESTACK_KEY, proxy.getInvocation().getStack());所以後續我們也只要使用request對象然後結合對應的STRUTS_VALUESTACK_KEY 這個key即可獲取到值棧
-
獲得值棧代碼
ValueStack valueStack = (ValueStack) ServletActionContext.getRequest().getAttribute(ServletActionContext.STRUTS_VALUESTACK_KEY);
5.值棧存取值
5.1push方式
直接放置在棧頂,沒有什麼key與之對應。所以取值的話,直接寫屬性名即可。 但是如果push 了多個,並且還想獲取的不是棧頂的值,是棧頂下來的某一個位置的值,那麼可以採用[0] \ [1] 這種做法
-
存值Java代碼
User user = new User("admin" ,"10086"); ValueStack stack = ActionContext.getContext().getValueStack(); //執行的是壓棧的動作。 放置的東西永遠會在棧頂。 stack.push(user ); //第二次的時候,user02已經位於棧頂 ,之前的那個user就要往下壓一格 User user02 = new User("zhangsan" ,"1000000"); stack.push(user02 );
-
取值(演示[0]和[1]的區別)
取push放的值<br>
<s:property value="username"/> , <s:property value="password"/><br><br>取push的值 就取第二個,不取棧頂<br>
<s:property value="[1].top.username"/>  , <s:property value="[1].password"/><br>
5.2set方式
set 和 push 的區別在於, push 是直接把數據壓倒棧頂 , 但是set方式是用一個map集合來包裝數據,然後才把map壓倒棧頂。 所以取值手法也有點不一樣。
-
存值Java代碼
User user = new User("admin" ,"10086"); ValueStack stack = ActionContext.getContext().getValueStack(); stack.set("user01", user);
-
取值
取set放的值<br>
<s:property value="user01.username"/> , <s:property value="user01.password"/><br>
5.3屬性驅動方式
和之前的獲得請求參數屬性驅動類似.
-
存值Java代碼
public class ActionDemo01 extends ActionSupport { private String str; public String fun01(){ str = "hello"; return "success"; } //提供get方法 public String getStr() { return str; } }
-
取值
取屬性封裝的值<br> <s:property value="str"/>
5.4模型驅動方式
-
存值
public class ActionDemo01 extends ActionSupport implements ModelDriven<User> { private User user; public String fun01(){ return "success"; } @Override public User getModel() { if(user == null){ user = new User("李四", "66666666"); } return user; } }
-
取值
<s:property value="model.username"/> , <s:property value="model.password"/><br>
或者:
<s:property value="username"/> , <s:property value="password"/><br>
由於使用模型驅動封裝,存值的時候,也還是存到action的範圍裡面去.
5.5使用EL表達式取值
EL表達式也可以取到值棧的值,本來EL表達式是用於取作用域的值,但是值棧和作用域是兩個東西。 為什麼EL 表達式也能去值棧的值呢?原因是 : struts對EL 表達式取值的代碼進行了擴展,如果從作用域取不到值就會去值棧找。
reuqest.setAttribute("user" , user); ${user.name} ------> pageContext.findAttrbute(); --> 先從page範圍找, 沒有,就找request, 還沒有就找session。request類型被包裝成了 StrutsRequestWrapper 在裡面的getAttribute 做了判定,如果從作用域中去不到值,就去值棧取值
6.OGNL中的符號
6.1#號的作用
-
獲取Context中的數據,非根對象裡面的數據
<s:property value="#request.name"/>
<s:property value="#session.name"/>
-
構建一個Map集合
//var變數會存一份到root也會存一份到上下文
<s:iterator var="entry" value="#{ 'aa':'11','bb':'22','cc':'33' }">
<s:property value="key"/>--<s:property value="value"/><br/>
<s:property value="#entry.key"/>--<s:property value="#entry.value"/><br/>
</s:iterator>
6.2%號的作用
-
強制解析OGNL表達式
<s:textfield value="%{#request.name}" name="name"/>
-
強制不解析OGNL表達式
<s:property value="%{'#request.name'}"/>
1.概述
1.1什麼是攔截器
在struts2中,攔截器(Interceptor)是用來動態攔截Action執行的對象。
攔截器有點類似以前Servlet階段的Filter(過濾器) , 能夠在請求到達Action之前進行攔截操作, 可以在裡面進行判斷校驗。 典型的例子: 登錄攔截.
註:過濾器可以過濾servlet, 攔截器可以攔截Action , 過濾器除了可以過濾servlet之外,還可以過濾網路資源(html / jsp ) , 攔截器只能攔截Action
1.2 攔截器執行流程
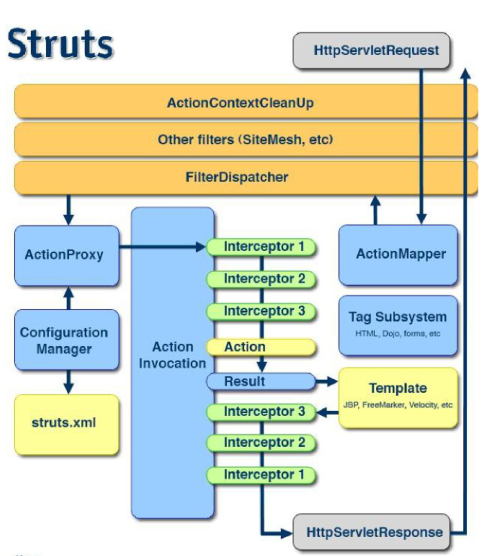
客戶端請求Action,執行核心過濾器,在核心過濾器內部創建了Action的代理類,調用代理類的execute方法,在execute方法內部執行ActionInvocation的invoke方法。在invoke方法內部遞歸調用攔截器的攔截的方法。如果沒有下一個攔截器執行目標Action,Action執行結束後根據Result進行頁面跳轉,執行攔截器的後面相應的代碼,最後由response對象生成響應。
-
流程圖

-
時序圖

2.自定義攔截器
2.1方式一:實現Interceptor介面
最原始的方式,也是最基本的方式. 要實現三個方法,其中init 和 destroy ,平常我們都不太用。
-
創建一個類實現Interceptor介面
public class Interceptor01 implements Interceptor {
    @Override
    public String intercept(ActionInvocation invocation) throws Exception {
        System.out.println("Interceptor01 執行了...");
        //放行
        invocation.invoke();
        return null;
    }
    @Override
    public void destroy() {
    }
    @Override
    public void init() {
    }
}
-
在struts.xml裡面聲明攔截器
<package name="test" extends="struts-default" namespace="/">
    <!-- 聲明攔截器 -->
    <interceptors>
        <interceptor name="interceptor01" class="demo.web.interceptor.Interceptor01">                </interceptor>
    </interceptors>
</package>
-
在action裡面使用攔截器
<action name="demo_*" class="demo.web.action.ActionDemo"  method="{1}">
        <interceptor-ref name="interceptor01"></interceptor-ref>
</action>
2.2方式二:繼承AbstractInterceptor
是Interceptor的一個子類, 只需要重寫intercept()方法.
-
創建一個類繼承AbstractInterceptor
public class Interceptor02 extends AbstractInterceptor {
    @Override
    public String intercept(ActionInvocation invocation) throws Exception {
        System.out.println("Interceptor01 執行了...");
        //放行
        invocation.invoke();
        return null;
    }
}
-
在struts.xml裡面聲明攔截器
<package name="test" extends="struts-default" namespace="/">
    <!-- 聲明攔截器 -->
    <interceptors>
        <interceptor name="interceptor02" class="demo.web.interceptor.Interceptor02">                </interceptor>
    </interceptors>
</package>
-
在action裡面使用攔截器
<action name="demo_*" class="demo.web.action.ActionDemo"  method="{1}">
    <interceptor-ref name="interceptor02"></interceptor-ref>
</action>
2.3方式三:繼承MethodFilterInterceptor
是AbstractInterceptor的一個子類.可以精確的控制攔截或者不攔截哪一個方法
-
創建一個類繼承MethodFilterInterceptor
public class Interceptor03 extends MethodFilterInterceptor { @Override protected String doIntercept(ActionInvocation invocation) throws Exception { System.out.println("Interceptor03 執行了..."); //放行 invocation.invoke(); return null; } }
-
在struts.xml裡面聲明攔截器
<package name="test" extends="struts-default" namespace="/">
    <!-- 聲明攔截器 -->
    <interceptors>
        <interceptor name="interceptor03" class="demo.web.interceptor.Interceptor03">                </interceptor>
    </interceptors>
</package>
-
在action裡面使用攔截器
<action name="demo_*" class="demo.web.action.ActionDemo"  method="{1}">
        <interceptor-ref name="interceptor03">
            <!--不攔截fun02()方法 -->
            <param name="excludeMethods">fun02</param>
        </interceptor-ref>
</action>
3.自定義攔截器相關的操作
3.1攔截器不放行
攔截器的處理結果,莫過於兩種:
放行: 如果後面還有攔截器就執行下一個攔截器,如果後面沒有了攔截器,就執行action
攔截: 但是註意,攔截後也需要返回到一個具體的頁面。 所以需要配置result標簽
-
放行, 調用invoke()方法即可
-
攔截,跳轉其它頁面
3.2自定義攔截器的問題
一旦自定義了自己的攔截器,那麼struts預設的哪一套 攔截器就不會走。 有點像有參構造和無參構造的關係。
-
struts預設的攔截器都有哪些呢?在struts-default.xml裡面有一個package 名字也叫作 struts-default 在這個包中定義了一個攔截器棧,名字叫做 defaultStack.
  <interceptor-stack name="defaultStack">
            <interceptor-ref name="exception"/>
            <interceptor-ref name="alias"/>
            <interceptor-ref name="servletConfig"/>
            <interceptor-ref name="i18n"/>
            <interceptor-ref name="prepare"/>
            <interceptor-ref name="chain"/>
            <interceptor-ref name="scopedModelDriven"/>
            <interceptor-ref name="modelDriven"/>
            <interceptor-ref name="fileUpload"/>
            <interceptor-ref name="checkbox"/>
            <interceptor-ref name="datetime"/>
            <interceptor-ref name="multiselect"/>
            <interceptor-ref name="staticParams"/>
            <interceptor-ref name="actionMappingParams"/>
            <interceptor-ref name="params"/>
            <interceptor-ref name="conversionError"/>
            <interceptor-ref name="validation">
                <param name="excludeMethods">input,back,cancel,browse</param>
            </interceptor-ref>
            <interceptor-ref name="workflow">
                <param name="excludeMethods">input,back,cancel,browse</param>
            </interceptor-ref>
            <interceptor-ref name="debugging"/>
            <interceptor-ref name="deprecation"/>
    </interceptor-stack>
        ....
    <default-interceptor-ref name="defaultStack"/>
-
如果我們給自己的action使用了自己定義的攔截器,那麼上面預設的這些攔截器都不會生效了,失去了這些功能,如果還想使用預設的這些攔截器。那麼可以在action裡面再引用它即可。
<action name="actionDemo_*" class="demo.action.ActionDemo" method="{1}"> <!-- 執行這個action,就必然要走名字叫做myInterceptor02的攔截器 --> <!-- 使用自定義的攔截器 --> <interceptor-ref name="myInterceptor"></interceptor-ref> <!-- 使用預設的攔截器 --> <interceptor-ref name="defaultStack"></interceptor-ref> <result name="login">/index.jsp</result> </action>
四,標簽庫
1.概述
1.1 Struts2標簽庫介紹
Struts2標簽庫是一個比較完善,且功能強大的標簽庫,它將所有標簽都統一到一個標簽庫中,從而簡化了標簽的使用,它還提供主題和模板的支持,極大地簡化了視圖頁面代碼的編寫。
1.2Struts2標簽庫分類

1.3使用步驟
-
如果使用Struts2的標簽庫,必須導入庫到頁面
<%@ taglib uri="/struts-tags" prefix="s" %>
-
根據語法書寫標簽庫...
2.流程式控制制標簽庫
-
if標簽,elseif標簽...類似JSP裡面的c:if
取值: <s:property value="#request.a"/><br/> <s:if test="#request.a > 10"> a 大於10 </s:if> <s:else> a 小於或者等於10 </s:else>
-
iterator標簽類似JSP裡面的c:foreach
<s:iterator value="list" var="u">
    <s:property value="username"/>
    <s:property value="password"/>
</s:iterator>
3.UI標簽
3.1表單標簽

-
和HTML標簽對比
<h1>一,HTML的表單標簽</h1>
<form action="${pageContext.request.contextPath }/demo03_fun03" method="post">
    用戶名:<input type="text" name="username"/><br/>
    密碼: <input type="password" name="password"/><br/>
    性別:<input type="radio" name="sex" value="1"/>男<input type="radio" name="sex" value="0"/>女<br/>
    愛好:
    <input type="checkbox" name="hobby" value="lq"/>籃球
    <input type="checkbox" name="hobby" value="zq"/>足球
    <input type="checkbox" name="hobby" value="ppq"/>


