spring MVC框架 一、什麼是spring MVC Spring MVC屬於SpringFrameWork的後續產品,已經融合在Spring Web Flow裡面。Spring 框架提供了構建 Web 應用程式的全功能 MVC 模塊。使用 Spring 可插入的 MVC 架構,從而在使用Spr ...
spring MVC框架
一、什麼是spring MVC
Spring MVC屬於SpringFrameWork的後續產品,已經融合在Spring Web Flow裡面。Spring 框架提供了構建 Web 應用程式的全功能 MVC 模塊。使用 Spring 可插入的 MVC 架構,從而在使用Spring進行WEB開發時,可以選擇使用Spring的SpringMVC框架或集成其他MVC開發框架,如Struts1(現在一般不用),Struts2等。
---------百度百科
從spring官網中可以看出,Spring MVC原名叫Spring Web MVC,它是構建在Servlet API上的最初的Web框架,從一開始就包含在Spring框架中。正式名稱“Spring Web MVC”來自其源模塊spring-webmvc的名稱, 但它通常被稱為“Spring MVC”。Spring web mvc和Struts2都屬於表現層的框架,它是Spring框架的一部分。
二、spring MVC框架的作用
從請求中接收傳入的參數,將處理後的結果返回給頁面展示
三、spring MVC執行流程

1)、 用戶發送請求至前端控制器DispatcherServlet
2)、 DispatcherServlet收到請求調用HandlerMapping處理器映射器。
3)、 處理器映射器根據請求url找到具體的處理器,生成處理器對象及處理器攔截器(如果有則生成)一併返回給DispatcherServlet。
4)、 DispatcherServlet通過HandlerAdapter處理器適配器調用處理器
5)、 執行處理器(Controller,也叫後端控制器)。
6)、 Controller執行完成返回ModelAndView
7)、 HandlerAdapter將controller執行結果ModelAndView返回給DispatcherServlet
8)、 DispatcherServlet將ModelAndView傳給ViewReslover視圖解析器
9)、 ViewReslover解析後返回具體View
10) DispatcherServlet對View進行渲染視圖(即將模型數據填充至視圖中)。
11) DispatcherServlet響應用戶
四、快速開發
需求:顯示商品列表
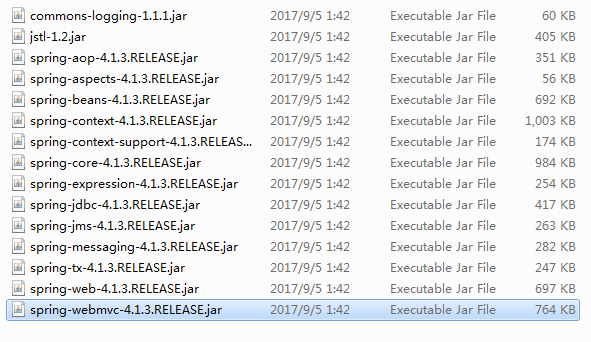
1、導入所需基本依賴jar包
jar包下載地址:springMVC_jar

2、在項目工程上創建源碼包,用來存放配置文件
3、創建spring MVC核心配置文件,文件名就叫SpringMvc.xml
導入相應地約束
<?xml version="1.0" encoding="UTF-8"?>
<beans xmlns="http://www.springframework.org/schema/beans"
    xmlns:xsi="http://www.w3.org/2001/XMLSchema-instance"
    xmlns:p="http://www.springframework.org/schema/p"
    xmlns:context="http://www.springframework.org/schema/context"
    xmlns:dubbo="http://code.alibabatech.com/schema/dubbo"
    xmlns:mvc="http://www.springframework.org/schema/mvc"
    xsi:schemaLocation="http://www.springframework.org/schema/beans http://www.springframework.org/schema/beans/spring-beans-4.0.xsd
        http://www.springframework.org/schema/mvc http://www.springframework.org/schema/mvc/spring-mvc-4.0.xsd
        http://code.alibabatech.com/schema/dubbo http://code.alibabatech.com/schema/dubbo/dubbo.xsd
        http://www.springframework.org/schema/context http://www.springframework.org/schema/context/spring-context-4.0.xsd">
</beans>
4、創建日誌文件,用於列印日誌(log4j.properties)
# Global logging configuration
log4j.rootLogger=DEBUG, stdout
# Console output...
log4j.appender.stdout=org.apache.log4j.ConsoleAppender
log4j.appender.stdout.layout=org.apache.log4j.PatternLayout
log4j.appender.stdout.layout.ConversionPattern=%5p [%t] - %m%n
5、定義Controller類
ItemController是一個普通的java類,不需要實現任何介面,只需要在類上添加@Controller註解即可。@RequestMapping註解指定請求的url,其中“.action”可以加 也可以不加。註意:1.這裡的配置@Controller註解 2.@RequestMapping用於識別功能變數名稱尾碼 3.modelAndView.setViewName用於設置跳轉頁面
// 在添加註解的同時,還得配置掃描
@Controller
public class ItemsController {
    //指定url到請求方法的映射
    //url中輸入一個地址,例如:localhost:8888/SpringMvc/list.action
    //用以替代了struts中採用的配置文件進行匹配來調用那個方法從而識別跳轉那個頁面
   @RequestMapping("/list")
   public ModelAndView itemsList()throws Exception{
       List<Items> itemList = new ArrayList<Items>();

        //商品列表
        Items items_1 = new Items();
        items_1.setName("聯想筆記本_3");
        items_1.setPrice(6000f);
        items_1.setDetail("ThinkPad T430 聯想筆記本電腦!");

        Items items_2 = new Items();
        items_2.setName("蘋果手機");
        items_2.setPrice(5000f);
        items_2.setDetail("iphone6蘋果手機!");

        itemList.add(items_1);
        itemList.add(items_2);
        //模型視圖
        //model模型:模型對象中存放了返回給頁面的數據
        //view視圖:視圖對象中指定給返回的頁面的位置
        //創建modelandView對象
        ModelAndView modelAndView = new ModelAndView();
        //添加model(將返回給頁面的數據放入模型和視圖對象中)
        modelAndView.addObject("itemList", itemList);
        //添加視圖(指定給 返回頁面的位置)
        modelAndView.setViewName("jsp/itemList.jsp");
        return modelAndView;
    }
   }
6、在SpringMvc.xml中配置註解掃描
這裡controller類是創建在cn.clj.controller包下的
<?xml version="1.0" encoding="UTF-8"?>
<beans xmlns="http://www.springframework.org/schema/beans"
    xmlns:xsi="http://www.w3.org/2001/XMLSchema-instance"
    xmlns:p="http://www.springframework.org/schema/p"
    xmlns:context="http://www.springframework.org/schema/context"
    xmlns:dubbo="http://code.alibabatech.com/schema/dubbo"
    xmlns:mvc="http://www.springframework.org/schema/mvc"
    xsi:schemaLocation="http://www.springframework.org/schema/beans http://www.springframework.org/schema/beans/spring-beans-4.0.xsd
        http://www.springframework.org/schema/mvc http://www.springframework.org/schema/mvc/spring-mvc-4.0.xsd
        http://code.alibabatech.com/schema/dubbo http://code.alibabatech.com/schema/dubbo/dubbo.xsd
        http://www.springframework.org/schema/context http://www.springframework.org/schema/context/spring-context-4.0.xsd">
        <!-- 配置@Controller註解掃描 -->
        <context:component-scan base-package="cn.clj.controller"/>

</beans>
7、在web.xml中配置前端控制器
註意:指定核心配置文件名不能寫錯,否則會找不到Controller類
<!-- springMvc前端控制器 -->
  <servlet>
     <servlet-name>springMvc</servlet-name>
     <!--路徑:spring-webmvc-4.1.3.RELEASE.jar\org.springframework.web.servlet  -->
     <servlet-class>org.springframework.web.servlet.DispatcherServlet</servlet-class>
     <!-- 如果沒有指定springMvc核心配置文件那麼預設會去找/WEB_INF/+<servlet-name>的內容+  -servlet.xml配置文件 -->
     <!-- 指定springMvc核心配置文件位置 -->
     <init-param>
        <param-name>contextConfigLocation</param-name>
        <param-value>classpath:SpringMvc.xml</param-value>
     </init-param>
     <!-- tomcat啟動時就載入這個servlet -->
     <load-on-startup>1</load-on-startup>
  </servlet>
  <servlet-mapping>
     <servlet-name>springMvc</servlet-name>
     <url-pattern>*.action</url-pattern>
  </servlet-mapping>
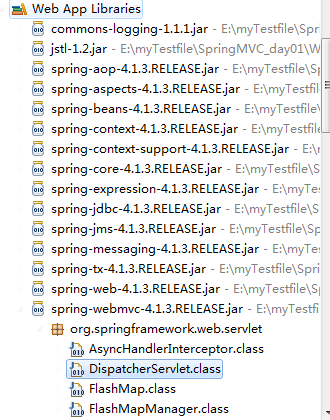
DispatcherServlet的路徑為:

8、配置jsp
在WebRoot下創建jsp文件夾,用來存放jsp
1.需引入jstl標簽 2.因為傳的是itemList,接收值不能寫錯
<%@taglib uri="http://java.sun.com/jstl/core_rt" prefix="c"%>

<body>
<form action="${pageContext.request.contextPath }/search.action" method="post">
查詢條件:
<table width="100%" border=1>
<tr>
<!-- 如果controller接受的是vo,那麼頁面上input框中name屬性值要等於vo屬性.屬性 (..)進行引用-->
<td>商品名稱:<input type="text" name="items.name"/></td>
<td>商品價格:<input type="text" name="items.price"/></td>
<td><input type="submit" value="查詢"/></td>
</tr>
</table>
商品列表:
<table width="100%" border=1>
<tr>
    <td>商品名稱</td>
    <td>商品價格</td>
    <td>生產日期</td>
    <td>商品描述</td>
    <td>操作</td>
</tr>
<c:forEach items="${itemList}" var="item">
<tr>
    <td>${item.name}</td>
    <td>${item.price}</td>
    <td><fmt:formatDate value="${item.createtime}" pattern="yyyy-MM-dd HH:mm:ss"/></td>
    <td>${item.detail}</td>

    <td><a href="${pageContext.request.contextPath }/itemEdit.action?id=${item.id}">修改</a></td>

</tr>
</c:forEach>

</table>
</form>
9、測試
此時在瀏覽器中輸入http://localhost:8080/項目名/list.action,如果成功跳轉到顯示頁面為成功
二、關於註解處理器映射器和註解處理器適配器
註解式處理器映射器:註解式處理器映射器,對類中標記@ResquestMapping的方法進行映射,根據ResquestMapping定義的url匹配ResquestMapping標記的方法,匹配成功返回HandlerMethod對象給前端控制器,HandlerMethod對象中封裝url對應的方法Method。
註解式處理器映射器:註解式處理器適配器,對標記@ResquestMapping的方法進行適配。
方式一:手動配置最新版本的映射器和適配器(缺點:隨著版本更新的重新配置)
 <!-- 配置最新版的註解的處理器映射器 -->
         <bean class="org.springframework.web.servlet.mvc.method.annotation.RequestMappingHandlerMapping"/>
         <!-- 配置最新版的註解的處理器適配器 -->
         <bean class="org.springframework.web.servlet.mvc.method.annotation.RequestMappingHandlerAdapter"/>
方式二:自動配置
<mvc:annotation-driven conversion-service="conversionService"></mvc:annotation-driven>
全部代碼如下
<?xml version="1.0" encoding="UTF-8"?>
<beans xmlns="http://www.springframework.org/schema/beans"
    xmlns:xsi="http://www.w3.org/2001/XMLSchema-instance"
    xmlns:p="http://www.springframework.org/schema/p"
    xmlns:context="http://www.springframework.org/schema/context"
    xmlns:dubbo="http://code.alibabatech.com/schema/dubbo"
    xmlns:mvc="http://www.springframework.org/schema/mvc"
    xsi:schemaLocation="http://www.springframework.org/schema/beans http://www.springframework.org/schema/beans/spring-beans-4.0.xsd
        http://www.springframework.org/schema/mvc http://www.springframework.org/schema/mvc/spring-mvc-4.0.xsd
        http://code.alibabatech.com/schema/dubbo http://code.alibabatech.com/schema/dubbo/dubbo.xsd
        http://www.springframework.org/schema/context http://www.springframework.org/schema/context/spring-context-4.0.xsd">
        <!-- 配置@Controller註解掃描 -->
        <context:component-scan base-package="cn.clj.controller"/>

        <!-- 如果沒有顯示配置處理器映射器和處理器適配器那個springMvc會預設的dispatcherServlet.properties中查找
        對應的處理器映射器和處理器適配器去使用,每個請求都要掃描一次的預設配置文件,效率非常低,會降低訪問速度,所以顯示的配置處理器映射器和處理器適配器
         -->
         <!-- 註解形式的處理器適配器
         <bean class="org.springframework.web.servlet.mvc.annotation.AnnotationMethodHandlerAdapter"/> -->
         <!-- 註解形式的處理器映射器
         <bean class="org.springframework.web.servlet.mvc.support.DefaultHandlerExceptionResolver"/>-->
         <!-- 配置最新版的註解的處理器映射器,以上已經過時
         <bean class="org.springframework.web.servlet.mvc.method.annotation.RequestMappingHandlerMapping"/>-->
         <!-- 配置最新版的註解的處理器適配器
         <bean class="org.springframework.web.servlet.mvc.method.annotation.RequestMappingHandlerAdapter"/>-->
         <!-- 註解驅動:能夠自動配置最新版的處理器映射器和處理器適配器 -->
         <mvc:annotation-driven conversion-service="conversionService"></mvc:annotation-driven>

</beans>
三、關於視圖解析器
1.分析情形
在controller中,每次配置跳轉頁面時,都要配置跳轉視圖的全部路徑,有點麻煩
2、配置視圖解析器
功能:在配置文件中配置全局跳轉視圖的首碼名和尾碼名,在controller類只要寫省去尾碼的jsp名即可,配置如下:
1)在SpringMvc.xml文件中配置視圖解析器
      <!-- 配置視圖解析器 -->
         <!-- 作用:在controller中指定頁面路徑的時候就不用寫頁面的完整路徑名稱,直接寫去掉尾碼的頁面名 -->
         <bean class="org.springframework.web.servlet.view.InternalResourceViewResolver">
             <!--真正頁面路徑=首碼+頁面名稱+尾碼  -->
             <!-- 跳轉視圖首碼 -->
             <property name="prefix" value="/jsp/"></property>
             <!-- 跳轉視圖尾碼 -->
             <property name="suffix" value=".jsp"></property>
      </bean>
2)更改conroller類中的寫法
        //添加視圖(指定給 返回頁面的位置)
       // modelAndView.setViewName("jsp/itemList.jsp");
        modelAndView.setViewName("itemList");
        return modelAndView;
四、SSM整合
個人認為,SpringMvc與Mybatis整合其實就是SSM整合,因為Spring與SpringMvc同屬於一家公司,無需整合,當然也需要用到Spring的IOC特性業務分配:此時控制層交給SpringMvc,持久層交給MyBatis,創建管理交給Spring
思路:
Dao層:
1、SqlMapConfig.xml,空文件即可。需要文件頭。

2、applicationContext-dao.xml。

a) 資料庫連接池

b) SqlSessionFactory對象,需要spring和mybatis整合包下的。

c) 配置mapper文件掃描器。
Service層:
1、applicationContext-service.xml包掃描器,掃描@service註解的類。

2、applicationContext-trans.xml配置事務。
表現層:
Springmvc.xml

1、包掃描器,掃描@Controller註解的類。

2、配置註解驅動。

3、視圖解析器

Web.xml

配置前端控制器。
1、快速部署環境
1)導入相應的依賴jar包
此包含Mybatis依賴jar包與逆向工程依賴jar包、Spring依賴jar包與Spring-mybatis整合包、SpringMVc依賴包,資料庫驅動包,第三方連接池


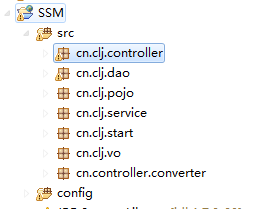
2)在工程項目下(非src)創建源碼包,用來存放配置文件,包名為config
3)創建分層包,採用MVC模式開發,每個包的業務不同

4)創建db.properties
jdbc.driver=com.mysql.jdbc.Driver
jdbc.url=jdbc:mysql://192.168.174.132:3306/SSM
jdbc.username=root
jdbc.password=root
5)配置log4j.properties
# Global logging configuration
log4j.rootLogger=DEBUG, stdout
# Console output...
log4j.appender.stdout=org.apache.log4j.ConsoleAppender
log4j.appender.stdout.layout=org.apache.log4j.PatternLayout
log4j.appender.stdout.layout.ConversionPattern=%5p [%t] - %m%n
6)創建spring核心配置文件之applicationContext-dao.xml
此文件用來管理dao層業務:配置數據源,配置SqlSessionFactory與dao層mapper掃描
<?xml version="1.0" encoding="UTF-8"?>
<beans xmlns="http://www.springframework.org/schema/beans"
    xmlns:context="http://www.springframework.org/schema/context"
    xmlns:p="http://www.springframework.org/schema/p"
    xmlns:aop="http://www.springframework.org/schema/aop"
    xmlns:tx="http://www.springframework.org/schema/tx"
    xmlns:xsi="http://www.w3.org/2001/XMLSchema-instance"
    xsi:schemaLocation="http://www.springframework.org/schema/beans http://www.springframework.org/schema/beans/spring-beans-4.0.xsd
    http://www.springframework.org/schema/context http://www.springframework.org/schema/context/spring-context-4.0.xsd
    http://www.springframework.org/schema/aop http://www.springframework.org/schema/aop/spring-aop-4.0.xsd http://www.springframework.org/schema/tx http://www.springframework.org/schema/tx/spring-tx-4.0.xsd
    http://www.springframework.org/schema/util http://www.springframework.org/schema/util/spring-util-4.0.xsd">

    <!-- 載入配置文件 -->
    <context:property-placeholder location="classpath:db.properties"/>
    <!-- 資料庫連接池 -->
    <bean id="dataSource" class="org.apache.commons.dbcp.BasicDataSource"
        destroy-method="close">
        <property name="driverClassName" value="${jdbc.driver}"/>
        <property name="url" value="${jdbc.url}"/>
        <property name="username" value="${jdbc.username}"/>
        <property name="password" value="${jdbc.password}"/>
        <property name="maxActive" value="10"/>
        <property name="maxIdle" value="5"/>
    </bean>
    <!-- mapper配置 -->
    <!-- 讓spring管理sqlsessionfactory 使用mybatis和spring整合包中的 -->
    <bean id="sqlSessionFactory" class="org.mybatis.spring.SqlSessionFactoryBean">
        <!-- 資料庫連接池 -->
        <property name="dataSource" ref="dataSource"/>
        <!-- 載入mybatis的全局配置文件 -->
        <property name="configLocation" value="classpath:SqlMapConfig.xml"/>
    </bean>
    <!-- 配置Mapper掃描器 -->
    <bean class="org.mybatis.spring.mapper.MapperScannerConfigurer">
        <property name="basePackage" value="cn.clj.dao"/>
    </bean>

</beans>
7)創建spring核心配置文件之applicationContext-service.xml
此文件主要是負責業務層:開啟service註解掃描
<?xml version="1.0" encoding="UTF-8"?>
<beans xmlns="http://www.springframework.org/schema/beans"
    xmlns:context="http://www.springframework.org/schema/context"
    xmlns:p="http://www.springframework.org/schema/p"
    xmlns:aop="http://www.springframework.org/schema/aop"
    xmlns:tx="http://www.springframework.org/schema/tx"
    xmlns:xsi="http://www.w3.org/2001/XMLSchema-instance"
    xsi:schemaLocation="http://www.springframework.org/schema/beans
    http://www.springframework.org/schema/beans/spring-beans-4.0.xsd
    http://www.springframework.org/schema/context
    http://www.springframework.org/schema/context/spring-context-4.0.xsd
    http://www.springframework.org/schema/aop
    http://www.springframework.org/schema/aop/spring-aop-4.0.xsd
    http://www.springframework.org/schema/tx
    http://www.springframework.org/schema/tx/spring-tx-4.0.xsd
    http://www.springframework.org/schema/util
    http://www.springframework.org/schema/util/spring-util-4.0.xsd">
    <!-- @service掃描 -->
    <context:component-scan base-package="cn.clj.service"></context:component-scan>

</beans>
8)創建spring核心配置文件之applicationContext-transaction.xml
此文件主要負責事務:配置事務管理並註入數據源,配置事務通知與切麵
<?xml version="1.0" encoding="UTF-8"?>
<beans xmlns="http://www.springframework.org/schema/beans"
    xmlns:context="http://www.springframework.org/schema/context" xmlns:p="http://www.springframework.org/schema/p"
    xmlns:aop="http://www.springframework.org/schema/aop" xmlns:tx="http://www.springframework.org/schema/tx"
    xmlns:xsi="http://www.w3.org/2001/XMLSchema-instance"
    xsi:schemaLocation="http://www.springframework.org/schema/beans http://www.springframework.org/schema/beans/spring-beans-4.0.xsd
    http://www.springframework.org/schema/context http://www.springframework.org/schema/context/spring-context-4.0.xsd
    http://www.springframework.org/schema/aop http://www.springframework.org/schema/aop/spring-aop-4.0.xsd
http://www.springframework.org/schema/tx
http://www.springframework.org/schema/tx/spring-tx-4.0.xsd
    http://www.springframework.org/schema/util http://www.springframework.org/schema/util/spring-util-4.0.xsd">

    <!-- 事務管理器 -->
    <bean id="transactionManager"
        class="org.springframework.jdbc.datasource.DataSourceTransactionManager">
        <!-- 數據源 -->
        <property name="dataSource" ref="dataSource" />
    </bean>

    <!-- 通知 -->
    <tx:advice id="txAdvice" transaction-manager="transactionManager">
        <tx:attributes>
            <!-- 傳播行為 -->
            <tx:method name="save*" propagation="REQUIRED" />
            <tx:method name="insert*" propagation="REQUIRED" />
            <tx:method name="delete*" propagation="REQUIRED" />
            <tx:method name="update*" propagation="REQUIRED" />
            <tx:method name="find*" propagation="SUPPORTS" read-only="true" />
            <tx:method name="get*" propagation="SUPPORTS" read-only="true" />
        </tx:attributes>
    </tx:advice>

    <!-- 切麵 -->
    <aop:config>
        <aop:advisor advice-ref="txAdvice"
            pointcut="execution(* cn.clj.service.*.*(..))" />
    </aop:config>

</beans>
9)創建SpringMvc核心配置文件之SpringMvc.xml
<?xml version="1.0" encoding="UTF-8"?>
<beans xmlns="http://www.springframework.org/schema/beans"
    xmlns:xsi="http://www.w3.org/2001/XMLSchema-instance"
    xmlns:p="http://www.springframework.org/schema/p"
    xmlns:context="http://www.springframework.org/schema/context"
    xmlns:dubbo="http://code.alibabatech.com/schema/dubbo"
    xmlns:mvc="http://www.springframework.org/schema/mvc"
    xsi:schemaLocation="http://www.springframework.org/schema/beans http://www.springframework.org/schema/beans/spring-beans-4.0.xsd
        http://www.springframework.org/schema/mvc http://www.springframework.org/schema/mvc/spring-mvc-4.0.xsd
        http://code.alibabatech.com/schema/dubbo http://code.alibabatech.com/schema/dubbo/dubbo.xsd
        http://www.springframework.org/schema/context http://www.springframework.org/schema/context/spring-context-4.0.xsd">
        <!-- 配置@Controller註解掃描 -->
        <context:component-scan base-package="cn.clj.controller"/>

         <!-- 註解驅動:能夠自動配置最新版的處理器映射器和處理器適配器 -->
         <mvc:annotation-driven conversion-service="conversionService"></mvc:annotation-driven>
         <!-- 配置視圖解析器 -->
         <!-- 作用:在controller中指定頁面路徑的時候就不用寫頁面的完整路徑名稱,直接寫去掉尾碼的頁面名 -->
         <bean class="org.springframework.web.servlet.view.InternalResourceViewResolver">
             <!--真正頁面路徑=首碼+頁面名稱+尾碼  -->
             <!-- 跳轉視圖首碼 -->
             <property name="prefix" value="/jsp/"></property>
             <!-- 跳轉視圖尾碼 -->
             <property name="suffix" value=".jsp"></property>
         </bean>

</beans>
10)配置伺服器啟動掃描
整合後以上的配置文件,伺服器不能自動識別載入,需要在web.xml文件中開啟包掃描
  <!-- 開啟spring各核心配置文件掃描 -->
  <context-param>
    <param-name>contextConfigLocation</param-name>
    <param-value>classpath:applicationContext-*.xml</param-value>
  </context-param>
  <listener>
    <listener-class>org.springframework.web.context.ContextLoaderListener</listener-class>
  </listener>
  <!-- 開啟SpringMVc攔截器-->
  <servlet>
    <servlet-name>SpringMvc</servlet-name>
    <servlet-class>org.springframework.web.servlet.DispatcherServlet</servlet-class>
    <!-- 配置SpringMvc核心配置文件所在路徑  -->
    <init-param>
      <param-name>contextConfigLocation</param-name>
      <param-value>classpath:SpringMvc.xml</param-value>
    </init-param>
    <load-on-startup>1</load-on-startup>
  </servlet>
  <servlet-mapping>
    <servlet-name>SpringMvc</servlet-name>
    <url-pattern>*.action</url-pattern>
  </servlet-mapping>
以上整合環境部署大致完成
2、整合開發
需求1:從資料庫查詢到商品信息,並將數據返回到jsp中
1)開啟逆向工程自動生成pojo類和mapper介面和映射文件
1.1: 導入逆向工程jar包mybatis-generator-core-1.3.2
1.2 :在config包下創建generatorConfig.xml文件
<?xml version="1.0" encoding="UTF-8"?>
<!DOCTYPE generatorConfiguration
  PUBLIC "-//mybatis.org//DTD MyBatis Generator Configuration 1.0//EN"
  "http://mybatis.org/dtd/mybatis-generator-config_1_0.dtd">

<generatorConfiguration>
    <context id="testTables" targetRuntime="MyBatis3">
        <commentGenerator>
            <!-- 是否去除自動生成的註釋 true:是 : false:否 -->
            <property name="suppressAllComments" value="true" />
        </commentGenerator>
        <!--資料庫連接的信息:驅動類、連接地址、用戶名、密碼 -->
        <jdbcConnection driverClass="com.mysql.jdbc.Driver"
            connectionURL="jdbc:mysql://192.168.174.132:3306/SSM" userId="root"
            password="root">
        </jdbcConnection>
        <!-- <jdbcConnection driverClass="oracle.jdbc.OracleDriver"
            connectionURL="jdbc:oracle:thin:@127.0.0.1:1521:yycg"
            userId="yycg"
            password="yycg">
        </jdbcConnection> -->

        <!-- 預設false,把JDBC DECIMAL 和 NUMERIC 類型解析為 Integer,為 true時把JDBC DECIMAL 和
            NUMERIC 類型解析為java.math.BigDecimal -->
        <javaTypeResolver>
            <property name="forceBigDecimals" value="false" />
        </javaTypeResolver>

        <!-- targetProject:生成PO類的位置 -->
        <javaModelGenerator targetPackage="cn.clj.pojo"
            targetProject=".\src">
            <!-- enableSubPackages:是否讓schema作為包的尾碼 -->
            <property name="enableSubPackages" value="false" />
            <!-- 從資料庫返回的值被清理前後的空格 -->
            <property name="trimStrings" value="true" />
        </javaModelGenerator>
        <!-- targetProject:mapper映射文件生成的位置 -->
        <sqlMapGenerator targetPackage="cn.clj.dao"
            targetProject=".\src">
            <!-- enableSubPackages:是否讓schema作為包的尾碼 -->
            <property name="enableSubPackages" value="false" />
        </sqlMapGenerator>
        <!-- targetPackage:mapper介面生成的位置 -->
        <javaClientGenerator type="XMLMAPPER"
            targetPackage="cn.clj.dao"
            targetProject=".\src">
            <!-- enableSubPackages:是否讓schema作為包的尾碼 -->
            <property name="enableSubPackages" value="false" />
        </javaClientGenerator>
        <!-- 指定資料庫表 -->
        <table tableName="items"></table>
        <table tableName="user"></table>
        <!-- <table schema="" tableName="sys_user"></table>
        <table schema="" tableName="sys_role"></table>
        <table schema="" tableName="sys_permission"></table>
        <table schema="" tableName="sys_user_role"></table>
        <table schema="" tableName="sys_role_permission"></table> -->

        <!-- 有些表的欄位需要指定java類型
         <table schema="" tableName="">
            <columnOverride column="" javaType="" />
        </table> -->
    </context>
</generatorConfiguration>
1.3:創建啟動類
這裡需要配置generatorConfig.xml文件所在路徑,並運行此類
package cn.clj.start;

import java.io.File;
import java.util.ArrayList;
import java.util.List;

import org.mybatis.generator.api.MyBatisGenerator;
import org.mybatis.generator.config.Configuration;
import org.mybatis.generator.config.xml.ConfigurationParser;
import org.mybatis.generator.internal.DefaultShellCallback;

public class StartGenerator {
    public void generator() throws Exception{
        List<String> warnings = new ArrayList<String>();
        boolean overwrite = true;
        File configFile = new File("config/generatorConfig.xml");
        ConfigurationParser cp = new ConfigurationParser(warnings);
        Configuration config = cp.parseConfiguration(configFile);
        DefaultShellCallback callback = new DefaultShellCallback(overwrite);
        MyBatisGenerator myBatisGenerator = new MyBatisGenerator(config,
                callback, warnings);
        myBatisGenerator.generate(null);
    }
    public static void main(String[] args) throws Exception {
        try {
            StartGenerator startService = new StartGenerator();
            startService.generator();
        } catch (Exception e) {
            e.printStackTrace();
        }
}
}
自動生成的文件

2、定義介面和實現類
package cn.clj.service;

import java.util.List;

import cn.clj.pojo.Items;

public interface ItemsService {
    public List<Items> list() throws Exception;
}
註意:這裡註入了Mapper介面,並開啟了自動掃描註解
package cn.clj.service;

import java.util.List;

import org.springframework.beans.factory.annotation.Autowired;
import org.springframework.stereotype.Service;

import cn.clj.dao.ItemsMapper;
import cn.clj.pojo.Items;
import cn.clj.pojo.ItemsExample;

@Service
public class ItemsServiceImpl implements ItemsService{
    @Autowired
    private ItemsMapper itemsMapper;

    @Override
    public List<Items> list() throws Exception {
        //selectByExampleWithBLOBs(example)包含文本類型
        ItemsExample example=new ItemsExample();
        //example.createCriteria()可以創建查詢條件;如果無需任何查詢條件,直接將example實例化即可
        List<Items>  list=itemsMapper.selectByExampleWithBLOBs(example);
        return list;
    }
}
3、創建conroller類
@Controller
public class ItemController {
    //註意:這裡可以使用Autowired:自動裝配(缺點:當一個介面有兩個實現類時就無法世識別)
    //Resource:值是取實現類中定義的註解值
    @Autowired
    private ItemsService itemsService;
    //查詢所有
    @RequestMapping("/list")
    public ModelAndView itemsList() throws Exception{
        List<Items> list=itemsService.list();
        ModelAndView modelAndView=new ModelAndView();
        modelAndView.addObject("itemList",list);
        modelAndView.setViewName("itemList");
        return modelAndView;
    }
}
4、創建itemList.jsp接受參數
<%@taglib uri="http://java.sun.com/jstl/core_rt" prefix="c"%>
<body>
<form action="${pageContext.request.contextPath }/search.action" method="post">
查詢條件:
<table width="100%" border=1>
<tr>
<!-- 如果controller接受的是vo,那麼頁面上input框中name屬性值要等於vo屬性.屬性 (..)進行引用-->
<td>商品名稱:<input type="text" name="items.name"/></td>
<td>商品價格:<input type="text" name="items.price"/></td>
<td><input type="submit" value="查詢"/></td>
</tr>
</table>
商品列表:
<table width="100%" border=1>
<tr>
    <td>商品名稱</td>
    <td>商品價格</td>
    <td>生產日期</td>
    <td>商品描述</td>
    <td>操作</td>
</tr>
<c:forEach items="${itemList}" var="item">
<tr>
    <td>${item.name}</td>
    <td>${item.price}</td>
    <td><fmt:formatDate value="${item.createtime}" pattern="yyyy-MM-dd HH:mm:ss"/></td>
    <td>${item.detail}</td>

    <td><a href="${pageContext.request.contextPath }/itemEdit.action?id=${item.id}">修改</a></td>

</tr>
</c:forEach>

</table>
</form>
</body>
5、測試:http://localhost:8080/項目名/list.action
五、SpringMvc值參數綁定
1、關於@RequestParam標簽
1) 使用@RequestParam常用於處理簡單類型的綁定
如:jsp傳入一個值
<input type="text" name="item_id"/>
controller接收
public String editItem(@RequestParam(value="item_id",required=true) String id) {

}
註意:
1.1 ) value:參數名字,即入參的請求參數名字,形參名稱為id,但是這裡使用value="item_id"限定請求的參數名為item_id,所以頁面傳遞參數的名必須為item_id。如果請求參數中沒有item_id將跑出異常:
HTTP Status 500 - Required Integer parameter 'item_id' is not present
1.2)這裡通過required=true限定item_id參數為必需傳遞,如果不傳遞則報400錯誤,可以使用defaultvalue設置預設值,即使required=true也可以不傳item_id參數值
2、綁定普通類型
需求1:打開編輯界面,查看商品詳情
環境:引用以上環境,當觸發itemList.jsp中的修改按鈕,根據超鏈接跳轉,傳入參數為商品id
1)、編寫介面和實現類
public Items findItemsById(Integer id) throws Exception
package cn.clj.service;

import java.util.List;

import org.springframework.beans.factory.annotation.Autowired;
import org.springframework.stereotype.Service;

import cn.clj.dao.ItemsMapper;
import cn.clj.pojo.Items;
import cn.clj.pojo.ItemsExample;

@Service
public class ItemsServiceImpl implements ItemsService{
    @Autowired
    private ItemsMapper itemsMapper;
    @Override
    public Items findItemsById(Integer id) throws Exception {
        Items items=itemsMapper.selectByPrimaryKey(id);
        return items;
    }
}
2)、編寫controller
參數通過功能變數名稱封裝到請求中,此時可以在方法中定義HttpServletRequest、HttpSession、Model將參數獲得
註意:這裡設置返回頁面是個字元串
package cn.clj.controller;

import java.util.Date;
import java.util.List;

import javax.annotation.Resource;
import javax.servlet.http.HttpServletRequest;
import javax.servlet.http.HttpServletResponse;
import javax.servlet.http.HttpSession;

import org.springframework.beans.factory.annotation.Autowired;
import org.springframework.stereotype.Controller;
import org.springframework.ui.Model;
import org.springframework.web.bind.annotation.RequestMapping;
import org.springframework.web.servlet.ModelAndView;

import cn.clj.pojo.Items;
import cn.clj.service.ItemsService;
import cn.clj.vo.QueryVo;

@Controller
public class ItemController {
    //註意:這裡可以使用Autowired:自動裝配(缺點:當一個介面有兩個實現類時就無法世識別)
    //Resource:值是取實現類中定義的註解值
    @Autowired
    private ItemsService itemsService;/**
     * springMvc預設支持的參數類型,也就是說在controller方法中可以加入這些,也可以不加
     * HttpServletRequest
     * HttpServletResponse
     * HttpSession
     * Model
     */
    @RequestMapping("/itemEdit")
    public String itemEdit(HttpServletRequest request,Model model) throws Exception{
        String idStr=request.getParameter("id");
        Items items=itemsService.findItemsById(Integer.parseInt(idStr));
        //Model模型:模型中放入了返回給頁面的數據
        //Model底層就是用的request域傳遞數據,但是對request進行了擴展
        model.addAttribute("item",items);
        //如果springMvc方法返回一個簡單的string字元串,那麼springMvc就會認為這個字元串就是頁面的名稱
        return "editItem";
    }
}
3)、創建editItem.jsp接受參數
<%@ taglib uri="http://java.sun.com/jsp/jstl/core" prefix="c"%>

 <body>
    <!-- 上傳圖片是需要指定屬性 enctype="multipart/form-data" -->
    <!-- <form id="itemForm" action="" method="post" enctype="multipart/form-data"> -->
    <form id="itemForm"    action="${pageContext.request.contextPath }/updateitem.action" method="post">
        <input type="hidden" name="id" value="${item.id }" /> 修改商品信息:
        <table width="100%" border=1>
            <tr>
                <td>商品名稱</td>
                <td><input type="text" name="name" value="${item.name }" /></td>
            </tr>
            <tr>
                <td>商品價格</td>
                <td><input type="text" name="price" value="${item.price }" /></td>
            </tr>
            <tr>
                <td>商品簡介</td>
                <td><textarea rows="3" cols="30" name="detail">${item.detail }</textarea>
                </td>
            </tr>
            <tr>
                <td colspan="2" align="center"><input type="submit" value="提交" />
                </td>
            </tr>
        </table>

    </form>
</body>
綁定pojo類型
需求2、更新數據
1)、前提有pojo類(其中在修改界面中的接受的Items 的屬性必須與pojo類中的屬性保持一致)
package cn.clj.pojo;

import java.util.Date;

public class Items {
    private Integer id;

    private String name;

    private Float price;

    private String pic;

    private Date createtime;

    private String detail;

    //省略set/get方法
}
1)、創建介面和實現類
public void updateItems(Items items) throws Exception;
@Service
public class ItemsServiceImpl implements ItemsService{
    @Autowired
    private ItemsMapper itemsMapper;

    @Override
    public void updateItems(Items items) throws Exception {
        // TODO Auto-generated method stub
        //此方法包含大對象文本
        itemsMapper.updateByPrimaryKeyWithBLOBs(items);
    }

}
2)、創建conroller類定義方法
@Controller
public class ItemController {
    //註意:這裡可以使用Autowired:自動裝配(缺點:當一個介面有兩個實現類時就無法世識別)
    //Resource:值是取實現類中定義的註解值
    @Autowired
    private ItemsService itemsService;/**
     * 更新數據
     * @return
     */
    //1.springMvc可以直接接受基本數據類型,包括string,spring Mvc可以幫你自動進行類型轉換
    //controller方法接受的參數的變數名稱必須要等於頁面上input框的name屬性值
    //2.springMvc可以直接接受pojo類型,要求頁面上input框的name屬性名稱必須等於pojo的屬性名稱
    @RequestMapping("/updateitem")
    public String updateitem(Items items) throws Exception{      //方式二
    //


