使用Java應用程式發送E-mail十分簡單,但是首先你應該在你的機器上安裝JavaMail API 和Java Activation Framework (JAF) 。你可以在 JavaMail (Version 1.2) 下載最新的版本。你可以再 在JAF (Version 1.1.1)下載最新... ...
使用Java應用程式發送E-mail十分簡單,但是首先你應該在你的機器上安裝JavaMail API 和Java Activation Framework (JAF) 。
你可以在 JavaMail (Version 1.2) 下載最新的版本。
你可以再 在JAF (Version 1.1.1)下載最新的版本。
下載並解壓這些文件,最上層文件夾你會發現很多的jar文件。你需要將mail.jar和activation.jar 添加到你的CLASSPATH中。
如果你使用第三方郵件伺服器如QQ的SMTP伺服器,可查看文章底部用戶認證完整的實例。
發送一封簡單的 E-mail
下麵是一個發送簡單E-mail的例子。假設你的localhost已經連接到網路。
// 文件名 SendEmail.java

import java.util.*;
import javax.mail.*;
import javax.mail.internet.*;
import javax.activation.*;

public class SendEmail
{
   public static void main(String [] args)
   {
      // 收件人電子郵箱
      String to = "[email protected]";

      // 發件人電子郵箱
      String from = "[email protected]";

      // 指定發送郵件的主機為 localhost
      String host = "localhost";

      // 獲取系統屬性
      Properties properties = System.getProperties();

      // 設置郵件伺服器
      properties.setProperty("mail.smtp.host", host);

      // 獲取預設session對象
      Session session = Session.getDefaultInstance(properties);

      try{
         // 創建預設的 MimeMessage 對象
         MimeMessage message = new MimeMessage(session);

         // Set From: 頭部頭欄位
         message.setFrom(new InternetAddress(from));

         // Set To: 頭部頭欄位
         message.addRecipient(Message.RecipientType.TO,
                                  new InternetAddress(to));

         // Set Subject: 頭部頭欄位
         message.setSubject("This is the Subject Line!");

         // 設置消息體
         message.setText("This is actual message");

         // 發送消息
         Transport.send(message);
         System.out.println("Sent message successfully....");
      }catch (MessagingException mex) {
         mex.printStackTrace();
      }
   }
}
編譯並運行這個程式來發送一封簡單的E-mail:
$ java SendEmail
Sent message successfully....
如果你想發送一封e-mail給多個收件人,那麼使用下麵的方法來指定多個收件人ID:
void addRecipients(Message.RecipientType type,
                   Address[] addresses)
throws MessagingException
下麵是對於參數的描述:
-
type:要被設置為TO, CC 或者BCC. 這裡CC 代表抄送、BCC 代表秘密抄送y. 舉例:Message.RecipientType.TO
-
addresses: 這是email ID的數組。在指定電子郵件ID時,你將需要使用InternetAddress()方法。
發送一封HTML E-mail
下麵是一個發送HTML E-mail的例子。假設你的localhost已經連接到網路。
和上一個例子很相似,除了我們要使用setContent()方法來通過第二個參數為"text/html",來設置內容來指定要發送HTML內容。
// 文件名 SendHTMLEmail.java

import java.util.*;
import javax.mail.*;
import javax.mail.internet.*;
import javax.activation.*;

public class SendHTMLEmail
{
   public static void main(String [] args)
   {

      // 收件人電子郵箱
      String to = "[email protected]";

      // 發件人電子郵箱
      String from = "[email protected]";

      // 指定發送郵件的主機為 localhost
      String host = "localhost";

      // 獲取系統屬性
      Properties properties = System.getProperties();

      // 設置郵件伺服器
      properties.setProperty("mail.smtp.host", host);

      // 獲取預設的 Session 對象。
      Session session = Session.getDefaultInstance(properties);

      try{
         // 創建預設的 MimeMessage 對象。
         MimeMessage message = new MimeMessage(session);

         // Set From: 頭部頭欄位
         message.setFrom(new InternetAddress(from));

         // Set To: 頭部頭欄位
         message.addRecipient(Message.RecipientType.TO,
                                  new InternetAddress(to));

         // Set Subject: 頭欄位
         message.setSubject("This is the Subject Line!");

         // 發送 HTML 消息, 可以插入html標簽
         message.setContent("<h1>This is actual message</h1>",
                            "text/html" );

         // 發送消息
         Transport.send(message);
         System.out.println("Sent message successfully....");
      }catch (MessagingException mex) {
         mex.printStackTrace();
      }
   }
}
編譯並運行此程式來發送HTML e-mail:
$ java SendHTMLEmail
Sent message successfully....
發送帶有附件的 E-mail
下麵是一個發送帶有附件的 E-mail的例子。假設你的localhost已經連接到網路。
// 文件名 SendFileEmail.java

import java.util.*;
import javax.mail.*;
import javax.mail.internet.*;
import javax.activation.*;

public class SendFileEmail
{
   public static void main(String [] args)
   {

      // 收件人電子郵箱
      String to = "[email protected]";

      // 發件人電子郵箱
      String from = "[email protected]";

      // 指定發送郵件的主機為 localhost
      String host = "localhost";

      // 獲取系統屬性
      Properties properties = System.getProperties();

      // 設置郵件伺服器
      properties.setProperty("mail.smtp.host", host);

      // 獲取預設的 Session 對象。
      Session session = Session.getDefaultInstance(properties);

      try{
         // 創建預設的 MimeMessage 對象。
         MimeMessage message = new MimeMessage(session);

         // Set From: 頭部頭欄位
         message.setFrom(new InternetAddress(from));

         // Set To: 頭部頭欄位
         message.addRecipient(Message.RecipientType.TO,
                                  new InternetAddress(to));

         // Set Subject: 頭欄位
         message.setSubject("This is the Subject Line!");

         // 創建消息部分
         BodyPart messageBodyPart = new MimeBodyPart();

         // 消息
         messageBodyPart.setText("This is message body");

         // 創建多重消息
         Multipart multipart = new MimeMultipart();

         // 設置文本消息部分
         multipart.addBodyPart(messageBodyPart);

         // 附件部分
         messageBodyPart = new MimeBodyPart();
         String filename = "file.txt";
         DataSource source = new FileDataSource(filename);
         messageBodyPart.setDataHandler(new DataHandler(source));
         messageBodyPart.setFileName(filename);
         multipart.addBodyPart(messageBodyPart);

         // 發送完整消息
         message.setContent(multipart );

         //   發送消息
         Transport.send(message);
         System.out.println("Sent message successfully....");
      }catch (MessagingException mex) {
         mex.printStackTrace();
      }
   }
}
編譯並運行你的程式來發送一封帶有附件的郵件。
$ java SendFileEmail
Sent message successfully....
用戶認證部分
如果需要提供用戶名和密碼給e-mail伺服器來達到用戶認證的目的,你可以通過如下設置來完成:
 props.put("mail.smtp.auth", "true");
 props.setProperty("mail.user", "myuser");
 props.setProperty("mail.password", "mypwd");
e-mail其他的發送機制和上述保持一致。
需要用戶名密碼驗證郵件發送實例:
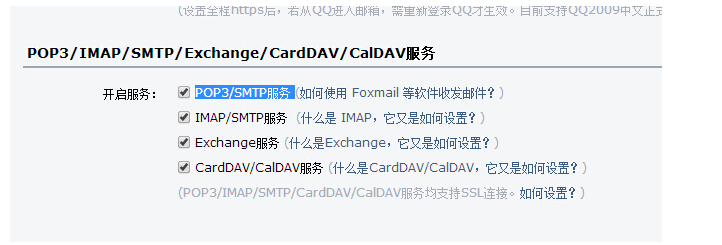
本實例以QQ郵件伺服器為例,你需要在登錄QQ郵箱後臺在"設置"=》賬號中開啟POP3/SMTP服務 ,如下圖所示:

Java 代碼如下:
// 需要用戶名密碼郵件發送實例
//文件名 SendEmail2.java
//本實例以QQ郵箱為例,你需要在qq後臺設置

import java.util.Properties;

import javax.mail.Authenticator;
import javax.mail.Message;
import javax.mail.MessagingException;
import javax.mail.PasswordAuthentication;
import javax.mail.Session;
import javax.mail.Transport;
import javax.mail.internet.InternetAddress;
import javax.mail.internet.MimeMessage;

public class SendEmail2
{
   public static void main(String [] args)
   {
      // 收件人電子郵箱
      String to = "[email protected]";

      // 發件人電子郵箱
      String from = "[email protected]";

      // 指定發送郵件的主機為 localhost
      String host = "smtp.qq.com";  //QQ 郵件伺服器

      // 獲取系統屬性
      Properties properties = System.getProperties();

      // 設置郵件伺服器
      properties.setProperty("mail.smtp.host", host);

      properties.put("mail.smtp.auth", "true");
      // 獲取預設session對象
      Session session = Session.getDefaultInstance(properties,new Authenticator(){
        public PasswordAuthentication getPasswordAuthentication()
        {
         return new PasswordAuthentication("[email protected]", "qq郵箱密碼"); //發件人郵件用戶名、密碼
        }
       });

      try{
         // 創建預設的 MimeMessage 對象
         MimeMessage message = new MimeMessage(session);

         // Set From: 頭部頭欄位
         message.setFrom(new InternetAddress(from));

         // Set To: 頭部頭欄位
         message.addRecipient(Message.RecipientType.TO,
                                  new InternetAddress(to));

         // Set Subject: 頭部頭欄位
         message.setSubject("This is the Subject Line!");

         // 設置消息體
         message.setText("This is actual message");

         // 發送消息
         Transport.send(message);
         System.out.println("Sent message successfully....from cnblogs.com");
      }catch (MessagingException mex) {
         mex.printStackTrace();
      }
   }
}


