1. Spring6 的JdbcTemplate的JDBC模板類的詳細使用說明 @目錄1. Spring6 的JdbcTemplate的JDBC模板類的詳細使用說明每博一文案2. 環境準備3. 數據準備4. 開始4.1 從數據表中插入(添加)數據4.2 從數據表中修改數據4.3 從數據表中刪除數據4 ...
1. Spring6 的JdbcTemplate的JDBC模板類的詳細使用說明
@
目錄每博一文案
他伸直雙臂,舉過頭頂,兩隻手握在一起,伸了個懶腰,望著天地交接的地方,聲音飄渺,嗯,有人說高中喜歡的人是能記一輩子的。
你信嗎?
他側著頭望著他,邢武對他笑,笑得那麼雲淡風輕,眼神卻那麼複雜,聲音透過風有些不真切地傳了過去。
你這麼優秀,不能回在感情上。
那一瞬間,晴也身上仿佛迸發出耀眼自信的光芒,轉過身,逆著光昂起下巴說,一輩子很長,可以做很多事,但我不會把它用來記住一個人。
我晴也不可能毀在任何事情上。
信我,我不是懦夫。
如果我敢拿未來賭一把,你會讓我輸嗎?
晴也把選擇權重新拾了起來,鄭重地交還到邢武手中。
他知道邢武的擔憂和閃躲,也知道他的顧慮和徘徊。
無論是他的家庭,他的出身,他的背景,讓他不敢去想以後。
所以晴也把自己的決心赤裸裸地灑在這片戈壁灘上,讓他清晰地感受著,神情凝重地望著邢武,身影被夕陽拉得頎長,那一刻,他只感覺到一股強大的力量撞進他的心臟。
仿佛藏著排山倒海的光束向他奔騰而來,那麼強烈,那麼堅定。
他的生命中從來沒有出現過這樣一個人,一個不懼天地萬物,不怕世俗捆綁的女孩兒,一個渾身是光讓他看見未來的女孩兒。
一個充滿智慧,勇敢,把命運牢牢攥在手中的女孩兒。
他忽然很怕眼前的這個女孩兒,怕過了這輩子就再也遇不到了。
如果他都敢賭,他又有什麼理由退縮呢?
							——————《耀眼》
JdbcTemplate 是Spring 提供的一個JDBC模板類,是對JDBC的封裝,簡化JDBC代碼,當然,你也可以不用,可以讓Spring集成其它的ORM框架,例如:MyBatis,Hibernate 等。其中JDBC關於資料庫的連接也是一個重要的內容,想要瞭解更多的大家可以移步至:✏️✏️✏️ JDBC_ChinaRainbowSea的博客-CSDN博客
下麵我們正式開始對 JdbcTemplate 上的學習,完成增刪改查。
2. 環境準備
這裡,我們新建一個模塊,方便學習,如下:因為我們這裡是Spring6,而Spring6最低支持的JDK是17,所以我這裡是 JDK17的。
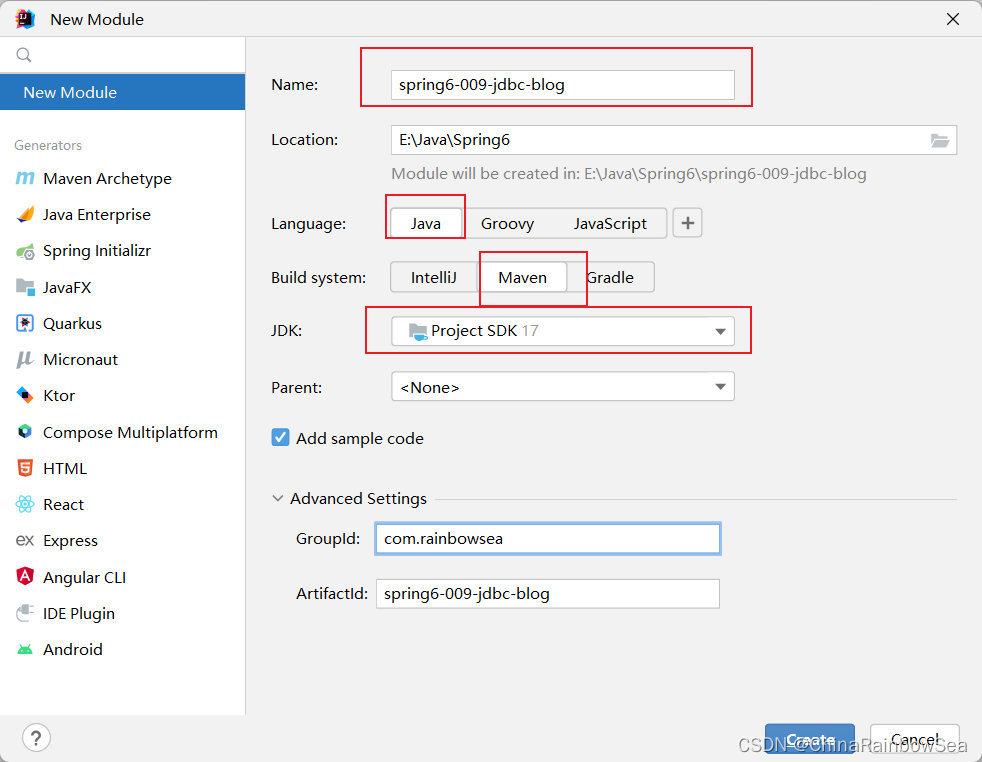
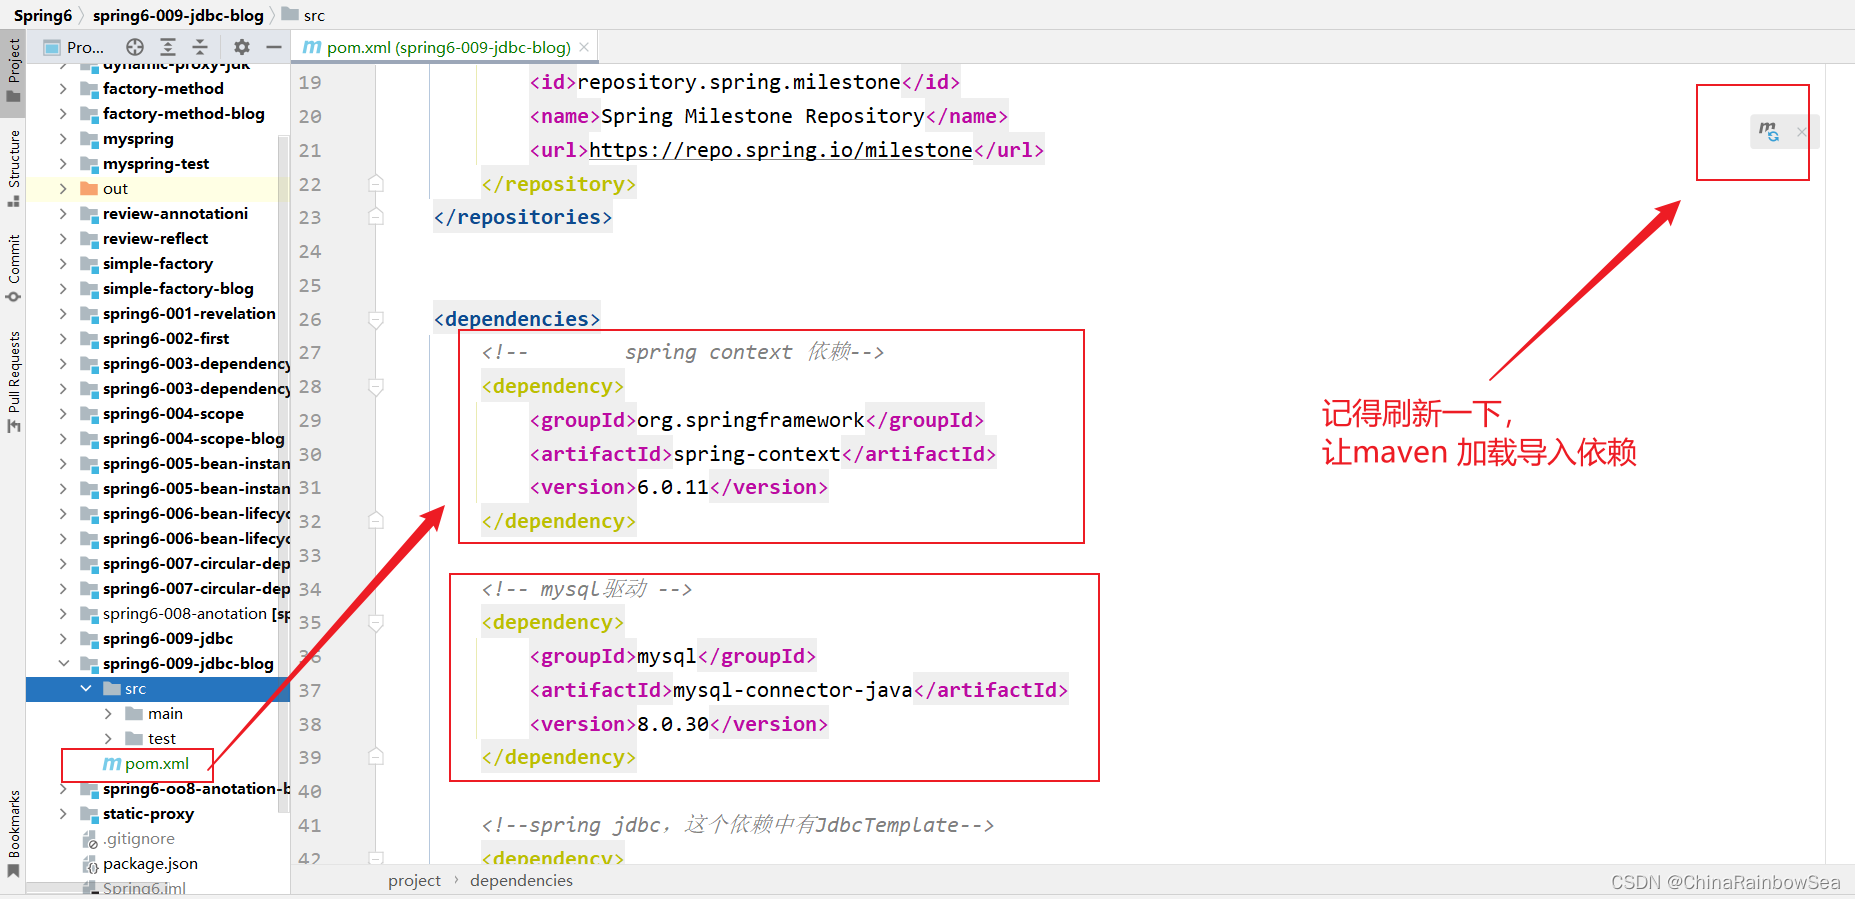
新建好模塊以後,我們需要導入相關的依賴,這裡我們通過 maven 導入依賴。關於Maven 的內容呢,大家可以移步至:✏️✏️✏️Maven_ChinaRainbowSea的博客-CSDN博客 ,進行更多的學習瞭解
具體的依賴有:
- spring context 依賴 (spring6 的依賴)
- mysql-connector-java(關於MySQL驅動的依賴,因為我們要連接資料庫,這裡我們連接的是MySQL資料庫)
- spring-jdbc (spring jdbc,這個依賴中有JdbcTemplate)
- junit (Junit4 單元測試依賴)
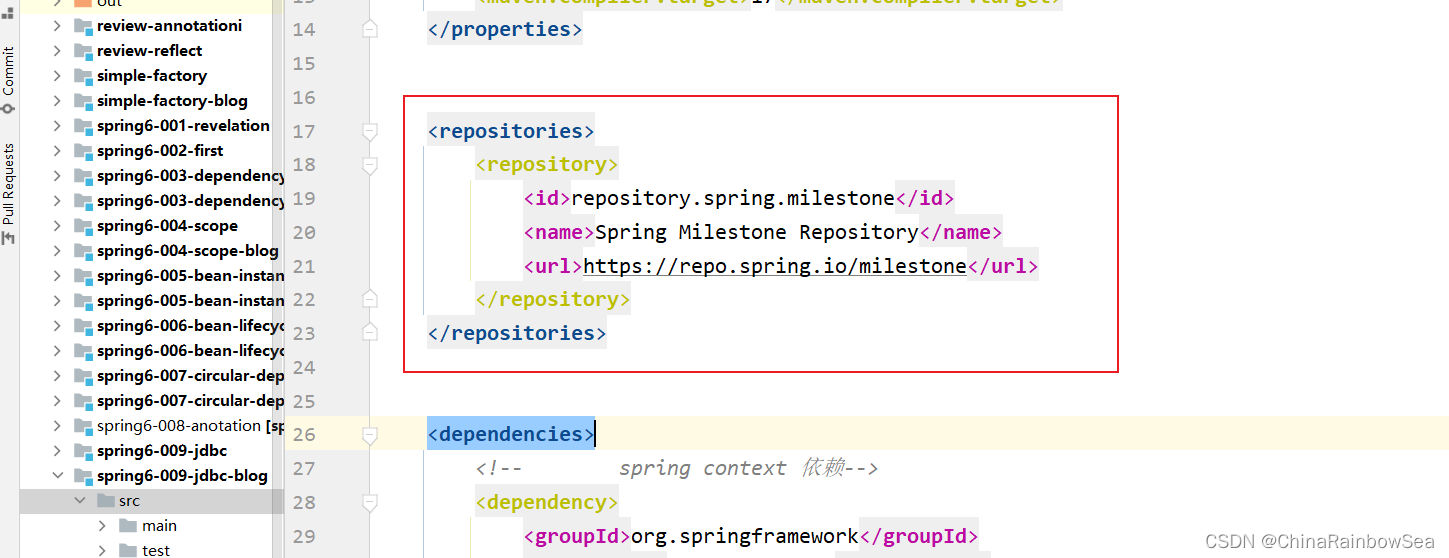
特殊的還有這個,也得添加上
<repositories>
        <repository>
            <id>repository.spring.milestone</id>
            <name>Spring Milestone Repository</name>
            <url>https://repo.spring.io/milestone</url>
        </repository>
    </repositories>
<?xml version="1.0" encoding="UTF-8"?>
<project xmlns="http://maven.apache.org/POM/4.0.0"
         xmlns:xsi="http://www.w3.org/2001/XMLSchema-instance"
         xsi:schemaLocation="http://maven.apache.org/POM/4.0.0 http://maven.apache.org/xsd/maven-4.0.0.xsd">
    <modelVersion>4.0.0</modelVersion>

    <groupId>com.rainbowsea</groupId>
    <artifactId>spring6-009-jdbc-blog</artifactId>
    <version>1.0-SNAPSHOT</version>

    <properties>
        <maven.compiler.source>17</maven.compiler.source>
        <maven.compiler.target>17</maven.compiler.target>
    </properties>


    <repositories>
        <repository>
            <id>repository.spring.milestone</id>
            <name>Spring Milestone Repository</name>
            <url>https://repo.spring.io/milestone</url>
        </repository>
    </repositories>


    <dependencies>
        <!--        spring context 依賴-->
        <dependency>
            <groupId>org.springframework</groupId>
            <artifactId>spring-context</artifactId>
            <version>6.0.11</version>
        </dependency>

        <!-- mysql驅動 -->
        <dependency>
            <groupId>mysql</groupId>
            <artifactId>mysql-connector-java</artifactId>
            <version>8.0.30</version>
        </dependency>

        <!--spring jdbc,這個依賴中有JdbcTemplate-->
        <dependency>
            <groupId>org.springframework</groupId>
            <artifactId>spring-jdbc</artifactId>
            <version>6.0.0-M2</version>
        </dependency>

        <!-- junit4 -->
        <dependency>
            <groupId>junit</groupId>
            <artifactId>junit</artifactId>
            <version>4.13.2</version>
            <scope>test</scope>
        </dependency>
    </dependencies>

</project>
3. 數據準備
首先,我們創建一個名為 spring6的資料庫,想要瞭解SQL語句的內容的,大家可以移步至✏️✏️✏️ SQL語法學習_ChinaRainbowSea的博客-CSDN博客
/* 判斷該資料庫是否存在,不存在,創建*/
CREATE DATABASE IF NOT EXISTS spring6;
然後在 spring6 資料庫中創建一個名為 user 的數據表
CREATE TABLE `user`  (
  `id` int NOT NULL AUTO_INCREMENT,
  `real_name` varchar(255) ,
  `age` int ,
  PRIMARY KEY (`id`) USING BTREE
) ;

-- ----------------------------
-- Records of user
-- ----------------------------
INSERT INTO `user` VALUES (1, '李四', 33);
INSERT INTO `user` VALUES (2, '李華', 20);
INSERT INTO `user` VALUES (3, '李華', 21);

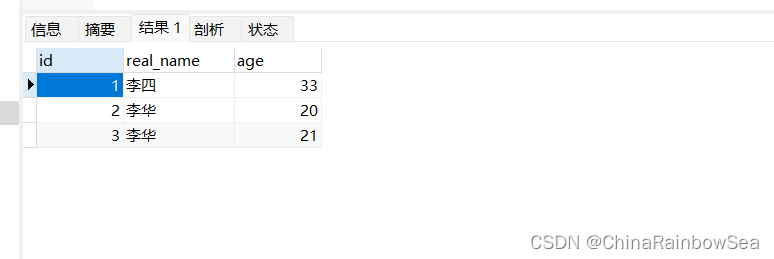
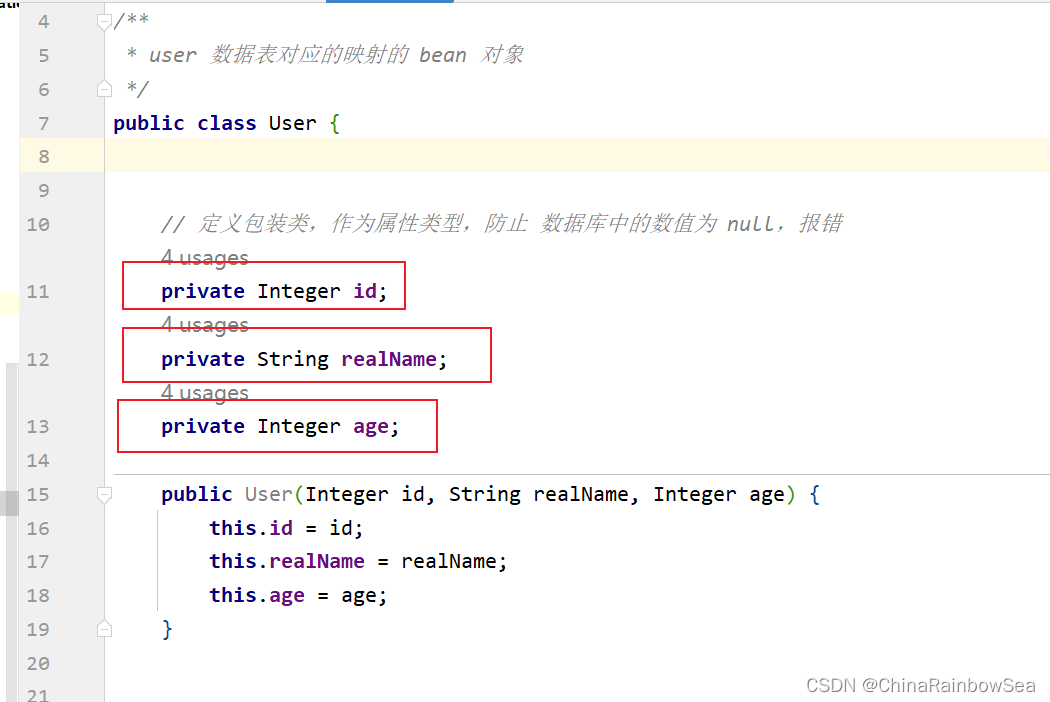
準備實體類:表user對應的實體類User。根據user 數據表結構創建對於的Bean 實體類。
註意: 這裡我們定義用對應簡單類型的包裝類,來定義成員變數,防止資料庫的數值為Null時,報錯,中斷。
package com.rainbowsea.spring6.bean;


/**
 * user 數據表對應的映射的 bean 對象
 */
public class User {


    // 定義包裝類,作為屬性類型,防止 資料庫中的數值為 null,報錯
    private Integer id;
    private String realName;
    private Integer age;

    public User(Integer id, String realName, Integer age) {
        this.id = id;
        this.realName = realName;
        this.age = age;
    }


    public User() {
    }


    public Integer getId() {
        return id;
    }

    public void setId(Integer id) {
        this.id = id;
    }

    public String getRealName() {
        return realName;
    }

    public void setRealName(String realName) {
        this.realName = realName;
    }

    public Integer getAge() {
        return age;
    }

    public void setAge(Integer age) {
        this.age = age;
    }

    @Override
    public String toString() {
        return "User{" +
                "id=" + id +
                ", realName='" + realName + '\'' +
                ", age=" + age +
                '}';
    }
}
配置編寫相關的spring.xml的信息
JdbcTemplate 是Spring 提供好的類,這類的完整類名是:org.springframework.jdbc.core.JdbcTemplate 。這個類上的使用,我們 new 對象就好了,而Spring 可以幫我們 new 對象,所以,我們就將這個new JdbcTemplate 對象這件事交給 Spring 來做。直接將這個類配置到
spring.xml的配置文件當中,納入 Bean管理即可。
我們來看一下這個JdbcTemplate源碼:
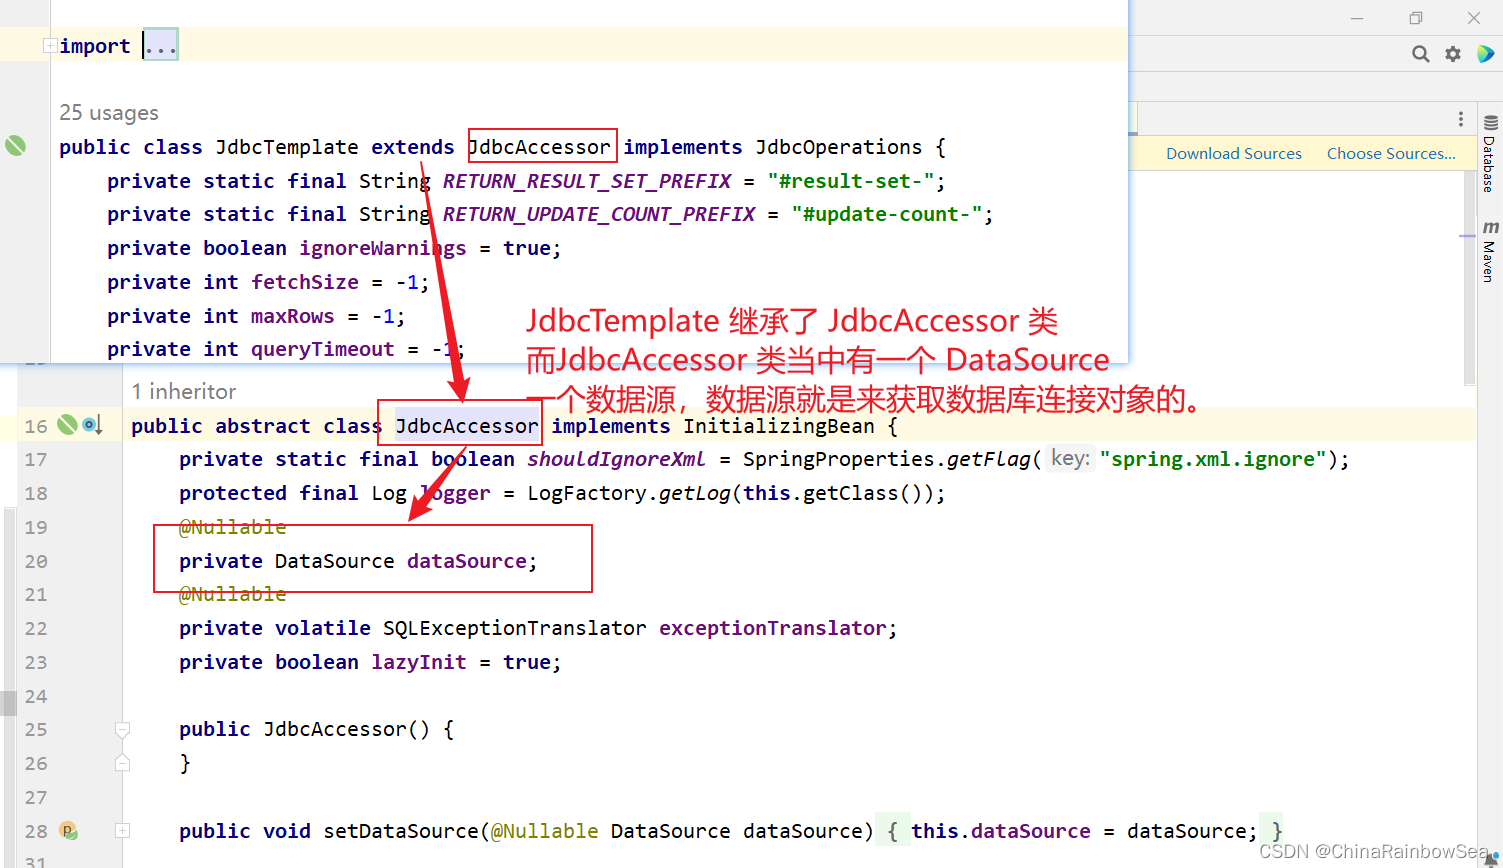
所以這裡,我們只需要配置好 DataSource 數據源,用來連接資料庫即可,將DataSource 屬性進行 set 註入賦值上。可以看到JdbcTemplate中有一個DataSource屬性,這個屬性是數據源,我們都知道連接資料庫需要Connection對象,而生成Connection對象是數據源負責的。所以我們需要給JdbcTemplate設置數據源屬性。
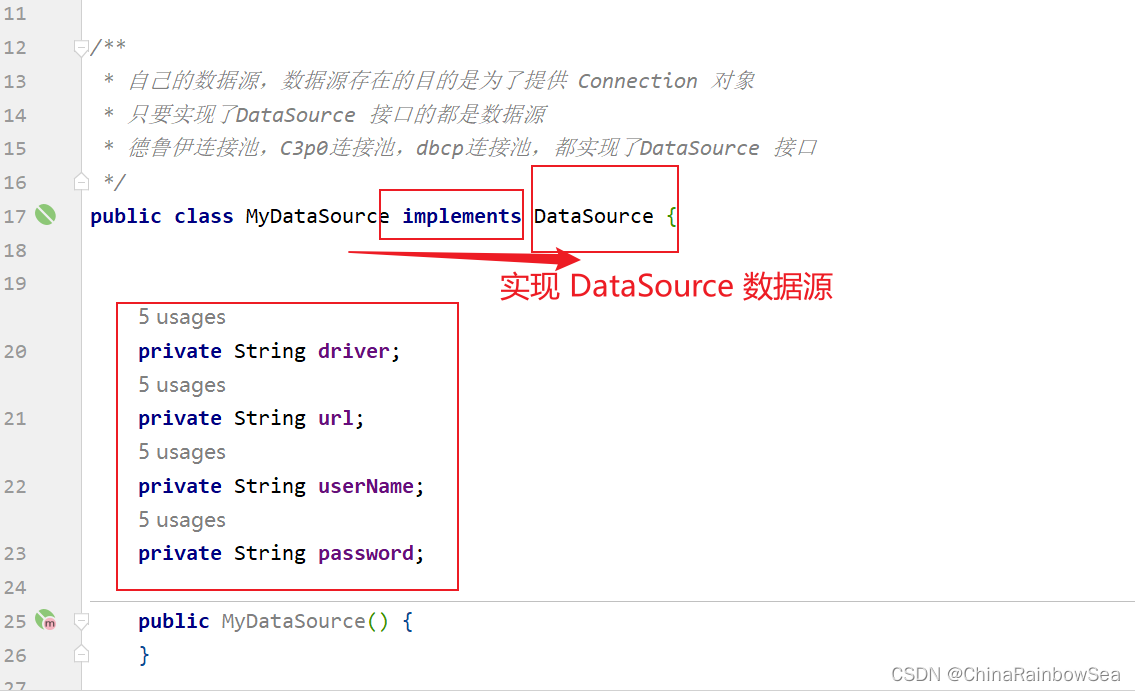
所有的數據源都是要實現javax.sql.DataSource介面的。這個數據源可以自己寫一個,也可以用寫好的,比如:阿裡巴巴的德魯伊連接池,c3p0,dbcp等。我們這裡自己先手寫一個數據源。
自己的數據源,數據源存在的目的是為了提供 Connection 對象;只要實現了DataSource 介面的都是數據源:德魯伊連接池,C3p0連接池,dbcp連接池,都實現了DataSource 介面
如下:
重寫其中的**public Connection getConnection() throws SQLException ** 方法,註意是沒有參數的。
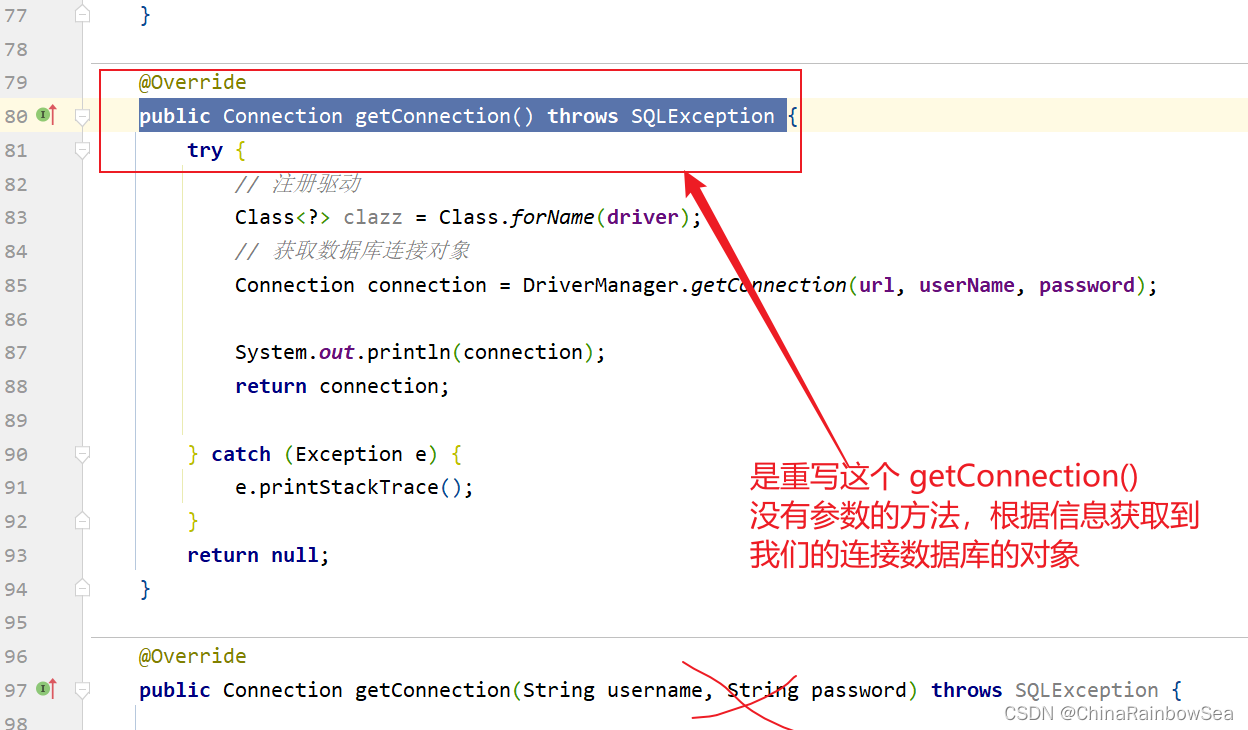
@Override
    public Connection getConnection() throws SQLException {
        try {
            // 註冊驅動
            Class<?> clazz = Class.forName(driver);
            // 獲取資料庫連接對象
            Connection connection = DriverManager.getConnection(url, userName, password);

            System.out.println(connection);
            return connection;

        } catch (Exception e) {
            e.printStackTrace();
        }
        return null;
    }
package com.rainbowsea.spring6.bean;

import javax.sql.DataSource;
import java.io.PrintWriter;
import java.sql.Connection;
import java.sql.DriverManager;
import java.sql.SQLException;
import java.sql.SQLFeatureNotSupportedException;
import java.util.logging.Logger;


/**
 * 自己的數據源,數據源存在的目的是為了提供 Connection 對象
 * 只要實現了DataSource 介面的都是數據源
 * 德魯伊連接池,C3p0連接池,dbcp連接池,都實現了DataSource 介面
 */
public class MyDataSource implements DataSource {


    private String driver;
    private String url;
    private String userName;
    private String password;

    public MyDataSource() {
    }

    public MyDataSource(String driver, String url, String userName, String password) {
        this.driver = driver;
        this.url = url;
        this.userName = userName;
        this.password = password;
    }


    public String getDriver() {
        return driver;
    }

    public void setDriver(String driver) {
        this.driver = driver;
    }

    public String getUrl() {
        return url;
    }

    public void setUrl(String url) {
        this.url = url;
    }

    public String getUserName() {
        return userName;
    }

    public void setUserName(String userName) {
        this.userName = userName;
    }

    public String getPassword() {
        return password;
    }

    public void setPassword(String password) {
        this.password = password;
    }


    @Override
    public String toString() {
        return "MyDataSource{" +
                "driver='" + driver + '\'' +
                ", url='" + url + '\'' +
                ", userName='" + userName + '\'' +
                ", password='" + password + '\'' +
                '}';
    }

    @Override
    public Connection getConnection() throws SQLException {
        try {
            // 註冊驅動
            Class<?> clazz = Class.forName(driver);
            // 獲取資料庫連接對象
            Connection connection = DriverManager.getConnection(url, userName, password);

            System.out.println(connection);
            return connection;

        } catch (Exception e) {
            e.printStackTrace();
        }
        return null;
    }

    @Override
    public Connection getConnection(String username, String password) throws SQLException {

        return null;

    }

    @Override
    public PrintWriter getLogWriter() throws SQLException {
        return null;
    }

    @Override
    public void setLogWriter(PrintWriter out) throws SQLException {

    }

    @Override
    public void setLoginTimeout(int seconds) throws SQLException {

    }

    @Override
    public int getLoginTimeout() throws SQLException {
        return 0;
    }

    @Override
    public Logger getParentLogger() throws SQLFeatureNotSupportedException {
        return null;
    }

    @Override
    public <T> T unwrap(Class<T> iface) throws SQLException {
        return null;
    }

    @Override
    public boolean isWrapperFor(Class<?> iface) throws SQLException {
        return false;
    }
}
寫完數據源,我們需要把這個數據源傳遞給JdbcTemplate。因為JdbcTemplate中有一個DataSource屬性;同時獲取為該 DataSource 數據源,通過Spring的set 註入,為其中的成員變數賦值。就是連接我們MySQL資料庫的一些信息。如下:
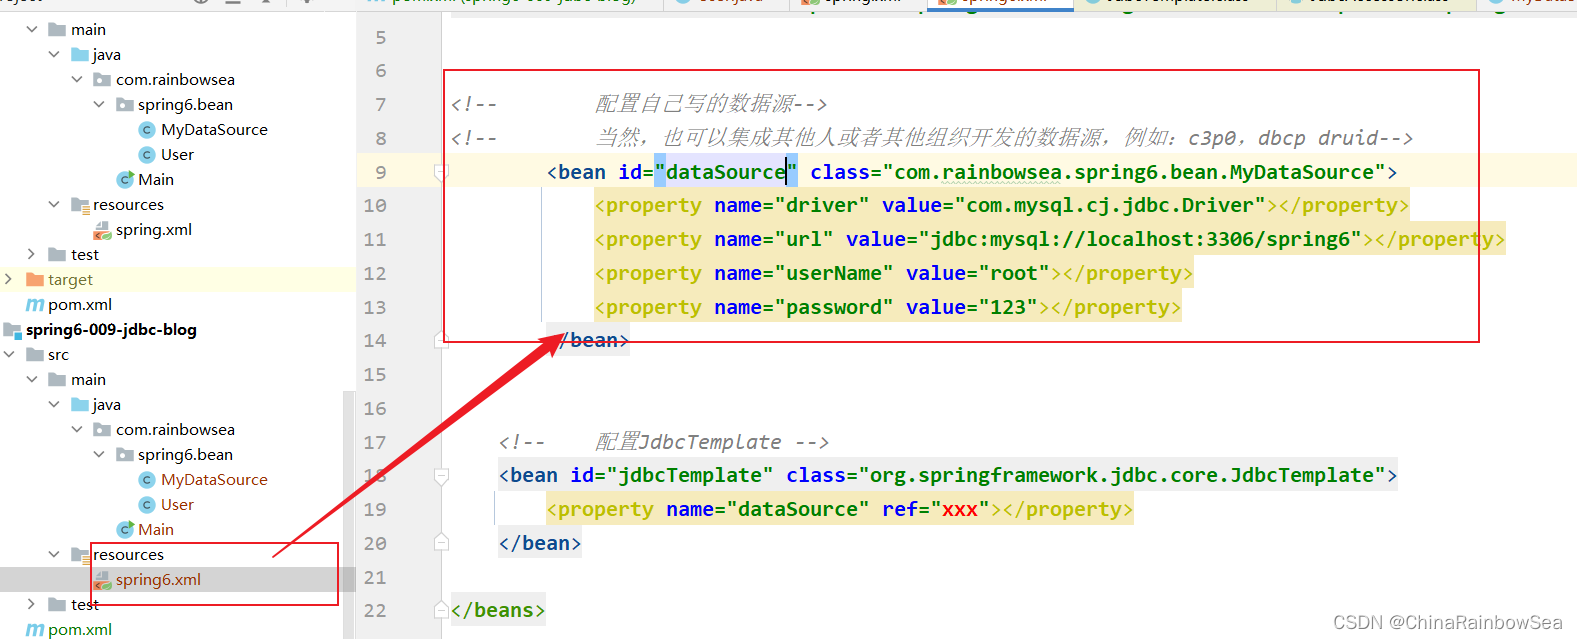
<!--        配置自己寫的數據源-->
<!--        當然,也可以集成其他人或者其他組織開發的數據源,例如:c3p0,dbcp druid-->
        <bean id="dataSource" class="com.rainbowsea.spring6.bean.MyDataSource">
            <property name="driver" value="com.mysql.cj.jdbc.Driver"></property>
            <property name="url" value="jdbc:mysql://localhost:3306/spring6"></property>
            <property name="userName" value="root"></property>
            <property name="password" value="123"></property>
        </bean>
這時候,我們就可以將這個數據源傳遞給JdbcTemplate。因為JdbcTemplate中有一個DataSource屬性。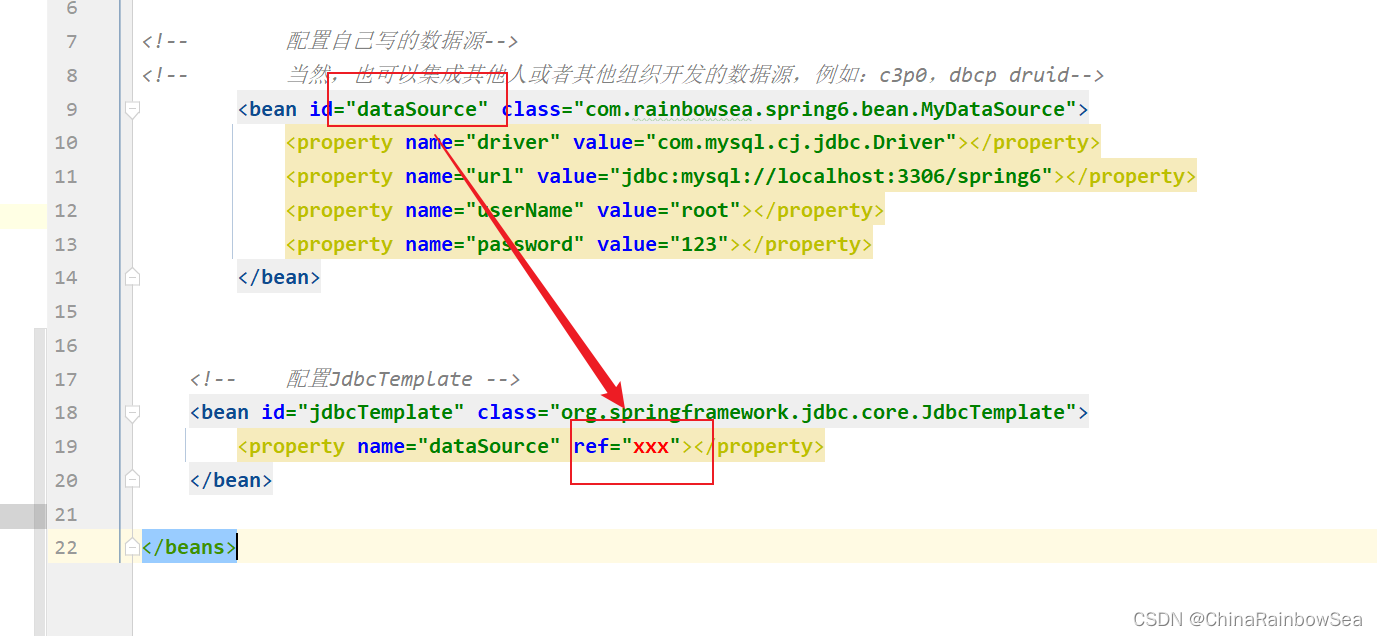
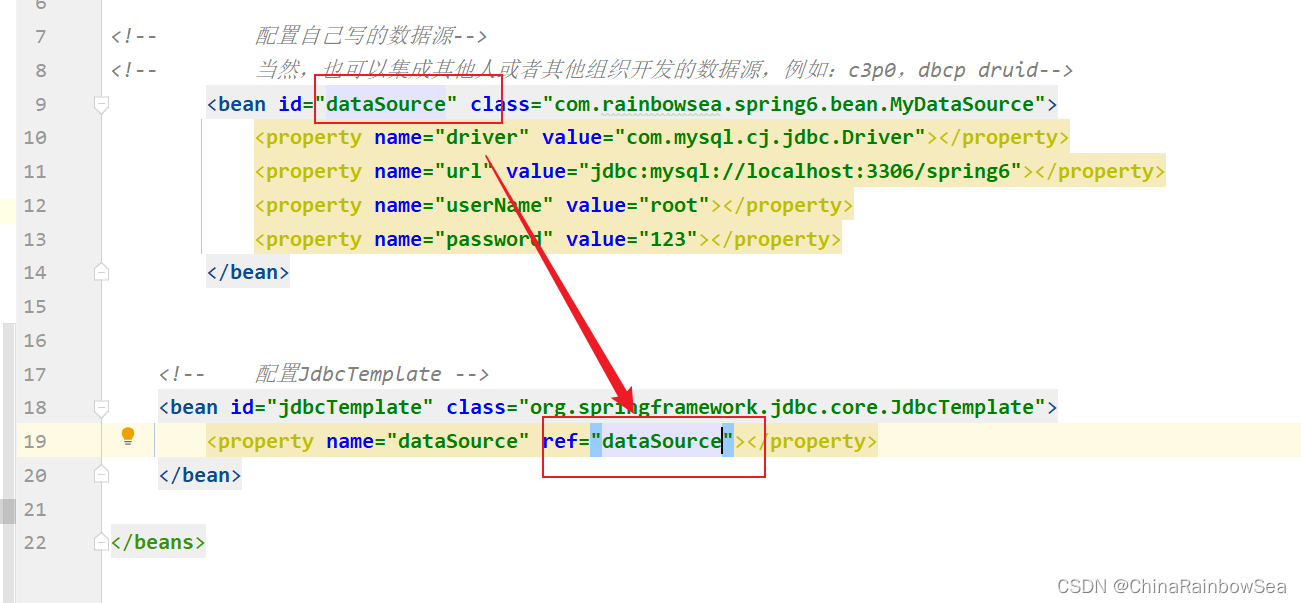
<?xml version="1.0" encoding="UTF-8"?>
<beans xmlns="http://www.springframework.org/schema/beans"
       xmlns:xsi="http://www.w3.org/2001/XMLSchema-instance"
       xsi:schemaLocation="http://www.springframework.org/schema/beans http://www.springframework.org/schema/beans/spring-beans.xsd">


<!--        配置自己寫的數據源-->
<!--        當然,也可以集成其他人或者其他組織開發的數據源,例如:c3p0,dbcp druid-->
        <bean id="dataSource" class="com.rainbowsea.spring6.bean.MyDataSource">
            <property name="driver" value="com.mysql.cj.jdbc.Driver"></property>
            <property name="url" value="jdbc:mysql://localhost:3306/spring6"></property>
            <property name="userName" value="root"></property>
            <property name="password" value="123"></property>
        </bean>


    <!--    配置JdbcTemplate -->
    <bean id="jdbcTemplate" class="org.springframework.jdbc.core.JdbcTemplate">
        <property name="dataSource" ref="dataSource"></property>
    </bean>

</beans>
這裡,我們的環境準備好了,數據表也準備好了,下麵就可以開始通過Spring 的JdbcTemplate 操作資料庫了(對資料庫進行增刪改查)的操作了。具體內容如下。
4. 開始
4.1 從數據表中插入(添加)數據
首先,我們通過 Spring 讀取上面我們配置好的spinrg.xml 文件當中的,從而實例化 JdbcTemplate 類對象。
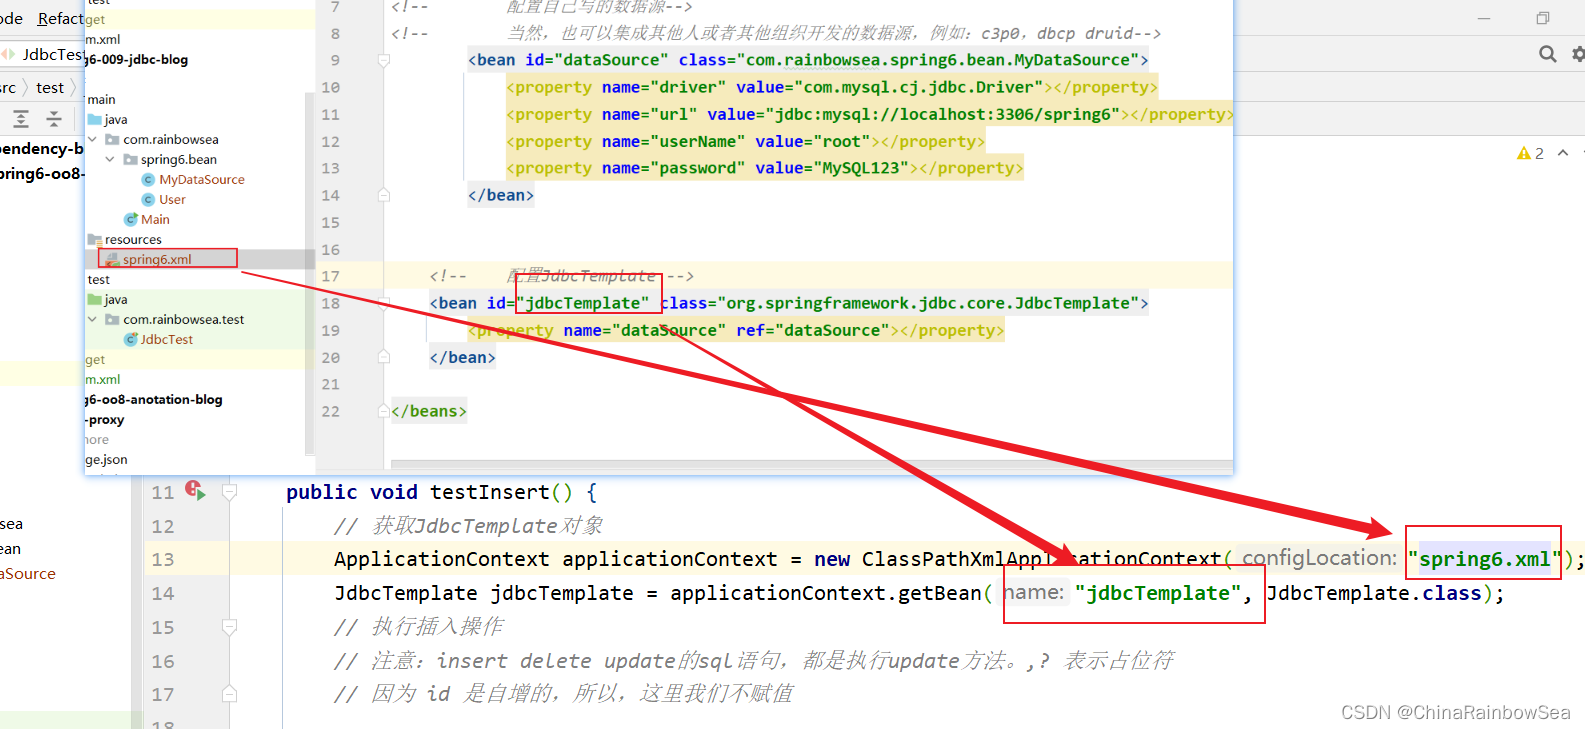
然後使用:jdbcTemplate.update() 的方法,執行SQL語句。
需要註意的是:在Spring當中的JdbcTemplate,對於資料庫上的增刪改,執行SQL語句都是使用update() 的方法處理的。
第一個參數:String sql
第二個參數: @Nullable Object... args 是一個可變參數(是一個數組),表示
表示:SQL語句當中的
?占位符的要填入的值。
返回值:int 表示修改/更新的記錄條數。


package com.rainbowsea.test;

import org.junit.Test;
import org.springframework.context.ApplicationContext;
import org.springframework.context.support.ClassPathXmlApplicationContext;
import org.springframework.jdbc.core.JdbcTemplate;

public class JdbcTest {

    @Test
    public void testInsert() {
        // 獲取JdbcTemplate對象
        ApplicationContext applicationContext = new ClassPathXmlApplicationContext("spring6.xml");
        JdbcTemplate jdbcTemplate = applicationContext.getBean("jdbcTemplate", JdbcTemplate.class);
        // 執行插入操作
        // 註意:insert delete update的sql語句,都是執行update方法。,? 表示占位符
        // 因為 id 是自增的,所以,這裡我們不賦值

        String sql = "insert into user(real_name,age) values(?,?)";
        // 返回修改的記錄條數
        int count = jdbcTemplate.update(sql,  "張三", 30);
        System.out.println("插入的記錄條數:" + count);
    }
}
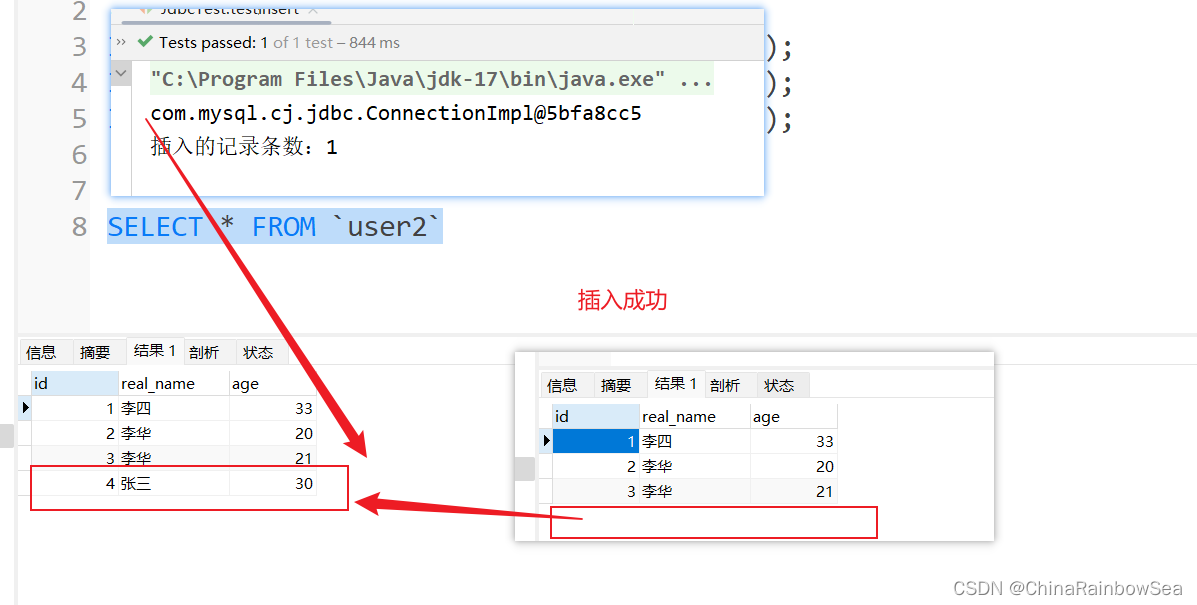
4.2 從數據表中修改數據
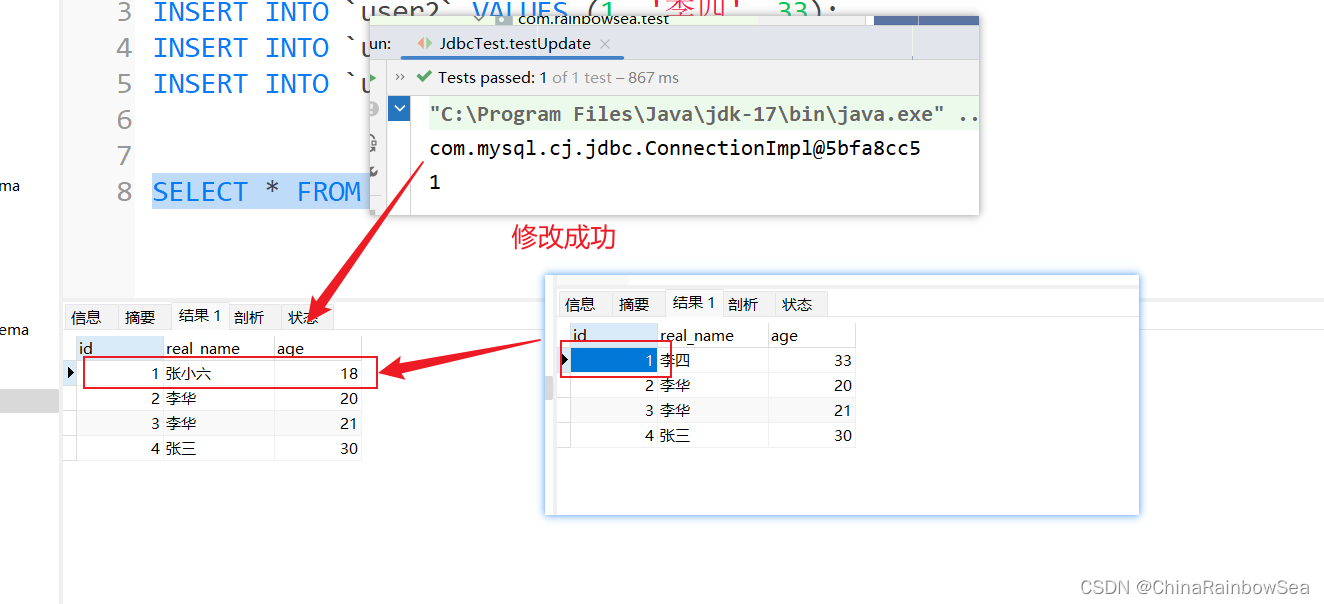
在Spring當中的JdbcTemplate,對於資料庫上的增刪改,執行SQL語句都是使用update() 的方法處理的。
我們這裡:將id 為1的,real_name修改為:張小六,age 為 18

package com.rainbowsea.test;

import org.junit.Test;
import org.springframework.context.ApplicationContext;
import org.springframework.context.support.ClassPathXmlApplicationContext;
import org.springframework.jdbc.core.JdbcTemplate;

public class JdbcTest {


    @Test
    public void testUpdate() {
        // 獲取JdbcTemplate對象
        ApplicationContext applicationContext = new ClassPathXmlApplicationContext("spring6.xml");
        JdbcTemplate jdbcTemplate = applicationContext.getBean("jdbcTemplate", JdbcTemplate.class);
        // 執行插入操作
        // 註意:insert delete update的sql語句,都是執行update方法。,? 表示占位符
        // 執行更新操作
        String sql = "update user2 set real_name = ?, age = ? where id = ?";
        int count = jdbcTemplate.update(sql, "張小六", 18, 1);
        System.out.println(count);
    }
}
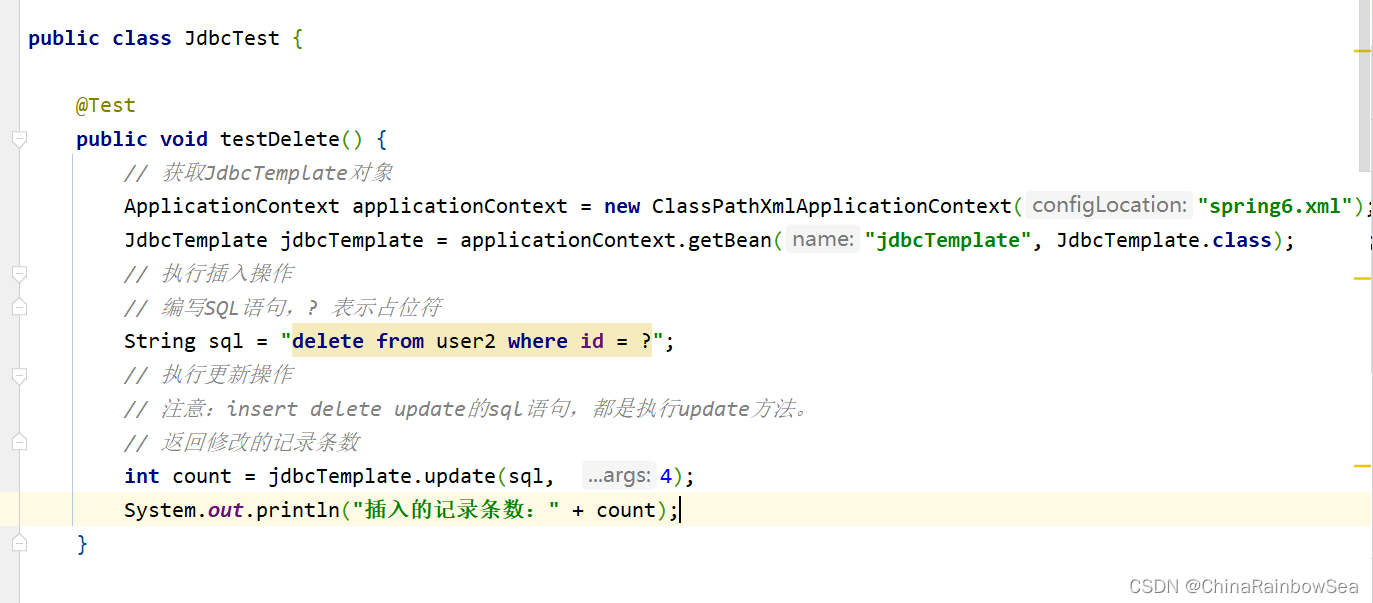
4.3 從數據表中刪除數據
在Spring當中的JdbcTemplate,對於資料庫上的增刪改,執行SQL語句都是使用update() 的方法處理的。
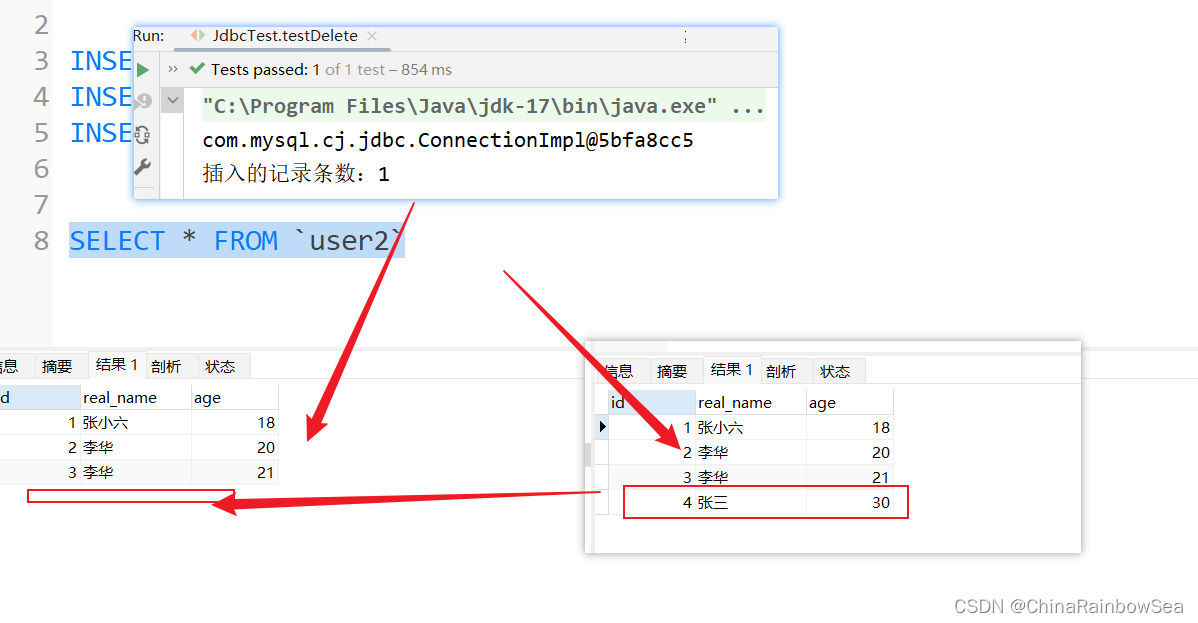
我們這裡:將id 為4的一條記錄刪除了。
package com.rainbowsea.test;

import org.junit.Test;
import org.springframework.context.ApplicationContext;
import org.springframework.context.support.ClassPathXmlApplicationContext;
import org.springframework.jdbc.core.JdbcTemplate;

public class JdbcTest {

    @Test
    public void testDelete() {
        // 獲取JdbcTemplate對象
        ApplicationContext applicationContext = new ClassPathXmlApplicationContext("spring6.xml");
        JdbcTemplate jdbcTemplate = applicationContext.getBean("jdbcTemplate", JdbcTemplate.class);
        // 執行插入操作
        // 編寫SQL語句,? 表示占位符
        String sql = "delete from user2 where id = ?";
        // 執行更新操作
        // 註意:insert delete update的sql語句,都是執行update方法。
        // 返回修改的記錄條數
        int count = jdbcTemplate.update(sql,  4);
        System.out.println("插入的記錄條數:" + count);
    }
}
4.4 從數據表中查詢一個對象
關於查詢一條記錄,使用 jdbcTemplate.queryForObject() 方法:

第一個參數:String sql 要執行的SQL語句
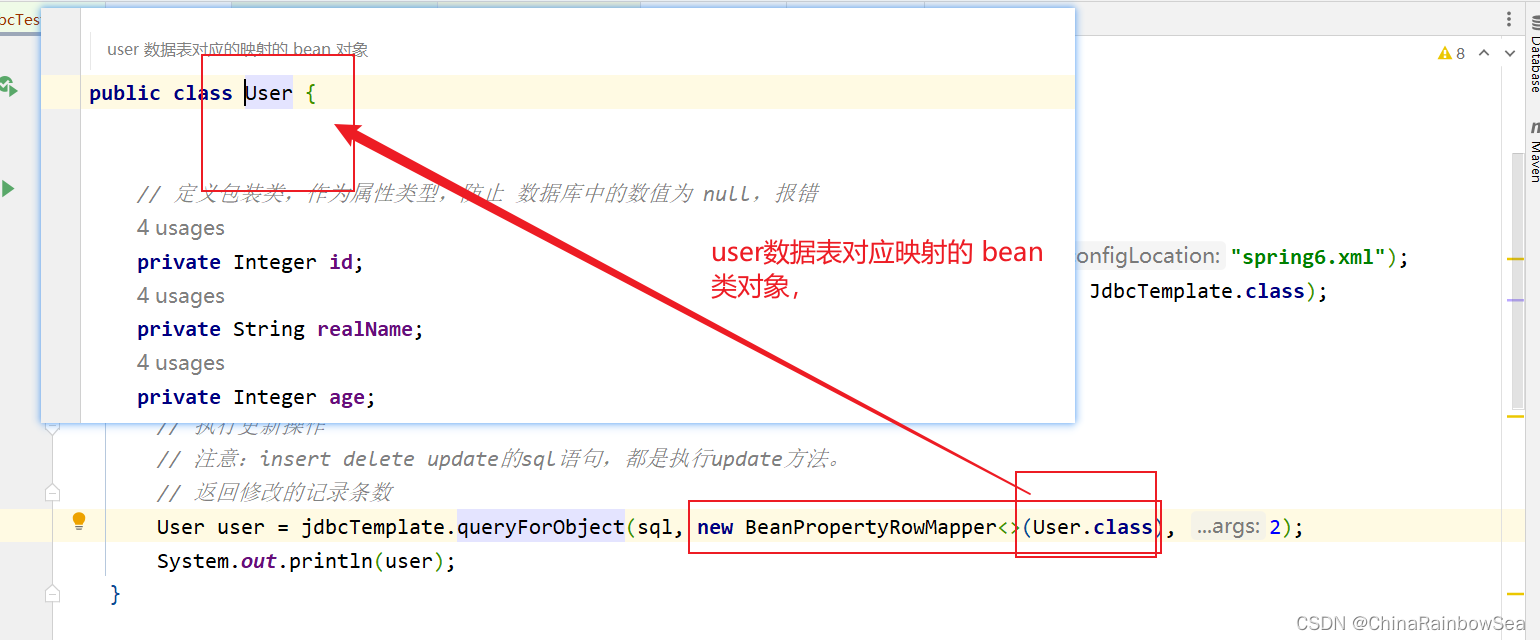
第二個參數:BeanPropertyRowMapper 與對應資料庫表中 bean 類的相映射的類。一般用: new BeanPropertyRowMapper<>(T.class) 這樣的對象裝配上。Bean屬性值和資料庫記錄行的映射對象。在構造方法中指定映射的對象類型。
第三個參數:SQL語句當中的
?占位符。可變長參數,給sql語句的占位符問號傳值。返回值:運用了泛型,也就是對應資料庫表中在Java當中相對應,映射的 bean 類。

這裡我們查詢一個id為1的,其中的ID,real_name,age 的一條記錄

import com.rainbowsea.spring6.bean.User;
import org.junit.Test;
import org.springframework.context.ApplicationContext;
import org.springframework.context.support.ClassPathXmlApplicationContext;
import org.springframework.jdbc.core.BeanPropertyRowMapper;
import org.springframework.jdbc.core.JdbcTemplate;

public class JdbcTest {

    @Test
    public void testSelectOne() {
        // 獲取JdbcTemplate對象
        ApplicationContext applicationContext = new ClassPathXmlApplicationContext("spring6.xml");
        JdbcTemplate jdbcTemplate = applicationContext.getBean("jdbcTemplate", JdbcTemplate.class);
        // 執行插入操作
        // 編寫SQL語句,? 表示占位符
        String sql = "select id, real_name, age from user2 where id = ?";
        // 執行更新操作
        // 返回對應查詢到的 Bean 類
        User user = jdbcTemplate.queryForObject(sql, new BeanPropertyRowMapper<>(User.class), 1);
        System.out.println(user);
    }
}
4.5 從數據表中查詢一個值
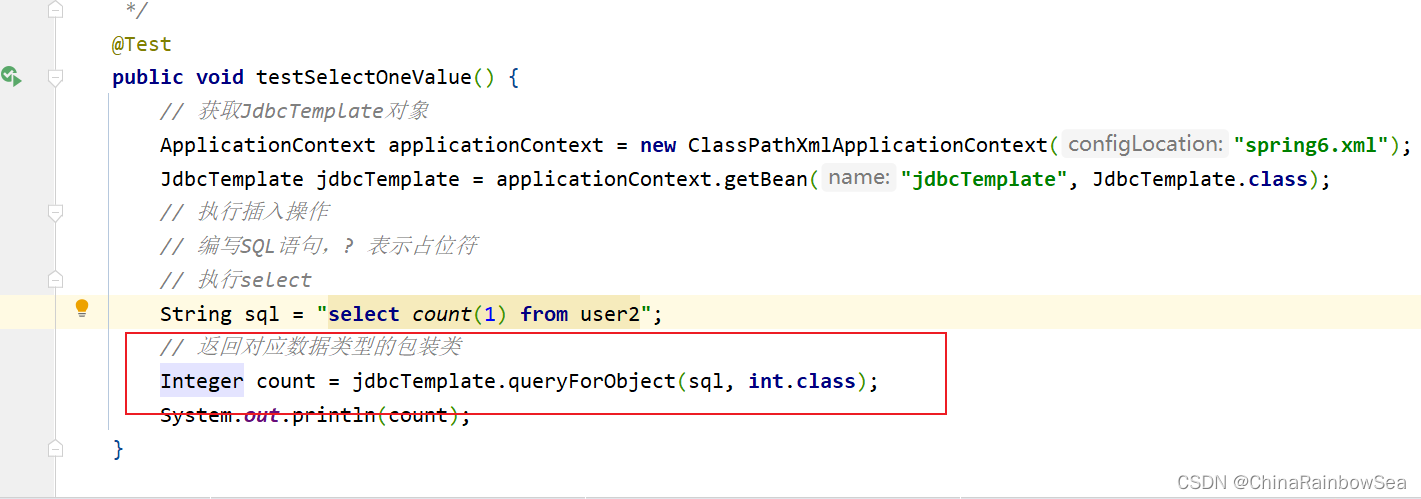
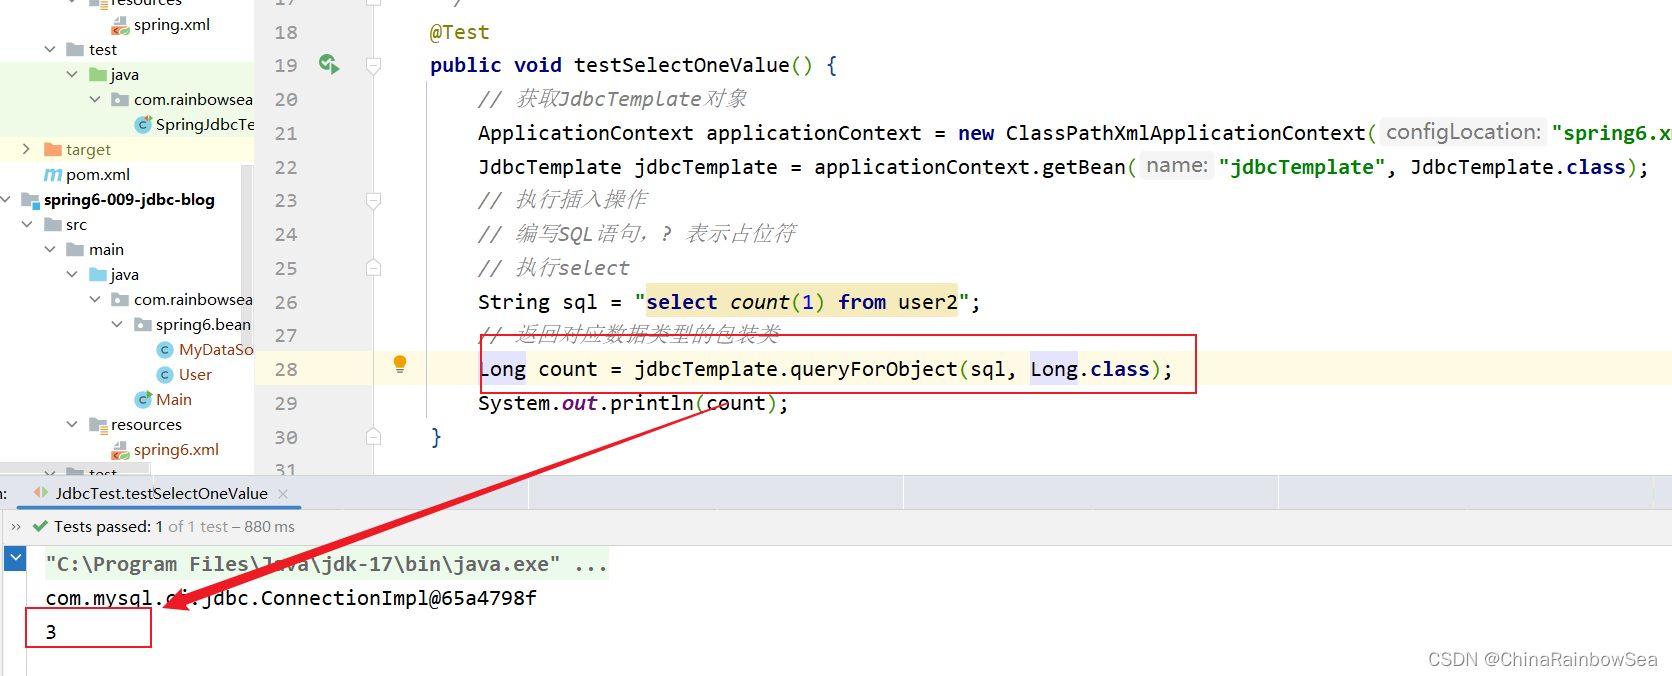
查詢數據表當中有幾條記錄,對應查詢數據表中的一個值的內容,我們同樣還是使用:jdbcTemplate.queryForObject() 方法來進行。不同的是,這個參數是兩個的,是對應的類對象,
- 比如這裡我們查詢的是一個數據表中有幾條記錄,幾條記錄,就是一個值了,一個數值類型的類對象了,可以是 int.class,也可以是 long.class,還可以是 short.class 因為只要是數值類型就可以了。
- 返回值是對應類的包裝類,

import com.rainbowsea.spring6.bean.User;
import org.junit.Test;
import org.springframework.context.ApplicationContext;
import org.springframework.context.support.ClassPathXmlApplicationContext;
import org.springframework.jdbc.core.BeanPropertyRowMapper;
import org.springframework.jdbc.core.JdbcTemplate;

import java.util.List;

public class JdbcTest {


    /**
     * 查詢數據表中的一個值
     */
    @Test
    public void testSelectOneValue() {
        // 獲取JdbcTemplate對象
        ApplicationContext applicationContext = new ClassPathXmlApplicationContext("spring6.xml");
        JdbcTemplate jdbcTemplate = applicationContext.getBean("jdbcTemplate", JdbcTemplate.class);
        // 執行插入操作
        // 編寫SQL語句,? 表示占位符
        // 執行select
        String sql = "select count(1) from user2";
        // 返回對應數據類型的包裝類
        Integer count = jdbcTemplate.queryForObject(sql, int.class);
        System.out.println(count);
    }
}
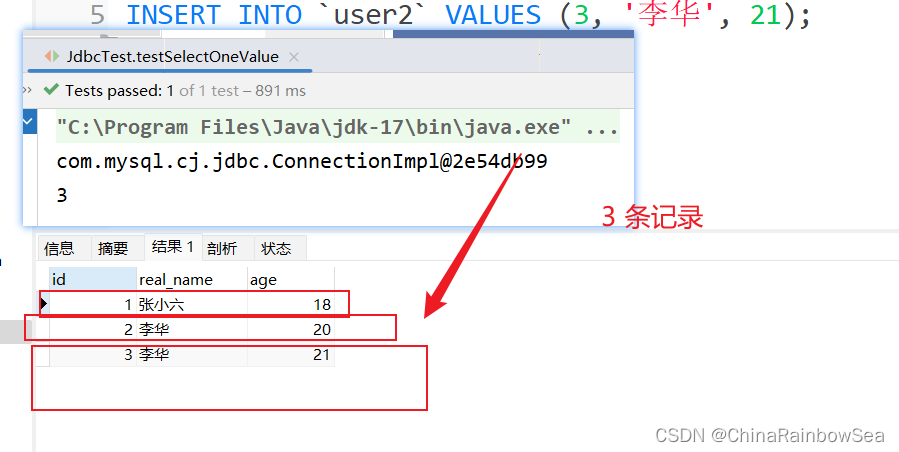
用 Long.class 也是可以的。
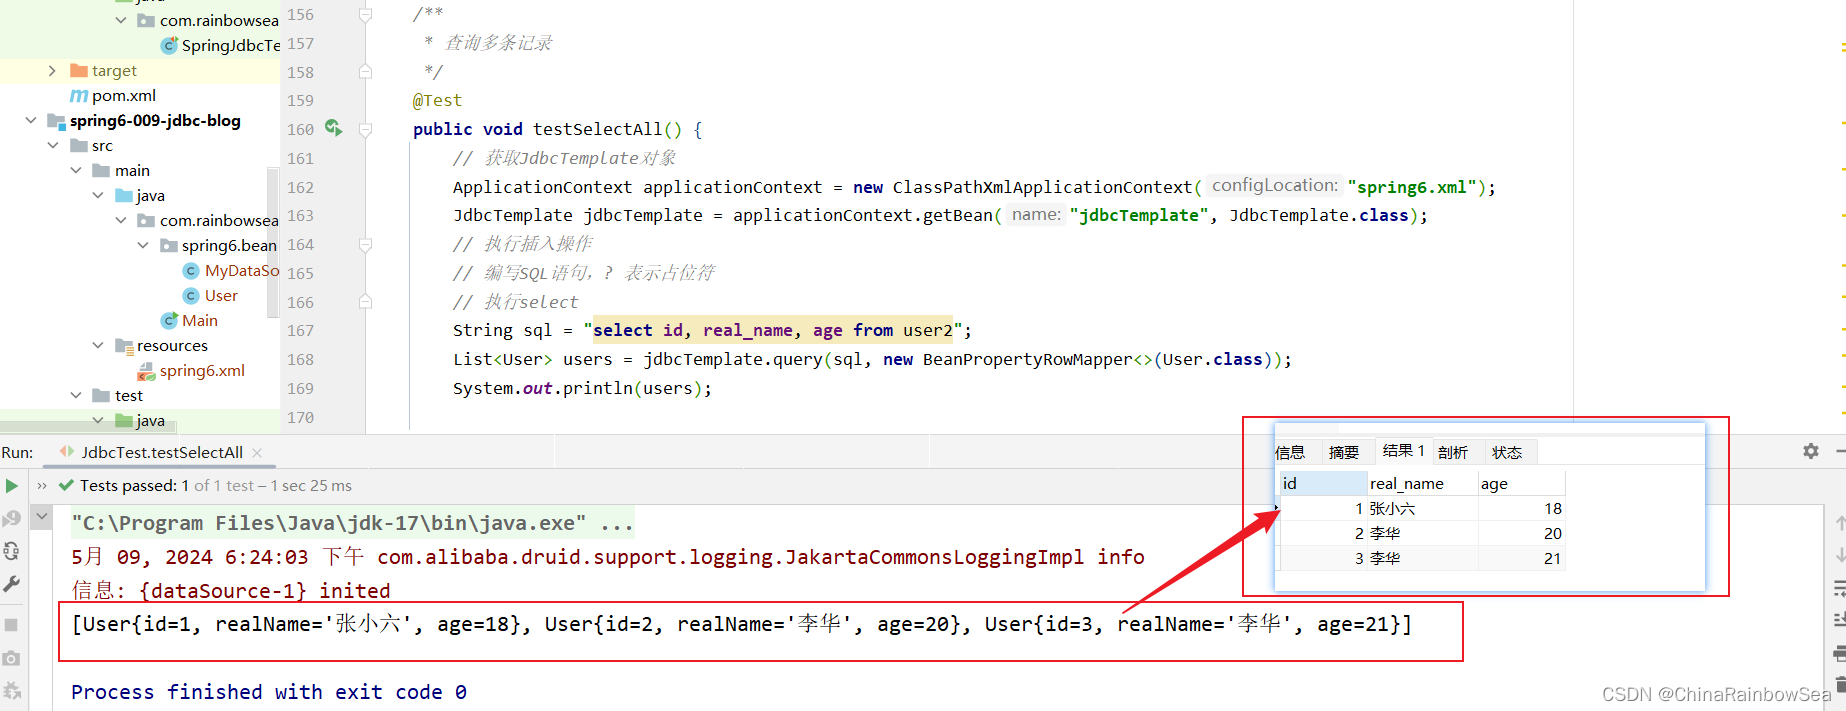
4.6 從數據表中查詢多條記錄
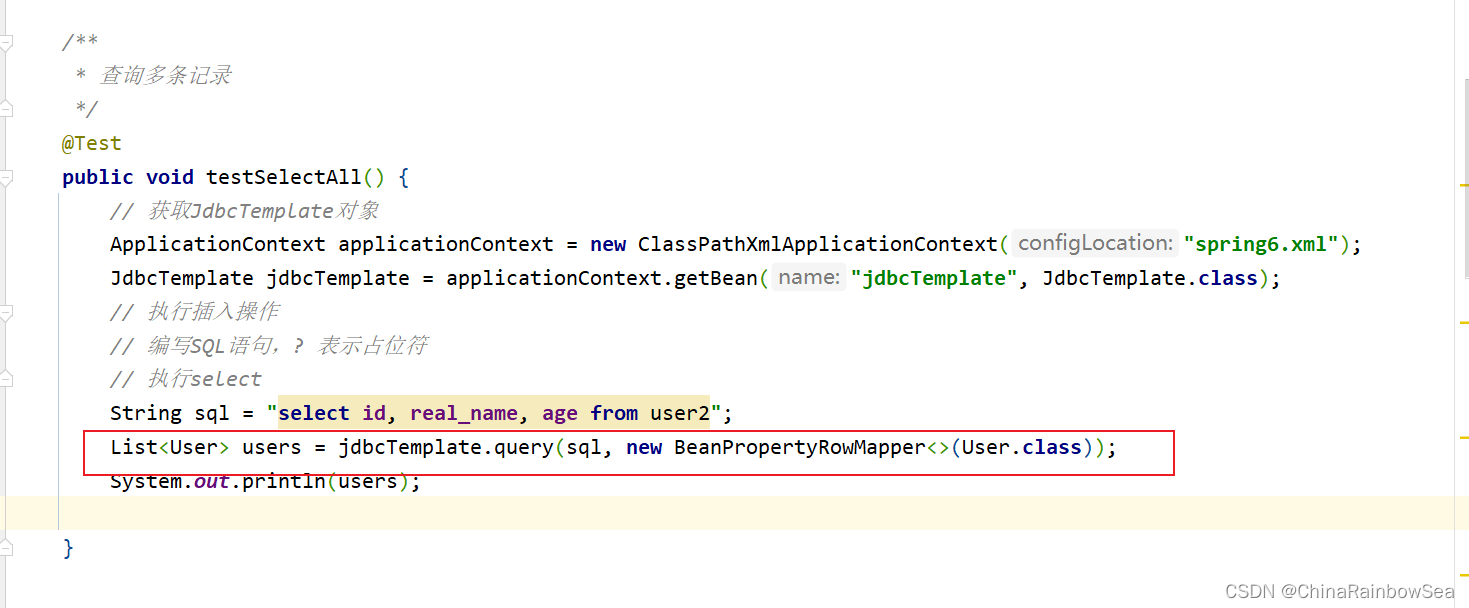
查詢數據表中的多個對象,我們就要使用:jdbcTemplate.query() 方法了
- 第一個參數:同樣還是:要執行的SQL語句
- 第二個參數:。Bean屬性值和資料庫記錄行的映射對象。在構造方法中指定映射的對象類型。;BeanPropertyRowMapper 與對應資料庫表中 bean 類的相映射的類。一般用: new BeanPropertyRowMapper<>(T.class) 這樣的對象裝配上。
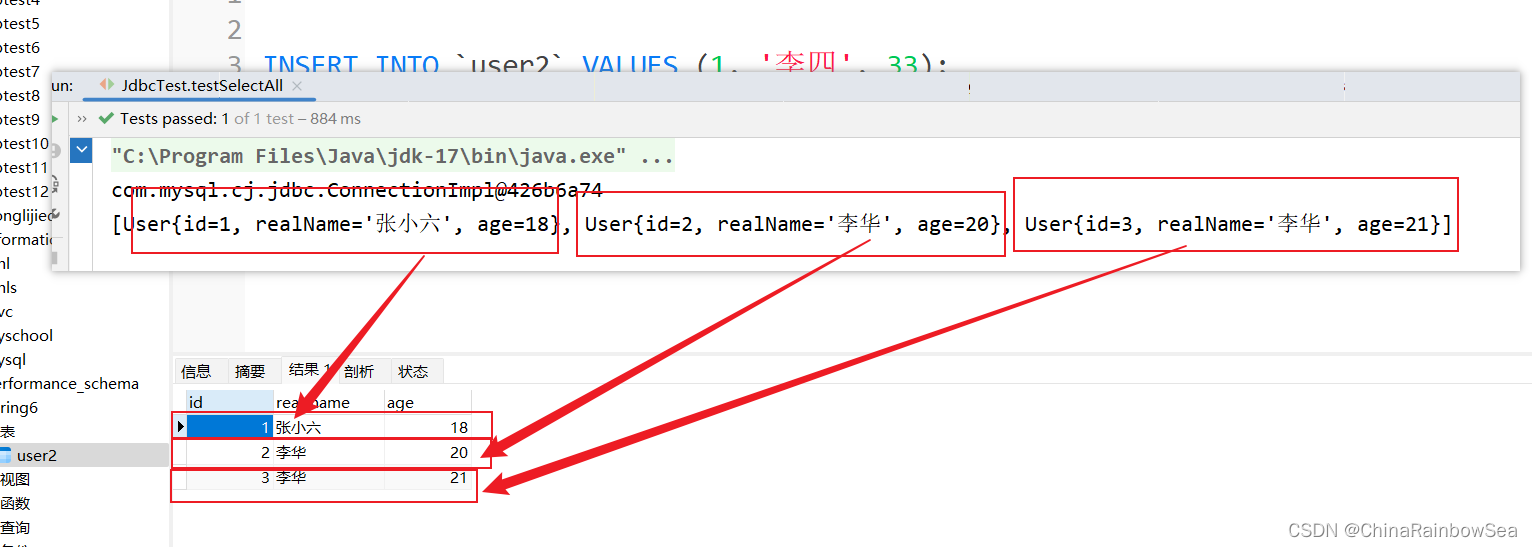
- 返回值:是一個List 集合了,因為我們查詢到的多條記錄,自然就是存儲到集合當中去了。

這裡我們查詢,user2 表中的所有用戶的所有信息。
import com.rainbowsea.spring6.bean.User;
import org.junit.Test;
import org.springframework.context.ApplicationContext;
import org.springframework.context.support.ClassPathXmlApplicationContext;
import org.springframework.jdbc.core.BeanPropertyRowMapper;
import org.springframework.jdbc.core.JdbcTemplate;

import java.util.List;

public class JdbcTest {

    /**
     * 查詢多條記錄
     */
    @Test
    public void testSelectAll() {
        // 獲取JdbcTemplate對象
        ApplicationContext applicationContext = new ClassPathXmlApplicationContext("spring6.xml");
        JdbcTemplate jdbcTemplate = applicationContext.getBean("jdbcTemplate", JdbcTemplate.class);
        // 執行插入操作
        // 編寫SQL語句,? 表示占位符
        // 執行select
        String sql = "select id, real_name, age from user2";
        List<User> users = jdbcTemplate.query(sql, new BeanPropertyRowMapper<>(User.class));
        System.out.println(users);

    }
}
4.7 從數據表中批量添加數據
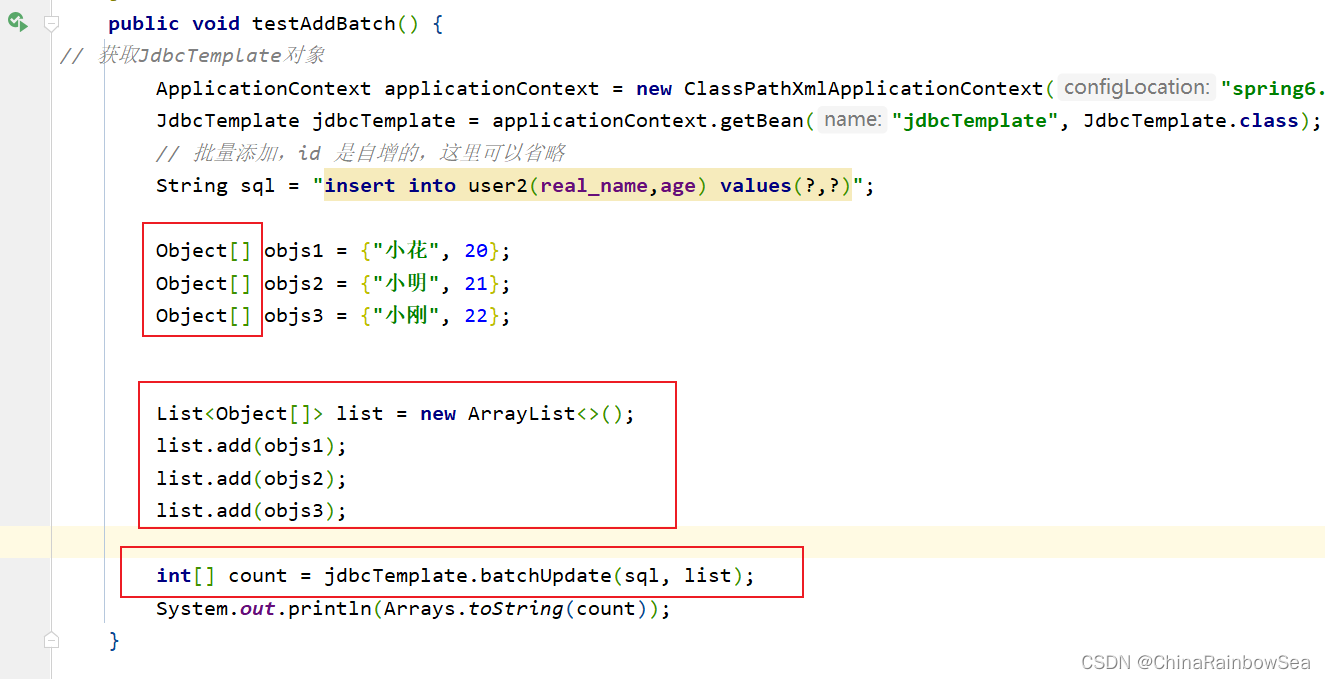
對於數據表中的批量添加數據,我們這裡需要用上:jdbcTemplate.batchUpdate() 方法
第一個參數:String sql 要執行的SQL語句
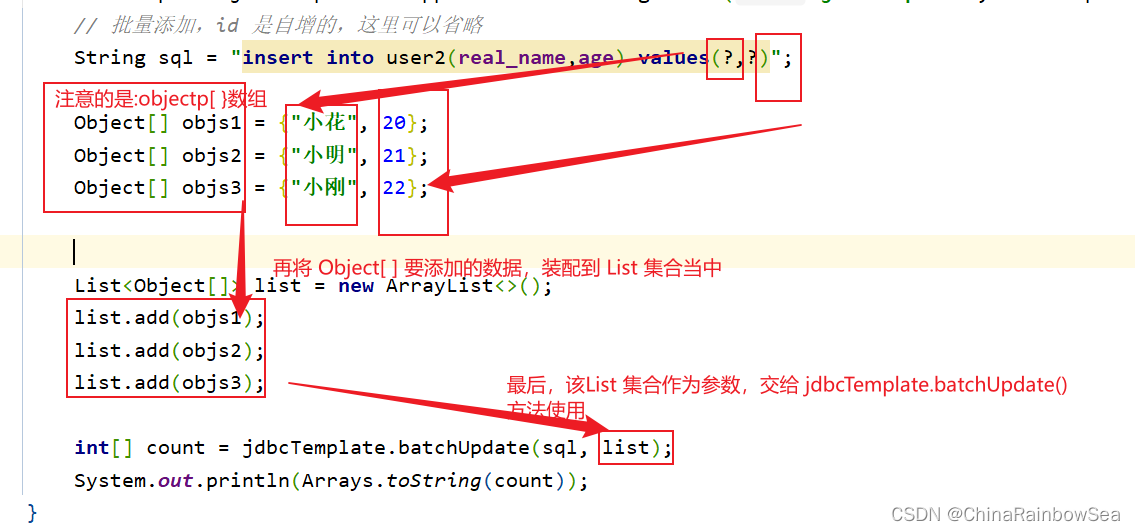
第二個參數: List<Object[]> batchArgs 是一個List集合當中存儲 Object[ ] 數組,註意是數組,這個List 就是,我們批量插入數據時,對於SQL語句當中的
?占位符的傳值,因為這個參數是: List<Object[]> batchArgs,所以我們需要將我們 ?占位符的值,放入到List 集合當中,再作為參數,傳給jdbcTemplate.batchUpdate() 方法。
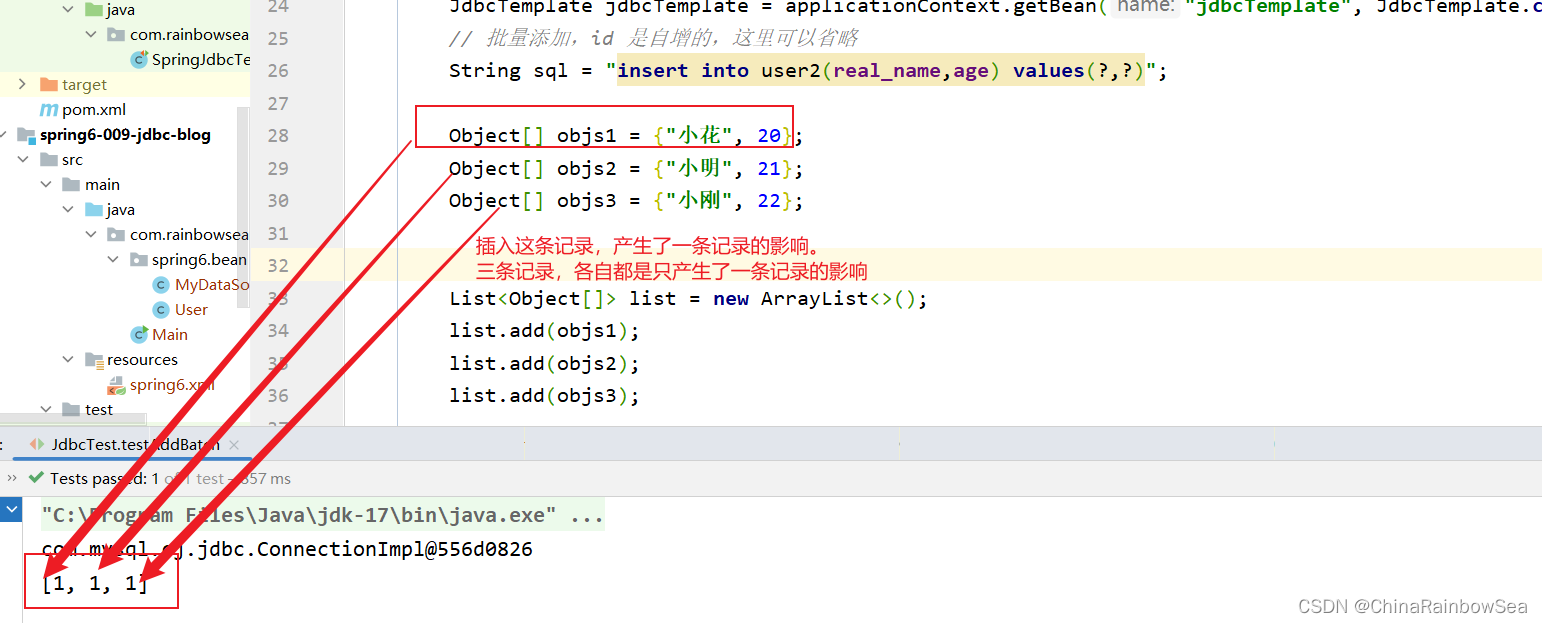
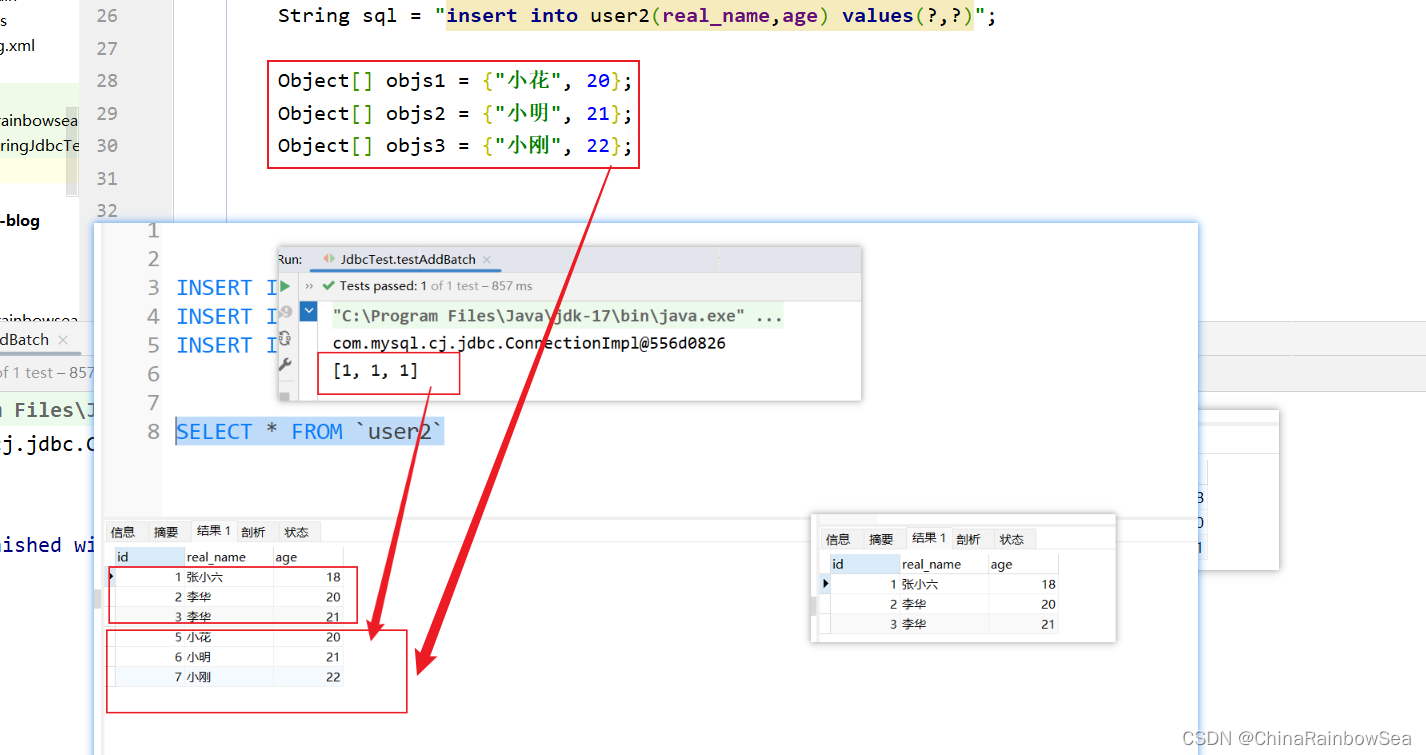
- 返回值:就是你各個批量插入的記錄的,各個成功的記錄條數,比如這裡我們批量添加了3條記錄,那麼如果三條記錄都插入成功了的話,就是[1,1,1]。表示每執行一次這個:"insert into user2(real_name,age) values(?,?)"; SQL語句就會影響到一條記錄。
插入這條記錄,產生了一條記錄的影響。
三條記錄,各自都是只產生了一條記錄的影響

import com.rainbowsea.spring6.bean.User;
import org.junit.Test;
import org.springframework.context.ApplicationContext;
import org.springframework.context.support.ClassPathXmlApplicationContext;
import org.springframework.jdbc.core.BeanPropertyRowMapper;
import org.springframework.jdbc.core.JdbcTemplate;

import java.util.ArrayList;
import java.util.Arrays;
import java.util.List;

public class JdbcTest {


    /**
     * 批量添加數據
     */
    @Test
    public void testAddBatch() {
// 獲取JdbcTemplate對象
        ApplicationContext applicationContext = new ClassPathXmlApplicationContext("spring6.xml");
        JdbcTemplate jdbcTemplate = applicationContext.getBean("jdbcTemplate", JdbcTemplate.class);
        // 批量添加,id 是自增的,這裡可以省略
        String sql = "insert into user2(real_name,age) values(?,?)";

        Object[] objs1 = {"小花", 20};
        Object[] objs2 = {"小明", 21};
        Object[] objs3 = {"小剛", 22};

// 將要修改的數據封裝到 List 集合當中,再作為參數傳入
        List<Object[]> list = new ArrayList<>();
        list.add(objs1);
        list.add(objs2);
        list.add(objs3);

        int[] count = jdbcTemplate.batchUpdate(sql, list);
        System.out.println(Arrays.toString(count));
    }
}
4.8 從數據表中批量修改數據
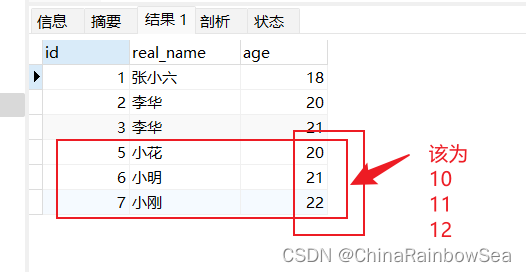
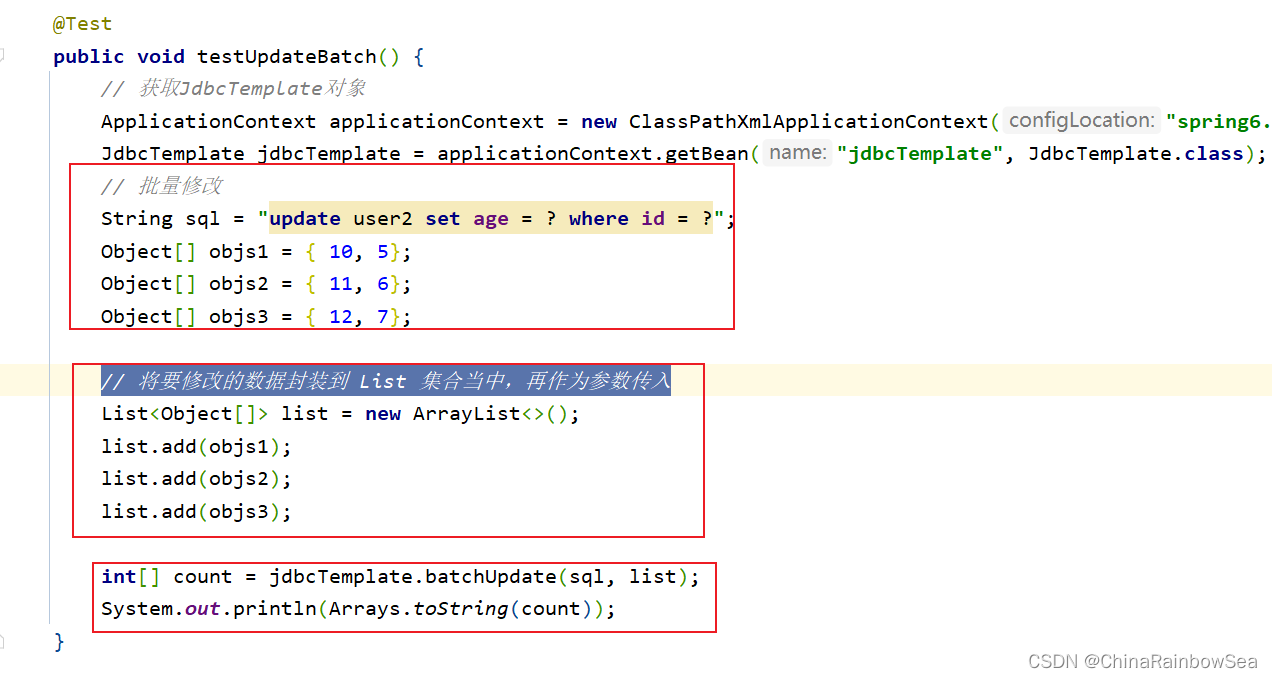
從數據表中批量修改數據還是使用:jdbcTemplate.batchUpdate() 方法。唯一不同的就是執行的SQL語句不同而已。下麵我們將id 為 5,6,7 的 age 改為 10,11,12
import com.rainbowsea.spring6.bean.User;
import org.junit.Test;
import org.springframework.context.ApplicationContext;
import org.springframework.context.support.ClassPathXmlApplicationContext;
import org.springframework.jdbc.core.BeanPropertyRowMapper;
import org.springframework.jdbc.core.JdbcTemplate;

import java.util.ArrayList;
import java.util.Arrays;
import java.util.List;

public class JdbcTest {

    /**
     * 批量修改
     */
    @Test
    public void testUpdateBatch() {
        // 獲取JdbcTemplate對象
        ApplicationContext applicationContext = new ClassPathXmlApplicationContext("spring6.xml");
        JdbcTemplate jdbcTemplate = applicationContext.getBean("jdbcTemplate", JdbcTemplate.class);
        // 批量修改
        String sql = "update user2 set age = ? where id = ?";
        Object[] objs1 = { 10, 5};
        Object[] objs2 = { 11, 6};
        Object[] objs3 = { 12, 7};

        // 將要修改的數據封裝到 List 集合當中,再作為參數傳入
        List<Object[]> list = new ArrayList<>();
        list.add(objs1);
        list.add(objs2);
        list.add(objs3);

        int[] count = jdbcTemplate.batchUpdate(sql, list);
        System.out.println(Arrays.toString(count));
    }
}
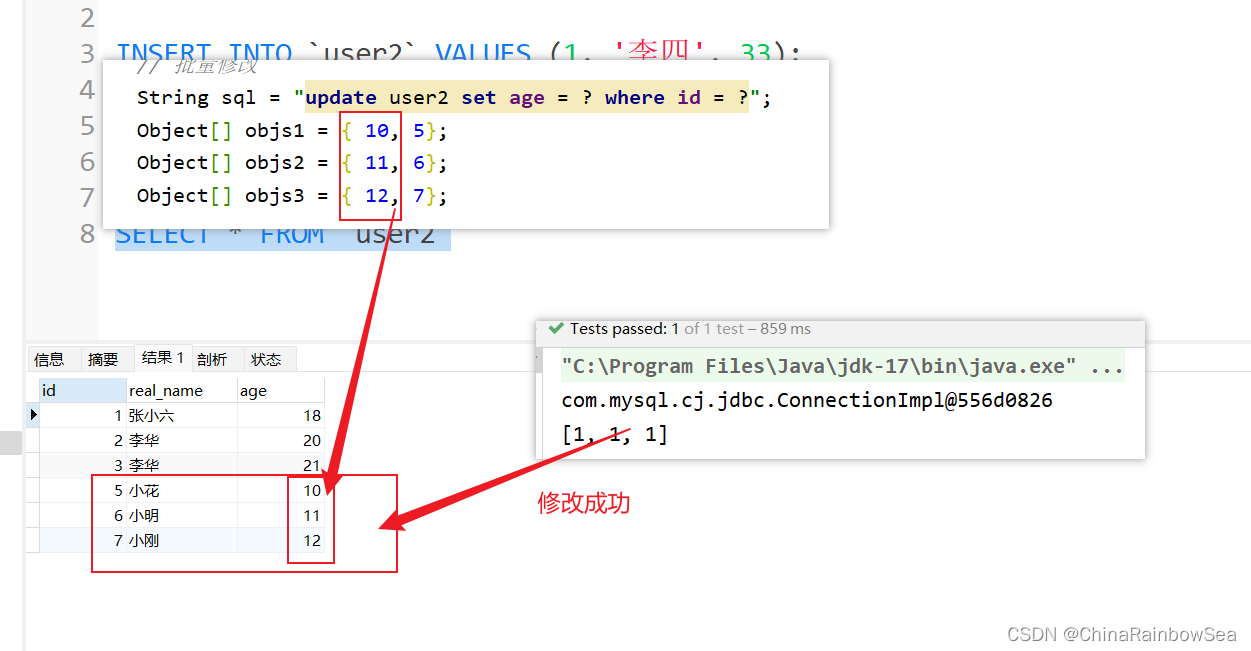
4.9 從數據表中批量刪除數據
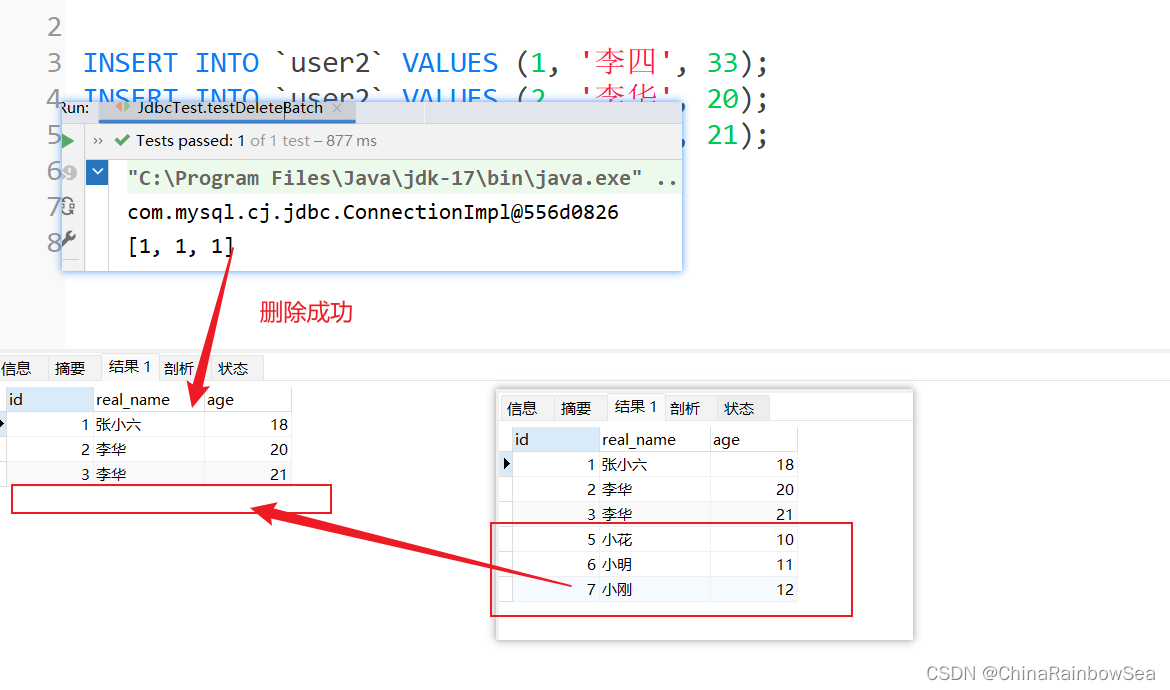
從數據表中批量刪除數據還是使用:jdbcTemplate.batchUpdate() 方法。唯一不同的就是執行的SQL語句不同而已。下麵我們將user 數據表中的 id 為 5,6,7 的記錄刪除了。
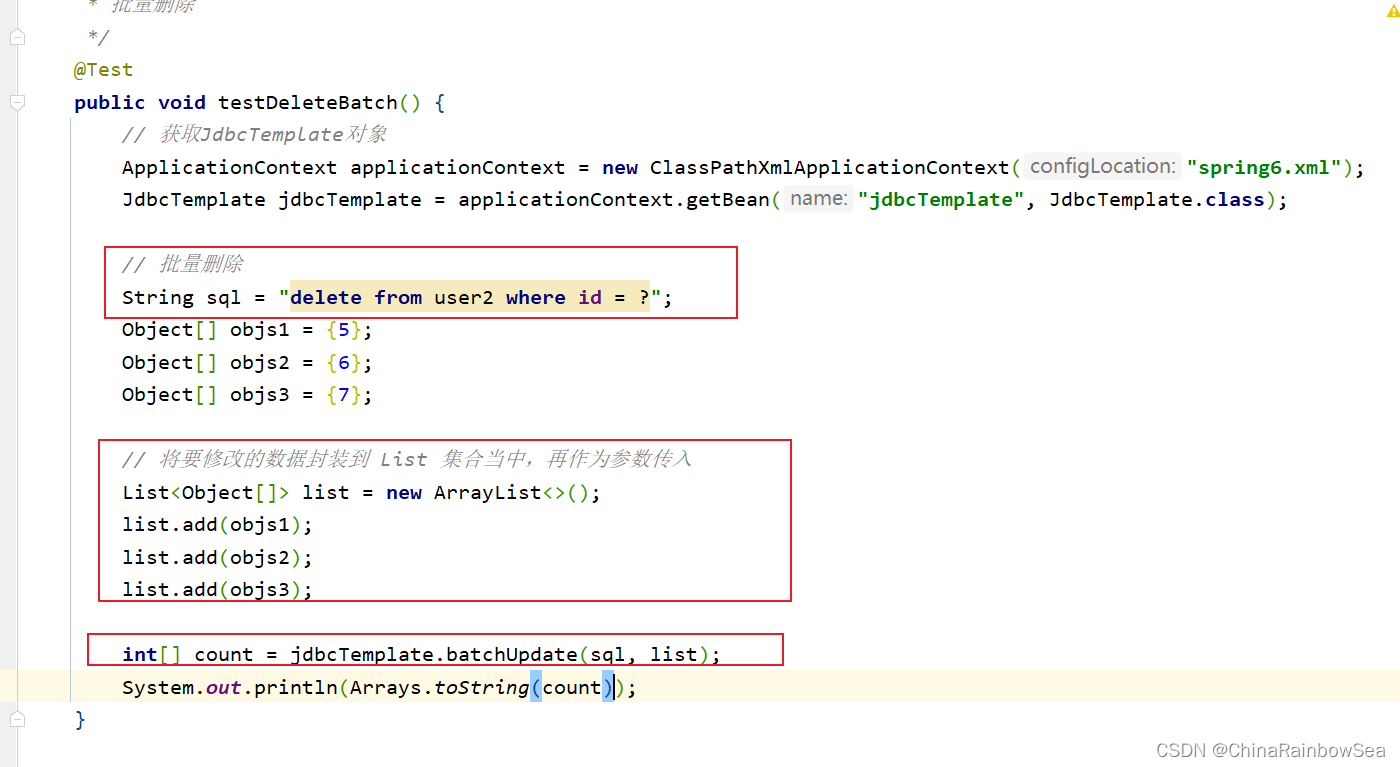
import com.rainbowsea.spring6.bean.User;
import org.junit.Test;
import org.springframework.context.ApplicationContext;
import org.springframework.context.support.ClassPathXmlApplicationContext;
import org.springframework.jdbc.core.BeanPropertyRowMapper;
import org.springframework.jdbc.core.JdbcTemplate;

import java.util.ArrayList;
import java.util.Arrays;
import java.util.List;

public class JdbcTest {


    /**
     * 批量刪除
     */
    @Test
    public void testDeleteBatch() {
        // 獲取JdbcTemplate對象
        ApplicationContext applicationContext = new ClassPathXmlApplicationContext("spring6.xml");
        JdbcTemplate jdbcTemplate = applicationContext.getBean("jdbcTemplate", JdbcTemplate.class);

        // 批量刪除
        String sql = "delete from user2 where id = ?";
        Object[] objs1 = {5};
        Object[] objs2 = {6};
        Object[] objs3 = {7};

        // 將要修改的數據封裝到 List 集合當中,再作為參數傳入
        List<Object[]> list = new ArrayList<>();
        list.add(objs1);
        list.add(objs2);
        list.add(objs3);

        int[] count = jdbcTemplate.batchUpdate(sql, list);
        System.out.println(Arrays.toString(count));
    }
}
4.10 JdbcTemplate 使用回調函數
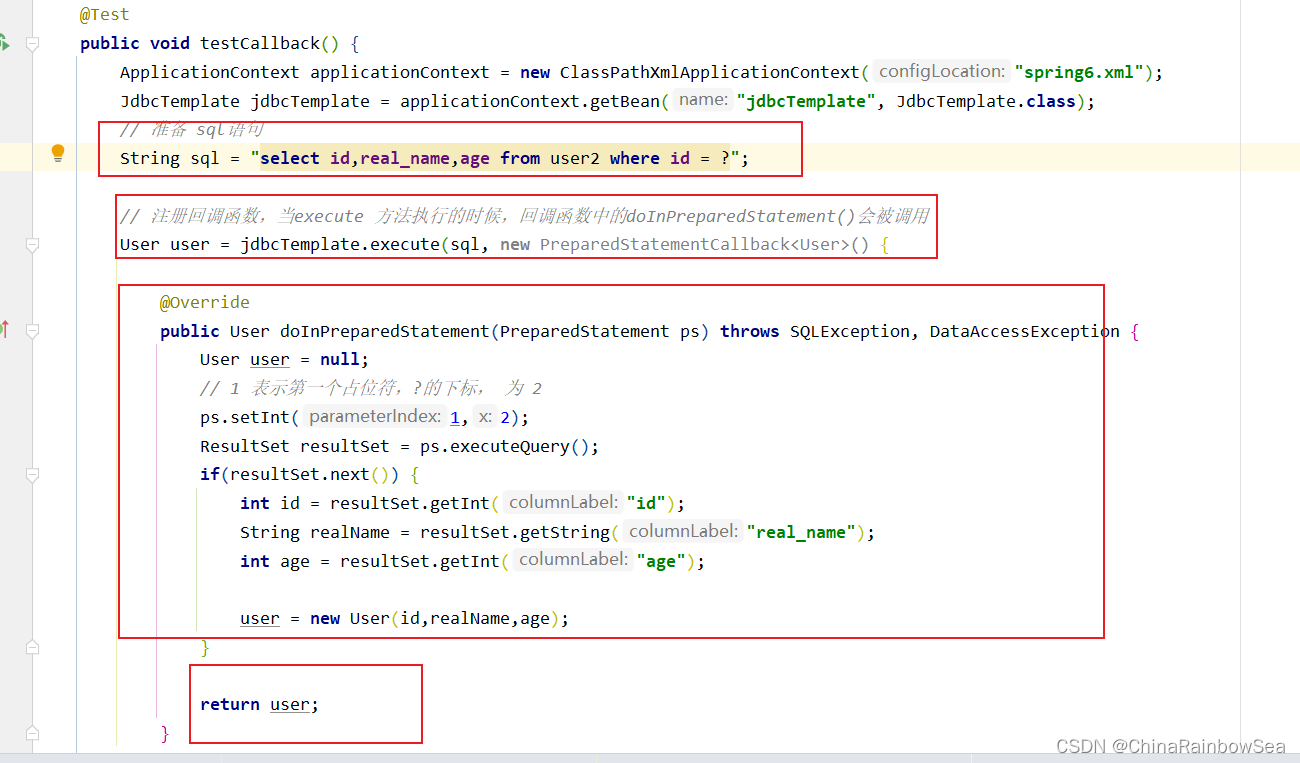
使用回調函數,可以參與的更加細節:例如:如果你想寫JDBC代碼,可以使用callback回調函數
想要執行回調函數,用使用上 jdbcTemplate.execute() 方法,

- 第一個參數是:String sql 要執行的SQL語句
- 第二個參數是:PreparedStatementCallback
action ,是個介面,我們要傳其實例化對象,
PreparedStatementCallback,一般我們通常是使用 lambda 表達式 ,簡化代碼。
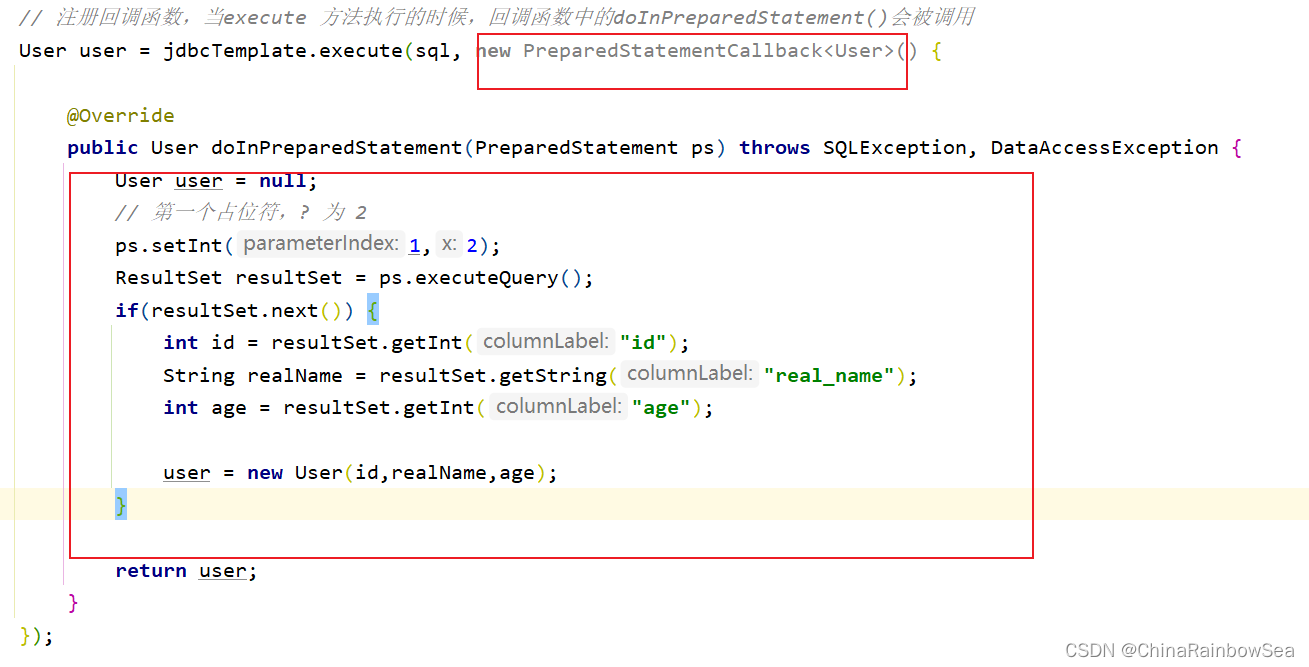
需要註意的是:註冊回調函數,當execute 方法執行的時候,回調函數中的doInPreparedStatement()會被調用
- 返回值:就是這裡運用的泛型,返回值,就是你傳的 T.class 的 Bean 對象。
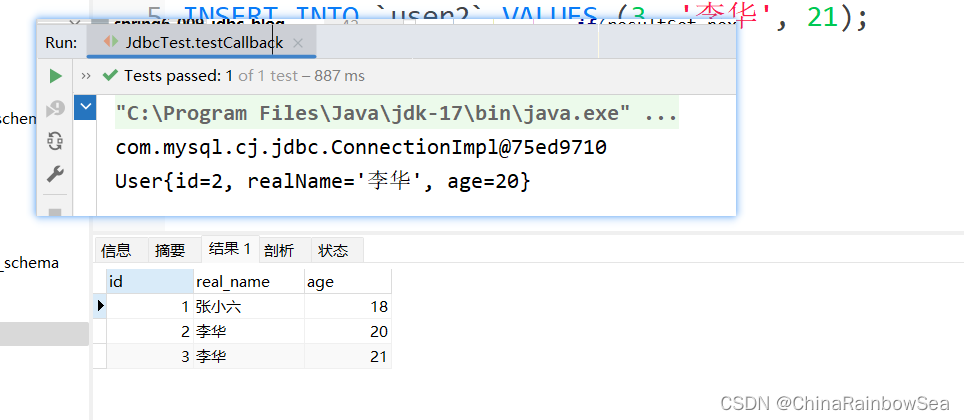
這裡我們使用回調函數,查詢 user 數據表中 id 為 2的 用戶的,id, real_name,age 的記錄信息
import com.rainbowsea.spring6.bean.User;
import org.junit.Test;
import org.springframework.context.ApplicationContext;
import org.springframework.context.support.ClassPathXmlApplicationContext;
import org.springframework.dao.DataAccessException;
import org.springframework.jdbc.core.BeanPropertyRowMapper;
import org.springframework.jdbc.core.JdbcTemplate;
import org.springframework.jdbc.core.PreparedStatementCallback;

import java.sql.PreparedStatement;
import java.sql.ResultSet;
import java.sql.SQLException;
import java.util.ArrayList;
import java.util.Arrays;
import java.util.List;

public class JdbcTest {


    /**
     * 回調函數
     * 如果你想寫JDBC代碼,可以使用callback回調函數
     */
    @Test
    public void testCallback() {
        ApplicationContext applicationContext = new ClassPathXmlApplicationContext("spring6.xml");
        JdbcTemplate jdbcTemplate = applicationContext.getBean("jdbcTemplate", JdbcTemplate.class);
        // 準備 sql語句
        String sql = "select id,real_name,age from user2 where id = ?";

        // 註冊回調函數,當execute 方法執行的時候,回調函數中的doInPreparedStatement()會被調用
        User user = jdbcTemplate.execute(sql, new PreparedStatementCallback<User>() {

            @Override
            public User doInPreparedStatement(PreparedStatement ps) throws SQLException, DataAccessException {
                User user = null;
                // 1 表示第一個占位符,?的下標, 為 2
                ps.setInt(1,2);
                ResultSet resultSet = ps.executeQuery();
                if(resultSet.next()) {
                    int id = resultSet.getInt("id");
                    String realName = resultSet.getString("real_name");
                    int age = resultSet.getInt("age");

                    user = new User(id,realName,age);
                }

                return user;
            }
        });

        System.out.println(user);


    }
}
4.11 JdbcTemplate 配合使用上德魯伊連接池
上面演示的是用我們自己寫的數據源。這裡我們其實也是可以使用別人寫好的。例如比較牛的德魯伊連接池。
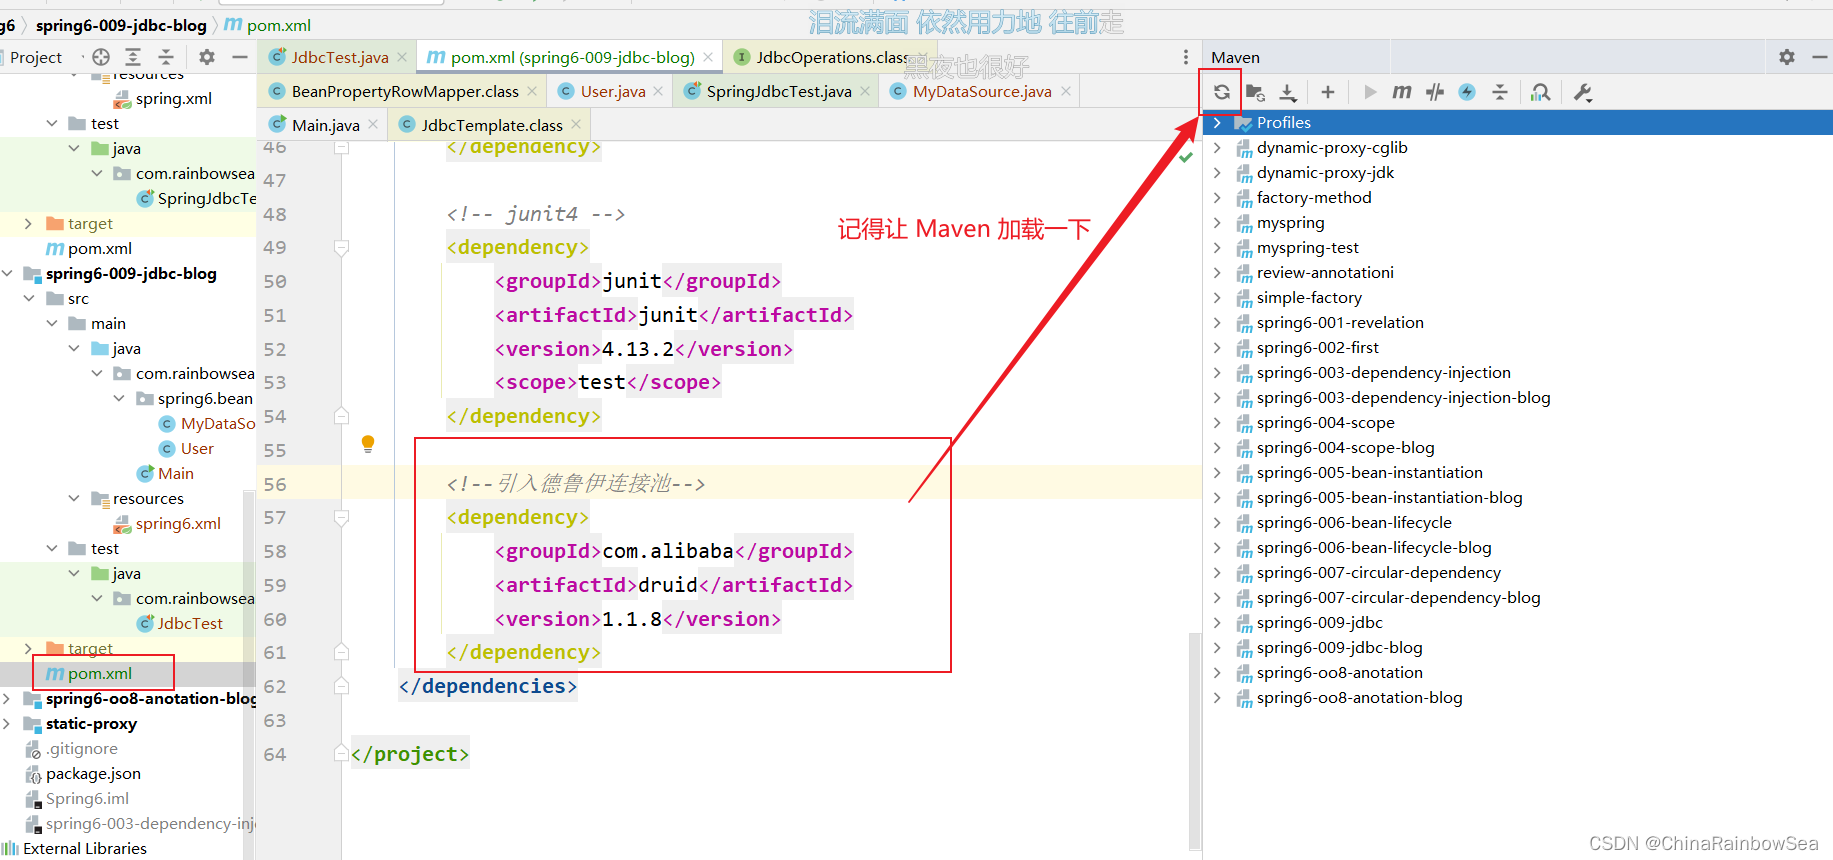
第一步:引入德魯伊連接池的依賴。(畢竟是別人寫的,我需要導入,才能使用),使用 maven 導入。
<!--引入德魯伊連接池-->
        <dependency>
            <groupId>com.alibaba</groupId>
            <artifactId>druid</artifactId>
            <version>1.1.8</version>
        </dependency>
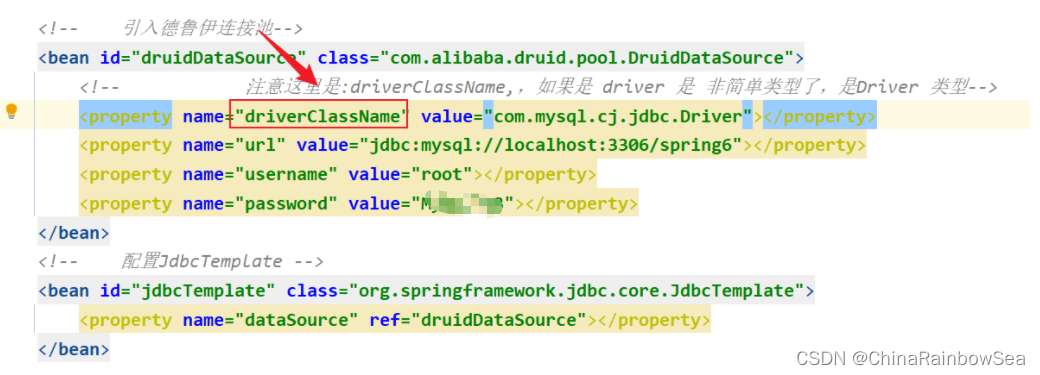
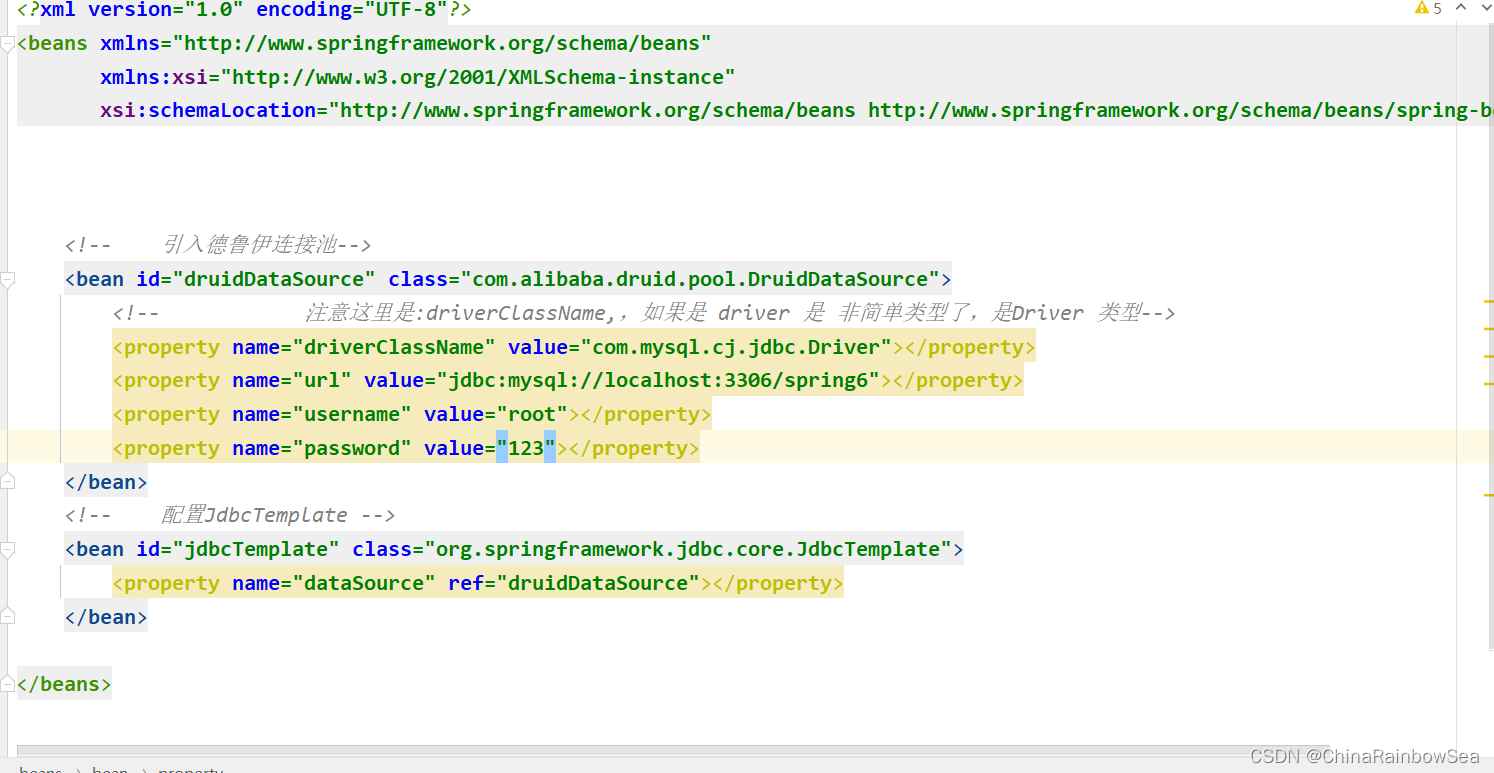
第二步:將德魯伊中的數據源配置到 spring.xml 配置文件中。和配置我們自己寫的一樣。就是一些:對應資料庫的註冊驅動,指明資料庫的所在位置,以及連接資料庫的賬號和密碼。
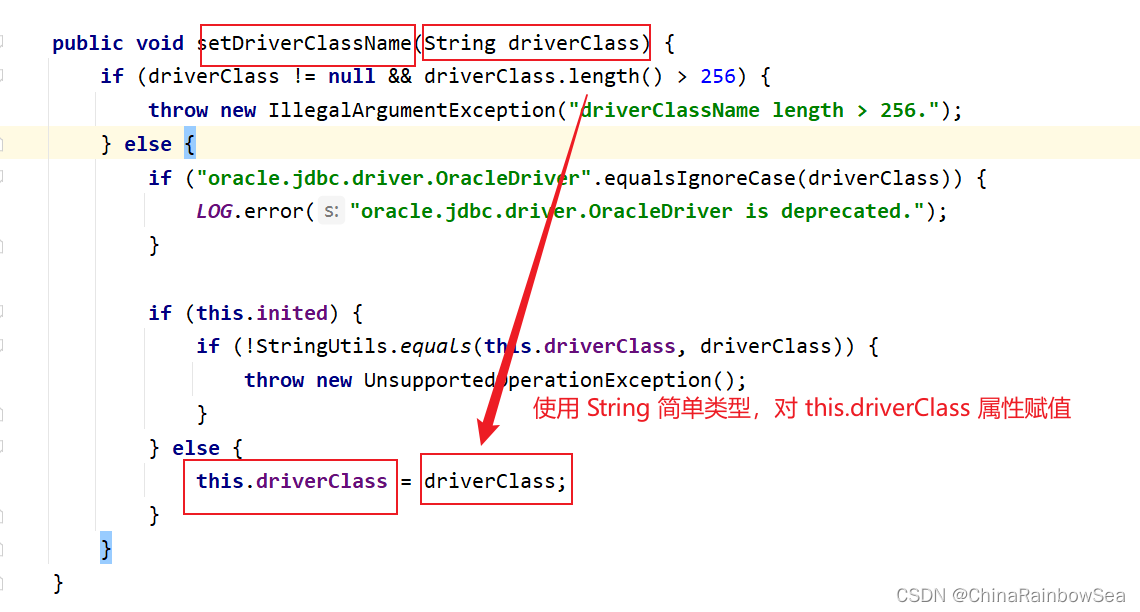
需要特別註意的是:註意這裡是:driverClassName,是簡單類型進行set註入對屬性賦值,簡單類型可以用 value
而如果是使用:driver,用 ref了
這裡我們用:driverClassName,進行簡單類型的set 註入,對 this.driver 成員變數的屬性賦值。
<?xml version="1.0" encoding="UTF-8"?>
<beans xmlns="http://www.springframework.org/schema/beans"
       xmlns:xsi="http://www.w3.org/2001/XMLSchema-instance"
       xsi:schemaLocation="http://www.springframework.org/schema/beans http://www.springframework.org/schema/beans/spring-beans.xsd">


    <!--    引入德魯伊連接池-->
    <bean id="druidDataSource" class="com.alibaba.druid.pool.DruidDataSource">
        <!--            註意這裡是:driverClassName,,如果是 driver 是 非簡單類型了,是Driver 類型-->
        <property name="driverClassName" value="com.mysql.cj.jdbc.Driver"></property>
        <property name="url" value="jdbc:mysql://localhost:3306/spring6"></property>
        <property name="username" value="root"></property>
        <property name="password" value="123"></property>
    </bean>
    <!--    配置JdbcTemplate -->
    <bean id="jdbcTemplate" class="org.springframework.jdbc.core.JdbcTemplate">
        <property name="dataSource" ref="druidDataSource"></property>
    </bean>

</beans>
下麵,我們測試,使用德魯伊資料庫連接池,進行對資料庫的查詢:
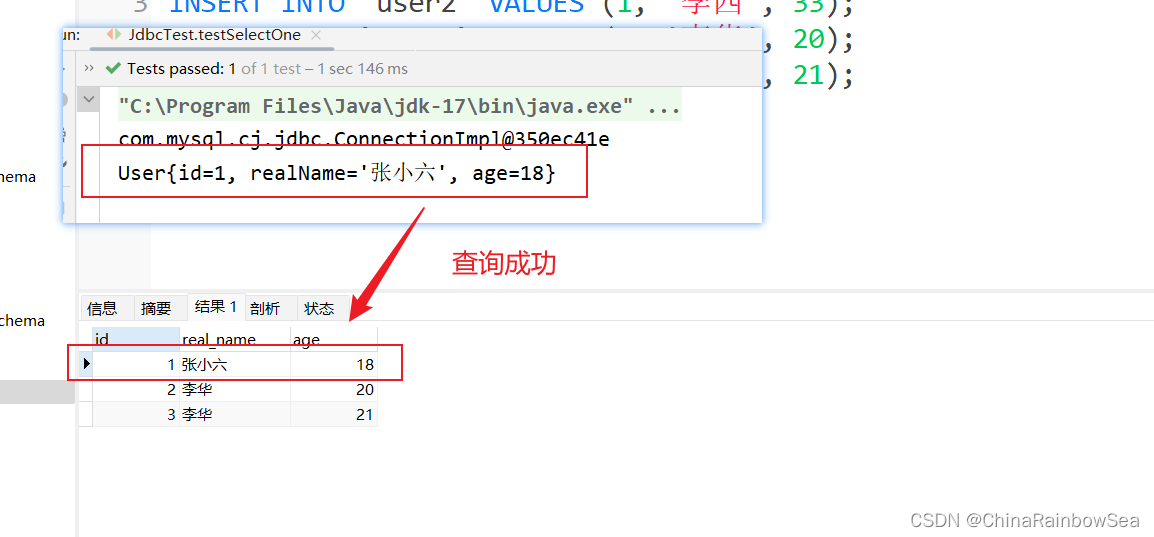
查詢id 為1的一條記錄。
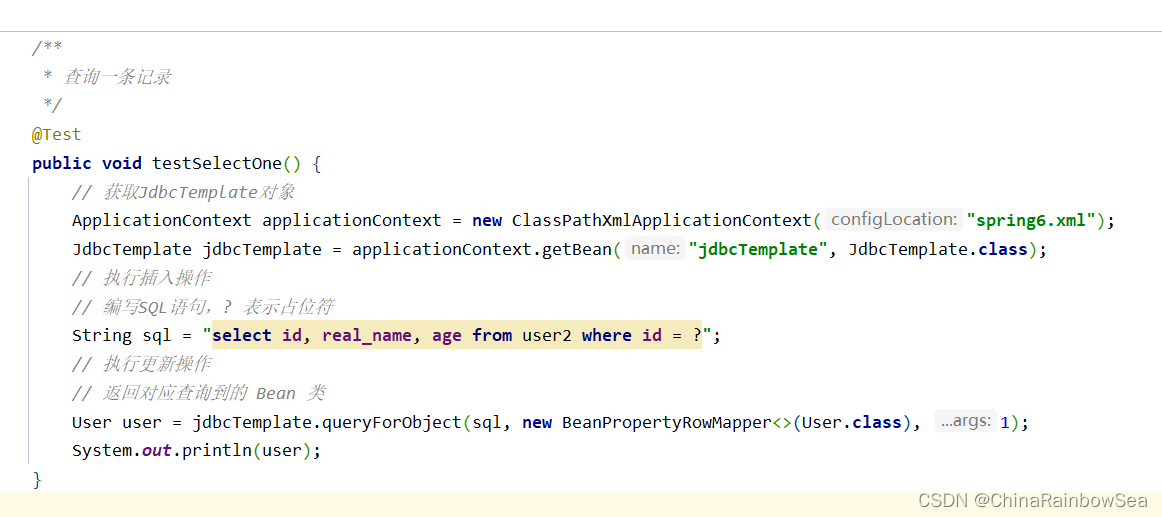

查詢成功。
我們再使用德魯伊進行多個數據的查詢。同樣也是沒有問題的。
5. 總結:
JdbcTemplate 是Spring 提供的一個JDBC模板類,是對JDBC的封裝,簡化JDBC代碼,當然,你也可以不用,可以讓Spring集成其它的ORM框架,例如:MyBatis,Hibernate 等。
使用JdbcTemplate 需要導入的如下 jar依賴
1. spring context 依賴 (spring6 的依賴)
2. mysql-connector-java(關於MySQL驅動的依賴,因為我們要連接資料庫,這裡我們連接的是MySQL資料庫)
3. spring-jdbc (spring jdbc,這個依賴中有JdbcTemplate)
4. junit (Junit4 單元測試依賴)
在Spring當中的JdbcTemplate,對於資料庫上的增刪改,執行SQL語句都是使用
update()的方法處理的。關於查詢一條記錄,使用 jdbcTemplate.queryForObject() 方法:
查詢數據表中的多個對象,我們就要使用:jdbcTemplate.query() 方法了
查詢數據表當中有幾條記錄,對應查詢數據表中的一個值的內容,我們同樣還是使用:jdbcTemplate.queryForObject() 方法來進行。不同的是,這個參數是兩個的,是對應的類對象。需要註意的第二個參數,使用的是:對應返回類型的 T.class 類
使用回調函數,可以參與的更加細節:例如:如果你想寫JDBC代碼,可以使用callback回調函數
想要執行回調函數,用使用上 jdbcTemplate.execute() 方法, 需要註意的是:註冊回調函數,當execute 方法執行的時候,回調函數中的doInPreparedStatement()會被調用
對於數據表中的批量添加刪除修改數據,我們這裡需要用上:jdbcTemplate.batchUpdate() 方法
6. 最後:
“在這個最後的篇章中,我要表達我對每一位讀者的感激之情。你們的關註和回覆是我創作的動力源泉,我從你們身上吸取了無盡的靈感與勇氣。我會將你們的鼓勵留在心底,繼續在其他的領域奮鬥。感謝你們,我們總會在某個時刻再次相遇。”

