
準備 今天學習的Demo是Data Binding中的Linq: 創建一個空白解決方案,然後添加現有項目,選擇Linq,解決方案如下所示: 查看這個Demo的效果: 開始學習這個Demo xaml部分 查看MainWindow.xaml: <Window x:Class="Linq.MainWind ...
準備
今天學習的Demo是Data Binding中的Linq:
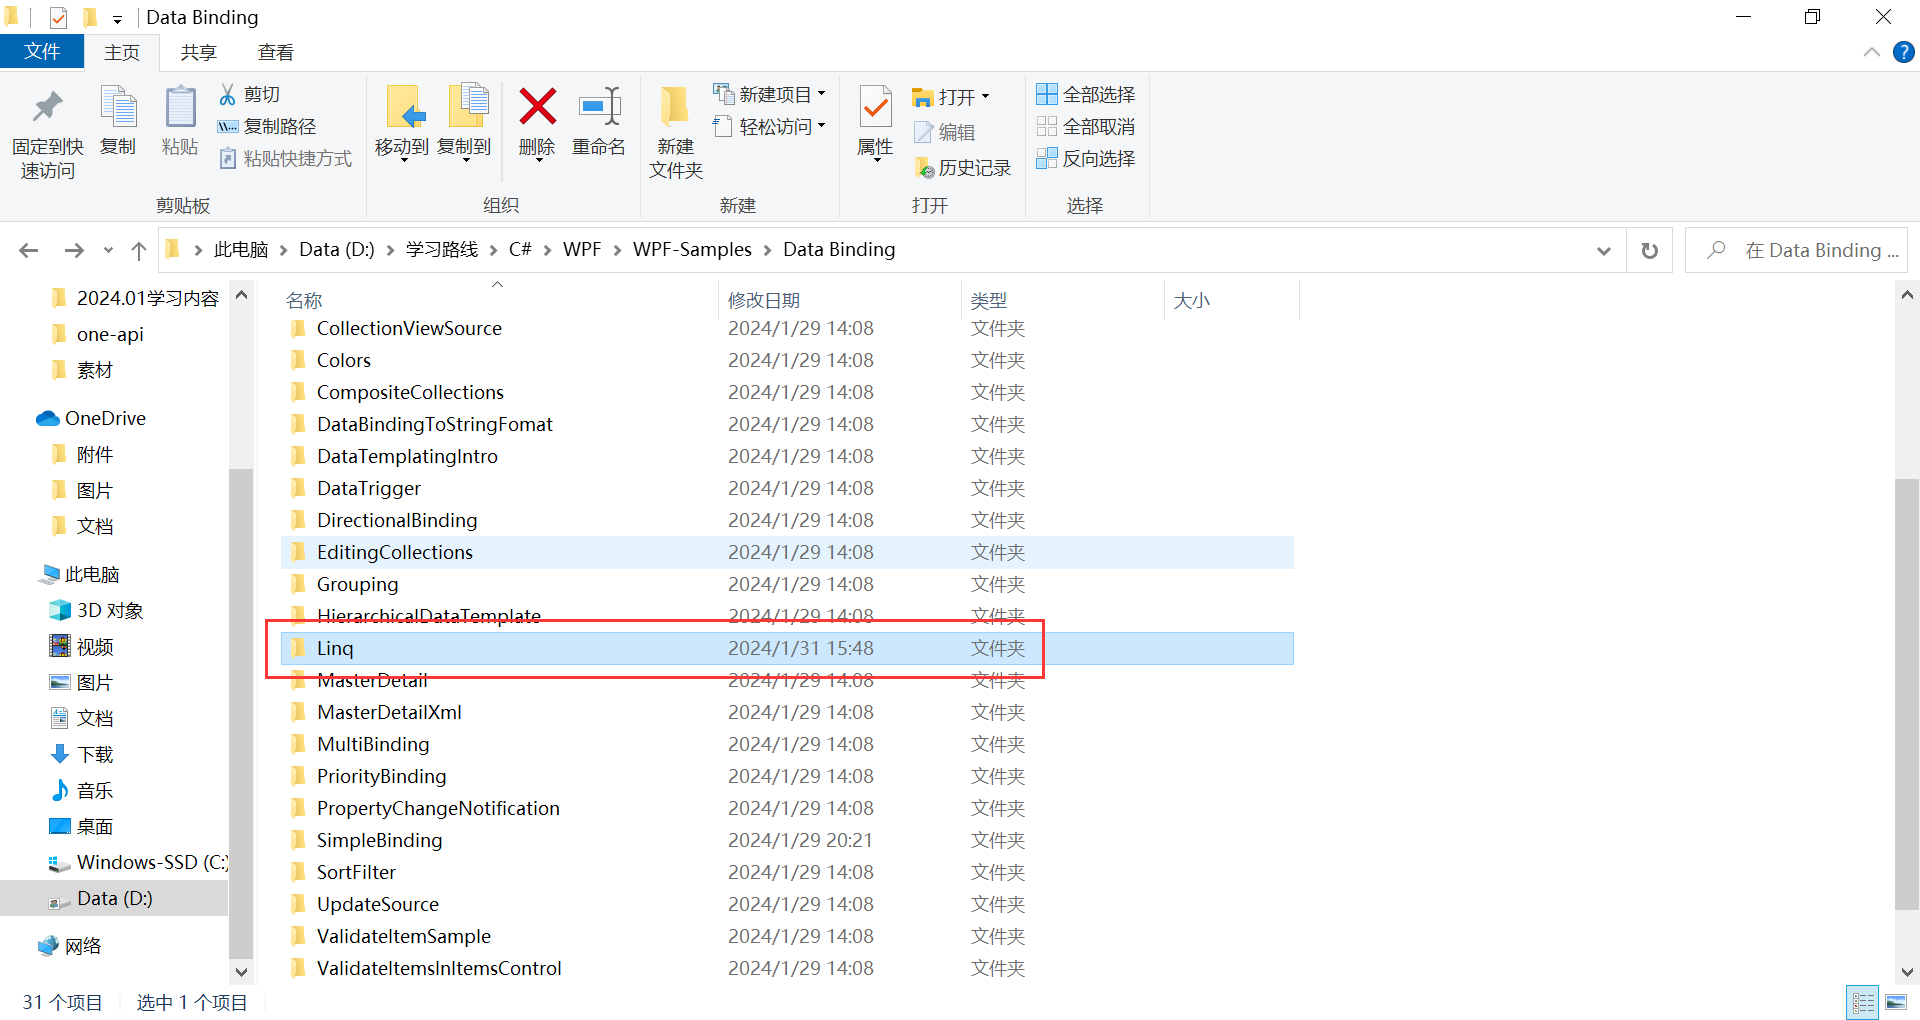
創建一個空白解決方案,然後添加現有項目,選擇Linq,解決方案如下所示:

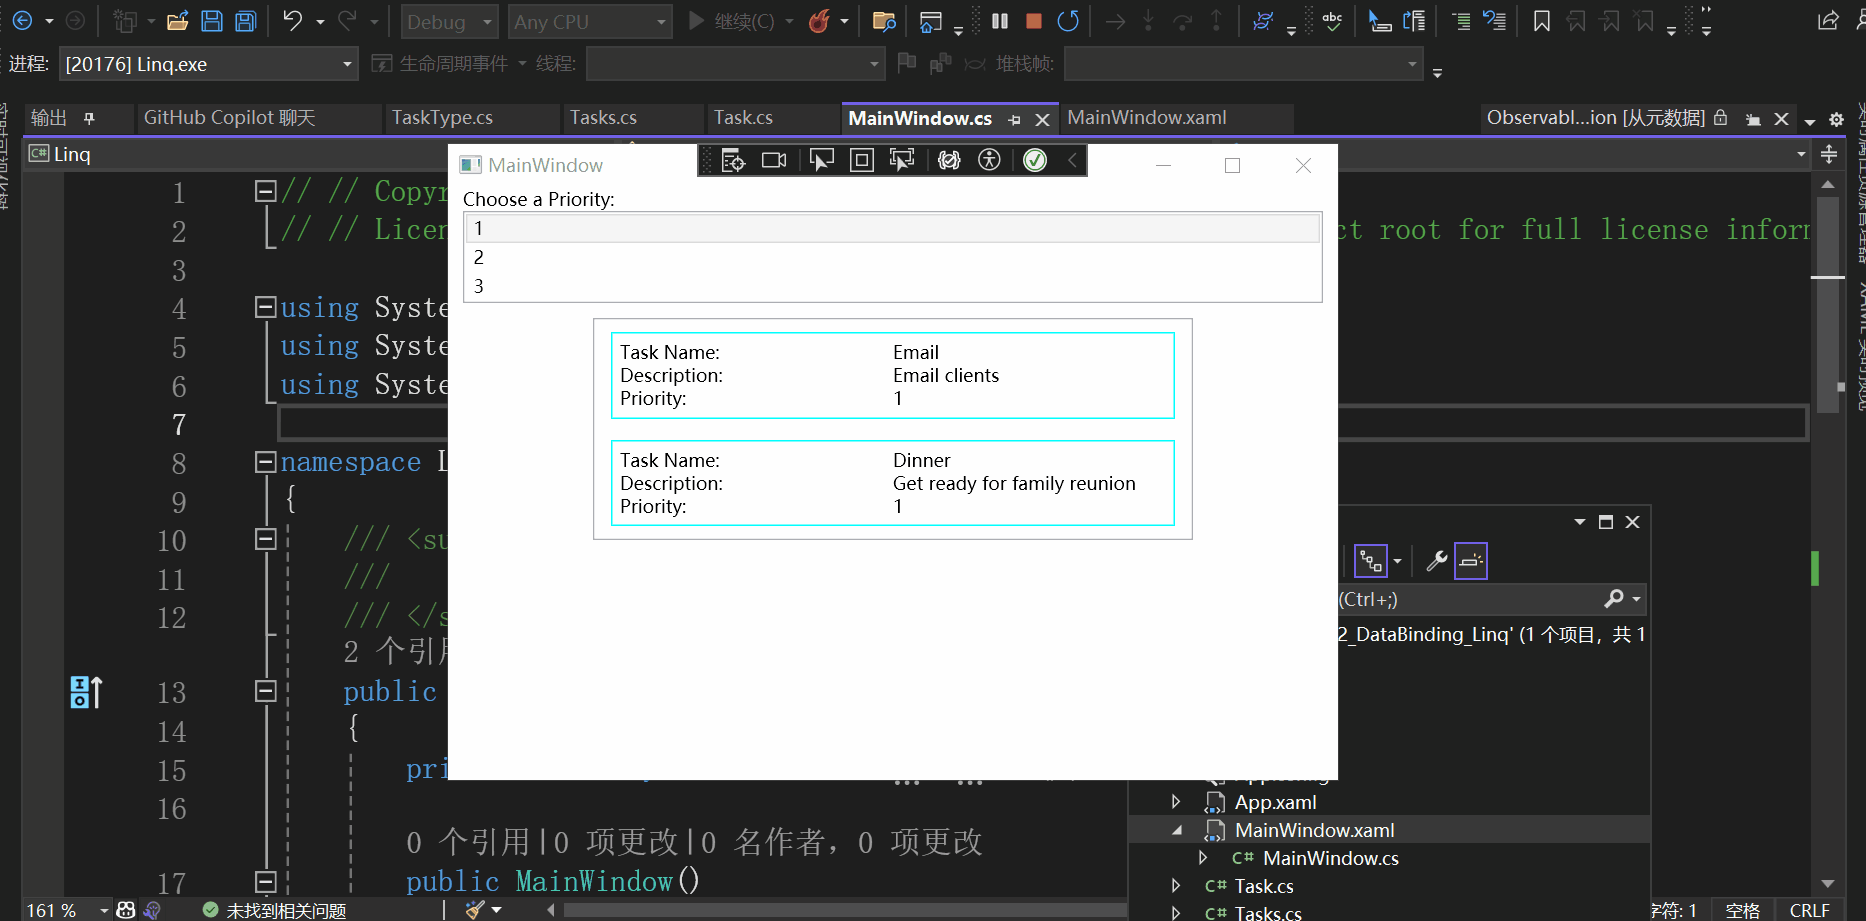
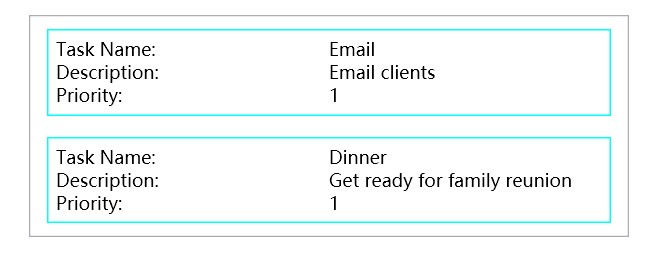
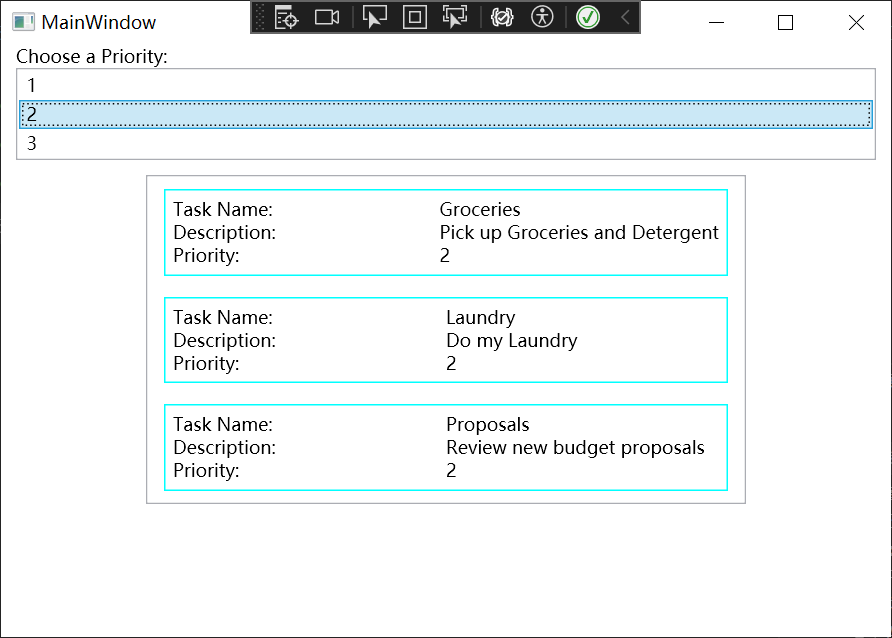
查看這個Demo的效果:
開始學習這個Demo
xaml部分
查看MainWindow.xaml:
<Window x:Class="Linq.MainWindow"
        xmlns="http://schemas.microsoft.com/winfx/2006/xaml/presentation"
        xmlns:x="http://schemas.microsoft.com/winfx/2006/xaml"
        xmlns:d="http://schemas.microsoft.com/expression/blend/2008"
        xmlns:mc="http://schemas.openxmlformats.org/markup-compatibility/2006"
        xmlns:local="clr-namespace:Linq"
        mc:Ignorable="d"
        Title="MainWindow" SizeToContent="WidthAndHeight" Height="600">
    <Window.Resources>
        <local:Tasks x:Key="MyTodoList"/>
        <DataTemplate x:Key="MyTaskTemplate">
            <Border Name="border" BorderBrush="Aqua" BorderThickness="1"
              Padding="5" Margin="5">
                <Grid>
                    <Grid.RowDefinitions>
                        <RowDefinition/>
                        <RowDefinition/>
                        <RowDefinition/>
                    </Grid.RowDefinitions>
                    <Grid.ColumnDefinitions>
                        <ColumnDefinition />
                        <ColumnDefinition />
                    </Grid.ColumnDefinitions>
                    <TextBlock Grid.Row="0" Grid.Column="0" Text="Task Name:"/>
                    <TextBlock Grid.Row="0" Grid.Column="1" Text="{Binding Path=TaskName}" />
                    <TextBlock Grid.Row="1" Grid.Column="0" Text="Description:"/>
                    <TextBlock Grid.Row="1" Grid.Column="1" Text="{Binding Path=Description}"/>
                    <TextBlock Grid.Row="2" Grid.Column="0" Text="Priority:"/>
                    <TextBlock Grid.Row="2" Grid.Column="1" Text="{Binding Path=Priority}"/>
                </Grid>
            </Border>
        </DataTemplate>
    </Window.Resources>
    <StackPanel>
        <TextBlock Margin="10,0,0,0">Choose a Priority:</TextBlock>
        <ListBox SelectionChanged="ListBox_SelectionChanged"
                 SelectedIndex="0" Margin="10,0,10,0" >
            <ListBoxItem>1</ListBoxItem>
            <ListBoxItem>2</ListBoxItem>
            <ListBoxItem>3</ListBoxItem>
        </ListBox>
        <ListBox Width="400" Margin="10" Name="myListBox"
                 HorizontalContentAlignment="Stretch"
                 ItemsSource="{Binding}"
                 ItemTemplate="{StaticResource MyTaskTemplate}"/>

    </StackPanel>
</Window>
先來看看資源包含什麼內容(省略子項):
<Window.Resources>
        <local:Tasks x:Key="MyTodoList"/>
        <DataTemplate x:Key="MyTaskTemplate">
        </DataTemplate>
</Window.Resources>
<Window.Resources> 是 XAML 中的一個元素,它定義了一個資源字典,你可以在其中聲明和存儲可在整個視窗中重用的資源。
我們發現包含兩個資源:一個 Tasks 對象和一個 DataTemplate。
通過上一篇文章的學習,我們明白
<local:Tasks x:Key="MyTodoList"/>
的意思就是創建了一個 Tasks 對象,並給它分配了一個鍵(key)MyTodoList。這樣你就可以在其他地方通過這個鍵引用這個 Tasks 對象了。
DataTemplate又是什麼呢?
<DataTemplate x:Key="MyTaskTemplate">
            <Border Name="border" BorderBrush="Aqua" BorderThickness="1"
              Padding="5" Margin="5">
                <Grid>
                    <Grid.RowDefinitions>
                        <RowDefinition/>
                        <RowDefinition/>
                        <RowDefinition/>
                    </Grid.RowDefinitions>
                    <Grid.ColumnDefinitions>
                        <ColumnDefinition />
                        <ColumnDefinition />
                    </Grid.ColumnDefinitions>
                    <TextBlock Grid.Row="0" Grid.Column="0" Text="Task Name:"/>
                    <TextBlock Grid.Row="0" Grid.Column="1" Text="{Binding Path=TaskName}" />
                    <TextBlock Grid.Row="1" Grid.Column="0" Text="Description:"/>
                    <TextBlock Grid.Row="1" Grid.Column="1" Text="{Binding Path=Description}"/>
                    <TextBlock Grid.Row="2" Grid.Column="0" Text="Priority:"/>
                    <TextBlock Grid.Row="2" Grid.Column="1" Text="{Binding Path=Priority}"/>
                </Grid>
            </Border>
        </DataTemplate>
其中<DataTemplate x:Key="MyTaskTemplate"> 是 XAML 中的一個元素,它定義瞭如何將數據對象呈現為 UI 元素。
在這個例子中,DataTemplate 定義了一個模板,該模板描述瞭如何將數據呈現在 UI 中。這個模板被賦予了一個鍵(key),即 MyTaskTemplate,這樣你就可以在其他地方引用這個模板了。
 <Grid>
    <Grid.RowDefinitions>
         <RowDefinition/>
         <RowDefinition/>
          <RowDefinition/>
     </Grid.RowDefinitions>
     <Grid.ColumnDefinitions>
          <ColumnDefinition />
          <ColumnDefinition />
      </Grid.ColumnDefinitions>
 <Grid>
定義了一個3行2列的Grid佈局:
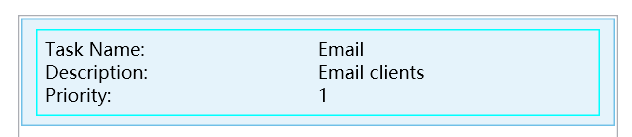
<TextBlock Grid.Row="0" Grid.Column="1" Text="{Binding Path=TaskName}" />
Grid.Row="0"表示第1行,Grid.Column="1"表示第2列,Text="{Binding Path=TaskName}" 表示Text屬性的值為綁定源的TaskName屬性的值。
   <TextBlock Margin="10,0,0,0">Choose a Priority:</TextBlock>
    <ListBox SelectionChanged="ListBox_SelectionChanged"
             SelectedIndex="0" Margin="10,0,10,0" >
        <ListBoxItem>1</ListBoxItem>
        <ListBoxItem>2</ListBoxItem>
        <ListBoxItem>3</ListBoxItem>
    </ListBox>
表示以下這部分:

<ListBox Width="400" Margin="10" Name="myListBox"
         HorizontalContentAlignment="Stretch"
         ItemsSource="{Binding}"
         ItemTemplate="{StaticResource MyTaskTemplate}"/>
表示以下這部分:
我們會發現它沒有顯式的寫 <ListBoxItem>,而且它的ListBoxItem數量不是固定的。
它使用了ItemsSource="{Binding}",ItemsSource 是 ListBox 的一個屬性,它決定了 ListBox 中顯示的項的數據源。
{Binding} 是一個標記擴展,它創建一個數據綁定。在這個例子中,由於沒有指定路徑(Path),所以它會綁定到當前的數據上下文(DataContext)。數據上下文通常在父元素中設置,並且所有的子元素都可以訪問。
ItemTemplate="{StaticResource MyTaskTemplate}"表示每個<ListBoxItem>對象將按照這個模板進行顯示。
cs部分
首先定義了TaskType枚舉類型:
namespace Linq
{
    public enum TaskType
    {
        Home,
        Work
    }
}
定義了Task類:
// // Copyright (c) Microsoft. All rights reserved.
// // Licensed under the MIT license. See LICENSE file in the project root for full license information.

using System.ComponentModel;

namespace Linq
{
    public class Task : INotifyPropertyChanged
    {
        private string _description;
        private string _name;
        private int _priority;
        private TaskType _type;

        public Task()
        {
        }

        public Task(string name, string description, int priority, TaskType type)
        {
            _name = name;
            _description = description;
            _priority = priority;
            _type = type;
        }

        public string TaskName
        {
            get { return _name; }
            set
            {
                _name = value;
                OnPropertyChanged("TaskName");
            }
        }

        public string Description
        {
            get { return _description; }
            set
            {
                _description = value;
                OnPropertyChanged("Description");
            }
        }

        public int Priority
        {
            get { return _priority; }
            set
            {
                _priority = value;
                OnPropertyChanged("Priority");
            }
        }

        public TaskType TaskType
        {
            get { return _type; }
            set
            {
                _type = value;
                OnPropertyChanged("TaskType");
            }
        }

        public event PropertyChangedEventHandler PropertyChanged;

        public override string ToString() => _name;

        protected void OnPropertyChanged(string info)
        {
            var handler = PropertyChanged;
            handler?.Invoke(this, new PropertyChangedEventArgs(info));
        }
    }
}
實現了INotifyPropertyChanged介面。
實現INotifyPropertyChanged介面的主要目的是為了提供一個通知機制,當對象的一個屬性更改時,可以通知到所有綁定到該屬性的元素。
INotifyPropertyChanged 介面只有一個事件 PropertyChanged。當你的類實現了這個介面,你需要在每個屬性的 setter 中觸發這個事件。這樣,當屬性的值更改時,所有綁定到這個屬性的 UI 元素都會收到通知,並自動更新其顯示的值。
再查看Tasks類:
// // Copyright (c) Microsoft. All rights reserved.
// // Licensed under the MIT license. See LICENSE file in the project root for full license information.

using System.Collections.ObjectModel;

namespace Linq
{
    public class Tasks : ObservableCollection<Task>
    {
        public Tasks()
        {
            Add(new Task("Groceries", "Pick up Groceries and Detergent", 2, TaskType.Home));
            Add(new Task("Laundry", "Do my Laundry", 2, TaskType.Home));
            Add(new Task("Email", "Email clients", 1, TaskType.Work));
            Add(new Task("Clean", "Clean my office", 3, TaskType.Work));
            Add(new Task("Dinner", "Get ready for family reunion", 1, TaskType.Home));
            Add(new Task("Proposals", "Review new budget proposals", 2, TaskType.Work));
        }
    }
}
繼承自ObservableCollection<Task>類。
ObservableCollection<T> 是 .NET 框架中的一個類,它表示一個動態數據集合,當添加、刪除項或者整個列表刷新時,它會提供通知。這對於綁定到 UI 元素(例如 WPF 或 UWP 應用程式中的數據綁定)非常有用,因為當集合更改時,UI 元素可以自動更新。

再看下這個Demo中最為重要的部分:
// // Copyright (c) Microsoft. All rights reserved.
// // Licensed under the MIT license. See LICENSE file in the project root for full license information.

using System.Linq;
using System.Windows;
using System.Windows.Controls;

namespace Linq
{
    /// <summary>
    ///     Interaction logic for MainWindow.xaml
    /// </summary>
    public partial class MainWindow : Window
    {
        private readonly Tasks tasks = new Tasks();

        public MainWindow()
        {
            InitializeComponent();
        }

        private void ListBox_SelectionChanged(object sender, SelectionChangedEventArgs e)
        {
            var pri = int.Parse(((sender as ListBox).SelectedItem as ListBoxItem).Content.ToString());

            DataContext = from task in tasks
                where task.Priority == pri
                select task;
        }
    }
}
 private void ListBox_SelectionChanged(object sender, SelectionChangedEventArgs e)
        {
            var pri = int.Parse(((sender as ListBox).SelectedItem as ListBoxItem).Content.ToString());

            DataContext = from task in tasks
                where task.Priority == pri
                select task;
        }
表示ListBox選項改變事件處理函數。
var pri = int.Parse(((sender as ListBox).SelectedItem as ListBoxItem).Content.ToString());
獲取選中項的值。
   DataContext = from task in tasks
                where task.Priority == pri
                select task;
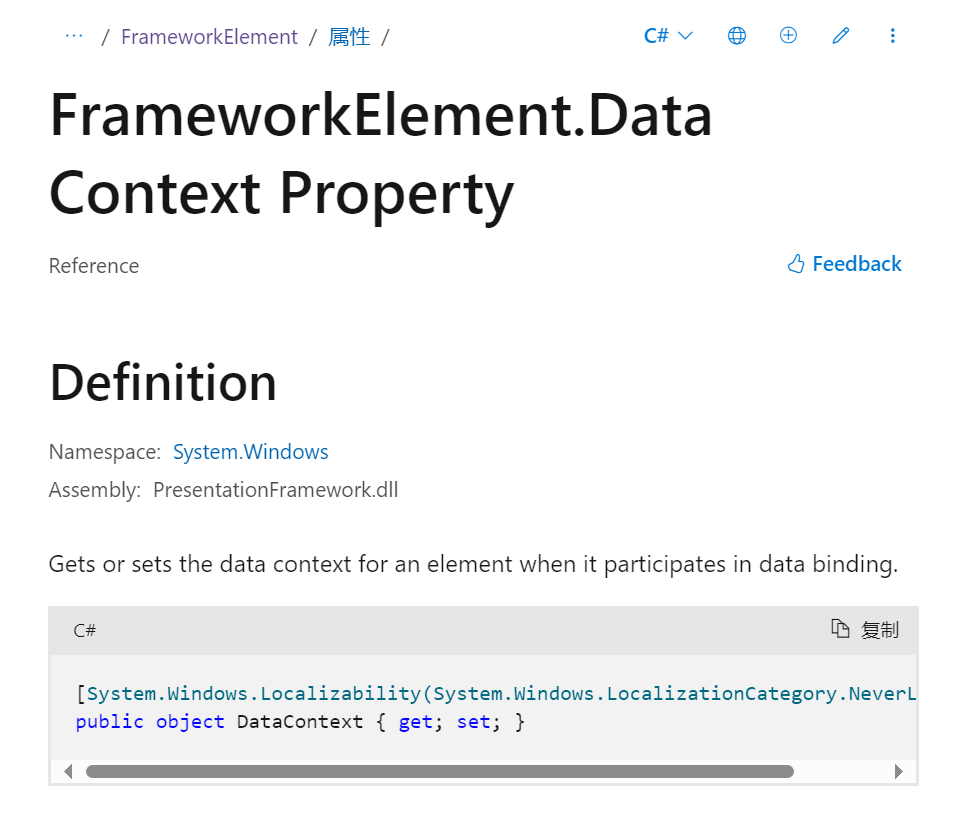
中的DataContext獲取或設置元素參與數據綁定時的數據上下文。
from task in tasks
where task.Priority == pri
select task;
使用C#中的Linq獲得tasks中Priority屬性等於pri的所有task對象,也可以這樣寫:
DataContext = tasks.Where(x => x.Priority == pri);
效果是一樣的。
過程
首先實例化了一個Tasks類如下:
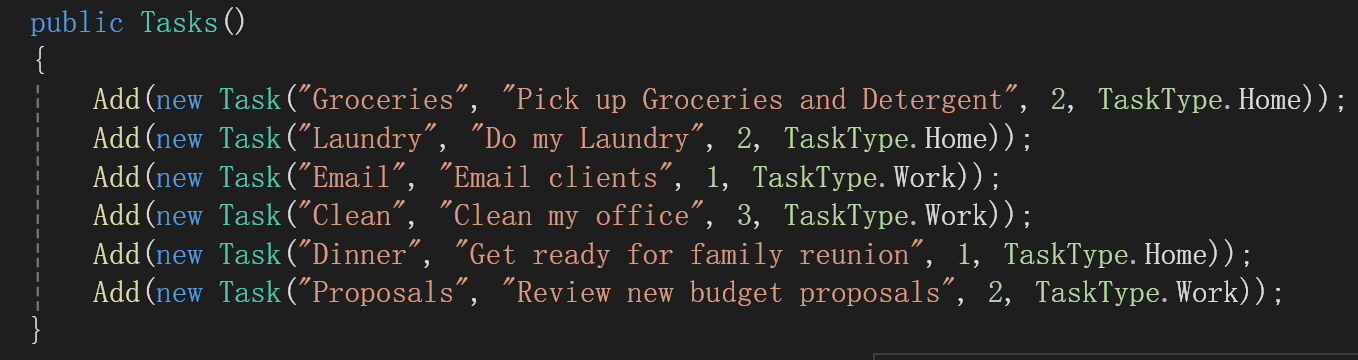
包含這些Task類。
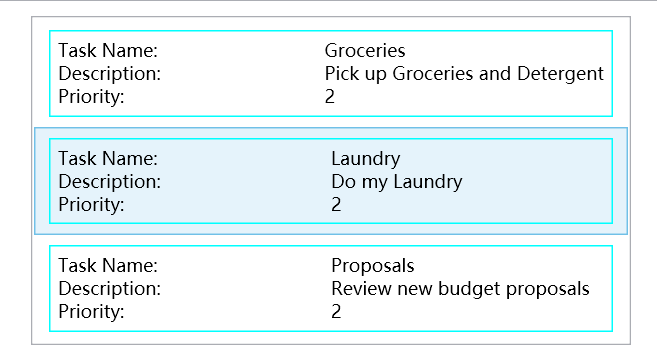
以選擇“2”為例,進行說明:
打個斷點:
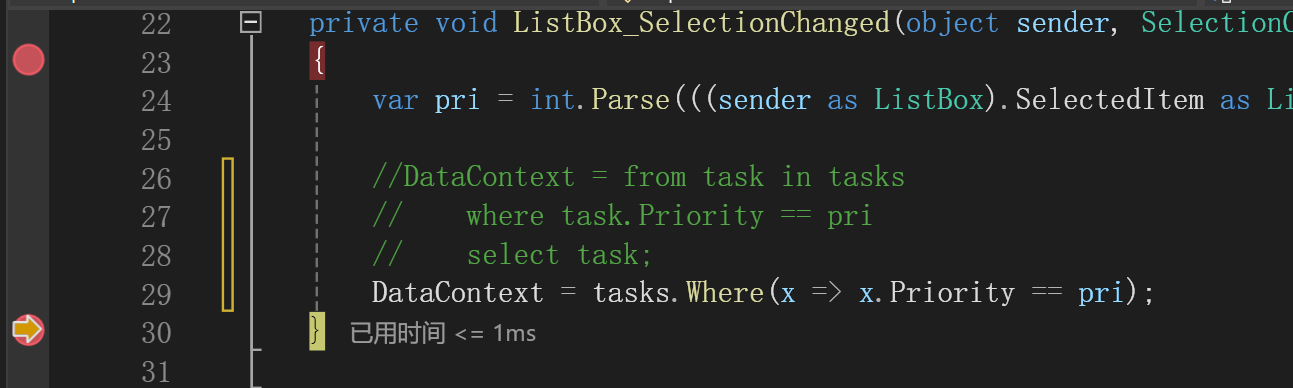
DataContext的結果如下:

<ListBox Width="400" Margin="10" Name="myListBox"
         HorizontalContentAlignment="Stretch"
         ItemsSource="{Binding}"
         ItemTemplate="{StaticResource MyTaskTemplate}"/>
中的ItemsSource="{Binding}"表示ListBox的數據源就是DataContext,也就是有3個Task對象,也就是有3個ListItem,每個ListItem都按照{StaticResource MyTaskTemplate}這個模板進行顯示。
結果就如上圖所示。
測試
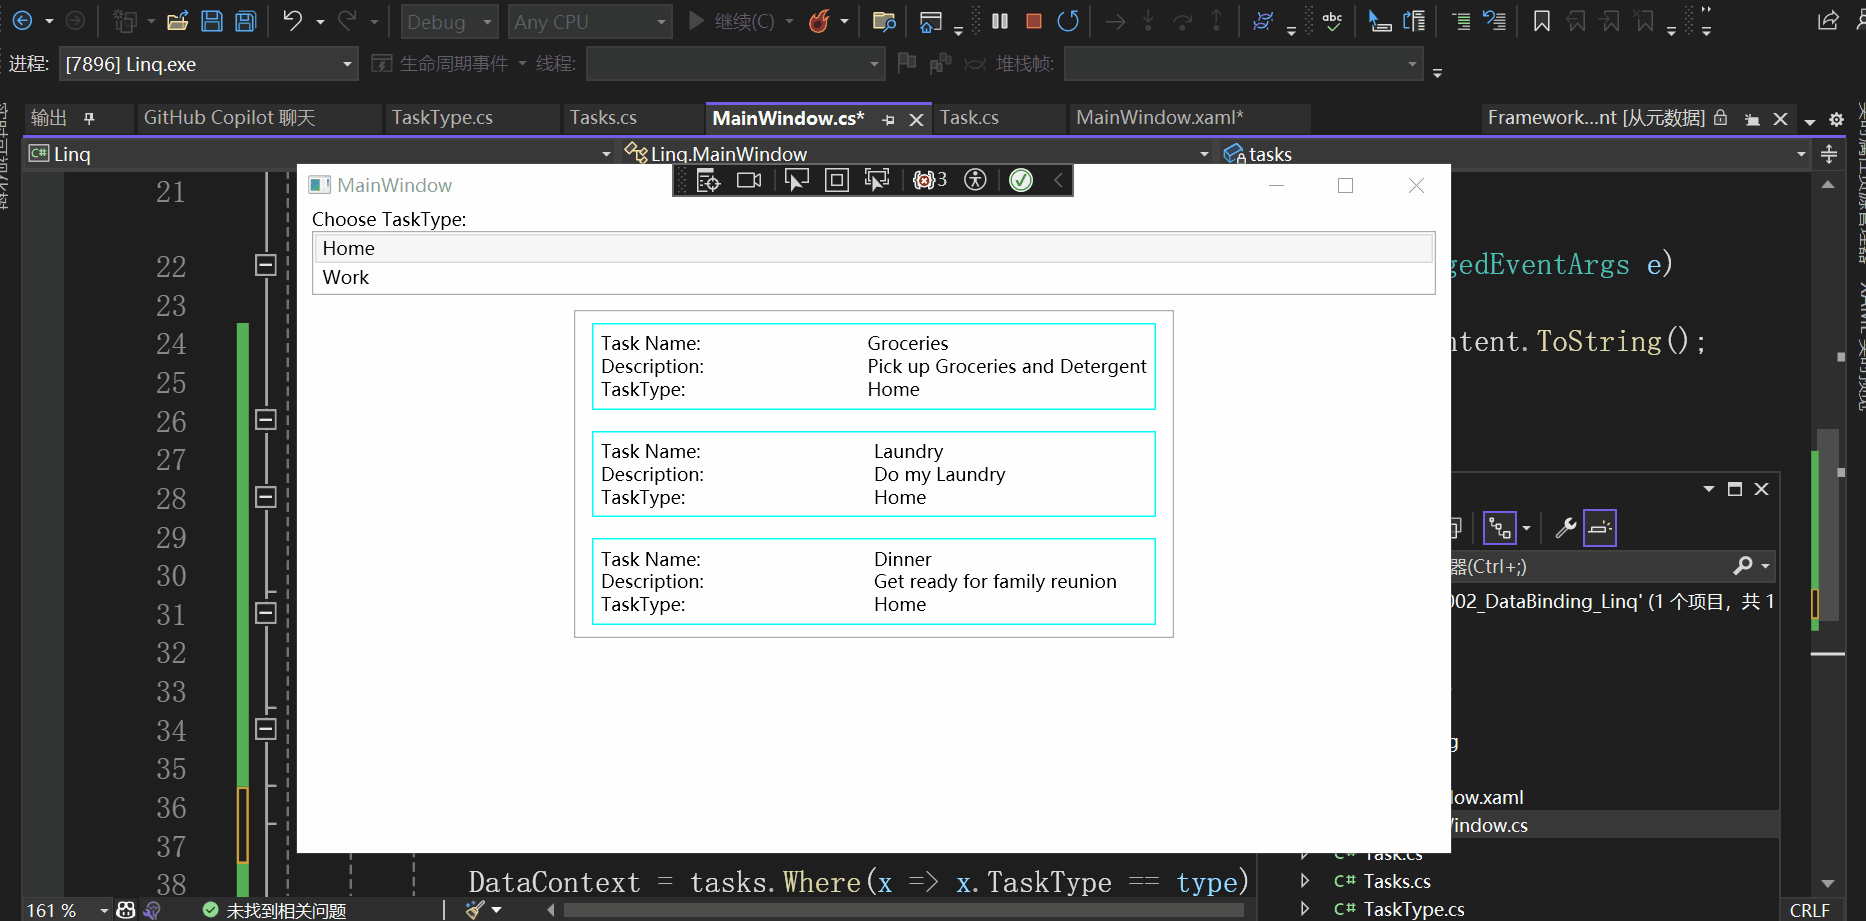
最後為了測試自己是否真的理解,可以按照自己的意圖進行更改,比如我想根據工作類型進行數據的顯示。
<TextBlock Grid.Row="2" Grid.Column="0" Text="TaskType:"/>
<TextBlock Grid.Row="2" Grid.Column="1" Text="{Binding Path=TaskType}"/>
修改數據模板。
<ListBox SelectionChanged="ListBox_SelectionChanged"
         SelectedIndex="0" Margin="10,0,10,0" >
    <ListBoxItem>Home</ListBoxItem>
    <ListBoxItem>Work</ListBoxItem>
</ListBox>
修改第一個ListBox。
private void ListBox_SelectionChanged(object sender, SelectionChangedEventArgs e)
{
    var pri = ((sender as ListBox).SelectedItem as ListBoxItem).Content.ToString();
    TaskType type = new TaskType();
    switch (pri)
    {
        case "Home":
            type = TaskType.Home;
            break;
        case "Work":
            type = TaskType.Work;
            break;
        default:
            break;
    }

    DataContext = tasks.Where(x => x.TaskType == type);
}
修改ListBox選項改變事件處理函數。
效果如下所示:
總結
本文主要介紹了數據綁定配合Linq的使用,希望對你有所幫助。


