Ultralytics YOLOv8 基於深度學習和電腦視覺領域的尖端技術,在速度和準確性方面具有無與倫比的性能。其流線型設計使其適用於各種應用,並可輕鬆適應從邊緣設備到雲 API 等不同硬體平臺。YOLOv8 OBB 模型是YOLOv8系列模型最新推出的任意方向的目標檢測模型,可以檢測任意方向的... ...
前言目錄Ultralytics YOLOv8 基於深度學習和電腦視覺領域的尖端技術,在速度和準確性方面具有無與倫比的性能。其流線型設計使其適用於各種應用,並可輕鬆適應從邊緣設備到雲 API 等不同硬體平臺。YOLOv8 OBB 模型是YOLOv8系列模型最新推出的任意方向的目標檢測模型,可以檢測任意方向的對象,大大提高了物體檢測的精度。同時官方發佈的模型已經支持 OpenVINO™ 部署工具加速模型推理,因此在該項目中,我們將結合之前開發的 OpenVINO™ C# API 部署YOLOv8 OBB 模型實現旋轉物體對象檢測。
項目鏈接為:
https://github.com/guojin-yan/OpenVINO-CSharp-API項目源碼鏈接為:
https://github.com/guojin-yan/OpenVINO-CSharp-API-Samples/tree/master/model_samples/yolov8/yolov8_obb_opencvsharp
https://github.com/guojin-yan/OpenVINO-CSharp-API-Samples/tree/master/model_samples/yolov8/yolov8_obb_emgucv
1. 前言
1.1 OpenVINO™ C# API
英特爾發行版 OpenVINO™ 工具套件基於 oneAPI 而開發,可以加快高性能電腦視覺和深度學習視覺應用開發速度工具套件,適用於從邊緣到雲的各種英特爾平臺上,幫助用戶更快地將更準確的真實世界結果部署到生產系統中。通過簡化的開發工作流程,OpenVINO™ 可賦能開發者在現實世界中部署高性能應用程式和演算法。
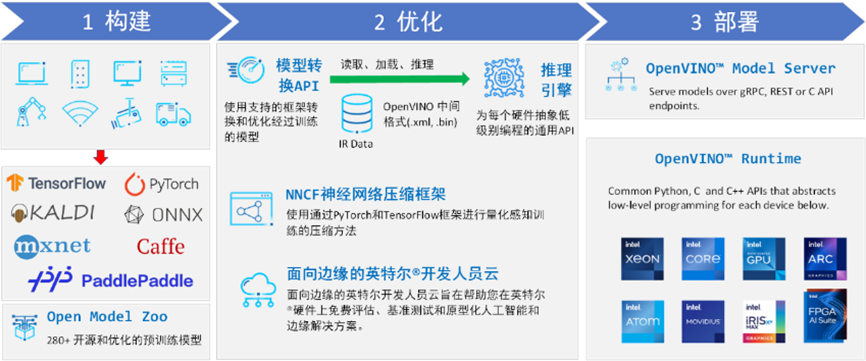
OpenVINO™ 2023.2 於 2023 年 11 月 16 日發佈,該工具包帶來了挖掘生成人工智慧全部潛力的新功能。更多的生成式 AI 覆蓋和框架集成,以最大限度地減少代碼更改,並且擴展了對直接 PyTorch 模型轉換的模型支持。支持更多新的模型,包括 LLaVA、chatGLM、Bark 和 LCM 等著名模型。支持更廣泛的大型語言模型(LLM)和更多模型壓縮技術,支持運行時推理支持以下 Int4 模型壓縮格式,通過神經網路壓縮框架(NNCF) 進行本機 Int4 壓縮等一系列新的功能。
OpenVINO™ C# API 是一個 OpenVINO™ 的 .Net wrapper,應用最新的 OpenVINO™ 庫開發,通過 OpenVINO™ C API 實現 .Net 對 OpenVINO™ Runtime 調用,使用習慣與 OpenVINO™ C++ API 一致。OpenVINO™ C# API 由於是基於 OpenVINO™ 開發,所支持的平臺與 OpenVINO™ 完全一致,具體信息可以參考 OpenVINO™。通過使用 OpenVINO™ C# API,可以在 .NET、.NET Framework等框架下使用 C# 語言實現深度學習模型在指定平臺推理加速。
1.2 YOLOv8 OBB 模型
目標檢測是電腦視覺中的一項基本任務,目前許多研究都是採用水平邊界框來定點陣圖像中的物體。然而,圖像中的物體通常是任意方向的。因此,使用水平邊界框來檢測目標會引起物體檢測框通常包含許多背景區域,檢測框記憶體在過多的背景區域,不僅增加了分類任務的難度,而且會導致目標範圍表示不准確的問題。其次,水平邊界框會導致檢測框之間出現重疊,降低檢測精度。
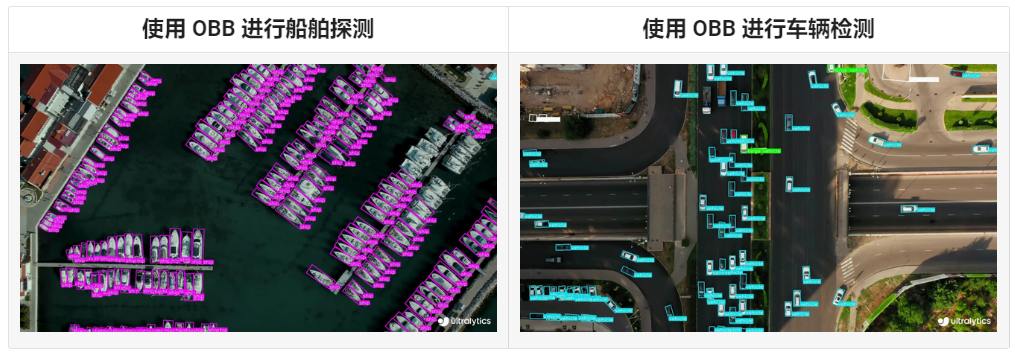
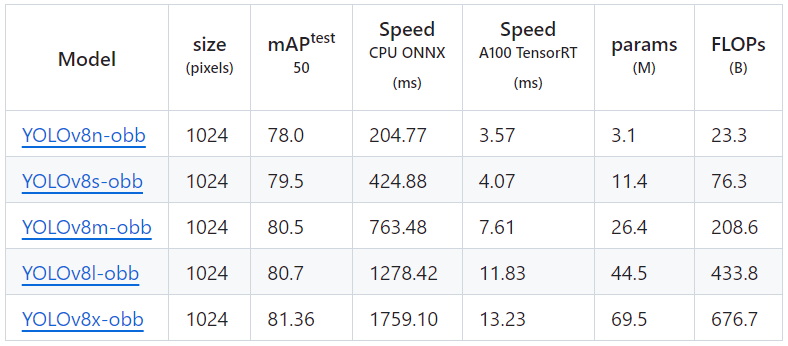
通過使用帶有角度信息的旋轉檢測框可以有效解決上述問題,它引入了一個額外的角度來更準確地定點陣圖像中的物體。Ultralytics YOLOv8 基於深度學習和電腦視覺領域的尖端技術,在速度和準確性方面具有無與倫比的性能。其流線型設計使其適用於各種應用,並可輕鬆適應從邊緣設備到雲 API 等不同硬體平臺。YOLOv8 OBB 模型是YOLOv8系列模型最新推出的任意方向的目標檢測模型,其模型輸出結果是一組旋轉的邊界框,這些邊界框精確地包圍了圖像中的物體,同時還包括每個邊界框的類標簽和置信度分數。當你需要識別場景中感興趣的物體,但又不需要知道物體的具體位置或確切形狀時,物體檢測是一個不錯的選擇。
2. YOLOv8 OBB模型下載與轉換
2.1 安裝模型下載與轉換環境
此處主要安裝 YOLOv8 OBB模型導出環境以及OpenVINO™模型轉換環境,使用Anaconda進行環境創建,依次輸入以下指令:
conda create -n yolo python=3.10
conda activate yolo
pip install ultralytics
pip install --upgrade openvino-nightly
此處只需要安裝以上兩個程式包即可。
2.2 導出 YOLOv8 OBB模型
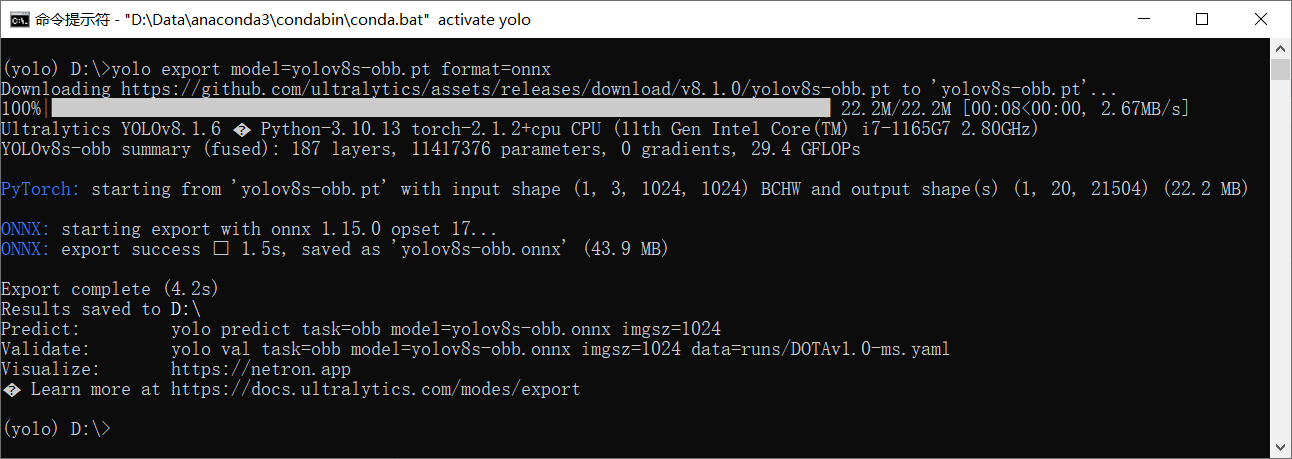
接下來以Yolov8s-obb模型到處為例,演示如何快速導出官方提供的預訓練模型,首先在創建的虛擬環境中輸入以下命令:
yolo export model=yolov8s-obb.pt format=onnx
下圖展示了模型導出命令輸出情況:
接下來查看導出的Yolov8s-obb模型的結構情況,通過Netron可以進行查看,如下所示:
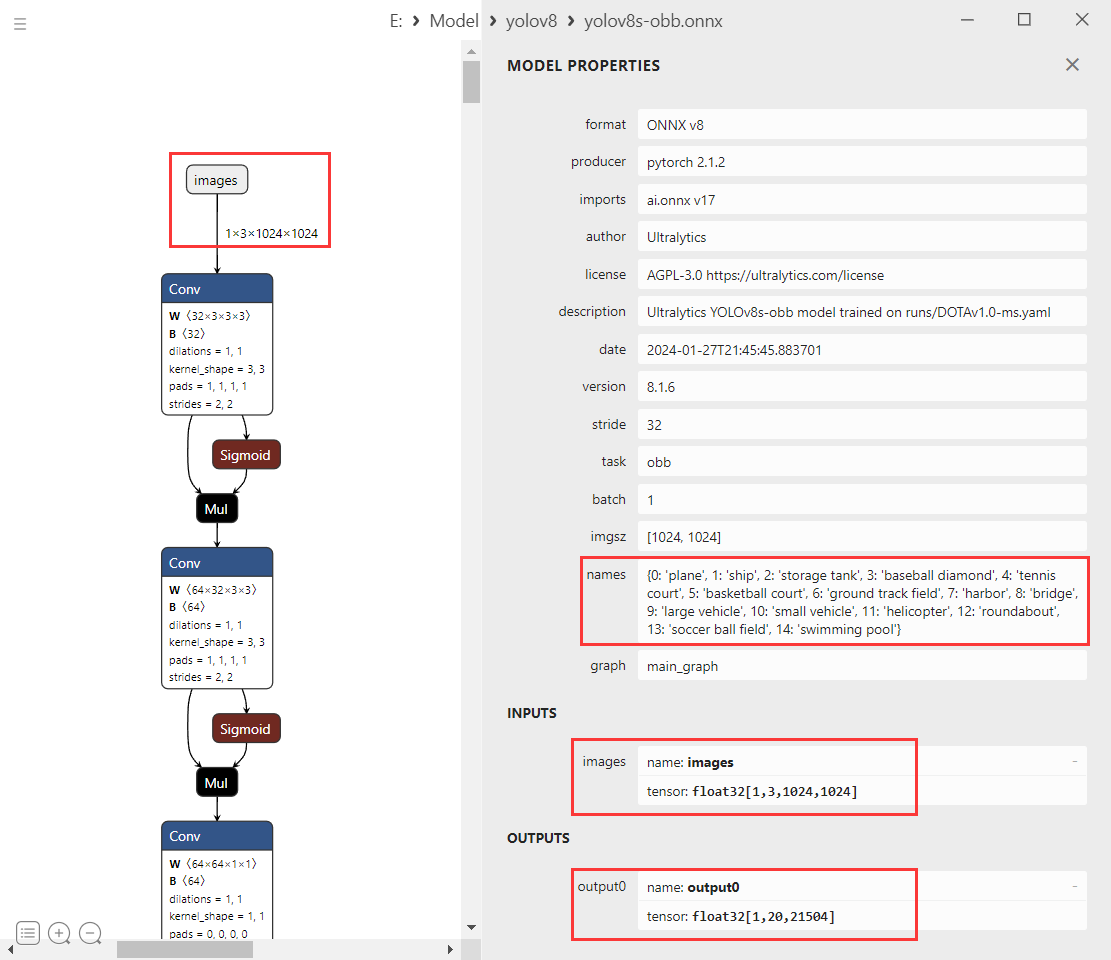
模型識別類別:由於官方模型是在DOTAv1數據集上預訓練的,因此導出的模型可以識別出15種類別,分別是:plane 、ship storage tank、baseball diamond、 tennis court、basketball court、ground track field、harbor、 bridge、large vehicle、 small vehicle、helicopter、roundabout、soccer ball field、 swimming pool。
模型輸入:模型輸入名稱為“image”,輸入大小為1×3×1024×1024的歸一化後的圖像數據,數據類型為float。
模型輸出:模型的輸出名稱為“output0”,輸出大小為1×20×21504,輸出數據為float。其中“20”表示為[x, y, w, h, sorce0, ···, sorce14, angle]的數組,數組中03這四個參數為預測框的矩形位置,數組中418這15個參數表示15各類別的分類置信度,數組中19這個參數表示預測框的旋轉角度;“21504”表示輸入為1024的模型三個檢測頭的輸出大小,總共有21504(1024÷8=128,1024÷16=64,1024÷32=32,128×128+64×64+32×32=21504)種結果。
2.3 轉換 IR 模型
接下來直接使用OpenVINO™工具直接進行模型轉換,在CMD中輸入以下指令即可:
ovc yolov8s-obb.onnx
模型導出輸出如下圖所示。

3. YOLOv8 OBB項目配置(OpenCvSharp)
此處項目創建與運行演示使用dotnet工具進行,大家也可以通過Visual Studio等IDE工具進行項目創建與運行。首先講解一下使用OpenCvSharp作為圖像處理工具的代碼程式。
3.1 項目創建
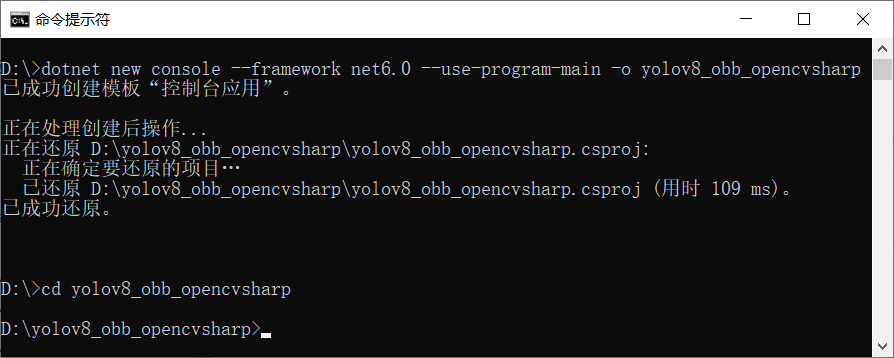
首先使用dotnet工具創建一個控制台應用,在CMD中輸入以下指令:
dotnet new console --framework net6.0 --use-program-main -o yolov8_obb_opencvsharp
cd yolov8_obb_opencvsharp
項目創建後輸出為:
3.2 添加項目依賴
此處以Windows平臺為例安裝項目依賴,首先是安裝OpenVINO™ C# API項目依賴,在命令行中輸入以下指令即可:
dotnet add package OpenVINO.CSharp.API
dotnet add package OpenVINO.runtime.win
dotnet add package OpenVINO.CSharp.API.Extensions
dotnet add package OpenVINO.CSharp.API.Extensions.OpenCvSharp
接下來安裝使用到的圖像處理庫OpenCvSharp,在命令行中輸入以下指令即可:
dotnet add package OpenCvSharp4
dotnet add package OpenCvSharp4.Extensions
dotnet add package OpenCvSharp4.runtime.win
添加完成項目依賴後,項目的配置文件如下所示:
<Project Sdk="Microsoft.NET.Sdk">

  <PropertyGroup>
    <OutputType>Exe</OutputType>
    <TargetFramework>net6.0</TargetFramework>
    <ImplicitUsings>enable</ImplicitUsings>
    <Nullable>enable</Nullable>
  </PropertyGroup>

  <ItemGroup>
    <PackageReference Include="OpenCvSharp4" Version="4.9.0.20240103" />
    <PackageReference Include="OpenCvSharp4.Extensions" Version="4.9.0.20240103" />
    <PackageReference Include="OpenCvSharp4.runtime.win" Version="4.9.0.20240103" />
    <PackageReference Include="OpenVINO.CSharp.API" Version="2023.2.0.4" />
    <PackageReference Include="OpenVINO.CSharp.API.Extensions" Version="1.0.1" />
    <PackageReference Include="OpenVINO.CSharp.API.Extensions.OpenCvSharp" Version="1.0.4" />
    <PackageReference Include="OpenVINO.runtime.win" Version="2023.3.0.1" />
  </ItemGroup>

</Project>
3.3 定義預測方法
Yolov8 Obb模型部署流程與方式與Yolov8 Det基本一致,其主要不同點在與其結果的後處理方式,本項目所定義的Yolov8 Obb模型推理代碼如下所示:
static void yolov8_obb(string model_path, string image_path, string device)
{
    // -------- Step 1. Initialize OpenVINO Runtime Core --------
    Core core = new Core();
    // -------- Step 2. Read inference model --------
    Model model = core.read_model(model_path);
    OvExtensions.printf_model_info(model);
    // -------- Step 3. Loading a model to the device --------
    CompiledModel compiled_model = core.compile_model(model, device);
    // -------- Step 4. Create an infer request --------
    InferRequest infer_request = compiled_model.create_infer_request();
    // -------- Step 5. Process input images --------
    Mat image = new Mat(image_path); // Read image by opencvsharp
    int max_image_length = image.Cols > image.Rows ? image.Cols : image.Rows;
    Mat max_image = Mat.Zeros(new OpenCvSharp.Size(max_image_length, max_image_length), MatType.CV_8UC3);
    Rect roi = new Rect(0, 0, image.Cols, image.Rows);
    image.CopyTo(new Mat(max_image, roi));
    float factor = (float)(max_image_length / 1024.0);
    // -------- Step 6. Set up input data --------
    Tensor input_tensor = infer_request.get_input_tensor();
    Shape input_shape = input_tensor.get_shape();
    Mat input_mat = CvDnn.BlobFromImage(max_image, 1.0 / 255.0, new OpenCvSharp.Size(input_shape[2], input_shape[3]), 0, true, false);
    float[] input_data = new float[input_shape[1] * input_shape[2] * input_shape[3]];
    Marshal.Copy(input_mat.Ptr(0), input_data, 0, input_data.Length);
    input_tensor.set_data<float>(input_data);
    // -------- Step 7. Do inference synchronously --------
    infer_request.infer();
    // -------- Step 8. Get infer result data --------
    Tensor output_tensor = infer_request.get_output_tensor();
    int output_length = (int)output_tensor.get_size();
    float[] output_data = output_tensor.get_data<float>(output_length);
    // -------- Step 9. Process reault  --------
    Mat result_data = new Mat(20, 21504, MatType.CV_32F, output_data);
    result_data = result_data.T();
    float[] d = new float[output_length];
    result_data.GetArray<float>(out d);
    // Storage results list
    List<Rect2d> position_boxes = new List<Rect2d>();
    List<int> class_ids = new List<int>();
    List<float> confidences = new List<float>();
    List<float> rotations = new List<float>();
    // Preprocessing output results
    for (int i = 0; i < result_data.Rows; i++)
    {
        Mat classes_scores = new Mat(result_data, new Rect(4, i, 15, 1));
        OpenCvSharp.Point max_classId_point, min_classId_point;
        double max_score, min_score;
        // Obtain the maximum value and its position in a set of data
        Cv2.MinMaxLoc(classes_scores, out min_score, out max_score,
            out min_classId_point, out max_classId_point);
        // Confidence level between 0 ~ 1
        // Obtain identification box information
        if (max_score > 0.25)
        {
            float cx = result_data.At<float>(i, 0);
            float cy = result_data.At<float>(i, 1);
            float ow = result_data.At<float>(i, 2);
            float oh = result_data.At<float>(i, 3);
            double x = (cx - 0.5 * ow) * factor;
            double y = (cy - 0.5 * oh) * factor;
            double width = ow * factor;
            double height = oh * factor;
            Rect2d box = new Rect2d();
            box.X = x;
            box.Y = y;
            box.Width = width;
            box.Height = height;
            position_boxes.Add(box);
            class_ids.Add(max_classId_point.X);
            confidences.Add((float)max_score);
            rotations.Add(result_data.At<float>(i, 19));
        }
    }
    // NMS non maximum suppression
    int[] indexes = new int[position_boxes.Count];
    CvDnn.NMSBoxes(position_boxes, confidences, 0.25f, 0.7f, out indexes);
    List<RotatedRect> rotated_rects = new List<RotatedRect>();
    for (int i = 0; i < indexes.Length; i++)
    {
        int index = indexes[i];
        float w = (float)position_boxes[index].Width;
        float h = (float)position_boxes[index].Height;
        float x = (float)position_boxes[index].X + w / 2;
        float y = (float)position_boxes[index].Y + h / 2;
        float r = rotations[index];
        float w_ = w > h ? w : h;
        float h_ = w > h ? h : w;
        r = (float)((w > h ? r : (float)(r + Math.PI / 2)) % Math.PI);
        RotatedRect rotate = new RotatedRect(new Point2f(x, y), new Size2f(w_, h_), (float)(r * 180.0 / Math.PI));
        rotated_rects.Add(rotate);
    }
    for (int i = 0; i < indexes.Length; i++)
    {
        int index = indexes[i];
        Point2f[] points = rotated_rects[i].Points();
        for (int j = 0; j < 4; j++)
        {
            Cv2.Line(image, (Point)points[j], (Point)points[(j + 1) % 4], new Scalar(255, 100, 200), 2);
        }
        Cv2.PutText(image, class_lables[class_ids[index]] + "-" + confidences[index].ToString("0.00"),
            (Point)points[0], HersheyFonts.HersheySimplex, 0.8, new Scalar(0, 0, 0), 2);
    }
    string output_path = Path.Combine(Path.GetDirectoryName(Path.GetFullPath(image_path)),
        Path.GetFileNameWithoutExtension(image_path) + "_result.jpg");
    Cv2.ImWrite(output_path, image);
    Slog.INFO("The result save to " + output_path);
    Cv2.ImShow("Result", image);
    Cv2.WaitKey(0);
}
Yolov8 Obb模型的一條預測結果輸出為 [x, y, w, h, sorce0, ···, sorce14, angle],其中前19個數據與Yolov8 Det模型的數據處理方式是一致的,主要是多了一個預測框旋轉角度,因此在處理時需要同時記錄旋轉角度這一個數據。
3.4 預測方法調用
定義好上述方法後,便可以直接在主函數中調用該方法,只需要在主函數中增加以下代碼即可:
yolov8_obb("yolov8s-obb.xml", "test_image.png", "AUTO");
如果開發者自己沒有進行模型下載與轉換,又同時想快速體驗該項目,我此處提供了線上的轉換後的模型以及帶預測圖片,開發者可以直接在主函數中增加以下代碼,便可以直接自動下載模型以及推理數據,並調用推理方法,實現程式直接運行。
static void Main(string[] args)
{
    string model_path = "";
    string image_path = "";
    string device = "AUTO";
    if (args.Length == 0)
    {
        if (!Directory.Exists("./model"))
        {
            Directory.CreateDirectory("./model");
        }
        if (!File.Exists("./model/yolov8s-obb.bin") && !File.Exists("./model/yolov8s-obb.bin"))
        {
            if (!File.Exists("./model/yolov8s-obb.tar"))
            {
                _ = Download.download_file_async("https://github.com/guojin-yan/OpenVINO-CSharp-API-Samples/releases/download/Model/yolov8s-obb.tar",
                    "./model/yolov8s-obb.tar").Result;
            }
            Download.unzip("./model/yolov8s-obb.tar", "./model/");
        }
        if (!File.Exists("./model/plane.png"))
        {
            _ = Download.download_file_async("https://github.com/guojin-yan/OpenVINO-CSharp-API-Samples/releases/download/Image/plane.png",
                "./model/plane.png").Result;
        }
        model_path = "./model/yolov8s-obb.xml";
        image_path = "./model/plane.png";
    }
    else if (args.Length >= 2)
    {
        model_path = args[0];
        image_path = args[1];
        device = args[2];
    }
    else
    {
        Console.WriteLine("Please enter the correct command parameters, for example:");
        Console.WriteLine("> 1. dotnet run");
        Console.WriteLine("> 2. dotnet run <model path> <image path> <device name>");
    }
    // -------- Get OpenVINO runtime version --------
    OpenVinoSharp.Version version = Ov.get_openvino_version();
    Slog.INFO("---- OpenVINO INFO----");
    Slog.INFO("Description : " + version.description);
    Slog.INFO("Build number: " + version.buildNumber);

    Slog.INFO("Predict model files: " + model_path);
    Slog.INFO("Predict image  files: " + image_path);
    Slog.INFO("Inference device: " + device);
    Slog.INFO("Start yolov8 model inference.");
    yolov8_obb(model_path, image_path, device);
}
備註:
上述項目中的完整代碼全部放在GitHub上開源,項目鏈接為:
https://github.com/guojin-yan/OpenVINO-CSharp-API-Samples/tree/master/model_samples/yolov8/yolov8_obb_opencvsharp
4. YOLOv8 OBB項目配置(Emgu.CV)
相信有不少開發者在C#中進行圖像處理時,使用的是Emgu.CV工具,因此,在此處我們同時提供了使用 Emgu.CV作為圖像處理工具的YOLOv8 OBB模型部署代碼。項目的創建方式與流程與上一節中一致,此處不再進行演示:
4.1 添加項目依賴
此處以Windows平臺為例安裝項目依賴,首先是安裝OpenVINO™ C# API項目依賴,在命令行中輸入以下指令即可:
dotnet add package OpenVINO.CSharp.API
dotnet add package OpenVINO.runtime.win
dotnet add package OpenVINO.CSharp.API.Extensions
dotnet add package OpenVINO.CSharp.API.Extensions.EmguCV
接下來安裝使用到的圖像處理庫Emgu.CV,在命令行中輸入以下指令即可:
dotnet add package Emgu.CV
dotnet add package Emgu.CV.runtime.windows
添加完成項目依賴後,項目的配置文件如下所示:
<Project Sdk="Microsoft.NET.Sdk">

  <PropertyGroup>
    <OutputType>Exe</OutputType>
    <TargetFramework>net6.0</TargetFramework>
    <ImplicitUsings>enable</ImplicitUsings>
    <Nullable>enable</Nullable>
  </PropertyGroup>

  <ItemGroup>
    <PackageReference Include="Emgu.CV" Version="4.8.1.5350" />
    <PackageReference Include="Emgu.CV.runtime.windows" Version="4.8.1.5350" />
    <PackageReference Include="OpenVINO.CSharp.API" Version="2023.2.0.4" />
    <PackageReference Include="OpenVINO.CSharp.API.Extensions" Version="1.0.1" />
    <PackageReference Include="OpenVINO.CSharp.API.Extensions.EmguCV" Version="1.0.4.1" />
    <PackageReference Include="OpenVINO.runtime.win" Version="2023.3.0.1" />
  </ItemGroup>

</Project>
4.2 定義預測方法
Yolov8 Obb模型部署流程與上一節中的流程一致,主要是替換了圖像處理方式,其實現代碼如下:
static void yolov8_obb(string model_path, string image_path, string device)
{
    // -------- Step 1. Initialize OpenVINO Runtime Core --------
    Core core = new Core();
    // -------- Step 2. Read inference model --------
    OpenVinoSharp.Model model = core.read_model(model_path);
    OvExtensions.printf_model_info(model);
    // -------- Step 3. Loading a model to the device --------
    CompiledModel compiled_model = core.compile_model(model, device);
    // -------- Step 4. Create an infer request --------
    InferRequest infer_request = compiled_model.create_infer_request();
    // -------- Step 5. Process input images --------
    Mat image = new Mat(image_path); // Read image by opencvsharp
    int max_image_length = image.Cols > image.Rows ? image.Cols : image.Rows;
    Mat max_image = Mat.Zeros(max_image_length, max_image_length, DepthType.Cv8U, 3);
    Rectangle roi = new Rectangle(0, 0, image.Cols, image.Rows);
    image.CopyTo(new Mat(max_image, roi));
    float factor = (float)(max_image_length / 1024.0);
    // -------- Step 6. Set up input data --------
    Tensor input_tensor = infer_request.get_input_tensor();
    Shape input_shape = input_tensor.get_shape();
    Mat input_mat = DnnInvoke.BlobFromImage(max_image, 1.0 / 255.0, new Size((int)input_shape[2], (int)input_shape[3]), new MCvScalar(0), true, false);
    float[] input_data = new float[input_shape[1] * input_shape[2] * input_shape[3]];
    //Marshal.Copy(input_mat.Ptr, input_data, 0, input_data.Length);
    input_mat.CopyTo<float>(input_data);
    input_tensor.set_data<float>(input_data);
    // -------- Step 7. Do inference synchronously --------
    infer_request.infer();
    // -------- Step 8. Get infer result data --------
    Tensor output_tensor = infer_request.get_output_tensor();
    int output_length = (int)output_tensor.get_size();
    float[] output_data = output_tensor.get_data<float>(output_length);
    // -------- Step 9. Process reault  --------
    Mat result_data = new Mat(20, 21504, DepthType.Cv32F, 1,
                   Marshal.UnsafeAddrOfPinnedArrayElement(output_data, 0), 4 * 21504);
    result_data = result_data.T();
    List<Rectangle> position_boxes = new List<Rectangle>();
    List<int> class_ids = new List<int>();
    List<float> confidences = new List<float>();
    List<float> rotations = new List<float>();
    // Preprocessing output results
    for (int i = 0; i < result_data.Rows; i++)
    {
        Mat classes_scores = new Mat(result_data, new Rectangle(4, i, 15, 1));//GetArray(i, 5, classes_scores);
        Point max_classId_point = new Point(), min_classId_point = new Point();
        double max_score = 0, min_score = 0;
        CvInvoke.MinMaxLoc(classes_scores, ref min_score, ref max_score,
            ref min_classId_point, ref max_classId_point);
        if (max_score > 0.25)
        {
            Mat mat = new Mat(result_data, new Rectangle(0, i, 20, 1));
            float[,] data = (float[,])mat.GetData();
            float cx = data[0, 0];
            float cy = data[0, 1];
            float ow = data[0, 2];
            float oh = data[0, 3];
            int x = (int)((cx - 0.5 * ow) * factor);
            int y = (int)((cy - 0.5 * oh) * factor);
            int width = (int)(ow * factor);
            int height = (int)(oh * factor);
            Rectangle box = new Rectangle();
            box.X = x;
            box.Y = y;
            box.Width = width;
            box.Height = height;

            position_boxes.Add(box);
            class_ids.Add(max_classId_point.X);
            confidences.Add((float)max_score);
            rotations.Add(data[0, 19]);
        }
    }

    // NMS non maximum suppression
    int[] indexes = DnnInvoke.NMSBoxes(position_boxes.ToArray(), confidences.ToArray(), 0.5f, 0.5f);

    List<RotatedRect> rotated_rects = new List<RotatedRect>();
    for (int i = 0; i < indexes.Length; i++)
    {
        int index = indexes[i];

        float w = (float)position_boxes[index].Width;
        float h = (float)position_boxes[index].Height;
        float x = (float)position_boxes[index].X + w / 2;
        float y = (float)position_boxes[index].Y + h / 2;
        float r = rotations[index];
        float w_ = w > h ? w : h;
        float h_ = w > h ? h : w;
        r = (float)((w > h ? r : (float)(r + Math.PI / 2)) % Math.PI);
        RotatedRect rotate = new RotatedRect(new PointF(x, y), new SizeF(w_, h_), (float)(r * 180.0 / Math.PI));
        rotated_rects.Add(rotate);
    }
    for (int i = 0; i < indexes.Length; i++)
    {
        int index = indexes[i];

        PointF[] points = rotated_rects[i].GetVertices();
        for (int j = 0; j < 4; j++)
        {
            CvInvoke.Line(image, new Point((int)points[j].X, (int)points[j].Y),
                new Point((int)points[(j + 1) % 4].X, (int)points[(j + 1) % 4].Y), new MCvScalar(255, 100, 200), 2);
        }
        CvInvoke.PutText(image, class_lables[class_ids[index]] + "-" + confidences[index].ToString("0.00"),
            new Point((int)points[0].X, (int)points[0].Y), FontFace.HersheySimplex, 0.8, new MCvScalar(0, 0, 0), 2);
    }
    string output_path = Path.Combine(Path.GetDirectoryName(Path.GetFullPath(image_path)),
        Path.GetFileNameWithoutExtension(image_path) + "_result.jpg");
    CvInvoke.Imwrite(output_path, image);
    Slog.INFO("The result save to " + output_path);
    CvInvoke.Imshow("Result", image);
    CvInvoke.WaitKey(0);
}
備註:
上述項目中的完整代碼全部放在GitHub上開源,項目鏈接為:
https://github.com/guojin-yan/OpenVINO-CSharp-API-Samples/tree/master/model_samples/yolov8/yolov8_obb_emgucv
5. 項目編譯與運行
5.1 項目文件編譯
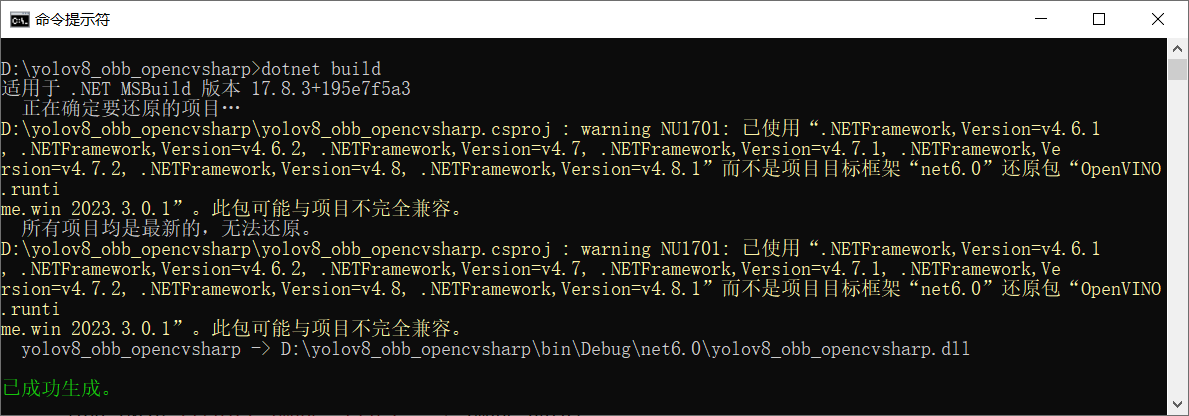
接下來輸入項目編譯指令進行項目編譯,輸入以下指令即可:
dotnet build
程式編譯後輸出為:
5.2 項目文件運行
接下來運行編譯後的程式文件,在CMD中輸入以下指令,運行編譯後的項目文件:
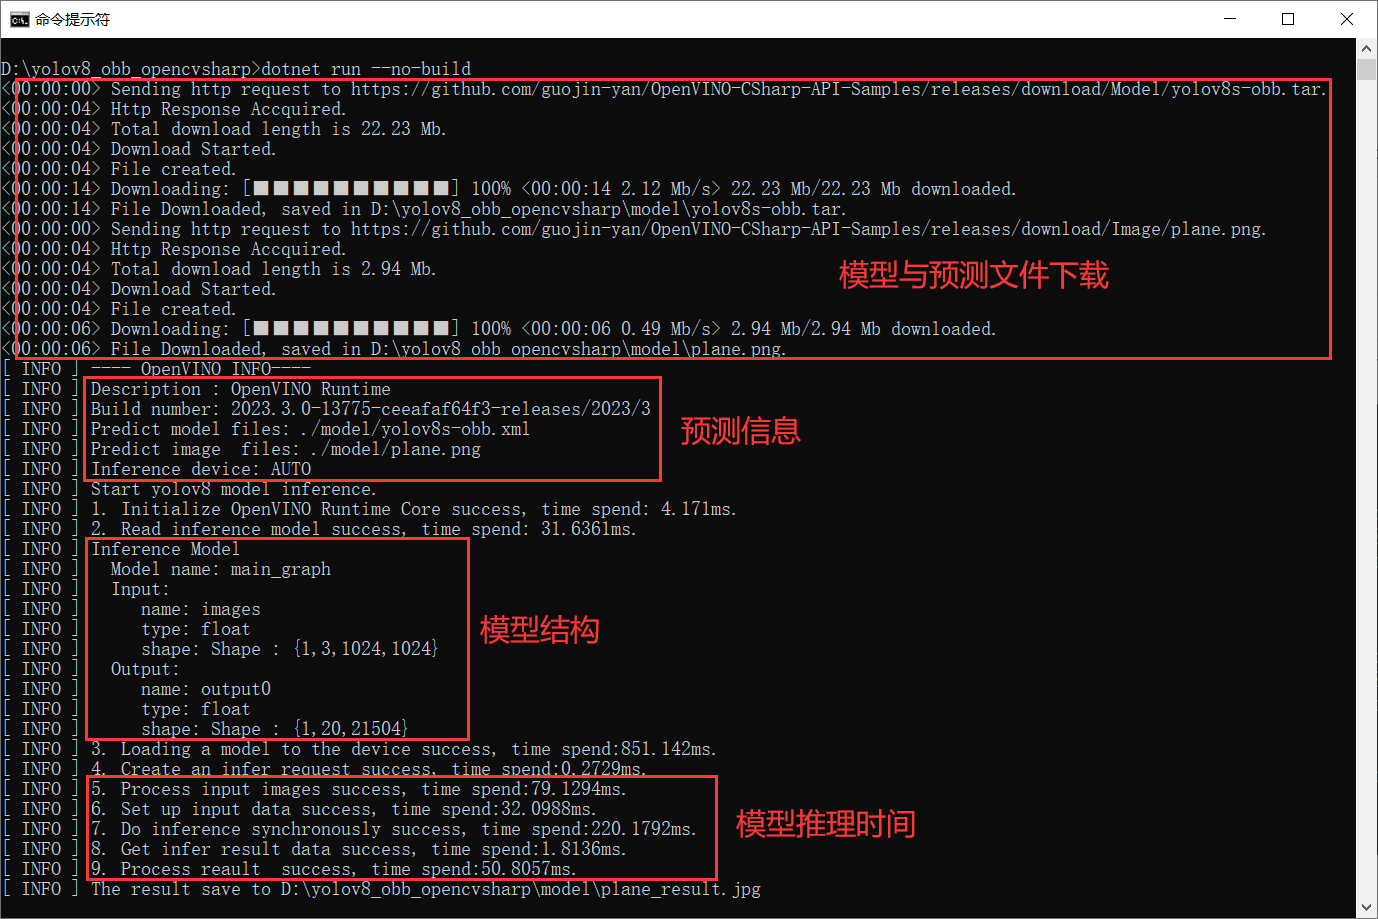
dotnet run --no-build
運行後項目輸出為:
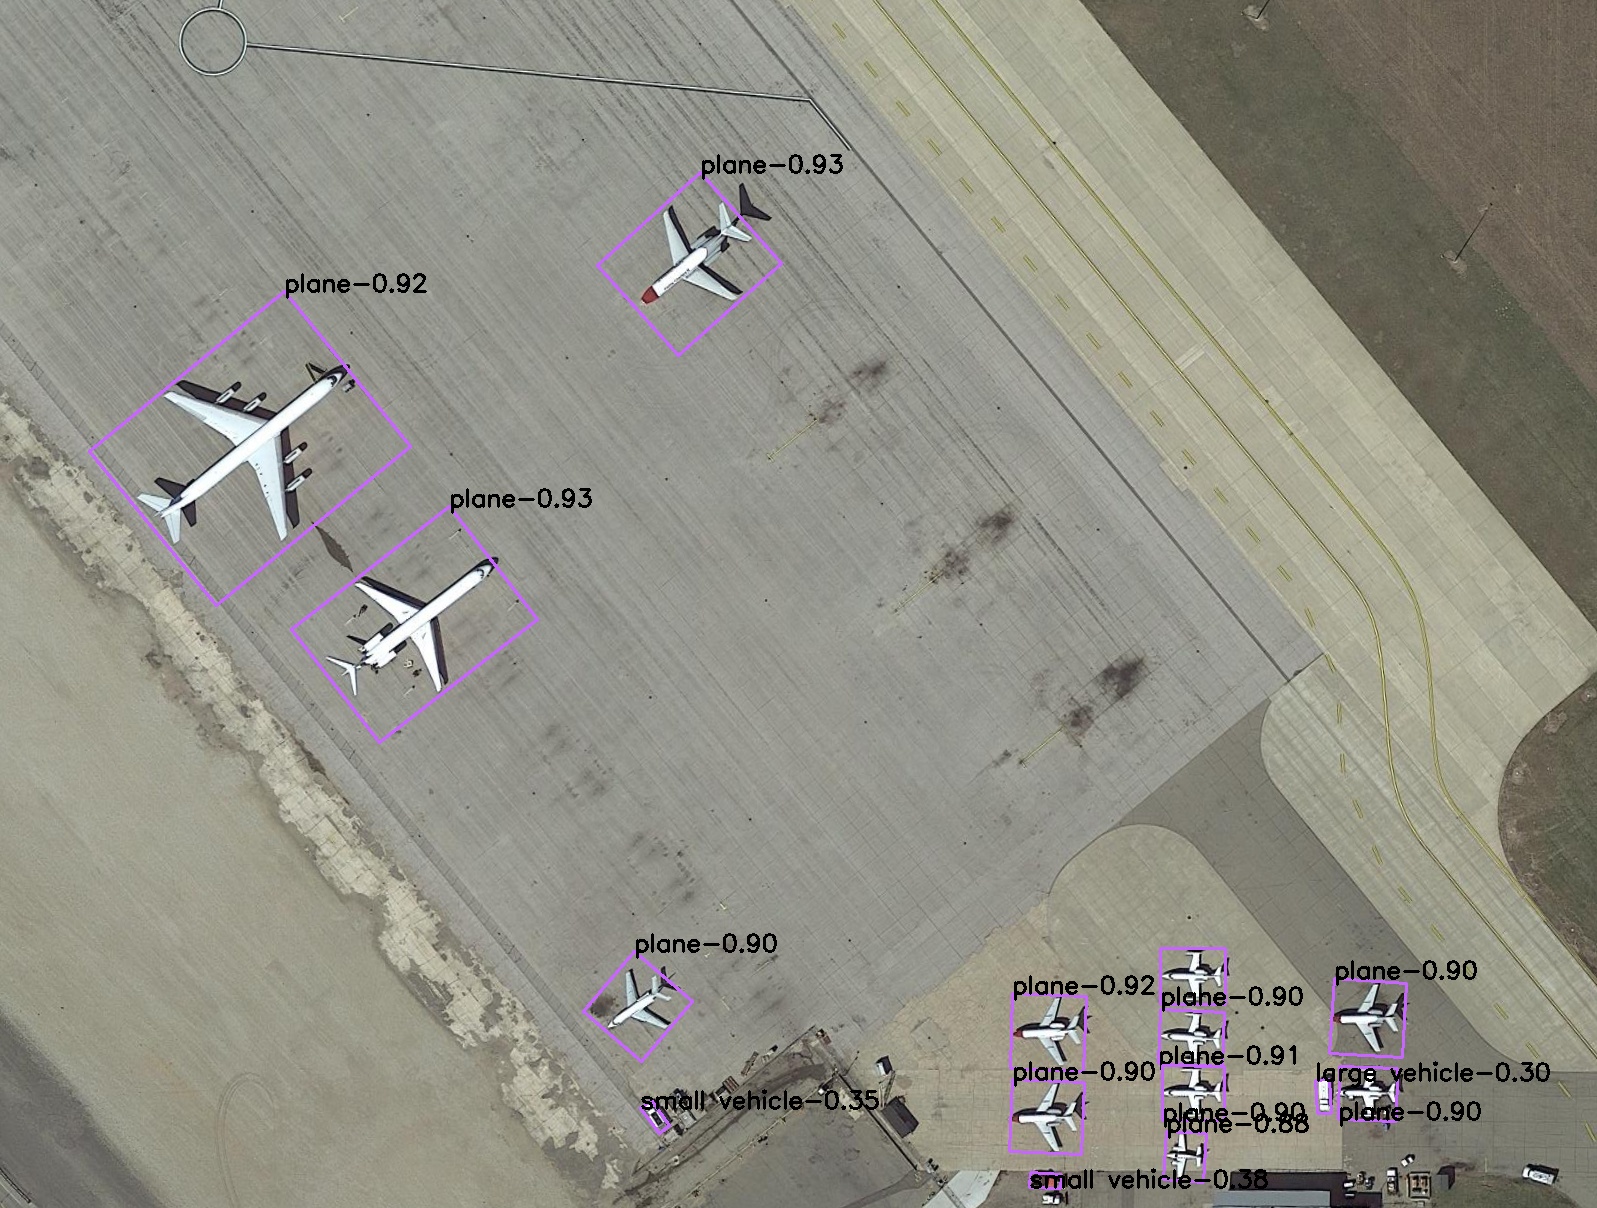
6. 總結
在該項目中,我們結合之前開發的 OpenVINO™ C# API 項目部署YOLOv8 OBB 模型,成功實現了旋轉對象目標檢測,並且根據不同開發者的使用習慣,同時提供了OpenCvSharp以及Emgu.CV兩種版本,供各位開發者使用。最後如果各位開發者在使用中有任何問題,歡迎大家與我聯繫。


