1、認識SpringMVC 1、什麼是MVC MVC是一種軟體架構的思想,將軟體按照模型、視圖、控制器來劃分 M:Model,模型層,指工程中的JavaBean,作用是處理數據 JavaBean分為兩類: 一類稱為實體類Bean:專門存儲業務數據的,如 Student、User 等 一類稱為業務處理 ...
1、認識SpringMVC
1、什麼是MVC
MVC是一種軟體架構的思想,將軟體按照模型、視圖、控制器來劃分
M:Model,模型層,指工程中的JavaBean,作用是處理數據
JavaBean分為兩類:
- 一類稱為實體類Bean:專門存儲業務數據的,如 Student、User 等
- 一類稱為業務處理 Bean:指 Service 或 Dao 對象,專門用於處理業務邏輯和數據訪問。
V:View,視圖層,指工程中的html或jsp等頁面,作用是與用戶進行交互,展示數據
C:Controller,控制層,指工程中的servlet,作用是接收請求和響應瀏覽器
MVC的工作流程:
用戶通過視圖層發送請求到伺服器,在伺服器中請求被Controller接收,Controller調用相應的Model層處理請求,處理完畢將結果返回到Controller,Controller再根據請求處理的結果找到相應的View視圖,渲染數據後最終響應給瀏覽器
2、什麼是SpringMVC
SpringMVC是Spring的一個後續產品,是Spring的一個子項目
SpringMVC 是 Spring 為表述層開發提供的一整套完備的解決方案。在表述層框架歷經 Strust、WebWork、Strust2 等諸多產品的歷代更迭之後,目前業界普遍選擇了 SpringMVC 作為 Java EE 項目表述層開發的首選方案。
註:三層架構分為表述層(或表示層)、業務邏輯層、數據訪問層,表述層表示前臺頁面和後臺servlet
2、HelloSpringMVC
1、快速入門
導入依賴
<dependency>
	<groupId>org.springframework</groupId>
	<artifactId>spring-webmvc</artifactId>
	<version>5.3.21</version>
</dependency>
<dependency>
	<groupId>javax.servlet</groupId>
	<artifactId>servlet-api</artifactId>
	<version>2.3</version>
</dependency>
添加web框架
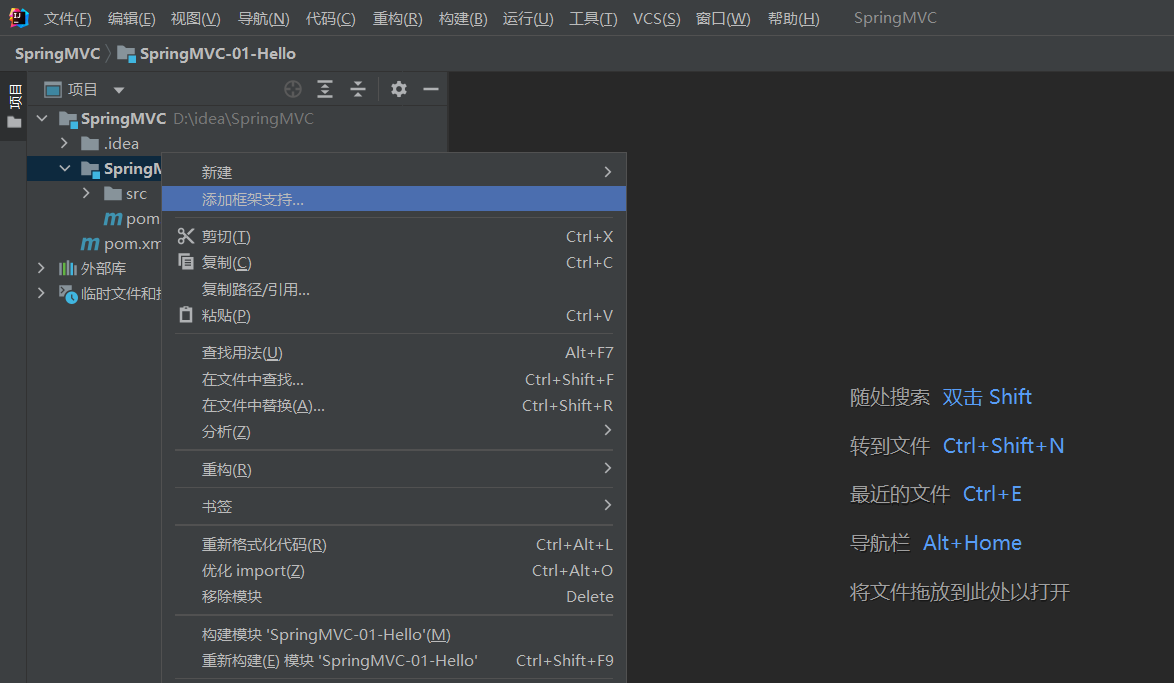
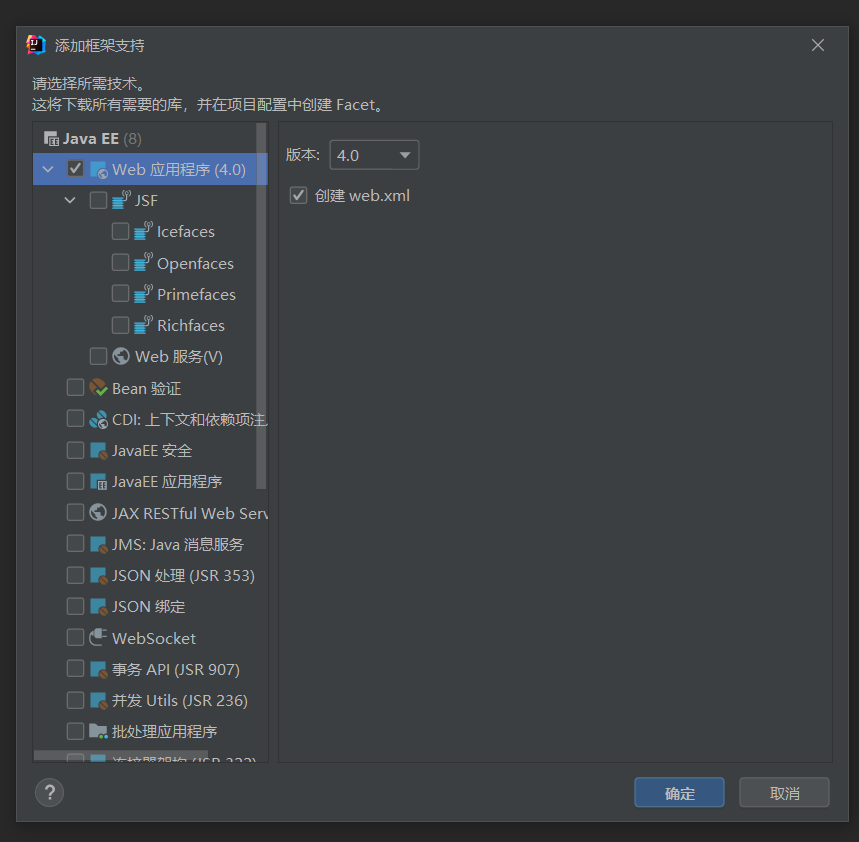
在web.xml中配置servlet
<?xml version="1.0" encoding="UTF-8"?>
<web-app xmlns="http://xmlns.jcp.org/xml/ns/javaee"
         xmlns:xsi="http://www.w3.org/2001/XMLSchema-instance"
         xsi:schemaLocation="http://xmlns.jcp.org/xml/ns/javaee http://xmlns.jcp.org/xml/ns/javaee/web-app_4_0.xsd"
         version="4.0">
    <servlet>
	    <servlet-name>dispatcherServlet</servlet-name>
        <servlet-class>org.springframework.web.servlet.DispatcherServlet</servlet-class>
        <init-param>
	        <param-name>contextConfigLocation</param-name>
            <param-value>classpath:SpringMVC.xml</param-value>
        </init-param>
        <load-on-startup>1</load-on-startup>
    </servlet>
    <servlet-mapping>
	    <servlet-name>dispatcherServlet</servlet-name>
        <!--配置 / 則不能匹配jsp靜態資源的請求-->
        <!--配置 /* 匹配所有請求-->
        <!--此配置覆蓋了tomcat中的預設servlet,但是jsp文件有別的servlet匹配-->
        <url-pattern>/</url-pattern>
    </servlet-mapping>
</web-app>
關於<url-pattern>為什麼要設置成/
tomcat提供的兩個Servlet
1、DefaultServlet
DefaultServlet為預設的Servlet,當客戶端請求不能匹配其他所有Servlet時,將由DefaultServlet處理。它配置的url-pattern為/。
DefaultServlet主要用於處理靜態資源,如HTML、圖片、CSS、JS文件等,而且為了提升伺服器性能,Tomcat對訪問文件進行緩存。按照預設配置,客戶端請求路徑與資源的物理路徑是一致的。
如果我們希望Web應用覆蓋Tomcat的DefaultServlet配置,只需將“ / ”添加到自定義Servlet的url-pattern中即可(此時,自定義Servlet將成為Web應用的預設的Servlet)。
2、JspServlet
預設情況下,JspServlet的url-pattern為.jsp和.jspx,因此他負責處理所有JSP文件的請求。
JspServlet主要做了這些事情:
根據JSP文件生成對應Servlet的Java代碼(JSP文件生成類的父類為org.apache.jasper.runtime.HttpJspBase——實現了Servlet介面)。
將Java代碼編譯為Java Class。Tomcat支持Ant和JDT(Eclipse提供的編譯器)兩種編譯JSP類,預設採用JDT。
構造Servlet類實例並且執行請求
DispatcherServlet的配置/和/*的區別
如果把DispatcherServlet的url-pattern配置成/*,那麼它會覆蓋掉jsp servlet,所有的jsp請求最交給DispatchServlet處理,如果Controller中沒有配置相關處理方法那麼會無法處理。事實上沒有必要越俎代庖的處理.jsp請求,完全可以交給Tomcat容器處理jsp請求,因此DispatchServlet要配置成/。
配置SpringMVC配置文件
<?xml version="1.0" encoding="UTF-8"?>
<beans xmlns="http://www.springframework.org/schema/beans"
       xmlns:xsi="http://www.w3.org/2001/XMLSchema-instance"
       xmlns:context="http://www.springframework.org/schema/context"
       xmlns:mvc="http://www.springframework.org/schema/mvc"
       xsi:schemaLocation="http://www.springframework.org/schema/beans http://www.springframework.org/schema/beans/spring-beans.xsd http://www.springframework.org/schema/context https://www.springframework.org/schema/context/spring-context.xsd http://www.springframework.org/schema/mvc https://www.springframework.org/schema/mvc/spring-mvc.xsd">

    <!--組件掃描-->
    <context:component-scan base-package="com.zh.controller"/>

    <!-- <mvc:annotation-driven /> 會自動註冊DefaultAnnotationHandlerMapping與AnnotationMethodHandlerAdapter 兩個bean,
    是spring MVC為@Controllers分發請求所必須的。它提供了數據綁定支持,讀取json的支持 -->
    <mvc:annotation-driven/>

    <!--訪問靜態資源時使用預設的處理器處理,若不配置,則所有請求都當做正常請求處理,會添加視圖解析器的前尾碼,則會找不到資源-->
    <mvc:default-servlet-handler/>
    <!-- 配置jsp視圖解析器 -->
    <bean class="org.springframework.web.servlet.view.InternalResourceViewResolver" id="jspViewResolver">
        <property name="prefix" value="/WEB-INF/jsp/"/>
        <property name="suffix" value=".jsp"/>
    </bean>
</beans>
控制器
@Controller
public class HelloController {

    @RequestMapping("/hello")
    public String Hello(){
        return "hello";
    }
}

環境搭建成功
總結:
瀏覽器發送請求,若請求地址符合前端控制器的url-pattern,該請求就會被前端控制器DispatcherServlet處理。前端控制器會讀取SpringMVC的核心配置文件,通過掃描組件找到控制器,將請求地址和控制器中@RequestMapping註解的value屬性值進行匹配,若匹配成功,該註解所標識的控制器方法就是處理請求的方法。處理請求的方法需要返回一個字元串類型的視圖名稱,該視圖名稱會被視圖解析器解析,加上首碼和尾碼組成視圖的路徑,通過Thymeleaf對視圖進行渲染,最終轉發到視圖所對應頁面
3、@RequestMapping註解
1、@RequestMapping註解的功能
從註解名稱上我們可以看到,@RequestMapping註解的作用就是將請求和處理請求的控制器方法關聯起來,建立映射關係。
SpringMVC 接收到指定的請求,就會來找到在映射關係中對應的控制器方法來處理這個請求。
2、@RequestMapping註解的位置
@RequestMapping標識一個類:設置映射請求的請求路徑的初始信息
@RequestMapping標識一個方法:設置映射請求請求路徑的具體信息
@Controller
@RequestMapping("/test")
public class RequestMappingController {

	//此時請求映射所映射的請求的請求路徑為:/test/testRequestMapping
    @RequestMapping("/testRequestMapping")
    public String testRequestMapping(){
        return "success";
    }

}
3、@RequestMapping註解的value屬性
@RequestMapping註解的value屬性通過請求的請求地址匹配請求映射
@RequestMapping註解的value屬性是一個字元串類型的數組,表示該請求映射能夠匹配多個請求地址所對應的請求
@RequestMapping註解的value屬性必須設置,至少通過請求地址匹配請求映射
@Controller
public class Test {

    @RequestMapping(value = {"/test01","/test02"})
    public String test01(){
        return "test";
    }
}
4、@RequestMapping註解的method屬性
@RequestMapping註解的method屬性通過請求的請求方式(get或post)匹配請求映射
@RequestMapping註解的method屬性是一個RequestMethod類型的數組,表示該請求映射能夠匹配多種請求方式的請求
若當前請求的請求地址滿足請求映射的value屬性,但是請求方式不滿足method屬性,則瀏覽器報錯405:Request method 'POST' not supported
@RequestMapping(
        value = {"/testRequestMapping", "/test"},
        method = {RequestMethod.GET, RequestMethod.POST}
)
public String testRequestMapping(){
    return "success";
}
註:
1、對於處理指定請求方式的控制器方法,SpringMVC中提供了@RequestMapping的派生註解
處理get請求的映射-->@GetMapping
處理post請求的映射-->@PostMapping
處理put請求的映射-->@PutMapping
處理delete請求的映射-->@DeleteMapping
2、常用的請求方式有get,post,put,delete
但是目前瀏覽器只支持get和post,若在form表單提交時,為method設置了其他請求方式的字元串(put或delete),則按照預設的請求方式get處理
若要發送put和delete請求,則需要通過spring提供的過濾器HiddenHttpMethodFilter,在RESTful部分會講到
5、@RequestMapping註解的params屬性(瞭解)
@RequestMapping註解的params屬性通過請求的請求參數匹配請求映射
@RequestMapping註解的params屬性是一個字元串類型的數組,可以通過四種表達式設置請求參數和請求映射的匹配關係
"param":要求請求映射所匹配的請求必須攜帶param請求參數
"!param":要求請求映射所匹配的請求必須不能攜帶param請求參數
"param=value":要求請求映射所匹配的請求必須攜帶param請求參數且param=value
"param!=value":要求請求映射所匹配的請求必須攜帶param請求參數但是param!=value
註:
若當前請求滿足@RequestMapping註解的value和method屬性,但是不滿足params屬性,此時頁面回報錯400:Parameter conditions "username, password!=123456" not met for actual request parameters: username={admin}, password={123456}
6、@RequestMapping註解的headers屬性(瞭解)
@RequestMapping註解的headers屬性通過請求的請求頭信息匹配請求映射
@RequestMapping註解的headers屬性是一個字元串類型的數組,可以通過四種表達式設置請求頭信息和請求映射的匹配關係
"header":要求請求映射所匹配的請求必須攜帶header請求頭信息
"!header":要求請求映射所匹配的請求必須不能攜帶header請求頭信息
"header=value":要求請求映射所匹配的請求必須攜帶header請求頭信息且header=value
"header!=value":要求請求映射所匹配的請求必須攜帶header請求頭信息且header!=value
若當前請求滿足@RequestMapping註解的value和method屬性,但是不滿足headers屬性,此時頁面顯示404錯誤,即資源未找到
7、SpringMVC支持ant風格的路徑
?:表示任意的單個字元
*:表示任意的0個或多個字元
**:表示任意的一層或多層目錄
註意:在使用**時,只能使用/**/xxx的方式
8、SpringMVC支持路徑中的占位符(重點)
原始方式:/deleteUser?id=1
rest方式:/deleteUser/1
SpringMVC路徑中的占位符常用於RESTful風格中,當請求路徑中將某些數據通過路徑的方式傳輸到伺服器中,就可以在相應的@RequestMapping註解的value屬性中通過占位符{xxx}表示傳輸的數據,在通過@PathVariable註解,將占位符所表示的數據賦值給控制器方法的形參
4、SpringMVC獲取請求參數
1、通過ServletAPI獲取
將HttpServletRequest作為控制器方法的形參,此時HttpServletRequest類型的參數表示封裝了當前請求的請求報文的對象
//1、通過ServletAPI獲取
@RequestMapping("/test01")
public String test01(HttpServletRequest request){
    String name = request.getParameter("name");
    String id = request.getParameter("id");

    System.out.println("=====test01=====");
    System.out.println(name);
    System.out.println(id);

    return "test";
}
2、通過控制器方法的形參獲取請求參數
在控制器方法的形參位置,設置和請求參數同名的形參,當瀏覽器發送請求,匹配到請求映射時,在DispatcherServlet中就會將請求參數賦值給相應的形參
//2、通過請求參數名字
@RequestMapping("/test02")
public String test02(String name,String id){

    System.out.println("=====test02=====");
    System.out.println(name);
    System.out.println(id);

    return "test";
}
註:
若請求所傳輸的請求參數中有多個同名的請求參數,此時可以在控制器方法的形參中設置字元串數組或者字元串類型的形參接收此請求參數
若使用字元串數組類型的形參,此參數的數組中包含了每一個數據
若使用字元串類型的形參,此參數的值為每個數據中間使用逗號拼接的結果
作用:獲取前端多選框數據
3、@RequestParam
@RequestParam是將請求參數和控制器方法的形參創建映射關係
@RequestParam註解一共有三個屬性:
value:指定為形參賦值的請求參數的參數名
required:設置是否必須傳輸此請求參數,預設值為true
若設置為true時,則當前請求必須傳輸value所指定的請求參數,若沒有傳輸該請求參數,且沒有設置defaultValue屬性,則頁面報錯400:Required String parameter 'xxx' is not present;若設置為false,則當前請求不是必須傳輸value所指定的請求參數,若沒有傳輸,則註解所標識的形參的值為null
defaultValue:不管required屬性值為true或false,當value所指定的請求參數沒有傳輸或傳輸的值為""時,則使用預設值為形參賦值
//3、當前端參數名和方法形參名字不一樣時通過@RequestParam獲取
@RequestMapping("/test03")
public String test03(@RequestParam("name") String username, String id){

    System.out.println("=====test03=====");
    System.out.println(username);
    System.out.println(id);

    return "test";
}
4、@RequestHeader
@RequestHeader是將請求頭信息和控制器方法的形參創建映射關係
@RequestHeader註解一共有三個屬性:value、required、defaultValue,用法同@RequestParam
//4、獲取請求頭
@RequestMapping("/test04")
public String test04(@RequestHeader("host") String host){

    System.out.println("=====test04=====");
    System.out.println(host);

    return "test";
}
5、@CookieValue
@CookieValue是將cookie數據和控制器方法的形參創建映射關係
@CookieValue註解一共有三個屬性:value、required、defaultValue,用法同@RequestParam
//5、獲取cookie參數
@RequestMapping("/test05")
public String test05(@CookieValue("JSESSIONID") String session){

    System.out.println("=====test05=====");
    System.out.println(session);

    return "test";
}
6、通過POJO獲取請求參數
可以在控制器方法的形參位置設置一個實體類類型的形參,此時若瀏覽器傳輸的請求參數的參數名和實體類中的屬性名一致,那麼請求參數就會為此屬性賦值
<form action="/SpringMVC_03_Parameter/pojo" method="post">
  用戶名:<input type="text" name="username"><br>
  密碼:<input type="password" name="password"><br>
  性別:<input type="radio" name="sex" value="男">男
  <input type="radio" name="sex" value="女">女<br>
  年齡:<input type="text" name="age"><br>
  <input type="submit">
</form>
public class User {
    private String username;
    private String password;
    private String sex;
    private String age;

    public User() {
    }
    ......
//6、獲取屬性自動封裝到類中
@RequestMapping("/pojo")
public String test06(User user){

    System.out.println("=====pojo=====");
    System.out.println(user);

    return "test";
}

User{username='張三', password='123321', sex='男', age='11'}
7、解決獲取請求參數的亂碼問題
配置過濾器
<!--配置springMVC的編碼過濾器-->
<filter>
    <filter-name>CharacterEncodingFilter</filter-name>
    <filter-class>org.springframework.web.filter.CharacterEncodingFilter</filter-class>
    <init-param>
	    <param-name>encoding</param-name>
        <param-value>UTF-8</param-value>
    </init-param>
</filter>

<filter-mapping>
    <filter-name>CharacterEncodingFilter</filter-name>
    <!--這裡設置成/*-->
    <url-pattern>/*</url-pattern>
</filter-mapping>
註:
SpringMVC中處理編碼的過濾器一定要配置到其他過濾器之前,否則無效
5、域對象共用數據
1、使用ServletAPI向request域對象共用數據
@RequestMapping("/testServletAPI")
public String testServletAPI(HttpServletRequest request){
    request.setAttribute("testScope", "hello,servletAPI");
    return "success";
}
2、使用ModelAndView向request域對象共用數據
@RequestMapping("/testModelAndView")
public ModelAndView testModelAndView(){
    /**
     * ModelAndView有Model和View的功能
     * Model主要用於向請求域共用數據
     * View主要用於設置視圖,實現頁面跳轉
     */
    ModelAndView mav = new ModelAndView();
    //向請求域共用數據
    mav.addObject("testScope", "hello,ModelAndView");
    //設置視圖,實現頁面跳轉
    mav.setViewName("success");
    return mav;
}
3、使用Model向request域對象共用數據
@RequestMapping("/testModel")
public String testModel(Model model){
    model.addAttribute("testScope", "hello,Model");
    return "success";
}
4、使用map向request域對象共用數據
@RequestMapping("/testMap")
public String testMap(Map<String, Object> map){
    map.put("testScope", "hello,Map");
    return "success";
}
5、使用ModelMap向request域對象共用數據
@RequestMapping("/testModelMap")
public String testModelMap(ModelMap modelMap){
    modelMap.addAttribute("testScope", "hello,ModelMap");
    return "success";
}
6、Model、ModelMap、Map的關係
Model、ModelMap、Map類型的參數其實本質上都是 BindingAwareModelMap 類型的
public interface Model{}
public class ModelMap extends LinkedHashMap<String, Object> {}
public class ExtendedModelMap extends ModelMap implements Model {}
public class BindingAwareModelMap extends ExtendedModelMap {}
7、向session域共用數據
@RequestMapping("/testSession")
public String testSession(HttpSession session){
    session.setAttribute("testSessionScope", "hello,session");
    return "success";
}
8、向application域共用數據
@RequestMapping("/testApplication")
public String testApplication(HttpSession session){
	ServletContext application = session.getServletContext();
    application.setAttribute("testApplicationScope", "hello,application");
    return "success";
}
9、回顧四大域對象
【1】ServletContext 域--- application
ServletContext代表整個web應用的對象。
生命周期:web應用被tomcat伺服器載入時,ServletContext對象產生,生命周期開始。
web應用被移除容器或者tomcat伺服器關閉的時候,ServletContext對象銷毀,生命周期結束。
作用範圍:整個web應用。
主要功能:在整個web應用範圍內共用數據。
【2】session 域---session
Session代表整個會話的對象
生命周期:當調用request.getSession()時,Session對象被創建。生命周期開始
調用session.invalidate()方法銷毀Session對象
在設定的時間內,Session對象沒有被使用,則Session對象被銷毀。預設為30分鐘
當伺服器意外關閉的時候,Session對象被銷毀。當伺服器正常關閉的時候,Session對象中仍有數據,會序列化到磁碟上形成一個文件,
這個過程稱之為鈍化。在伺服器再次啟動的時候,這個文件會被重新讀取到伺服器中使用,這個過程稱之為活化。
作用範圍:整個會話範圍
主要功能:在會話範圍內共用數據
【3】request 域---request
Request代表請求的對象
生命周期:請求鏈開始,request對象被創建,請求鏈結束,request對象銷毀。
作用範圍:整個請求鏈
主要功能:在請求鏈內共用數據
【4】pageContext域---pageContext
PageContext代表當前頁面的對象
生命周期:在訪問jsp頁面時,pageContext對象產生,生命周期開始。在結束訪問jsp頁面時,pageContext對象銷毀,生命周期結束。
作用範圍:整個jsp頁面
主要功能:在整個jsp頁面內共用數據
6、HttpMessageConverter
HttpMessageConverter,報文信息轉換器,將請求報文轉換為Java對象,或將Java對象轉換為響應報文
HttpMessageConverter提供了兩個註解和兩個類型:@RequestBody,@ResponseBody,RequestEntity,
ResponseEntity
1、@RequestBody
@RequestBody可以獲取請求體,需要在控制器方法設置一個形參,使用@RequestBody進行標識,當前請求的請求體就會為當前註解所標識的形參賦值
<form action="/SpringMVC_03_Parameter/pojo" method="post">
  用戶名:<input type="text" name="username"><br>
  密碼:<input type="password" name="password"><br>
  性別:<input type="radio" name="sex" value="男">男
  <input type="radio" name="sex" value="女">女<br>
  年齡:<input type="text" name="age"><br>
  <input type="submit">
</form>
public String test06(User user,@RequestBody String body){
    System.out.println("=====pojo=====");

    System.out.println(body);

    System.out.println(user);

	return null;
}
輸出結果:
username=%C3%A5%C2%BC%C2%A0%C3%A4%C2%B8%C2%89&password=111&sex=%C3%A7%C2%94%C2%B7&age=11
User{username='??????', password='111', sex='??·', age='11'}
2、RequestEntity
RequestEntity封裝請求報文的一種類型,需要在控制器方法的形參中設置該類型的形參,當前請求的請求報文就會賦值給該形參,可以通過getHeaders()獲取請求頭信息,通過getBody()獲取請求體信息
@RequestMapping("/testRequestEntity")
public String testRequestEntity(RequestEntity<String> requestEntity){
    System.out.println("requestHeader:"+requestEntity.getHeaders());
    System.out.println("requestBody:"+requestEntity.getBody());
    return "success";
}
輸出結果:
requestHeader:[host:"localhost:8080", connection:"keep-alive", content-length:"27", cache-control:"max-age=0", sec-ch-ua:"" Not A;Brand";v="99", "Chromium";v="90", "Google Chrome";v="90"", sec-ch-ua-mobile:"?0", upgrade-insecure-requests:"1", origin:"http://localhost:8080", user-agent:"Mozilla/5.0 (Windows NT 10.0; Win64; x64) AppleWebKit/537.36 (KHTML, like Gecko) Chrome/90.0.4430.93 Safari/537.36"]
requestBody:username=admin&password=123
3、@ResponseBody
@ResponseBody用於標識一個控制器方法,可以將該方法的返回值直接作為響應報文的響應體響應到瀏覽器
@RequestMapping("/pojo")
@ResponseBody
public String test06(User user){
    System.out.println("=====pojo=====");

    System.out.println(user);

    return user.toString();
}
結果:瀏覽器頁面顯示User{username='å¼ ä¸‰', password='132', sex='ç”·', age='11'}
控制台輸出
pojo
User{username='??????', password='132', sex='??·', age='11'}
4、解決亂碼問題
亂碼問題我認為可以分為兩種
1、獲取前端參數亂碼
解決方法:配置過濾器
<filter>
    <filter-name>CharacterEncodingFilter</filter-name>
    <filter-class>org.springframework.web.filter.CharacterEncodingFilter</filter-class>
    <init-param>
	    <param-name>encoding</param-name>
        <param-value>UTF-8</param-value>
    </init-param></filter>

<filter-mapping>
    <filter-name>CharacterEncodingFilter</filter-name>
    <url-pattern>/*</url-pattern>
</filter-mapping>
過濾所有請求:/*
配置好後,控制台輸出:
pojo
User{username='張三', password='123321', sex='男', age='111'}
2、後端返回數據後前端顯示亂碼
打開前端控制台可以發現響應報文有如下信息:
Content-Type:text/html;charset=ISO-8859-1
這就是導致亂碼的原因
為什麼返回的數據編碼是ISO-8859-1?
在spring處理ResponseBody時涉及到org.springframework.http.converter.StringHttpMessageConverter這個類,該類在預設實現中將defaultCharset設為ISO-8859-1。當@RequestMapping標記的方法未配置produces屬性時,將自動使用預設編碼;如果配置了produces屬性,AbstractHttpMessageConverter中的write方法將不會受supportedMediaTypes影響,而用produce設置的header賦值給contentType。
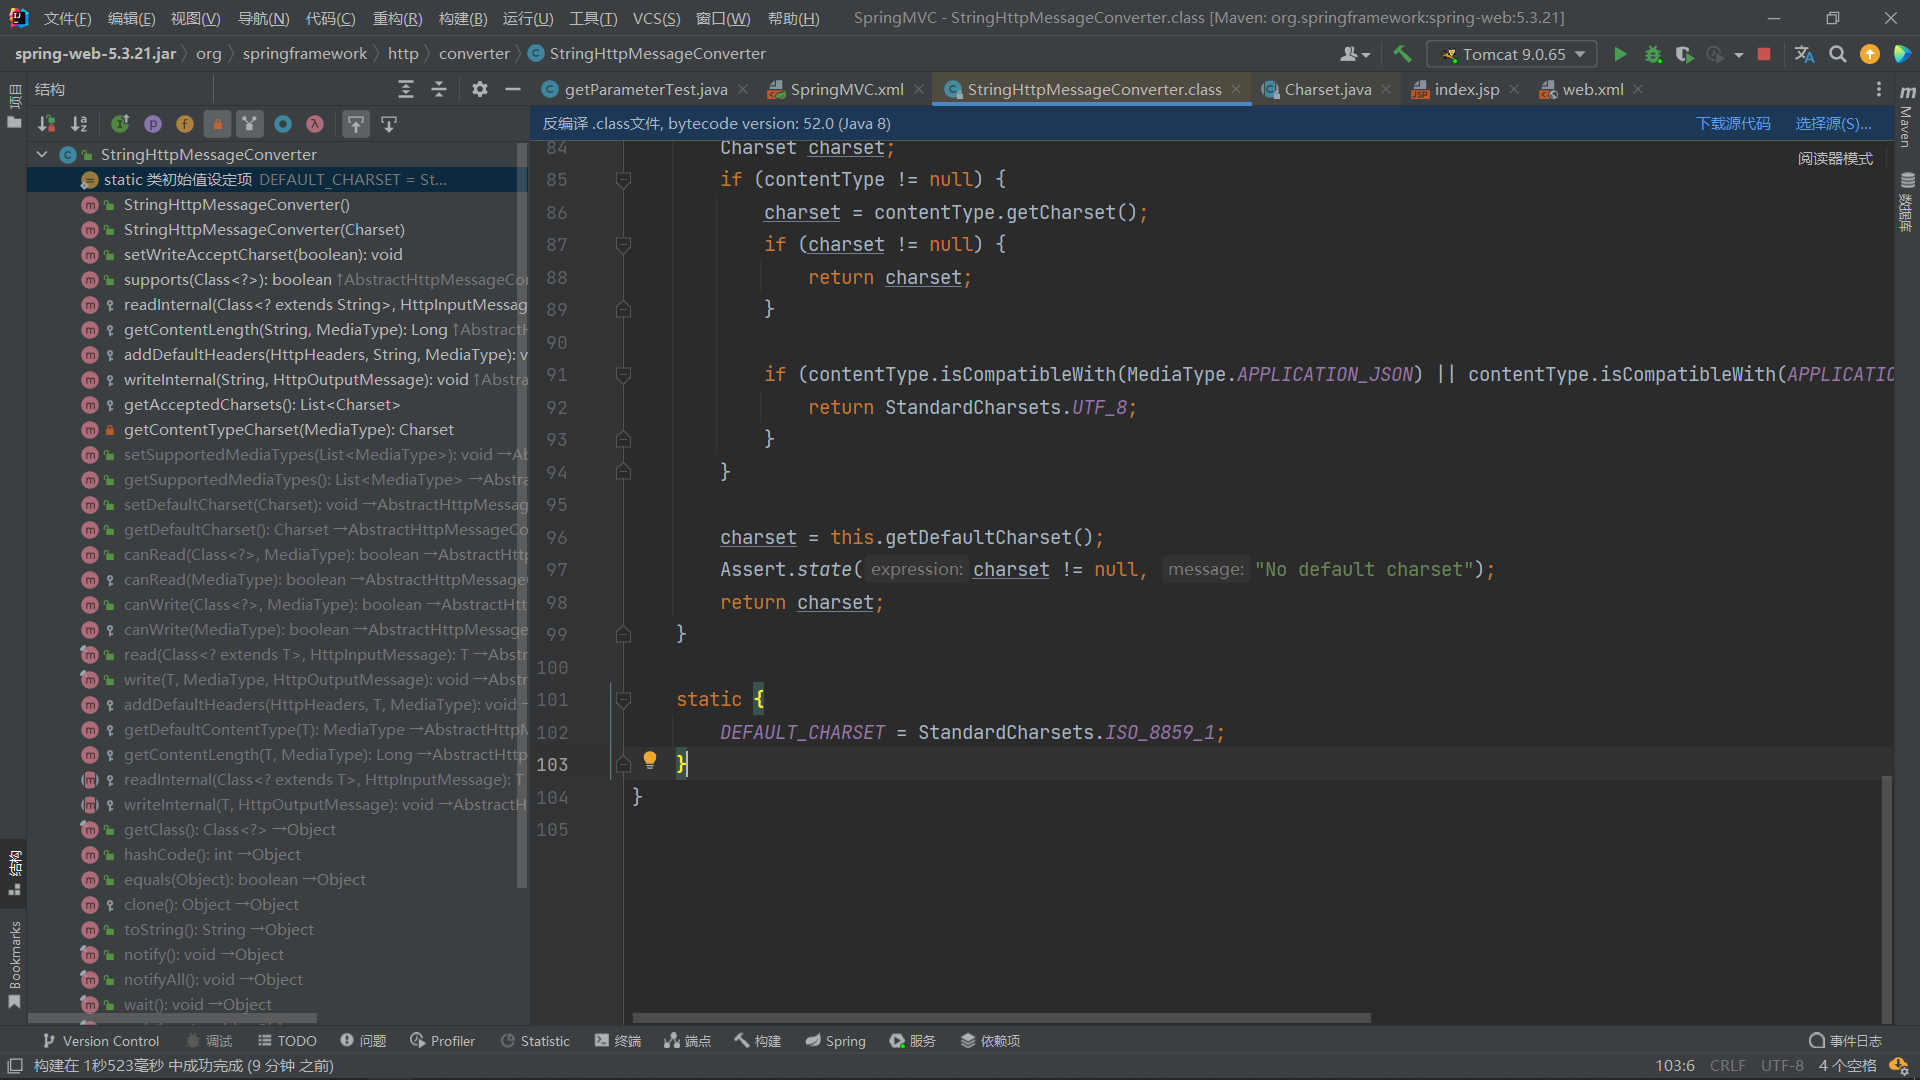
源碼預設為ISO-8859-1
因此,解決方法是:指定給消息轉換器的編碼為utf-8
解決方法:
1、配置@RequestMapping(value = "/pojo",produces = "text/html;charset=UTF-8")
2、配置 HttpMessageConverter
<mvc:annotation-driven>
    <mvc:message-converters>
        <bean class="org.springframework.http.converter.StringHttpMessageConverter">
            <property name="supportedMediaTypes">
                <list>
	                <value>text/html;charset=UTF-8</value>
                </list>
			</property>
		</bean>
	</mvc:message-converters>
</mvc:annotation-driven>
這裡值設置了返回一種媒體類型,可以設置多種,SpringMVC會自動尋找合適的消息轉換器
關於過濾器為什麼無法設置ContentType
@RequestMapping(value = "/rulelist", method = RequestMethod.GET)

@ResponseBody

public String getRuleList(HttpServletRequest request,

        HttpServletResponse response) {

    response.addHeader("test", "test");

    return service.getRuleList();

}
通過驗證,我們可以看到test項已經被成功添加到response的頭部信息
`Content-Length: 2 kilobytes`

`Content-Type:   text/plain;charset=ISO-8859-1`

`Server: Apache-Coyote/1.1`

`test: test`
@RequestMapping(value = "/rulelist", method = RequestMethod.GET)

@ResponseBody

public String getRuleList(HttpServletRequest request,

        HttpServletResponse response) {

    response.addHeader("Content-Type", "application/json;charset=UTF-8");

    return service.getRuleList();

}
沒有設置成功
`Content-Length: 2 kilobytes`

`Content-Type:   text/plain;charset=ISO-8859-1`

`Server: Apache-Coyote/1.1`
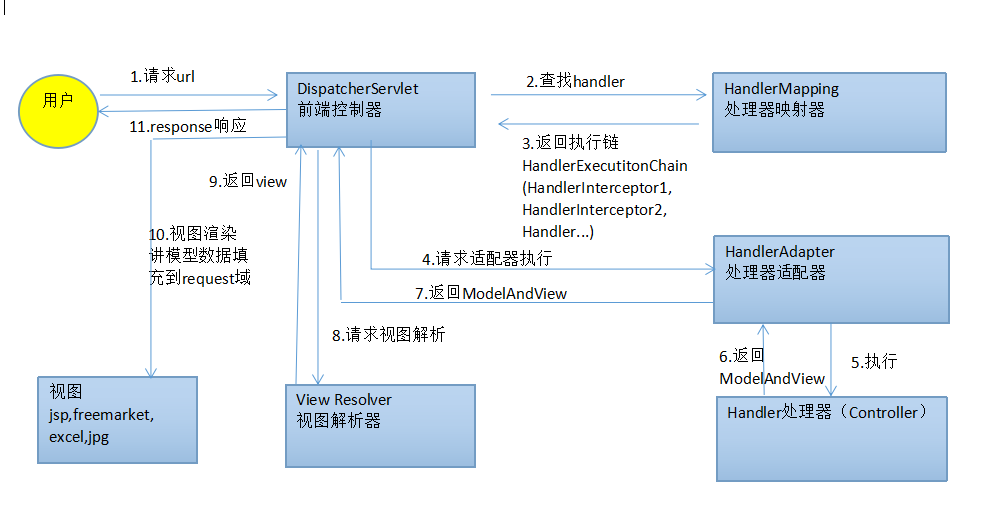
下圖清晰地向大家展示了Spring MVC處理HTTP請求的流程,(圖片來自網路)
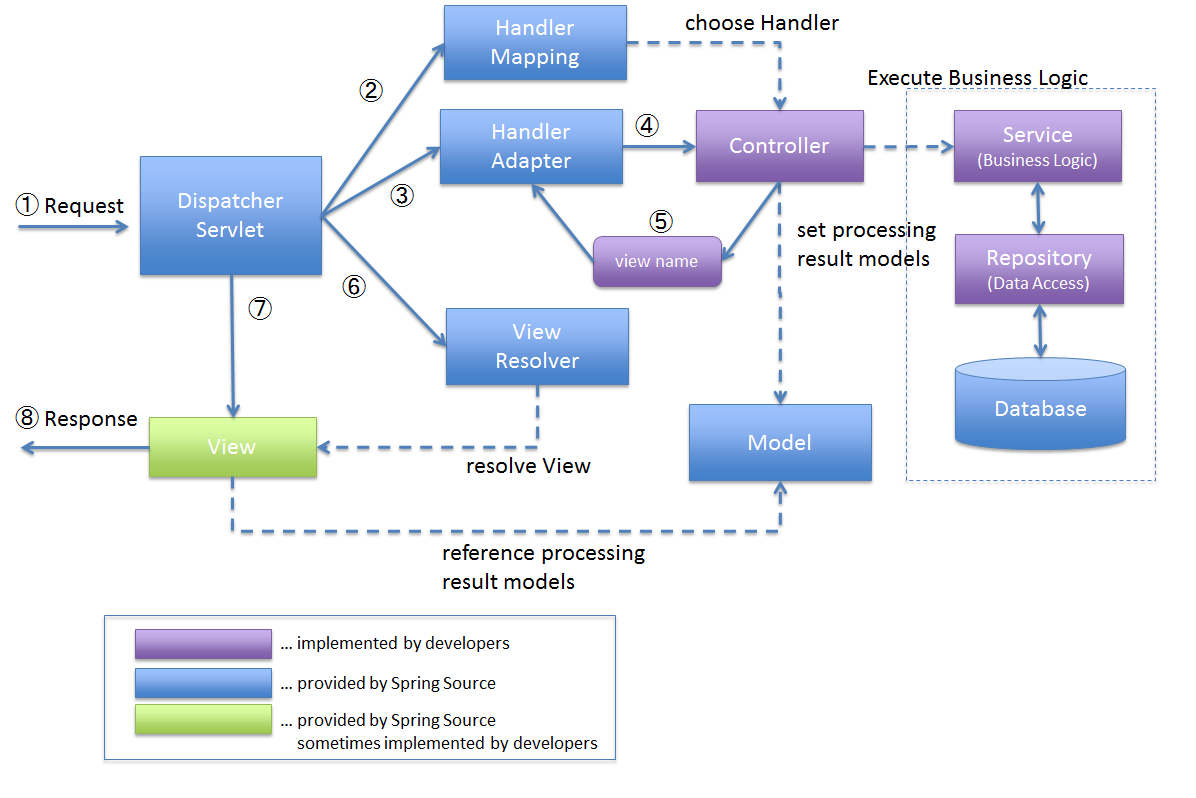
具體流程如下:
1、DispatcherServlet接收到Request請求
2、HandlerMapping選擇一個合適的Handler處理Request請求
3-4、 選擇合適的HandlerAdapter,調用用戶編寫的Controller處理業務邏輯。(HandlerAdapter主要是幫助Spring MVC支持多種類型的Controller)
5、Controller將返回結果放置到Model中並且返回view名稱給Handler Adapter
6、DispatcherServlet選擇合適的ViewResolver來生成View對象
7-8、 View對象利用Model中的數據進行渲染並返回數據
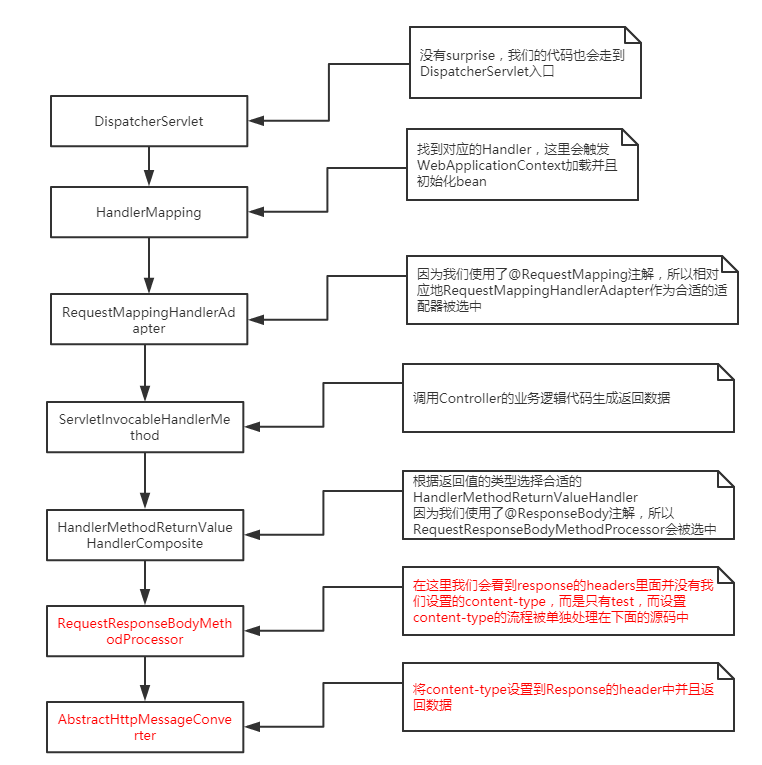
從上面的流程圖我們可以看到,content-type header是單獨被處理的,media-type被單獨的邏輯進行處理,因此直接在ServletResponse中設置content-type header並不能正常生效。
5、SpringMVC處理json
@ResponseBody處理json的步驟:
a>導入jackson的依賴
<dependency>
    <groupId>com.fasterxml.jackson.core</groupId>
    <artifactId>jackson-databind</artifactId>
    <version>2.9.4</version>
</dependency>
b>在SpringMVC的核心配置文件中開啟mvc的註解驅動,此時在HandlerAdaptor中會自動裝配一個消息轉換器:MappingJackson2HttpMessageConverter,可以將響應到瀏覽器的Java對象轉換為Json格式的字元串
<mvc:annotation-driven />
c>在處理器方法上使用@ResponseBody註解進行標識
d>將Java對象直接作為控制器方法的返回值返回,就會自動轉換為Json格式的字元串
@RequestMapping("/pojo")
@ResponseBody
public User test06(User user){
    System.out.println("=====pojo=====");

    System.out.println(user);

    return user;
}
瀏覽器的頁面中展示的結果:
{"username":"張三","password":"123321","sex":"男","age":"11"}
6、@RestController註解
@RestController註解是springMVC提供的一個複合註解,標識在控制器的類上,就相當於為類添加了@Controller註解,並且為其中的每個方法添加了@ResponseBody註解
7、ResponseEntity
ResponseEntity用於控制器方法的返回值類型,該控制器方法的返回值就是響應到瀏覽器的響應報文
7、SpringMVC的視圖
SpringMVC中的視圖是View介面,視圖的作用渲染數據,將模型Model中的數據展示給用戶
SpringMVC視圖的種類很多,預設有轉發視圖和重定向視圖
當工程引入jstl的依賴,轉發視圖會自動轉換為JstlView
若使用的視圖技術為Thymeleaf,在SpringMVC的配置文件中配置了Thymeleaf的視圖解析器,由此視圖解析器解析之後所得到的是ThymeleafView
1、ThymeleafView
當控制器方法中所設置的視圖名稱沒有任何首碼時,此時的視圖名稱會被SpringMVC配置文件中所配置的視圖解析器解析,視圖名稱拼接視圖首碼和視圖尾碼所得到的最終路徑,會通過轉發的方式實現跳轉
@RequestMapping("/testHello")
public String testHello(){
    return "hello";
}
2、轉發視圖
SpringMVC中預設的轉發視圖是InternalResourceView
SpringMVC中創建轉發視圖的情況:
當控制器方法中所設置的視圖名稱以"forward:"為首碼時,創建InternalResourceView視圖,此時的視圖名稱不會被SpringMVC配置文件中所配置的視圖解析器解析,而是會將首碼"forward:"去掉,剩餘部分作為最終路徑通過轉發的方式實現跳轉
例如"forward:/","forward:/employee"
@RequestMapping("/testForward")
public String testForward(){
    return "forward:/testHello";
}
實例
@RequestMapping("/test07")
public String test07(){
    System.out.println("進入Test07");
    return "forward:/test08";
}
@RequestMapping("/test08")
public ModelAndView test08(User user){
    ModelAndView modelAndView = new ModelAndView();

    System.out.println("進入Test08");

    modelAndView.addObject("user",user.toString());

    modelAndView.setViewName("user");

    return modelAndView;

}
3、重定向視圖
SpringMVC中預設的重定向視圖是RedirectView
當控制器方法中所設置的視圖名稱以"redirect:"為首碼時,創建RedirectView視圖,此時的視圖名稱不會被SpringMVC配置文件中所配置的視圖解析器解析,而是會將首碼"redirect:"去掉,剩餘部分作為最終路徑通過重定向的方式實現跳轉
例如"redirect:/","redirect:/employee"
@RequestMapping("/testRedirect")
public String testRedirect(){
    return "redirect:/testHello";
}
註:
重定向視圖在解析時,會先將redirect:首碼去掉,然後會判斷剩餘部分是否以/開頭,若是則會自動拼接上下文路徑
4、視圖控制器view-controller
當控制器方法中,僅僅用來實現頁面跳轉,即只需要設置視圖名稱時,可以將處理器方法使用view-controller標簽進行表示
<!--
	path:設置處理的請求地址
	view-name:設置請求地址所對應的視圖名稱
-->
<mvc:view-controller path="/testView" view-name="success"></mvc:view-controller>
註:
當SpringMVC中設置任何一個view-controller時,其他控制器中的請求映射將全部失效,此時需要在SpringMVC的核心配置文件中設置開啟mvc註解驅動的標簽:
<mvc:annotation-driven />
8、RESTful
1、RESTful簡介
REST:Representational State Transfer,表現層資源狀態轉移。
a>資源
資源是一種看待伺服器的方式,即,將伺服器看作是由很多離散的資源組成。每個資源是伺服器上一個可命名的抽象概念。因為資源是一個抽象的概念,所以它不僅僅能代表伺服器文件系統中的一個文件、資料庫中的一張表等等具體的東西,可以將資源設計的要多抽象有多抽象,只要想象力允許而且客戶端應用開發者能夠理解。與面向對象設計類似,資源是以名詞為核心來組織的,首先關註的是名詞。一個資源可以由一個或多個URI來標識。URI既是資源的名稱,也是資源在Web上的地址。對某個資源感興趣的客戶端應用,可以通過資源的URI與其進行交互。
b>資源的表述
資源的表述是一段對於資源在某個特定時刻的狀態的描述。可以在客戶端-伺服器端之間轉移(交換)。資源的表述可以有多種格式,例如HTML/XML/JSON/純文本/圖片/視頻/音頻等等。資源的表述格式可以通過協商機制來確定。請求-響應方向的表述通常使用不同的格式。
c>狀態轉移
狀態轉移說的是:在客戶端和伺服器端之間轉移(transfer)代表資源狀態的表述。通過轉移和操作資源的表述,來間接實現操作資源的目的。
2、RESTful的實現
具體說,就是 HTTP 協議裡面,四個表示操作方式的動詞:GET、POST、PUT、DELETE。
它們分別對應四種基本操作:GET 用來獲取資源,POST 用來新建資源,PUT 用來更新資源,DELETE 用來刪除資源。
REST 風格提倡 URL 地址使用統一的風格設計,從前到後各個單詞使用斜杠分開,不使用問號鍵值對方式攜帶請求參數,而是將要發送給伺服器的數據作為 URL 地址的一部分,以保證整體風格的一致性。
| 操作 | 傳統方式 | REST風格 |
|---|---|---|
| 查詢操作 | getUserById?id=1 | user/1-->get請求方式 |
| 保存操作 | saveUser | user-->post請求方式 |
| 刪除操作 | deleteUser?id=1 | user/1-->delete請求方式 |
| 更新操作 | updateUser | user-->put請求方式 |
3、HiddenHttpMethodFilter
由於瀏覽器只支持發送get和post方式的請求,那麼該如何發送put和delete請求呢?
SpringMVC 提供了 HiddenHttpMethodFilter 幫助我們將 POST 請求轉換為 DELETE 或 PUT 請求
HiddenHttpMethodFilter 處理put和delete請求的條件:
a>當前請求的請求方式必須為post
b>當前請求必須傳輸請求參數_method
滿足以上條件,HiddenHttpMethodFilter 過濾器就會將當前請求的請求方式轉換為請求參數_method的值,因此請求參數_method的值才是最終的請求方式
在web.xml中註冊HiddenHttpMethodFilter
<filter>
    <filter-name>HiddenHttpMethodFilter</filter-name>
    <filter-class>org.springframework.web.filter.HiddenHttpMethodFilter</filter-class>
</filter>
<filter-mapping>
    <filter-name>HiddenHttpMethodFilter</filter-name>
    <url-pattern>/*</url-pattern>
</filter-mapping>
註:
目前為止,SpringMVC中提供了兩個過濾器:CharacterEncodingFilter和HiddenHttpMethodFilter
在web.xml中註冊時,必須先註冊CharacterEncodingFilter,再註冊HiddenHttpMethodFilter
原因:
在 CharacterEncodingFilter 中通過 request.setCharacterEncoding(encoding) 方法設置字元集的
request.setCharacterEncoding(encoding) 方法要求前面不能有任何獲取請求參數的操作
而 HiddenHttpMethodFilter 恰恰有一個獲取請求方式的操作:
String paramValue = request.getParameter(this.methodParam);
4、RESTful案例
準備工作
配置
<?xml version="1.0" encoding="UTF-8"?>
<beans xmlns="http://www.springframework.org/schema/beans"
       xmlns:xsi="http://www.w3.org/2001/XMLSchema-instance"
       xmlns:mvc="http://www.springframework.org/schema/mvc"
       xmlns:context="http://www.springframework.org/schema/context"
       xsi:schemaLocation="http://www.springframework.org/schema/beans
       http://www.springframework.org/schema/beans/spring-beans.xsd       http://www.springframework.org/schema/mvc       https://www.springframework.org/schema/mvc/spring-mvc.xsd       http://www.springframework.org/schema/context       https://www.springframework.org/schema/context/spring-context.xsd">


    <context:component-scan base-package="com.zh"/>

    <mvc:default-servlet-handler/>

    <bean class="org.springframework.web.servlet.view.InternalResourceViewResolver" id="jspViewResolver">
        <property name="prefix" value="/WEB-INF/jsp/"/>
        <property name="suffix" value=".jsp"/>
    </bean>
    <mvc:annotation-driven>
        <mvc:message-converters>
            <bean class="org.springframework.http.converter.StringHttpMessageConverter">
                <property name="supportedMediaTypes">
                    <list>
	                    <value>application/json;charset=UTF-8</value>
                        <value>text/html;charset=UTF-8</value>
                    </list>
				</property>
			</bean>
		</mvc:message-converters>
    </mvc:annotation-driven>

    <mvc:view-controller path="/" view-name="index"/>

    <mvc:view-controller path="/UserList" view-name="userlist"/>
    <mvc:view-controller path="/addUser" view-name="addUser"/>

</beans>
web.xml
<?xml version="1.0" encoding="UTF-8"?>
<web-app xmlns="http://xmlns.jcp.org/xml/ns/javaee"
         xmlns:xsi="http://www.w3.org/2001/XMLSchema-instance"
         xsi:schemaLocation="http://xmlns.jcp.org/xml/ns/javaee http://xmlns.jcp.org/xml/ns/javaee/web-app_4_0.xsd"
         version="4.0">

    <filter>
	    <filter-name>characterEncodingFilter</filter-name>
        <filter-class>org.springframework.web.filter.CharacterEncodingFilter</filter-class>
        <init-param>
	        <param-name>encoding</param-name>
            <param-value>utf-8</param-value>
        </init-param>
        <init-param>
	        <param-name>forceResponseEncoding</param-name>
            <param-value>true</param-value>
        </init-param>
	</filter>
	<filter-mapping>
		<filter-name>characterEncodingFilter</filter-name>
        <url-pattern>/*</url-pattern>
    </filter-mapping>
    <filter>
	    <filter-name>HiddenHttpMethodFilter</filter-name>
        <filter-class>org.springframework.web.filter.HiddenHttpMethodFilter</filter-class>
    </filter>
    <filter-mapping>
	    <filter-name>HiddenHttpMethodFilter</filter-name>
        <url-pattern>/*</url-pattern>
    </filter-mapping>

    <servlet>
	    <servlet-name>dispatcherServlet</servlet-name>
        <servlet-class>org.springframework.web.servlet.DispatcherServlet</servlet-class>
        <init-param>
	        <param-name>contextConfigLocation</param-name>
            <param-value>classpath:SpringMVC.xml</param-value>
        </init-param>
	</servlet>
	<servlet-mapping>
		<servlet-name>dispatcherServlet</servlet-name>
        <url-pattern>/</url-pattern>
    </servlet-mapping>
</web-app>
User類
package com.zh.pojo;

import java.util.Objects;

public class User {
    private int id;
    private String name;
    private int age;
    //省略set和get....
}
DAO類
package com.zh.userDAO;

import com.zh.pojo.User;

import java.util.ArrayList;
import java.util.List;

public class UserDAO {

    private List<User> userList = new ArrayList<>();

    private int idNum = 4;

    public UserDAO() {
        userList.add(new User(1,"張三",12));
        userList.add(new User(2,"李四",14));
        userList.add(new User(3,"王五",16));
        userList.add(new User(4,"趙六",17));
    }


    //查詢所有用戶
    public List<User> getUserList(){
        return userList;
    }

    //根據用戶id查詢用戶
    public User getUserById(int id){
        for (User user : userList) {
            if (user.getId() == id){
                return user;
            }
        }
        return null;
    }

    //添加用戶
    public boolean addUser(User user){
        idNum++;
        user.setId(idNum);
        return userList.add(user);
    }


    //根據id刪除用戶
    public boolean delUser(int id){
        for (User user : userList) {
            if (user.getId() == id){
                return userList.remove(user);
            }
        }
        return false;
    }

    //根據id修改用戶
    public boolean updateUser(int id,User newUser){
        for (User user : userList) {
            if (user.getId() == id){
                user.setAge(newUser.getAge());
                user.setName(newUser.getName());
                return true;            }
        }
        return false;
    }
}
Controller類
package com.zh.controller;

import com.fasterxml.jackson.core.JsonProcessingException;
import com.fasterxml.jackson.databind.ObjectMapper;
import com.zh.pojo.User;
import com.zh.userDAO.UserDAO;
import org.springframework.stereotype.Controller;
import org.springframework.ui.Model;
import org.springframework.web.bind.annotation.PathVariable;
import org.springframework.web.bind.annotation.RequestMapping;
import org.springframework.web.bind.annotation.RequestMethod;
import org.springframework.web.bind.annotation.ResponseBody;

/**
 * RESRFul風格實例
 */


@Controller
public class Controller01 {

    private UserDAO userDAO = new UserDAO();

    /**
     * 使用RESTFul模擬操作用戶信息
     * /user    get    查詢所有用戶信息
     * /user/1  get    查詢指定用戶信息
     * /user    post    增加用戶信息
     * /user/1  delete 刪除指定用戶信息
     * /user/1  put    修改指定用戶信息
     */

    //查詢所有用戶,返回JSON數組
    @RequestMapping(value = "/user",method = RequestMethod.GET)
    @ResponseBody
    public String getUser() throws JsonProcessingException {

        ObjectMapper objectMapper = new ObjectMapper();
        String userListString = objectMapper.writeValueAsString(userDAO.getUserList());

        return userListString;
    }

    //查詢一個用戶,並將用戶數據綁定到user.jsp頁面上併進行跳轉
    @RequestMapping(value = "/user/{id}",method = RequestMethod.GET)
    public String getUserById(@PathVariable("id") int id, Model model){

        User user = userDAO.getUserById(id);
        model.addAttribute("user",user);

        return "user";
    }

    //增加一個用戶,然後重定向到列表頁面
    @RequestMapping(value = "/user",method = RequestMethod.POST)
    public String addUser(String username,int age){

        userDAO.addUser(new User(username,age));
        return "redirect:/UserList";
    }

    //刪除一個用戶
    @RequestMapping(value = "/user",method = RequestMethod.DELETE)
    public String delUser(int id){
        userDAO.delUser(id);
        return "redirect:/UserList";
    }

    //修改用戶信息
    @RequestMapping(value = "/user",method = RequestMethod.PUT)
    @ResponseBody
    public void updUser(int id,String username,int age){
        userDAO.updateUser(id,new User(username,age));
    }
}
JSP頁面
UserList
<%@ page contentType="text/html;charset=UTF-8" language="java" %>
<html>
<head>
<title>UserList</title>
<script src="https://apps.bdimg.com/libs/jquery/2.1.4/jquery.min.js"></script>
<style type="text/css">
table{
margin-top: 200px;
}
td{
text-align: center;
}
a{
text-decoration: none;
}
</style>
</head>
<body>
<table border="1" cellspacing="0" align="center" width="25%" id="table">
</table> <p align="center">
<input type="button" id="btn1" value="刷新">
<input type="button" id="btn2" value="增加">
</p>
</body>
<script>
function getPath(){
let pathName = document.location.pathname;
let index = pathName.substr(1).indexOf("/");
let result = pathName.substr(0,index+1);
return result;
}
function aDelClick(){
var as = document.getElementsByClassName('del');
for (let i = 0; i < as.length; i++) {
as[i].onclick = function (){
let tr = this.parentNode.parentNode;
let id = tr.children[0].innerHTML;
let name = tr.children[1].innerHTML;
var flag = confirm("確認刪除"+ name + "嗎?");
if(flag){
//刪除tr對應用戶的信息
$.ajax({
type: 'post',
dateType: 'json',
url:getPath()+"/user",
data: {
_method:'delete',
id:id
},
success:function (){
}
})
tr.parentNode.removeChild(tr);
}
}
}
}
function aUpdClick(){
var as = document.getElementsByClassName('upd');
for (let i = 0; i < as.length; i++) {
as[i].onclick = function (){
let tr = this.parentNode.parentNode;
let id = tr.children[0].innerHTML;
window.location = getPath()+'/user'+'/'+id;
}
}
}
function getUserList(){
var table = $("table");
$.ajax({
type:"get",
dateType:"json",
url:getPath()+"/user",
data:{},
success:function (msg){
table.text('');
table.append('<tr><th colspan="4">用戶列表</th></tr><tr><td>id</td><td>姓名</td> <td>年齡</td><td>操作</td> </tr>')
for (let i = 0; i <msg.length; i++) {
let tr = '<tr><td>'+msg[i].id+'</td><td>'+msg[i].name+'</td><td>'+msg[i].age+'</td><td><a href="#" class="upd">修改</a> <a href="#" class="del">刪除</a></tr>';
table.append(tr);
}
aDelClick();
aUpdClick();
}
})
}
$("#btn1").click(function (){
getUserList();
})
$("#btn2").click(function (){
window.location = getPath()+'/addUser';
})
$(function (){
getUserList();
})
</script>
</html>
user.jsp
<%@ page import="com.zh.pojo.User" %>
<%@ page contentType="text/html;charset=UTF-8" language="java" %>
<html>
<head>
    <title>Title</title>
    <script src="https://apps.bdimg.com/libs/jquery/2.1.4/jquery.min.js"></script>
</head>
<style type="text/css">
    h1{
        text-align: center;
    }
    #btn{
        margin: 0 auto;
        margin-top: 10px;
        margin-left: 100px;
    }
    #out{
        margin: 0 auto;
        margin-left: 650px;
    }
</style>
<body>
<div>
    <h1>修改用戶</h1>
    <div id="out">
        <form action="/RESTFul/user" method="post">
            <%
                User user = (User) request.getAttribute("user");
            %>
            姓名:<input type="text" name="username" id="username" value="<%=user.getName()%>"><br>
            年齡:<input type="text" name="age" id="age" value="<%=user.getAge()%>"><br>
            <div>                <button type="button" id="btn1">修改</button>
                <button type="button" id="btn2">返回</button>
            </div>        </form>    </div></div>
</body>
<script>
    function  getPath(){
        let pathName = document.location.pathname;
        let index = pathName.substr(1).indexOf("/");
        let result = pathName.substr(0,index+1);
        return result;
    }
    $('#btn1').click(function (){
        var id = <%=user.getId()%>;
        var username = $('#username').val();
        var age = $('#age').val();
        $.ajax({
            type:'post',
            dataType:'text',
            url:getPath()+'/user',
            data:{
                _method:'put',
                id:id,
                username:username,
                age:age
            },
            success:function (){
               window.location = getPath()+'/UserList';
            }
        })
    })
    $('#btn2').click(function (){
        window.location = getPath()+'/UserList'
    })
</script>
</html>
adduser.jsp
<%@ page contentType="text/html;charset=UTF-8" language="java" %>
<html>
<head>
    <title>Title</title>
</head>
<style type="text/css">
    h1{
        text-align: center;
    }
    #submit{
        margin: 0 auto;
        margin-top: 10px;
        margin-left: 100px;
    }
    #out{
        margin: 0 auto;
        margin-left: 650px;
    }
</style>
<body>
<div>
    <h1>增加用戶</h1>
    <div id="out">
        <form action="/RESTFul/user" method="post">
            姓名:<input type="text" name="username"><br>
            年齡:<input type="text" name="age"><br>
            <div>                <input type="submit" align="center" id="submit">
            </div>        </form>    </div></div>
</body>
</html>
index
<%@ page contentType="text/html;charset=UTF-8" language="java" %>
<html>
<head>
    <title>Title</title>
</head>
<body>
    <h1>首頁</h1>
    <h4><a href="/RESTFul/UserList">用戶列表</a></h4>
</body>
</html>
5、功能說明
查詢所有用戶
控制器映射的url是/user,請求方式是get,返回dao類中的集合的json字元串,前端頁面一開始就發送一次Ajax請求,收到數據之後執行回調方法,根據JSON數組的長度動態的添加進表格(拼接標簽),併為每個操作的a標簽添加一個點擊事件(點擊修改之後,js代碼獲取點擊時這一用戶的id,然後重定向到此url,例如/user/1,點擊刪除之後,獲取到點擊時這一用戶的id,發送Ajax請求到伺服器,請求刪除用戶,然後重定向到列表頁面刷新)
查詢一個用戶
url是/user/{id},get請求,符合的url將會執行這個方法,控制器拿到id之後,在dao層中獲取到此用戶的信息,然後把用戶信息添加到請求域中,然後返回視圖,前端中可以獲取到這個數據
增加用戶
點擊增加用戶之後,會跳轉到增加用戶的界面,url是/addUser,點擊修改之後,發送Ajax請求,url是/user,請求方式:post,控制器接收到信息之後會操作數據,然後返回操作狀態,前端根據返回的結果提示信息和進行跳轉回用戶列表
刪除用戶
點擊刪除按鈕之後,會發送一個Ajax請求,請求參數包含_method和id,請求url: /user,_methon值為delet,控制器收到數據執行刪除用戶操作,刪除完成前端進行跳轉會用戶列表
修改用戶
點擊修改用戶之後,會重定向到要修改的用戶的界面,例如/user/1,控制器已經將參數攜帶進請求中,可以進行回顯,點擊修改之後,提交用戶信息,前端控制重定向回列表頁面
至此,完成了RESTful風格的增刪改查
| url | 操作 | 請求方式 |
|---|---|---|
| /user | 查詢所有用戶 | get |
| /user/1 | 查詢一個用戶 | get |
| /user | 增加用戶 | post |
| /user | 刪除用戶 | delete |
| /user | 修改用戶 | put |
9、SpringMVC攔截器
請求---->過濾器--->前端控制器--->控制器
SpringMVC中的攔截器用於攔截控制器方法的執行
SpringMVC中的攔截器需要實現HandlerInterceptor
SpringMVC的攔截器必須在SpringMVC的配置文件中進行配置:
package net.biancheng.interceptor;

import javax.servlet.http.HttpServletRequest;
import javax.servlet.http.HttpServletResponse;

import org.springframework.web.servlet.HandlerInterceptor;
import org.springframework.web.servlet.ModelAndView;

public class TestInterceptor implements HandlerInterceptor {
    @Override
    public void afterCompletion(HttpServletRequest request,
            HttpServletResponse response, Object handler, Exception ex)
            throws Exception {
        System.out.println("afterCompletion方法在控制器的處理請求方法執行完成後執行,即視圖渲染結束之後執行");

    }

    @Override
    public void postHandle(HttpServletRequest request,
            HttpServletResponse response, Object handler,
            ModelAndView modelAndView) throws Exception {
        System.out.println("postHandle方法在控制器的處理請求方法調用之後,解析視圖之前執行");
    }

    @Override
    public boolean preHandle(HttpServletRequest request,
            HttpServletResponse response, Object handler) throws Exception {
        System.out.println("preHandle方法在控制器的處理請求方法調用之前執行");
        return false;
    }
}
上述攔截器的定義中實現了 HandlerInterceptor 介面,並實現了介面中的 3 個方法,說明如下。
- preHandle( ):該方法在控制器的處理請求方法前執行,其返回值表示是否中斷後續操作,返回 true 表示繼續向下執行,返回 false 表示中斷後續操作。
- postHandle( ):該方法在控制器的處理請求方法調用之後、解析視圖之前執行,可以通過此方法對請求域中的模型和視圖做進一步的修改。
- afterCompletion( ):該方法在控制器的處理請求方法執行完成後執行,即視圖渲染結束後執行,可以通過此方法實現一些資源清理、記錄日誌信息等工作。
1、攔截器的配置
讓自定義的攔截器生效需要在 Spring MVC 的配置文件中進行配置,配置示例代碼如下:
<!-- 配置攔截器 -->
<mvc:interceptors>
    <!-- 配置一個全局攔截器,攔截所有請求 -->
    <bean class="net.biancheng.interceptor.TestInterceptor" />
    <mvc:interceptor>
        <!-- 配置攔截器作用的路徑 -->
        <mvc:mapping path="/**" />
        <!-- 配置不需要攔截作用的路徑 -->
        <mvc:exclude-mapping path="" />
        <!-- 定義<mvc:interceptor>元素中,表示匹配指定路徑的請求才進行攔截 -->
        <bean class="net.biancheng.interceptor.Interceptor1" />
    </mvc:interceptor>


