1、Durid 1.1 簡介 Java程式很大一部分要操作資料庫,為了提高性能操作資料庫的時候,又不得不使用資料庫連接池。 Druid 是阿裡巴巴開源平臺上一個資料庫連接池實現,結合了 C3P0、DBCP 等 DB 池的優點,同時加入了日誌監控。 Druid 可以很好的監控 DB 池連接和 SQL ...
1、Durid
1.1 簡介
Java程式很大一部分要操作資料庫,為了提高性能操作資料庫的時候,又不得不使用資料庫連接池。
Druid 是阿裡巴巴開源平臺上一個資料庫連接池實現,結合了 C3P0、DBCP 等 DB 池的優點,同時加入了日誌監控。
Druid 可以很好的監控 DB 池連接和 SQL 的執行情況,天生就是針對監控而生的 DB 連接池。
Druid已經在阿裡巴巴部署了超過600個應用,經過一年多生產環境大規模部署的嚴苛考驗。
Spring Boot 2.0 以上預設使用 Hikari 數據源,可以說 Hikari 與 Driud 都是當前 Java Web 上最優秀的數據源,我們來重點介紹 Spring Boot 如何集成 Druid 數據源,如何實現資料庫監控。
Github地址:https://github.com/alibaba/druid/

1.2 依賴
<!-- druid begin -->
<dependency>
    <groupId>com.alibaba</groupId>
    <artifactId>druid</artifactId>
    <version>1.2.8</version>
</dependency>
<!-- druid end -->

<!-- log4j begin -->
<dependency>
    <groupId>log4j</groupId>
    <artifactId>log4j</artifactId>
    <version>1.2.17</version>
</dependency>
<!-- log4j begin -->
1.3 配置
1.3.1 application.yml
# 埠
server:
  port: 9603

# 服務名
spring:
  application:
    name: kgcmall96-user

  # 數據源配置
  datasource:
    driver-class-name: com.mysql.cj.jdbc.Driver
    url: jdbc:mysql://localhost:3306/kh96_alibaba_kgcmalldb?useUnicode=true&characterEncoding=utf-8&useSSL=false&serverTimezone=GMT
    username: root
    password: root
    #2、切換數據源;之前已經說過 Spring Boot 2.0 以上預設使用 com.zaxxer.hikari.HikariDataSource 數據源,但可以 通過 spring.datasource.type 指定數據源。
    # 指定數據源類型
    type: com.alibaba.druid.pool.DruidDataSource
    # 數據源其他配置
    # 初始化時建立物理連接的個數。初始化發生在顯示調用init方法,或者第一次getConnection時
    initialSize: 5
    # 最小連接池數量
    minIdle: 5
    # 最大連接池數量
    maxActive: 20
    # 獲取連接時最大等待時間,單位毫秒。
    maxWait: 60000
    # 配置間隔多久才進行一次檢測,檢測需要關閉的空閑連接,單位是毫秒
    timeBetweenEvictionRunsMillis: 60000
    # 配置一個連接在池中最小生存的時間,單位是毫秒
    minEvictableIdleTimeMillis: 300000
    # 用來檢測連接是否有效的sql,要求是一個查詢語句。如果validationQuery為null,testOnBorrow、testOnReturn、testWhileIdle都不會其作用。
    validationQuery: SELECT 1 FROM DUAL
    # 建議配置為true,不影響性能,並且保證安全性。申請連接的時候檢測,如果空閑時間大於timeBetweenEvictionRunsMillis,執行validationQuery檢測連接是否有效
    testWhileIdle: true
    # 申請連接時執行validationQuery檢測連接是否有效,做了這個配置會降低性能。
    testOnBorrow: false
    # 歸還連接時執行validationQuery檢測連接是否有效,做了這個配置會降低性能
    testOnReturn: false
    # 是否緩存preparedStatement,也就是PSCache。PSCache對支持游標的資料庫性能提升巨大,比如說oracle。在mysql下建議關閉
    poolPreparedStatements: false
    maxPoolPreparedStatementPerConnectionSize: 20
    # 合併多個DruidDataSource的監控數據
    useGlobalDataSourceStat: true
    # 配置監控統計攔截的filters,去掉後監控界面sql無法統計
    # 屬性性類型是字元串,通過別名的方式配置擴展插件,常用的插件有:監控統計用的filter:stat日誌用的filter:log4j防禦sql註入的filter:wall
    filters: stat,wall,log4j
    # 通過connectProperties屬性來打開mergeSql功能;慢SQL記錄
    connectionProperties: druid.stat.mergeSql=true;druid.stat.slowSqlMillis=500

  # jpa配置
  jpa:
    hibernate:
      ddl-auto: update
    show-sql: true
1.3.2 log4j.properties
在網上隨便搜的一個;
log4j.rootLogger=DEBUG, stdout
# Console output...
log4j.appender.stdout=org.apache.log4j.ConsoleAppender
log4j.appender.stdout.layout=org.apache.log4j.PatternLayout
log4j.appender.stdout.layout.ConversionPattern=%5p [%t] - %m%n
1.4 Druid數據源配置類
/**
 * @author : huayu
 * @date   : 29/11/2022
 * @param  :
 * @return :
 * @description :  Druid數據源配置類
 */
@Configuration
public class DruidConfig {

    @Bean
    @ConfigurationProperties(prefix = "spring.datasource")
    public DataSource dataSource() {
        return new DruidDataSource();
    }

    /**
     * 配置後臺管理
     */
    @Bean
    public ServletRegistrationBean statViewServlet() {
        ServletRegistrationBean bean = new ServletRegistrationBean(new StatViewServlet(), "/druid/*");

        // 初始化參數
        Map<String, String> initParams = new HashMap<>();
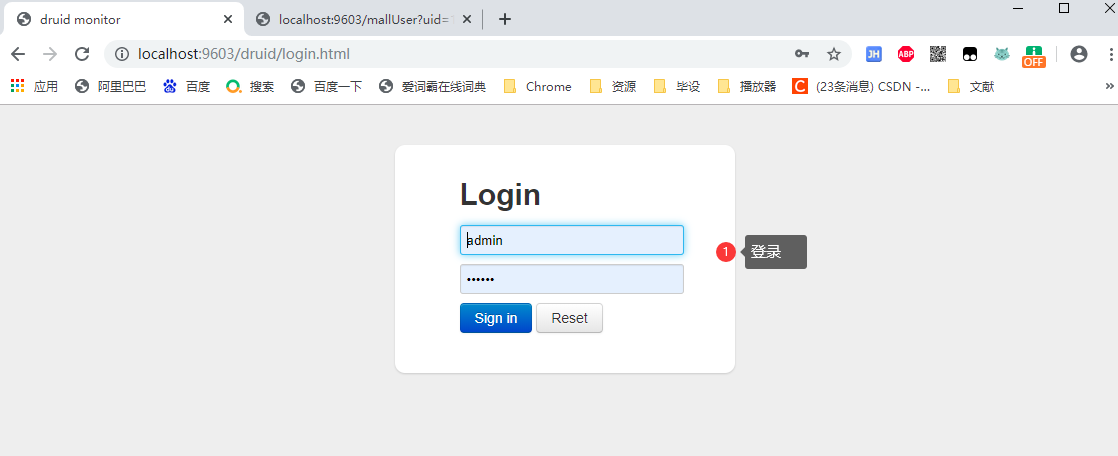
        initParams.put("loginUsername", "admin");
        initParams.put("loginPassword", "123456");
        // 是否允許訪問
        initParams.put("allow", "");
        bean.setInitParameters(initParams);
        return bean;
    }

    /**
     * 配置web監控的過濾器
     */
    @Bean
    public FilterRegistrationBean webStatFilter() {
        FilterRegistrationBean bean = new FilterRegistrationBean();

        bean.setFilter(new WebStatFilter());
        // 初始化參數
        Map<String, String> initParams = new HashMap<>();
        // 排除過濾,靜態文件等
        initParams.put("exclusions", "*.css,*.js,/druid/*");

        bean.setInitParameters(initParams);

        bean.setUrlPatterns(Arrays.asList("/*"));

        return bean;
    }
}
1.5 測試
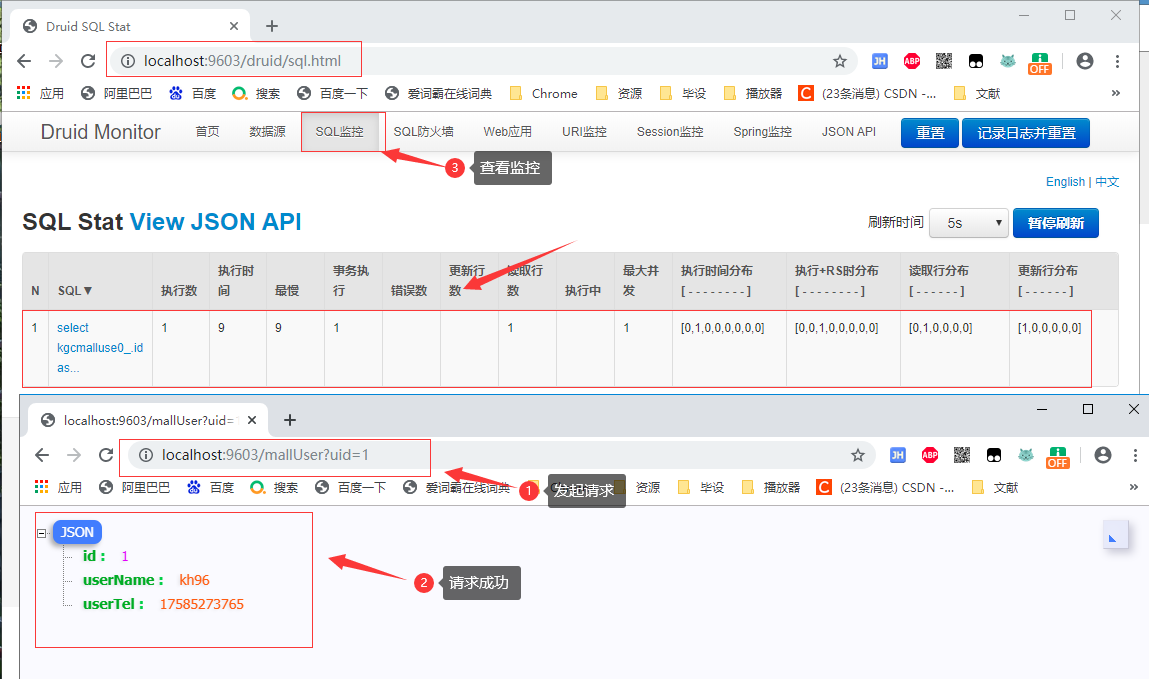
測試代碼不在贅述,就簡單寫一個測試請求就好;
1.5.1 登錄
1.5.2 測試請求
2、SpringSecurity
2.0 認識SpringSecurity
Spring Security 是針對Spring項目的安全框架,也是Spring Boot底層安全模塊預設的技術選型,他可以實現強大的Web安全控制,對於安全控制,我們僅需要引入 spring-boot-starter-security 模塊,進行少量的配置,即可實現強大的安全管理!
記住幾個類:
- WebSecurityConfigurerAdapter:自定義Security策略
- AuthenticationManagerBuilder:自定義認證策略
- @EnableWebSecurity:開啟WebSecurity模式
Spring Security的兩個主要目標是 “認證” 和 “授權”(訪問控制)。
“認證”(Authentication)
身份驗證是關於驗證您的憑據,如用戶名/用戶ID和密碼,以驗證您的身份。
身份驗證通常通過用戶名和密碼完成,有時與身份驗證因素結合使用。
“授權” (Authorization)
授權發生在系統成功驗證您的身份後,最終會授予您訪問資源(如信息,文件,資料庫,資金,位置,幾乎任何內容)的完全許可權。
這個概念是通用的,而不是只在Spring Security 中存在。
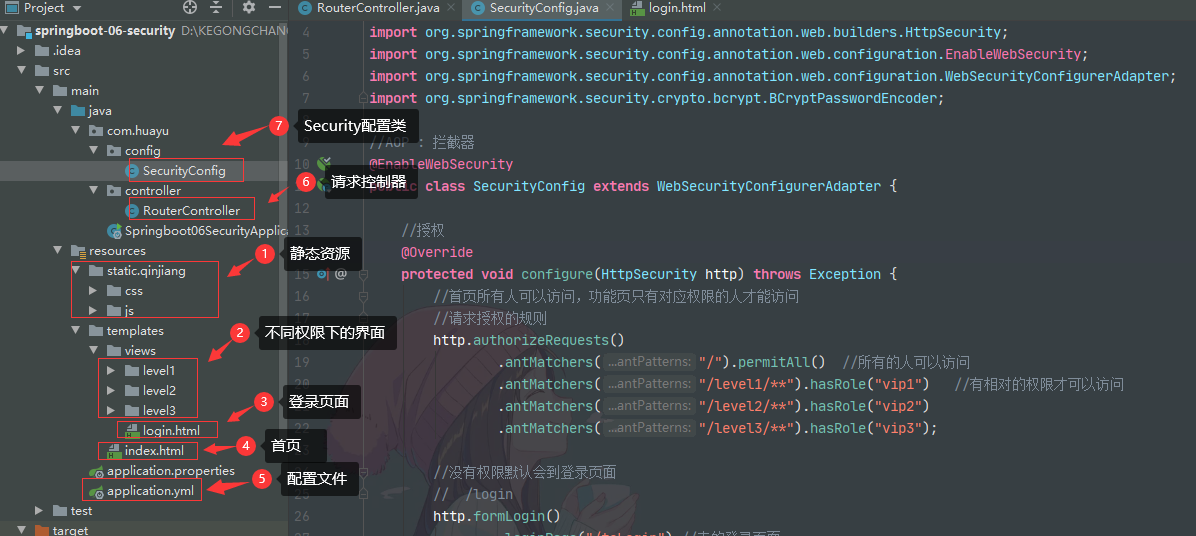
2.1 項目介紹
2.1 依賴
<!--  thymeleaf  -->
<dependency>
    <groupId>org.springframework.boot</groupId>
    <artifactId>spring-boot-starter-thymeleaf</artifactId>
</dependency>
<!--  security -->
<dependency>
    <groupId>org.springframework.boot</groupId>
    <artifactId>spring-boot-starter-security</artifactId>
</dependency>

<!--   security-thymeleaf整合包  -->
<dependency>
    <groupId>org.thymeleaf.extras</groupId>
    <artifactId>thymeleaf-extras-springsecurity5</artifactId>
    <version>3.0.4.RELEASE</version>
</dependency>
2.2 application.yml
# 關閉模板緩存
spring:
  thymeleaf:
    cache: false
2.3 html
2.3.1 1.html
創建這幾個文件;

1.html(這幾個html的代碼都是一樣的)
<!DOCTYPE html>
<html lang="en" xmlns:th="http://www.thymeleaf.org">
<head>
    <meta charset="UTF-8">
    <meta name="viewport" content="width=device-width, initial-scale=1, maximum-scale=1">
    <title>首頁</title>
    <!--semantic-ui-->
    <link href="https://cdn.bootcss.com/semantic-ui/2.4.1/semantic.min.css" rel="stylesheet">
    <link th:href="@{/qinjiang/css/qinstyle.css}" rel="stylesheet">
</head>
<body>

<!--主容器-->
<div class="ui container">

    <div th:replace="~{index::nav-menu}"></div>

    <div class="ui segment" style="text-align: center">
        <h3>Level-1-1</h3>
    </div>

</div>

<script th:src="@{/qinjiang/js/jquery-3.1.1.min.js}"></script>
<script th:src="@{/qinjiang/js/semantic.min.js}"></script>

</body>
</html>
2.3.2 login.html
<!DOCTYPE html>
<html lang="en" xmlns:th="http://www.thymeleaf.org">
<head>
    <meta charset="UTF-8">
    <meta name="viewport" content="width=device-width, initial-scale=1, maximum-scale=1">
    <title>登錄</title>
    <!--semantic-ui-->
    <link href="https://cdn.bootcss.com/semantic-ui/2.4.1/semantic.min.css" rel="stylesheet">
</head>
<body>

<!--主容器-->
<div class="ui container">

    <div class="ui segment">

        <div style="text-align: center">
            <h1 class="header">登錄</h1>
        </div>

        <div class="ui placeholder segment">
            <div class="ui column very relaxed stackable grid">
                <div class="column">
                    <div class="ui form">
                        <form th:action="@{/login}" method="post">
                            <div class="field">
                                <label>Username</label>
                                <div class="ui left icon input">
                                    <input type="text" placeholder="Username" name="username">
                                    <i class="user icon"></i>
                                </div>
                            </div>
                            <div class="field">
                                <label>Password</label>
                                <div class="ui left icon input">
                                    <input type="password" name="password">
                                    <i class="lock icon"></i>
                                </div>
                            </div>
                            <div class="field">
                                <input type="checkbox" name="remember"> 記住我
                            </div>

                            <input type="submit" class="ui blue submit button"/>
                        </form>
                    </div>
                </div>
            </div>
        </div>

        <div style="text-align: center">
            <div class="ui label">
                </i>註冊
            </div>
            <br><br>
            <small>blog.kuangstudy.com</small>
        </div>
        <div class="ui segment" style="text-align: center">
            <h3>Spring Security Study by 秦疆</h3>
        </div>
    </div>


</div>

<script th:src="@{/qinjiang/js/jquery-3.1.1.min.js}"></script>
<script th:src="@{/qinjiang/js/semantic.min.js}"></script>

</body>
</html>
2.3.3 index.html
<!DOCTYPE html>
<html lang="en" xmlns:th="http://www.thymeleaf.org"
      xmlns:sec="http://www.thymeleaf.org/thymeleaf-extras-springsecurity5">
<head>
    <meta charset="UTF-8">
    <meta name="viewport" content="width=device-width, initial-scale=1, maximum-scale=1">
    <title>首頁</title>
    <!--semantic-ui-->
    <link href="https://cdn.bootcss.com/semantic-ui/2.4.1/semantic.min.css" rel="stylesheet">
    <link th:href="@{/qinjiang/css/qinstyle.css}" rel="stylesheet">
</head>
<body>

<!--主容器-->
<div class="ui container">

    <div class="ui segment" id="index-header-nav" th:fragment="nav-menu">
        <div class="ui secondary menu">
            <a class="item"  th:href="@{/index}">首頁</a>

            <!--登錄註銷-->
            <div class="right menu">

                <!--  如果未登錄  用戶名,註銷-->
                <div sec:authorize="!isAuthenticated()">
                    <a class="item" th:href="@{/toLogin}">
                        <i class="address card icon"></i> 登錄
                    </a>
                </div>

                <!--如果登錄了: 用戶名 註銷-->
                <div sec:authorize="isAuthenticated()">
                    <a class="item">
                        用戶名: <span sec:authentication="name"></span>
                        角色: <span sec:authentication="principal.authorities"></span>
                    </a>
                    <a class="item" th:href="@{/logout}">
                        <i class="sign-out icon"></i> 註銷
                    </a>
                </div>

                <!--已登錄
                <a th:href="@{/usr/toUserCenter}">
                    <i class="address card icon"></i> admin
                </a>
                -->
            </div>
        </div>
    </div>

    <div class="ui segment" style="text-align: center">
        <h3>Spring Security Study by 秦疆</h3>
    </div>

    <div>
        <br>
        <div class="ui three column stackable grid">
            <div class="column" sec:authorize="hasRole('vip1')">
                <div class="ui raised segment">
                    <div class="ui">
                        <div class="content">
                            <h5 class="content">Level 1</h5>
                            <hr>
                            <div><a th:href="@{/level1/1}"><i class="bullhorn icon"></i> Level-1-1</a></div>
                            <div><a th:href="@{/level1/2}"><i class="bullhorn icon"></i> Level-1-2</a></div>
                            <div><a th:href="@{/level1/3}"><i class="bullhorn icon"></i> Level-1-3</a></div>
                        </div>
                    </div>
                </div>
            </div>

            <div class="column" sec:authorize="hasRole('vip3')">
                <div class="ui raised segment">
                    <div class="ui">
                        <div class="content">
                            <h5 class="content">Level 2</h5>
                            <hr>
                            <div><a th:href="@{/level2/1}"><i class="bullhorn icon"></i> Level-2-1</a></div>
                            <div><a th:href="@{/level2/2}"><i class="bullhorn icon"></i> Level-2-2</a></div>
                            <div><a th:href="@{/level2/3}"><i class="bullhorn icon"></i> Level-2-3</a></div>
                        </div>
                    </div>
                </div>
            </div>

            <div class="column" sec:authorize="hasRole('vip3')">
                <div class="ui raised segment">
                    <div class="ui">
                        <div class="content">
                            <h5 class="content">Level 3</h5>
                            <hr>
                            <div><a th:href="@{/level3/1}"><i class="bullhorn icon"></i> Level-3-1</a></div>
                            <div><a th:href="@{/level3/2}"><i class="bullhorn icon"></i> Level-3-2</a></div>
                            <div><a th:href="@{/level3/3}"><i class="bullhorn icon"></i> Level-3-3</a></div>
                        </div>
                    </div>
                </div>
            </div>

        </div>
    </div>

</div>


<script th:src="@{/qinjiang/js/jquery-3.1.1.min.js}"></script>
<script th:src="@{/qinjiang/js/semantic.min.js}"></script>

</body>
</html>
2.4 RouterController
@Controller
public class RouterController {

    //首頁
    @RequestMapping({"/","/index"})
    public String index(){
        return "index";
    }

    //登錄
    @RequestMapping("/toLogin")
    public String toLogin(){
        return "views/login";
    }

    //level1 許可權才可以訪問
    @RequestMapping("/level1/{id}")
    public String leave1(@PathVariable("id") int id){
        return "views/level1/"+id;
    }

    //level2 許可權才可以訪問
    @RequestMapping("/level2/{id}")
    public String leave2(@PathVariable("id") int id){
        return "views/level2/"+id;
    }

    //level3 許可權才可以訪問
    @RequestMapping("/level3/{id}")
    public String leave3(@PathVariable("id") int id){
        return "views/level3/"+id;
    }

}
2.5 SecurityConfig
//AOP : 攔截器
@EnableWebSecurity
public class SecurityConfig extends WebSecurityConfigurerAdapter {

    //授權
    @Override
    protected void configure(HttpSecurity http) throws Exception {
        //首頁所有人可以訪問,功能頁只有對應許可權的人才能訪問
        //請求授權的規則
        http.authorizeRequests()
                .antMatchers("/").permitAll()  //所有的人可以訪問
                .antMatchers("/level1/**").hasRole("vip1")   //有相對的許可權才可以訪問
                .antMatchers("/level2/**").hasRole("vip2")
                .antMatchers("/level3/**").hasRole("vip3");

        //沒有許可權預設會到登錄頁面
        //  /login
        http.formLogin()
                .loginPage("/toLogin") //走的登錄頁面
                .usernameParameter("username").passwordParameter("password") //預設的幫我們寫的登錄驗真參數為username,password,通過這個可以改變參數名字,例如user,pwd
                .loginProcessingUrl("/login");  //真正的登錄頁面

        //防止網站工具: get post
        http.csrf().disable(); //關閉csrf功能 防止攻擊  登錄失敗可能存在的原因

        //註銷,開啟了註銷功能,跳到首頁
        http.logout()
                .deleteCookies("remove")  //移除cookies
                .invalidateHttpSession(true)  //清除session
                .logoutSuccessUrl("/");

        //開啟記住我功能
        http.rememberMe()  //預設保存兩周  //這些直接開啟的都是自動配置裡面的那個登錄頁面,只需要開啟就可以;
        .rememberMeParameter("remember"); //自定義接收前端的參數  //這些需要自定義參數的都是我們自己寫的登錄頁面
    }


    //認證 , springboot 2.1.x可以使用
    //密碼編碼: PasswowrdEncoder   報錯: 密碼前面直接加{noop},就可以了 password("{noop}123456")
    //在Spring Secutiry 5.0+ 新增了很多的加密方法
    //定義認證規則
    @Override
    protected void configure(AuthenticationManagerBuilder auth) throws Exception {
        //這些數據正常應該從資料庫中讀
        auth
//                .jdbcAuthentication() //從資料庫中讀數據
                .inMemoryAuthentication().passwordEncoder(new BCryptPasswordEncoder())
                .withUser("kuangshen").password(new BCryptPasswordEncoder().encode("123456")).roles("vip2","vip3")
                .and()
                .withUser("root").password(new BCryptPasswordEncoder().encode("123456")).roles("vip1","vip2","vip3")
                .and()
                .withUser("guest").password(new BCryptPasswordEncoder().encode("123456")).roles("vip1");
    }

}
2.6 測試
2.6.1 不同許可權的用戶登錄
2.6.1.1 只有 vip1 許可權
登錄:guest 用戶
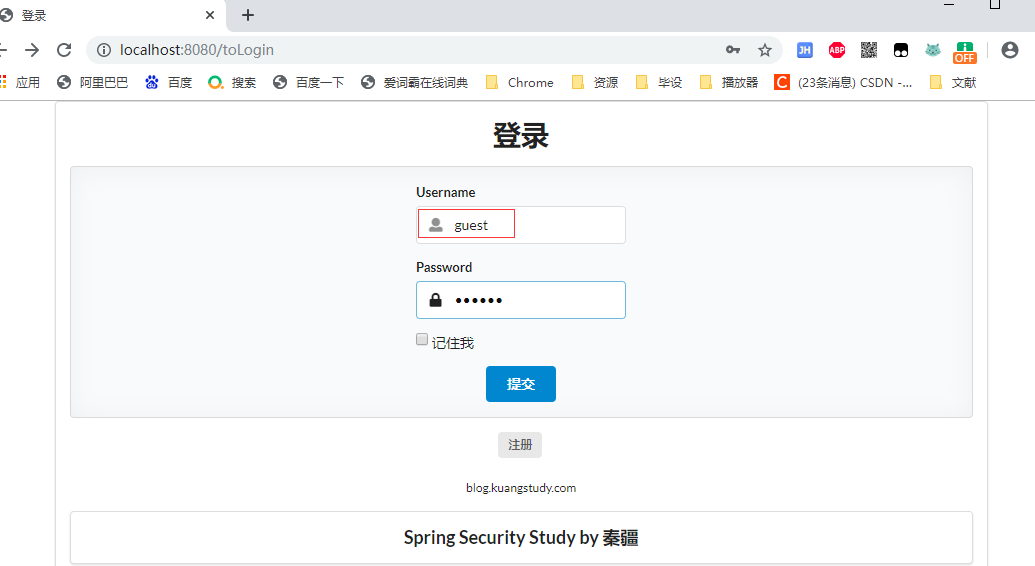
登錄成功:
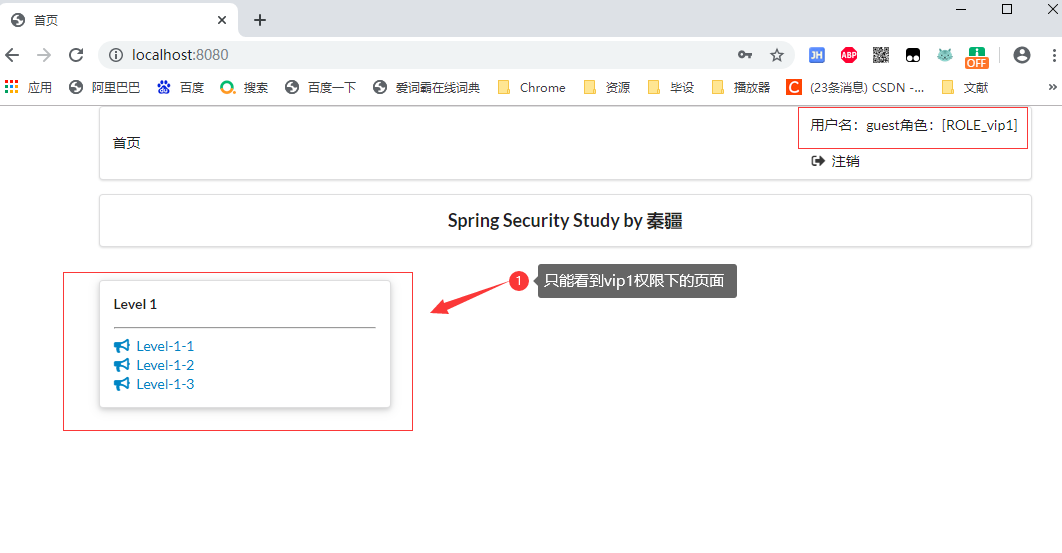
2.6.1.2 只有 vip1, vip2 許可權
登錄:kuangshen 用戶
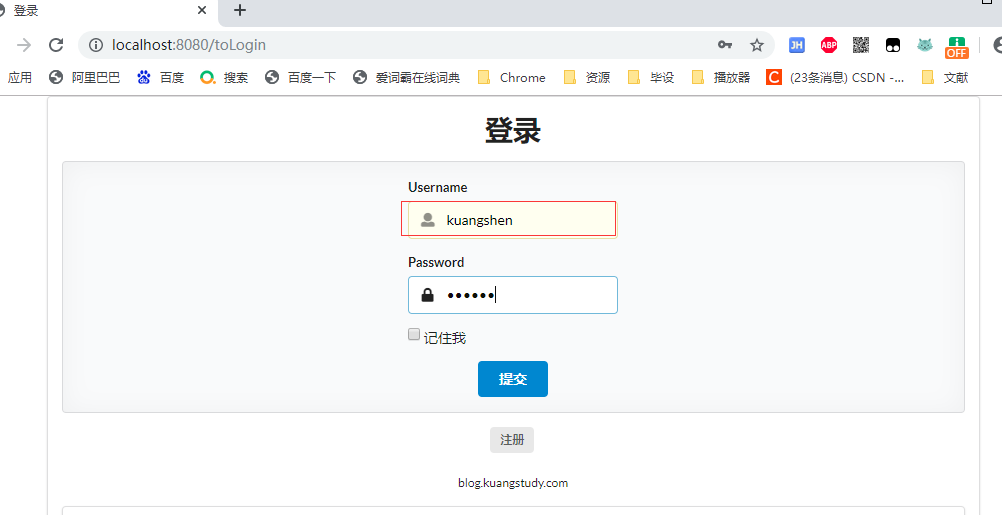
登陸成功:
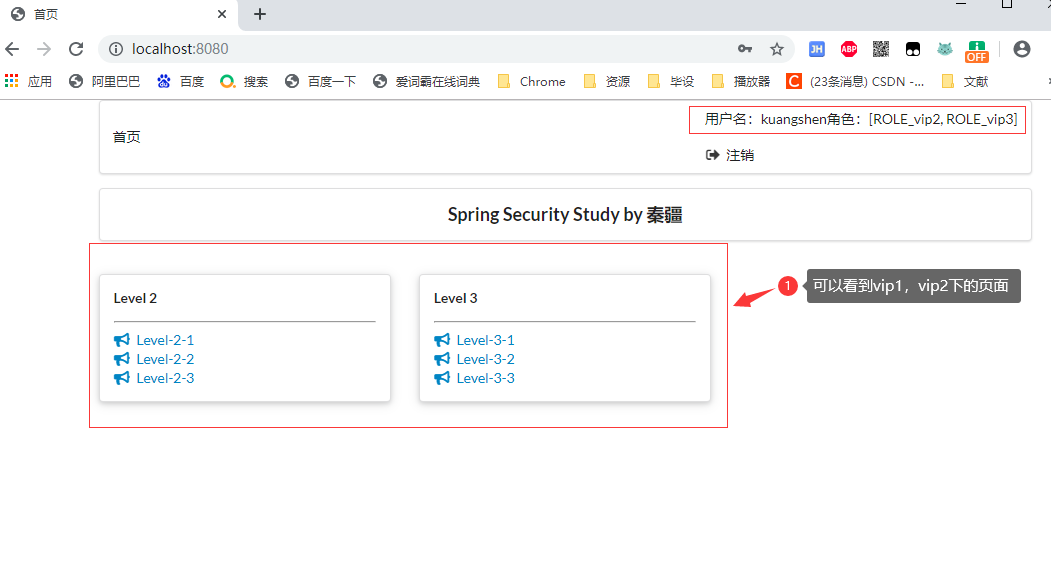
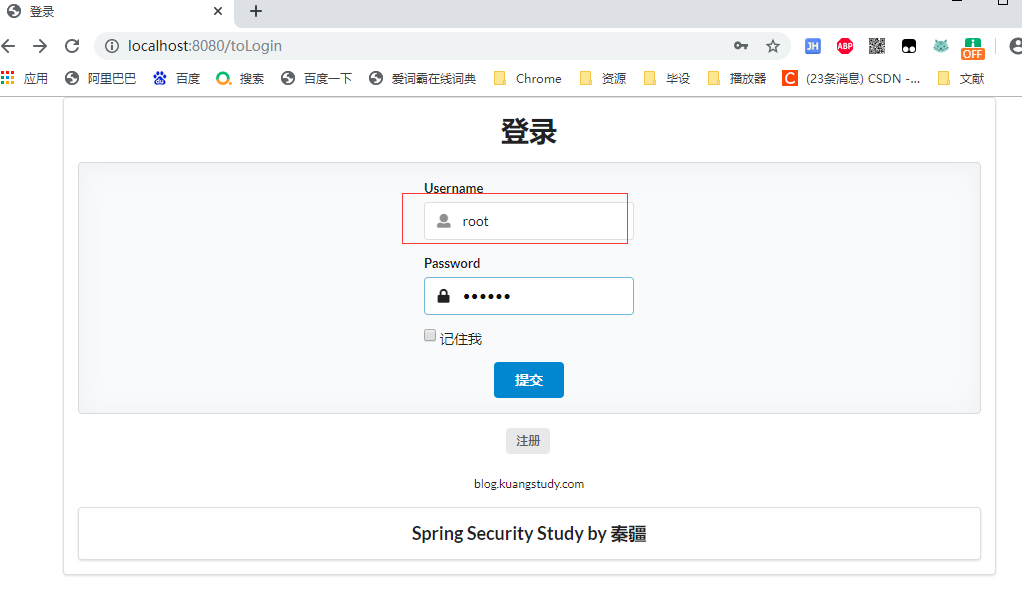
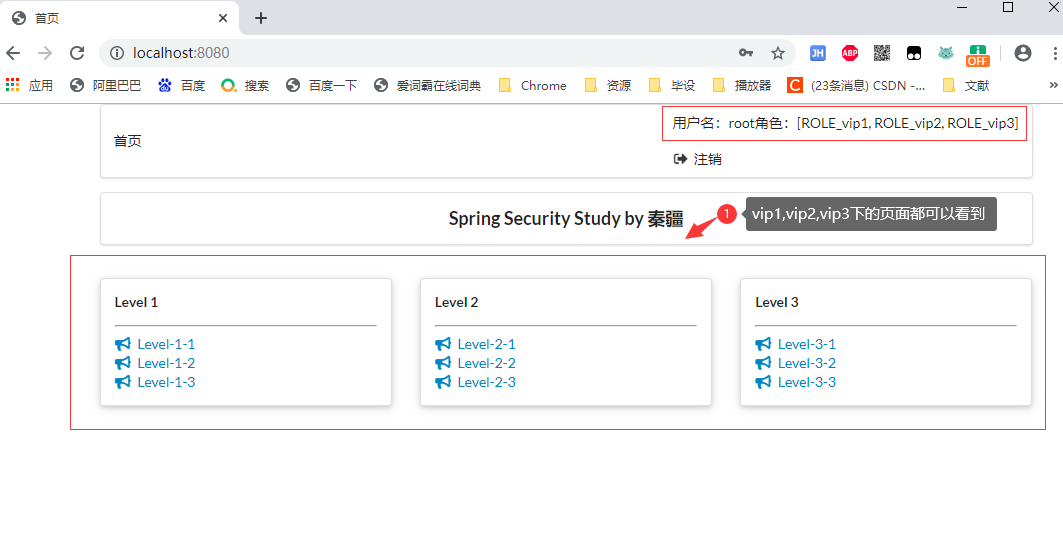
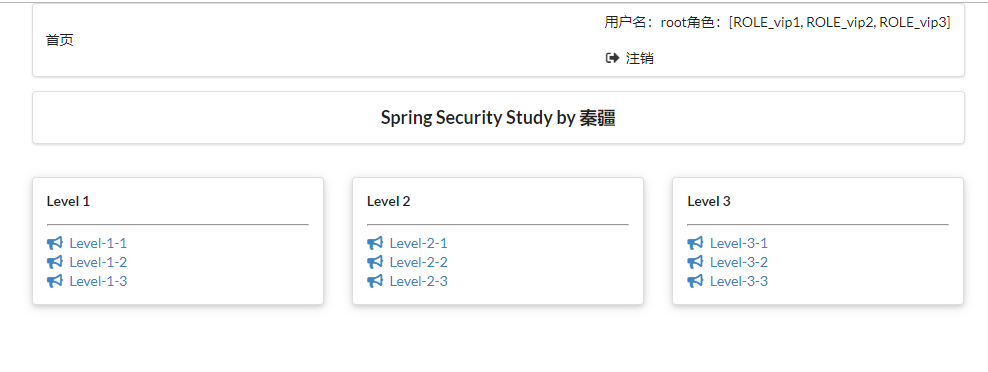
2.6.1.3 只有 vip1, vip2, vip3 許可權
登錄:root 用戶
登陸成功
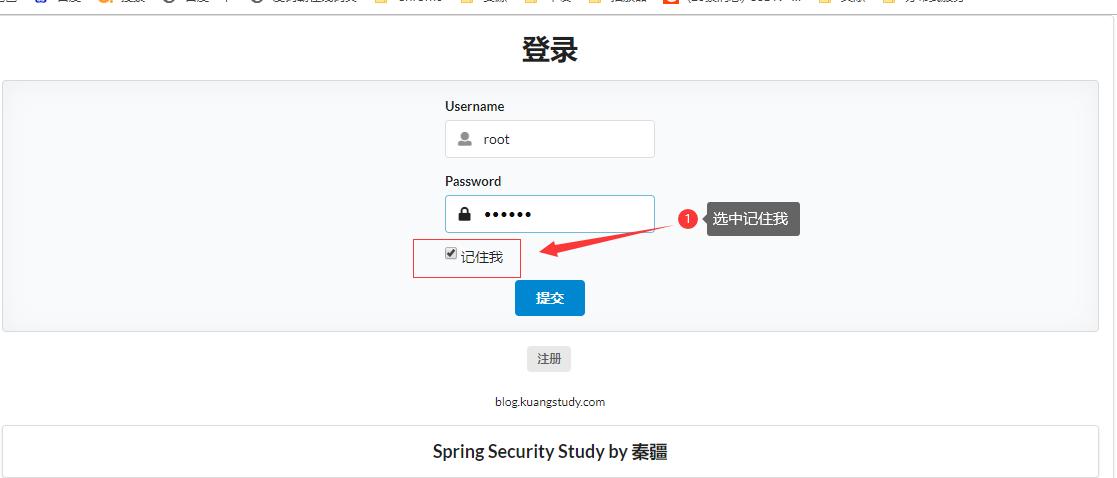
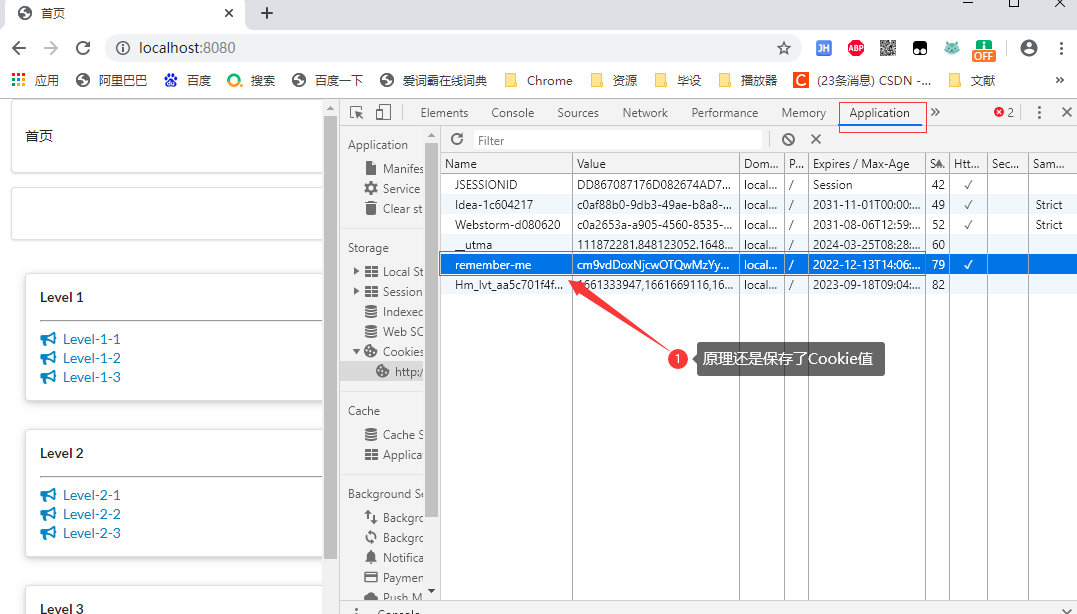
2.6.2 記住我
2.6.2.1 登錄
2.6.2.2 登錄成功
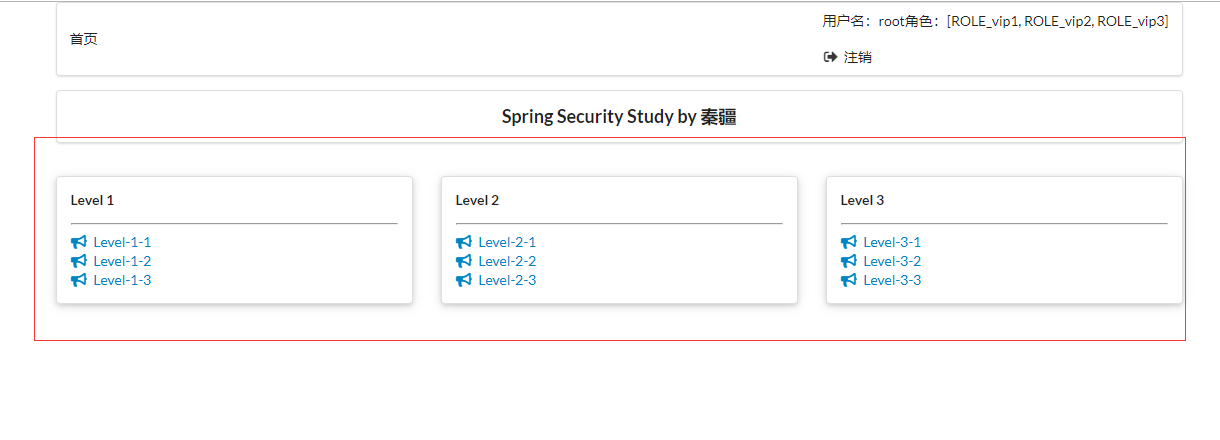
2.6.2.3 關閉瀏覽器,重新訪問 http://localhost:8080/
登錄成功
檢查Cookie
參考博客地址:https://mp.weixin.qq.com/s/FLdC-24_pP8l5D-i7kEwcg
視頻地址:https://www.bilibili.com/video/BV1PE411i7CV/?p=34
3、Shiro
3.1 helloShiro快速開始
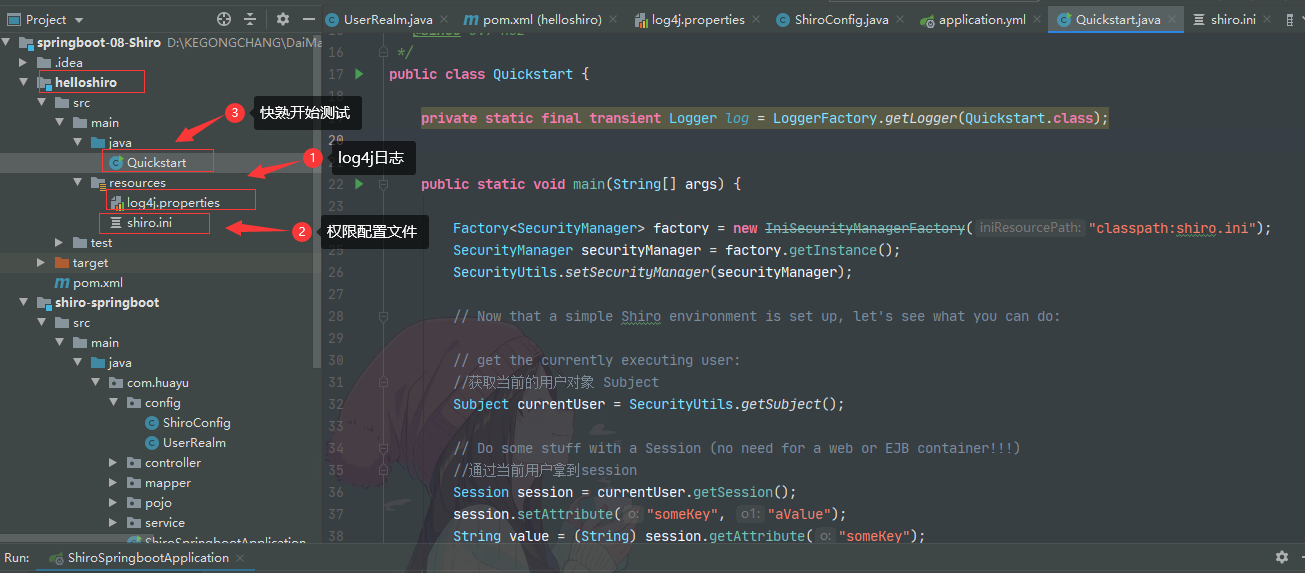
3.1.1 依賴
<!-- shiro-core  -->
<dependency>
    <groupId>org.apache.shiro</groupId>
    <artifactId>shiro-core</artifactId>
    <version>1.7.1</version>
</dependency>

<!-- configure logging -->
<dependency>
    <groupId>org.slf4j</groupId>
    <artifactId>jcl-over-slf4j</artifactId>
    <version>1.7.21</version>
</dependency>
<dependency>
    <groupId>org.slf4j</groupId>
    <artifactId>slf4j-log4j12</artifactId>
    <version>1.7.21</version>
</dependency>
<dependency>
    <groupId>log4j</groupId>
    <artifactId>log4j</artifactId>
    <version>1.2.17</version>
</dependency>
3.1.2 log4j.properties
log4j.rootLogger=INFO, stdout

log4j.appender.stdout=org.apache.log4j.ConsoleAppender
log4j.appender.stdout.layout=org.apache.log4j.PatternLayout
log4j.appender.stdout.layout.ConversionPattern=%d %p [%c] - %m %n

# General Apache libraries
log4j.logger.org.apache=WARN

# Spring
log4j.logger.org.springframework=WARN

# Default Shiro logging
log4j.logger.org.apache.shiro=INFO

# Disable verbose logging
log4j.logger.org.apache.shiro.util.ThreadContext=WARN
log4j.logger.org.apache.shiro.cache.ehcache.EhCache=WARN
3.1.3 shiro.ini
[users]
# user 'root' with password 'secret' and the 'admin' role
root = secret, admin
# user 'guest' with the password 'guest' and the 'guest' role
guest = guest, guest
# user 'presidentskroob' with password '12345' ("That's the same combination on
# my luggage!!!" ;)), and role 'president'
presidentskroob = 12345, president
# user 'darkhelmet' with password 'ludicrousspeed' and roles 'darklord' and 'schwartz'
darkhelmet = ludicrousspeed, darklord, schwartz
# user 'lonestarr' with password 'vespa' and roles 'goodguy' and 'schwartz'
lonestarr = vespa, goodguy, schwartz

# -----------------------------------------------------------------------------
# Roles with assigned permissions
#
# Each line conforms to the format defined in the
# org.apache.shiro.realm.text.TextConfigurationRealm#setRoleDefinitions JavaDoc
# -----------------------------------------------------------------------------
[roles]
# 'admin' role has all permissions, indicated by the wildcard '*'
admin = *
# The 'schwartz' role can do anything (*) with any lightsaber:
schwartz = lightsaber:*
# The 'goodguy' role is allowed to 'drive' (action) the winnebago (type) with
# license plate 'eagle5' (instance specific id)
goodguy = winnebago:drive:eagle5
3.1.4 Quickstart
/**
 * Simple Quickstart application showing how to use Shiro's API.
 *
 * @since 0.9 RC2
 */
public class Quickstart {

    private static final transient Logger log = LoggerFactory.getLogger(Quickstart.class);


    public static void main(String[] args) {

        Factory<SecurityManager> factory = new IniSecurityManagerFactory("classpath:shiro.ini");
        SecurityManager securityManager = factory.getInstance();
        SecurityUtils.setSecurityManager(securityManager);

        // Now that a simple Shiro environment is set up, let's see what you can do:

        // get the currently executing user:
        //獲取當前的用戶對象 Subject
        Subject currentUser = SecurityUtils.getSubject();

        // Do some stuff with a Session (no need for a web or EJB container!!!)
        //通過當前用戶拿到session
        Session session = currentUser.getSession();
        session.setAttribute("someKey", "aValue");
        String value = (String) session.getAttribute("someKey");
        if (value.equals("aValue")) {
            log.info("Retrieved the correct value! [" + value + "]");
        }

        //判斷當前用戶是否被認證
        //Token:沒有獲取,直接設置令牌
        if (!currentUser.isAuthenticated()) {
            UsernamePasswordToken token = new UsernamePasswordToken("lonestarr", "vespa");
            token.setRememberMe(true);//設置記住我
            try {
                currentUser.login(token);//執行登錄操作
            } catch (UnknownAccountException uae) {
                log.info("There is no user with username of " + token.getPrincipal());
            } catch (IncorrectCredentialsException ice) {
                log.info("Password for account " + token.getPrincipal() + " was incorrect!");
            } catch (LockedAccountException lae) {
                log.info("The account for username " + token.getPrincipal() + " is locked.  " +
                        "Please contact your administrator to unlock it.");
            }
            // ... catch more exceptions here (maybe custom ones specific to your application?
            catch (AuthenticationException ae) {
                //unexpected condition?  error?
            }
        }

        //say who they are:
        //print their identifying principal (in this case, a username):
        log.info("User [" + currentUser.getPrincipal() + "] logged in successfully.");

        //test a role:
        if (currentUser.hasRole("schwartz")) {
            log.info("May the Schwartz be with you!");
        } else {
            log.info("Hello, mere mortal.");
        }
        //粗粒度
        //test a typed permission (not instance-level)
        if (currentUser.isPermitted("lightsaber:wield")) {
            log.info("You may use a lightsaber ring.  Use it wisely.");
        } else {
            log.info("Sorry, lightsaber rings are for schwartz masters only.");
        }
        //細粒度
        //a (very powerful) Instance Level permission:
        if (currentUser.isPermitted("winnebago:drive:eagle5")) {
            log.info("You are permitted to 'drive' the winnebago with license plate (id) 'eagle5'.  " +
                    "Here are the keys - have fun!");
        } else {
            log.info("Sorry, you aren't allowed to drive the 'eagle5' winnebago!");
        }
        //註銷
        //all done - log out!
        currentUser.logout();
        //結束
        System.exit(0);
    }
}

3.1.5 測試

3.2 整合SpringBoot,MyBatis,Thymeleaf
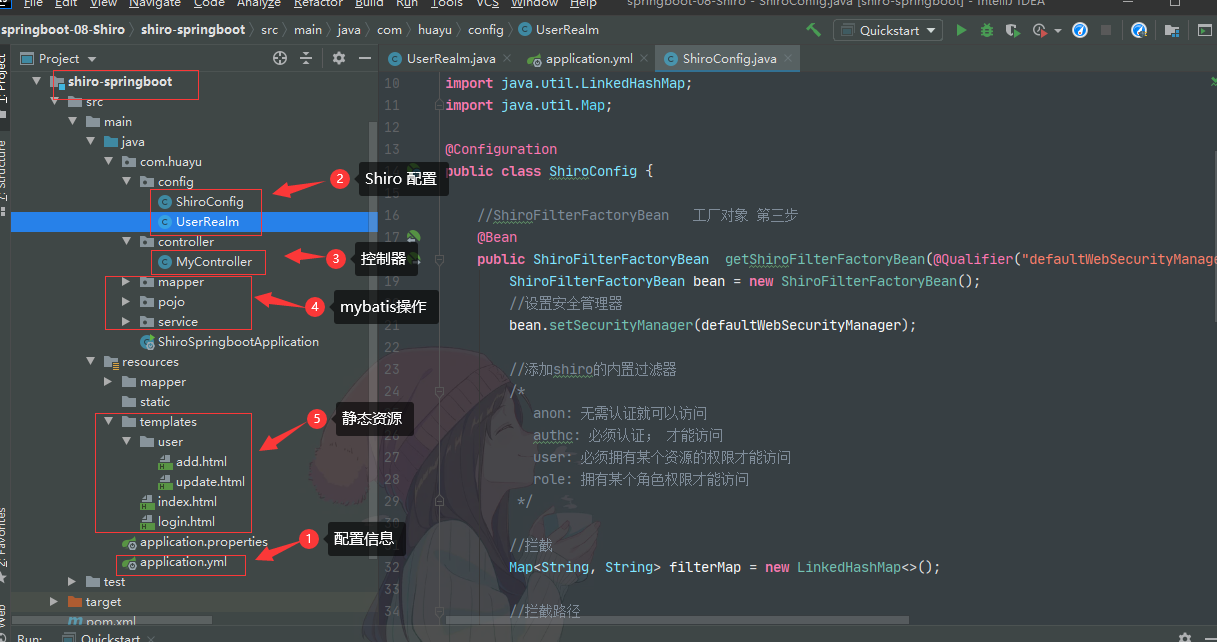
3.2.1 依賴
<!--
    Subject 用戶
    SecurityManger 管理所有用戶和
    Realm 連接資料庫
 -->
<!--shiro整合包-->
<dependency>
    <groupId>org.apache.shiro</groupId>
    <artifactId>shiro-spring</artifactId>
    <version>1.7.1</version>
</dependency>

<!--        thymeleaf模板  -->
<dependency>
    <groupId>org.thymeleaf</groupId>
    <artifactId>thymeleaf-spring5</artifactId>
</dependency>
<dependency>
    <groupId>org.thymeleaf.extras</groupId>
    <artifactId>thymeleaf-extras-java8time</artifactId>
</dependency>

<!--    log4j     -->
<dependency>
    <groupId>org.slf4j</groupId>
    <artifactId>slf4j-log4j12</artifactId>
    <version>1.7.21</version>
</dependency>
<dependency>
    <groupId>log4j</groupId>
    <artifactId>log4j</artifactId>
    <version>1.2.17</version>
</dependency>

<!-- druid -->
<dependency>
    <groupId>com.alibaba</groupId>
    <artifactId>druid</artifactId>
    <version>1.1.21</version>
</dependency>

<!-- mysql-connector-java -->
<dependency>
    <groupId>mysql</groupId>
    <artifactId>mysql-connector-java</artifactId>
    <scope>runtime</scope>
</dependency>

<!-- spring-boot-starter-jdbc -->
<dependency>
    <groupId>org.springframework.boot</groupId>
    <artifactId>spring-boot-starter-jdbc</artifactId>
</dependency>

<!-- mybatis-spring-boot-starter -->
<dependency>
    <groupId>org.mybatis.spring.boot</groupId>
    <artifactId>mybatis-spring-boot-starter</artifactId>
    <version>2.1.4</version>
</dependency>

<dependency>
    <groupId>org.projectlombok</groupId>
    <artifactId>lombok</artifactId>
    <version>1.18.22</version>
</dependency>

<!--  shiro-thymeleaf 整合-->
<!--導入thymeleaf依賴-->
<dependency>
    <groupId>org.thymeleaf</groupId>
    <artifactId>thymeleaf-spring5</artifactId>
    <version>3.0.11.RELEASE</version>
</dependency>
<dependency>
    <groupId>org.thymeleaf.extras</groupId>
    <artifactId>thymeleaf-extras-java8time</artifactId>
    <version>3.0.4.RELEASE</version>
</dependency>

<!--shiro-thymeleaf整合-->
<dependency>
    <groupId>com.github.theborakompanioni</groupId>
    <artifactId>thymeleaf-extras-shiro</artifactId>
    <version>2.0.0</version>
</dependency>
3.2.2 application.yml
spring:
  datasource:
    username: root
    password: 17585273765
    url: jdbc:mysql://localhost:3306/mybatis?serverTimezone=GMT&useUnicode=true&characterEncoding=utf-8
    driver-class-name: com.mysql.cj.jdbc.Driver
    type: com.alibaba.druid.pool.DruidDataSource

    #Spring Boot 預設是不註入這些屬性值的,需要自己綁定
    #druid 數據源專有配置
    initialSize: 5
    minIdle: 5
    maxActive: 20
    maxWait: 60000
    timeBetweenEvictionRunsMillis: 60000
    minEvictableIdleTimeMillis: 300000
    validationQuery: SELECT 1 FROM DUAL
    testWhileIdle: true
    testOnBorrow: false
    testOnReturn: false
    poolPreparedStatements: true

    #配置監控統計攔截的filters,stat:監控統計、log4j:日誌記錄、wall:防禦sql註入
    #如果允許時報錯  java.lang.ClassNotFoundException: org.apache.log4j.Priority
    #則導入 log4j 依賴即可,Maven 地址:https://mvnrepository.com/artifact/log4j/log4j
    filters: stat,wall,log4j
    maxPoolPreparedStatementPerConnectionSize: 20
    useGlobalDataSourceStat: true
    connectionProperties: druid.stat.mergeSql=true;druid.stat.slowSqlMillis=500

  thymeleaf:
    cache: false
3.2.3 靜態資源
3.2.3.1 login.html
<!DOCTYPE html>
<html lang="en" xmlns:th="http://www.themeleaf.org">
<head>
    <meta charset="UTF-8">
    <title>登錄頁面</title>
</head>
<body>

<h1>登錄</h1>

<p th:text="${msg}" style="color: red"></p>
<form th:action="@{/login}">
    <p>用戶名: <input type="text" name="username"></p>
    <p>密碼: <input type="text" name="password"></p>
    <p><input type="submit"></p>
</form>

</body>
</html>
3.2.3.2 index.html
<!DOCTYPE html>
<html lang="en" xmlns:th="http://www.themeleaf.org"
      xmlns:shiro="http://www.thymeleaf.org/thymeleaf-extras-shiro" >
<head>
    <meta charset="UTF-8">
    <title>首頁</title>
</head>
<body>

<h1>首頁</h1>
<p th:if="${session.loginUser} == null" >
    <a th:href="@{/toLogin}">登錄</a>
</p>

<p th:text="${msg}"></p>
<hr>

<div shiro:hasPermission="user:add">
    <a th:href="@{/user/add}">add</a>
</div>

<div shiro:hasPermission="user:update">
    <a th:href="@{/user/update}">update</a>
</div>


</body>
</html>
3.2.3.3 add.html
<!DOCTYPE html>
<html lang="en">
<head>
    <meta charset="UTF-8">
    <title>添加頁面</title>
</head>
<body>

<h1>add</h1>

</body>
</html>
3.2.3.4 update.html
<!DOCTYPE html>
<html lang="en">
<head>
    <meta charset="UTF-8">
    <title>修改頁面</title>
</head>
<body>

<h1>update</h1>

</body>
</html>
3.2.4 根據用戶名和密碼查詢用戶信息

3.2.5 shiro配置信息
3.2.5.1 UserRealm 認證
//自定義的 UserRealm  extends AuthorizingRealm
public class UserRealm extends AuthorizingRealm {

    @Autowired
    UserService userService;

    //授權
    @Override
    protected AuthorizationInfo doGetAuthorizationInfo(PrincipalCollection principalCollection) {
        System.out.println("執行了=>授權doGetAuthorizationInfo");

        SimpleAuthorizationInfo info = new SimpleAuthorizationInfo();

        //info.addStringPermission("user:add");  //給用戶添加add許可權

        //拿到當前登錄的這個對象
        Subject subject = SecurityUtils.getSubject();
        User currentUser  = (User)subject.getPrincipal();  //Shiro取出當前對象   拿到user對象

        //設置當前用戶的許可權
        info.addStringPermission(currentUser.getPerms());

        return info;
    }

    //認證
    @Override
    protected AuthenticationInfo doGetAuthenticationInfo(AuthenticationToken token) throws AuthenticationException {
        System.out.println("執行了=>認證doGetAuthenticationInfo");

        //用戶名 密碼  模擬 資料庫中取
//        String name = "root";
//        String password = "123456";


        UsernamePasswordToken userToken = (UsernamePasswordToken)token;

        //連接真實資料庫
        User user = userService.queryUserByName(userToken.getUsername());


        //模擬判斷
/*       if (!userToken.getUsername().equals(name)){
            return null; //拋出異常 UnknownAccountException
        }

        //密碼認證 shiro
        return new SimpleAuthenticationInfo("",user.password,"");
*/

        //資料庫判斷
        if(user == null){ //沒有這個人
            return  null;
        }

        //獲取session對象,保存user對象
        Subject currentSubject = SecurityUtils.getSubject();
        Session session = currentSubject.getSession();
        session.setAttribute("loginUser",user);

        //可以加密:md5  md5鹽值加密
        //密碼認證 shiro
        //第一個參數user是為了傳遞參數
        return new SimpleAuthenticationInfo(user,user.getPwd(),"");
    }
}
3.2.5.2 ShiroConfig 授權
@Configuration
public class ShiroConfig {

    //ShiroFilterFactoryBean   工廠對象 第三步
    @Bean
    public ShiroFilterFactoryBean  getShiroFilterFactoryBean(@Qualifier("defaultWebSecurityManager") DefaultWebSecurityManager defaultWebSecurityManager){
        ShiroFilterFactoryBean bean = new ShiroFilterFactoryBean();
        //設置安全管理器
        bean.setSecurityManager(defaultWebSecurityManager);

        //添加shiro的內置過濾器
        /*
           anon: 無需認證就可以訪問
           authc: 必須認證; 才能訪問
           user: 必須擁有某個資源的許可權才能訪問
           role: 擁有某個角色許可權才能訪問
         */

        //攔截
        Map<String, String> filterMap = new LinkedHashMap<>();

        //攔截路徑
//        filterMap.put("/user/add","authc");
//        filterMap.put("/user/update","authc");

        //授權 ,正常情況下,沒有授權會跳到未授權頁面
        filterMap.put("/user/add","perms[user:add]"); //有add許可權的user才可以訪問/user/add
        filterMap.put("/user/update","perms[user:update]");

        bean.setFilterChainDefinitionMap(filterMap);

        bean.setLoginUrl("/toLogin"); //設置登錄的請求

        //未授權頁面
        bean.setUnauthorizedUrl("/noauth");

        return bean;
    }

    //DefaultWebSecurityManger  安全對象  第二步
    @Bean("defaultWebSecurityManager")
    public DefaultWebSecurityManager getDefaultWebSecurityManager(@Qualifier("userRealm") UserRealm userRealm){
        DefaultWebSecurityManager securityManager = new DefaultWebSecurityManager();
        //關聯 userRealm
        securityManager.setRealm(userRealm);
        return securityManager;
    }

    //創建 realm 對象  ,需要自定義類  第一步
    @Bean(name = "userRealm")
    public UserRealm userRealm(){
        return  new UserRealm();
    }

    //整合ShiroDialect:用來整合 Shiro
    @Bean
    public ShiroDialect getShiroDialect(){
        return new ShiroDialect();
    }

}
3.2.6 控制層
@Controller
public class MyController {

    //index
    @GetMapping({"/","/index"})
    public String toIndex(Model model){
        model.addAttribute("msg","hello,shiro");
        return "index";
    }

    //add
    @RequestMapping("/user/add")
    public String add(){
        return "user/add";
    }

    //update
    @RequestMapping("/user/update")
    public String update(){
        return "user/update";
    }

    //去登錄
    @RequestMapping("/toLogin")
    public String toLogin(){
        return "login";
    }

    //登錄
    @RequestMapping("/login")
    public String login( String username, String password,Model model){
        //獲取當前的用戶
        Subject subject = SecurityUtils.getSubject();
        //封裝用戶的登陸數據
        UsernamePasswordToken token = new UsernamePasswordToken(username, password);

        try {
            subject.login(token); //執行登陸方法,如果沒有異常就說明Ok
            return "index";  //登錄成功,返迴首頁
        }catch (UnknownAccountException e){ //用戶名bu存在
            model.addAttribute("msg","用戶名錯誤");
            return "login";
        }catch (IncorrectCredentialsException e){  //密碼不存在
            model.addAttribute("msg","密碼錯誤");
            return "login";
        }
    }

    //未授權
    @RequestMapping("/noauth")
    @ResponseBody
    public String unauthorized(){
        return "未經授權無法訪問此頁面!!!";
    }


}
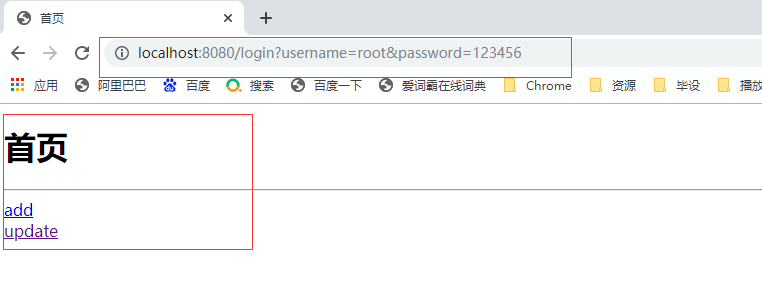
3.2.7 測試
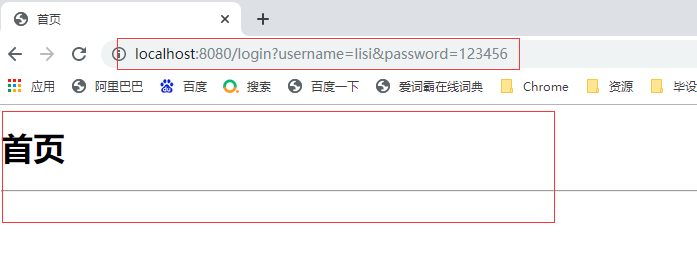
3.2.7.1 沒有許可權
3.2.7.2 add 許可權

3.2.7.3 update 許可權

3.2.7.4 add + update 許可權
