這裡給大家分享我在網上總結出來的一些知識,希望對大家有所幫助 一、前言 入職的第一個需求是跟著一位前端大佬一起完成的一個活動項目。 由於是一起開發,當然不會放過閱讀大佬的代碼的機會。 因為我的頁面中需要使用到倒計時功能,發現大佬的已經寫了個現成的倒計時組件,於是直接就拿過來用了。 傳個參數就實現了功 ...
這裡給大家分享我在網上總結出來的一些知識,希望對大家有所幫助
一、前言
入職的第一個需求是跟著一位前端大佬一起完成的一個活動項目。
由於是一起開發,當然不會放過閱讀大佬的代碼的機會。
因為我的頁面中需要使用到倒計時功能,發現大佬的已經寫了個現成的倒計時組件,於是直接就拿過來用了。
傳個參數就實現了功能的感覺真是太棒了。項目完成後,就膜拜了一下大佬的倒計時組件的代碼。真是讓我學到了不少。列舉如下:
1.計時器為什麼要用setTimeout而不用setInterval
2.為什麼不直接將剩餘時間-1。
3.如何將所需要的時間返回出去(有可能我只需要分鐘和秒數,那就只返回分鐘和秒數,也有可能我全都要)。
4.不確定介面返回的是剩餘時間還是截止日期,該怎麼同時相容這兩種情況。
5.不確定介面返回的時間是秒還是毫秒單位。
好了,你可能不太理解這些問題,但是沒關係,看完下麵的解釋,相信你會豁然開朗。
二、開始手操
1. 先創建一個vue組件
<template>
  <div class="_base-count-down">
  </div>
</template>
<script>

export default {
  data: () => ({

  }),
  props: {

  },
};
</script>
<style lang='scss' scoped>

</style>
2. 實現基本的倒計時組件
接下來,假設介面獲得的是一個剩餘時間。
將剩餘時間time傳入這個倒計時組件,由於time可能是秒為單位的,也有可能是毫秒為單位的,所以我們需要在傳入time的是有也傳入一個isMilliSecond來告訴倒計時組件這個time是毫秒還是秒為單位的。如下代碼中的props所示。
<template>
  <div class="_base-count-down">
  </div>
</template>
<script>

export default {
  data: () => ({
  }),
  props: {
    time: {
      type: [Number, String],
      default: 0
    },
    isMilliSecond: {
      type: Boolean,
      default: false
    }
  },
  computed: {
    duration() {
      const time = this.isMiniSecond ? Math.round(+this.time / 1000) : Math.round(+this.time);
      return time;
    }
  },
};
</script>
<style lang='scss' scoped>

</style>
computed中的duration是將time進行轉化的結果,不管time是毫秒還是秒,都轉化為秒 不知道你註意到了沒有:+this.time。為什麼要在前面加個‘+’號。這點很值得我們學習,因為介面返回的一串數字有時候是字元串的形式,有時候是數字的形式(不能過分相信後端同學,必須自己做好防範)。所以通過前面加個‘+’號 通通轉化為數字。現在的duration就是轉化後的time啦!
我們獲得duration之後就可以開始倒計時了
<template>
  <div class="_base-count-down">
  </div>
</template>
<script>

export default {
  data: () => ({
  }),
  props: {
    time: {
      type: [Number, String],
      default: 0
    },
    isMilliSecond: {
      type: Boolean,
      default: false
    }
  },
  computed: {
    duration() {
      const time = this.isMiniSecond ? Math.round(+this.time / 1000) : Math.round(+this.time);
      return time;
    }
  },
  // 新增代碼:
  mounted() {
    this.countDown();
  },
  methods: {
    countDown() {
      this.getTime(this.duration);
    },
  }
};
</script>
<style lang='scss' scoped>

</style>
在這裡創建了一個countDown方法,表示開始倒計時的意思,已進入頁面就開始執行countdown方法。
countDown方法調用了getTime方法,getTime需要傳入duration這個參數,也就是我們獲得的剩餘時間。
現在來實現一下這個方法。
<template>
  <div class="_base-count-down">
    還剩{{days}}天{{hours}}:{{mins}}:{{seconds}}
  </div>
</template>
<script>

export default {
  data: () => ({
    days: '0',
    hours: '00',
    mins: '00',
    seconds: '00',
    timer: null,
  }),
  props: {
    time: {
      type: [Number, String],
      default: 0
    },
    isMilliSecond: {
      type: Boolean,
      default: false
    }
  },
  computed: {
    duration() {
      const time = this.isMiniSecond ? Math.round(+this.time / 1000) : Math.round(+this.time);
      return time;
    }
  },
  mounted() {
    this.countDown();
  },
  methods: {
    countDown() {
      this.getTime(this.duration);
    },
    // 新增代碼:
    getTime(duration) {
      this.timer && clearTimeout(this.timer);
      if (duration < 0) {
        return;
      }
      const { dd, hh, mm, ss } = this.durationFormatter(duration);
      this.days = dd || 0;
      this.hours = hh || 0;
      this.mins = mm || 0;
      this.seconds = ss || 0;
      this.timer = setTimeout(() => {
        this.getTime(duration - 1);
      }, 1000);
    }
  }
};
</script>
<style lang='scss' scoped>

</style>
可以看到,getTime的目的就是獲得 days,hours,mins,seconds,然後顯示到html上,並且通過定時器實時來刷新days,hours,mins,seconds這個幾個值。從而實現了倒計時。很簡單,有木有?
durationFormatter是一個將duration轉化成天數,小時,分鐘,秒數的方法,很簡單,可以看下它的具體實現。
durationFormatter(time) {
  if (!time) return { ss: 0 };
  let t = time;
  const ss = t % 60;
  t = (t - ss) / 60;
  if (t < 1) return { ss };
  const mm = t % 60;
  t = (t - mm) / 60;
  if (t < 1) return { mm, ss };
  const hh = t % 24;
  t = (t - hh) / 24;
  if (t < 1) return { hh, mm, ss };
  const dd = t;
  return { dd, hh, mm, ss };
},
好了,問題開始來了!!
3. 為什麼要用setTimeout來模擬setInterval的行為?
這裡用setInerval不是更方便嗎?
setTimeout(function(){··· }, n); // n毫秒後執行function
setInterval(function(){··· }, n); // 每隔n毫秒執行一次function
可以看看setInterval有什麼缺點:
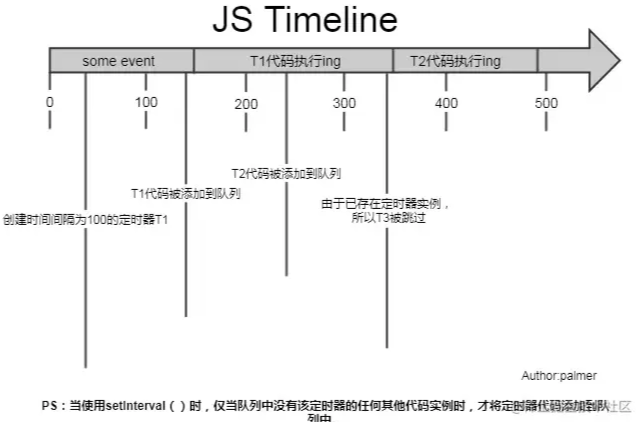
再次強調,定時器指定的時間間隔,表示的是何時將定時器的代碼添加到消息隊列,而不是何時執行代碼。所以真正何時執行代碼的時間是不能保證的,取決於何時被主線程的事件迴圈取到,並執行。
setInterval(function, N)
//即:每隔N秒把function事件推到消息隊列中

上圖可見,setInterval每隔100ms往隊列中添加一個事件;100ms後,添加T1定時器代碼至隊列中,主線程中還有任務在執行,所以等待,some event執行結束後執行T1定時器代碼;又過了100ms,T2定時器被添加到隊列中,主線程還在執行T1代碼,所以等待;又過了100ms,理論上又要往隊列里推一個定時器代碼,但由於此時T2還在隊列中,所以T3不會被添加,結果就是此時被跳過;這裡我們可以看到,T1定時器執行結束後馬上執行了T2代碼,所以並沒有達到定時器的效果。
綜上所述,setInterval有兩個缺點:
1.使用setInterval時,某些間隔會被跳過;
2.可能多個定時器會連續執行;
可以這麼理解:每個setTimeout產生的任務會直接push到任務隊列中;而setInterval在每次把任務push到任務隊列前,都要進行一下判斷(看上次的任務是否仍在隊列中)。
因而我們一般用setTimeout模擬setInterval,來規避掉上面的缺點。
4. 為什麼要clearTimeout(this.timer)
第二問:為什麼要有this.timer && clearTimeout(this.timer);這一句?
假設一個場景:
如圖所示,在倒計時的父組件中,有兩個按鈕,點擊活動一就會傳入活動一的剩餘時間,點擊活動二,就會傳入活動二的時間。
如果此時倒計時組件正在做活動一的倒計時,然後點擊活動二,就要會馬上傳入新的time,這個時候就需要重新計時。當然,這裡並不會重新計時,因為組件的mounted只會執行一次。也就是說this.countDown();只會執行一次,也就是說this.getTime(this.duration);只會執行一次,因此duration還是活動一的時間,怎麼辦呢?watch派上用場了。
我們來監聽duration,如果發現duration變化,說明新的時間time傳入組件,這時就要重新調用this.countDown()。
代碼如下:
<template>
  <div class="_base-count-down">
    還剩{{day}}天{{hours}}:{{mins}}:{{seconds}}
  </div>
</template>
<script>

export default {
  data: () => ({
    days: '0',
    hours: '00',
    mins: '00',
    seconds: '00',
    timer: null,
  }),
  props: {
    time: {
      type: [Number, String],
      default: 0
    },
    isMilliSecond: {
      type: Boolean,
      default: false
    }
  },
  computed: {
    duration() {
      const time = this.isMiniSecond ? Math.round(+this.time / 1000) : Math.round(+this.time);
      return time;
    }
  },
  mounted() {
    this.countDown();
  },
  // 新增代碼:
  watch: {
    duration() {
      this.countDown();
    }
  },
  methods: {
    countDown() {
      this.getTime(this.duration);
    },
    durationFormatter(){...}
    getTime(duration) {
      this.timer && clearTimeout(this.timer);
      if (duration < 0) {
        return;
      }
      const { dd, hh, mm, ss } = this.durationFormatter(duration);
      this.days = dd || 0;
      this.hours = hh || 0;
      this.mins = mm || 0;
      this.seconds = ss || 0;
      this.timer = setTimeout(() => {
        this.getTime(duration - 1);
      }, 1000);
    }
  }
};
</script>
<style lang='scss' scoped>

</style>
好了,但是並沒有解釋上面提出的那個問題:為什麼要有this.timer && clearTimeout(this.timer);這一句?
這樣,假設現在頁面顯示的是活動一的時間,這時,執行到setTimeout,在一秒後就會把setTimeout里的回調函數放到任務隊列中,註意是一秒後哦!這時,然而,在這一秒的開頭,我們點擊了活動二按鈕,這時候的活動二的時間就會傳入倒計時組件中,然後觸發countDown(),也就調用this.getTime(this.duration);,然後執行到setTimeout,也會一秒後把回調函數放到任務隊列中。
這時,任務隊列中就會有兩個setTimeout的回調函數了。等待一秒過去,兩個回調函數相繼執行,我們就會看到頁面上的時間一下子背減了2,實際上是很快速地進行了兩遍減1的操作。
這就是為什麼要添加上this.timer && clearTimeout(this.timer);這一句的原因了。就是要把上一個setTimeout清除掉。
5. 使用 diffTime
當你認為這是一個完美的組件的時候,你想把這個組件用到項目上,假設你也確實用了,而且還上線了,確發現出現了個大問題:當頁面打開的時候,倒計時開始了,時間是 還剩1天12:25:25,然後有人給你發微信,你馬上切換到微信,回覆消息後切回瀏覽器,發現倒計時時間卻還是還剩1天12:25:25。你慌了:你寫的代碼出現bug了!
這是怎麼回事?
出於節能的考慮, 部分瀏覽器在進入後臺時(或者失去焦點時), 會將 setTimeout 等定時任務暫停 待用戶回到瀏覽器時, 才會重新激活定時任務
說是暫停, 其實應該說是延遲, 1s 的任務延遲到 2s, 2s 的延遲到 5s, 實際情況因瀏覽器而異。
原來如此,看來不能每次都只是減1這麼簡單了(畢竟你把瀏覽器切到後臺之後setTimeout就冷卻了,等幾秒後切回,然後執行setTimeout,只是減了一秒而已)。
所以我們需要改寫一下getTime方法。
<template>
  <div class="_base-count-down">
    還剩{{day}}天{{hours}}:{{mins}}:{{seconds}}
  </div>
</template>
<script>

export default {
  data: () => ({
    days: '0',
    hours: '00',
    mins: '00',
    seconds: '00',
    timer: null,
    curTime: 0,// 新增代碼:
  }),
  props: {
    time: {
      type: [Number, String],
      default: 0
    },
    isMilliSecond: {
      type: Boolean,
      default: false
    }
  },
  computed: {
    duration() {
      const time = this.isMiniSecond ? Math.round(+this.time / 1000) : Math.round(+this.time);
      return time;
    }
  },
  mounted() {
    this.countDown();
  },

  watch: {
    duration() {
      this.countDown();
    }
  },
  methods: {
    countDown() {
      // 新增代碼:
      this.curTime = Date.now();
      this.getTime(this.duration);
    },
    durationFormatter(){...}
    getTime(duration) {
      this.timer && clearTimeout(this.timer);
      if (duration < 0) {
        return;
      }
      const { dd, hh, mm, ss } = this.durationFormatter(duration);
      this.days = dd || 0;
      this.hours = hh || 0;
      this.mins = mm || 0;
      this.seconds = ss || 0;
      this.timer = setTimeout(() => {
        // 新增代碼:
        const now = Date.now();
        const diffTime = Math.floor((now - this.curTime) / 1000);
        this.curTime = now;
        this.getTime(duration - diffTime);
      }, 1000);
    }
  }
};
</script>
<style lang='scss' scoped>

</style>
可以看到,我們在三個位置添加了新的代碼。
首先在data了添加了curTime這個變數,然後在執行countDown的時候給curTime賦值Date.now(),也就是當前的時刻,也就是顯示在頁面上的那個時刻。
然後看修改的第三處代碼。可以看到是將-1改成了-diffTime。
now 是 setTimeout的回調函數執行的時候的那個時刻。
因而 diffTime 則 表示 當前這個setTimeout的回調函數執行的時刻距離上 頁面上的剩餘時間上一次變化的時間段。其實也就是 當前這個setTimeout的回調函數執行的時刻距離上 一個setTimeout的回調函數執行的時刻時間段。
可能你還是不太能理解diffTime。舉個例子:
你打開了這個倒計時頁面,於是執行了countDown,也就是說要執行getTime這個方法了。也就是會馬上執行下列的代碼。
this.days = dd || 0;
this.hours = hh || 0;
this.mins = mm || 0;
this.seconds = ss || 0;
執行完這些代碼頁面上就會出現剩餘時間。
而this.curTime = Date.now(); 就記錄下了此刻的時間點。
然後一秒後執行setTimeout里的回調函數:
const now = Date.now(); 記錄當前這個setTimeout的回調函數執行的時間點。
const diffTime = Math.floor((now - this.curTime) / 1000); 記錄當前這個setTimeout的回調函數執行的時間點距離頁面上開始 渲染 剩餘時間的 這一段時間。其實此時的diffTime就是=1。
然後this.curTime = now; 將curTime的值變成當前這個setTimeout的回調函數執行的時間點。
this.getTime(duration - diffTime); 其實就是this.getTime(duration - 1);
然後又執行getTime,就會重新執行下麵的代碼,有渲染了新的剩餘時間。
this.days = dd || 0;
this.hours = hh || 0;
this.mins = mm || 0;
this.seconds = ss || 0;
然後一秒後又要執行setTmieout的回調函數,在這一秒還沒結束的時候,我們將瀏覽器切到後臺,此時setTimeout冷卻了。等5秒後再切回。於是setTmieout的回調函數才得以執行。
這時const now = Date.now(); 記錄當前這個setTimeout的回調函數執行的時間點。
而curTime是上一個setTimeout的回調函數執行的時間。
所以const diffTime = Math.floor((now - this.curTime) / 1000);實際上,diffTime的值就是5秒。
因而this.getTime(duration - diffTime); 其實就是this.getTime(duration - 5);
這樣就完美解決了因為瀏覽器切到後臺,導致剩餘時間不變的問題。
6. 添加新功能:可以傳入到期時間。
之前是只能傳入剩餘時間的,現在希望也支持傳入到期時間。
只需要改動一下duration就好了。
  computed: {
    duration() {
      if (this.end) {
        let end = String(this.end).length >= 13 ? +this.end : +this.end * 1000;
        end -= Date.now();
        return end;
      }
      const time = this.isMiniSecond ? Math.round(+this.time / 1000) : Math.round(+this.time);
      return time;
    }
  },
判斷傳入的end的長度是否大於13來判斷是秒還是毫秒。輕鬆!
7. 添加新功能:可以選擇要顯示的內容,例如只顯示秒,或者只顯示小時。
只需要改動一下html:
<template>
  <div class="_base-count-down no-rtl">
    <div class="content">
      <slot v-bind="{
        d: days, h: hours, m: mins, s: seconds,
        hh: `00${hours}`.slice(-2),
        mm: `00${mins}`.slice(-2),
        ss: `00${seconds}`.slice(-2),
      }"></slot>
    </div>
  </div>
</template>
很巧妙有沒有,只需要用插槽,就把倒計時組件,也就是把子組件的值傳遞給父組件了。
看看父組件是怎麼使用這個組件的。
<base-counter v-slot="timeObj" :time="countDown">
  <div class="count-down">
    <div class="icon"></div>
    {{timeObj.d}}天{{timeObj.hh}}小時{{timeObj.mm}}分鐘{{timeObj.ss}}秒
  </div>
</base-counter>
看,如此巧妙又簡單。
發現00${hours}.slice(-2) 這種寫法也很值得學習。以前在獲得到分鐘的時候,要手動判斷獲得的分鐘是兩位數還是一位數,如果是一位數的話就要在前面手動補上0。就像下麵的代碼:
var StartMinute = startDate.getMinutes().toString().length >= 2 ? startDate.getMinutes() : '0' + startDate.getHours();
而00${hours}.slice(-2) 則不用判斷,先補上0再說,然後再從後面往前截取兩位。
到此。
一個完美的倒計時組件就完成了。
三、學習總結
1.明白了setInterval的缺點以及用setTimeout代替setInterval。
2.學到了“+”,操作,不管三七二十一,將介面得到的長串數字轉化為數字保平安。
3.利用clearTimeout來清除掉之前的計時器,以防止造成影響。
4.學會使用v-slot來子傳父傳值
5.學會一個倒計時組件,為了以後方便cv操作。把組件完整代碼貼上:
最後
全部代碼如下:
<template>
  <div class="time-box">
    還剩{{days}}天{{`00${hours}`.slice(-2)}}:{{`00${mins}`.slice(-2)}}:{{`00${seconds}`.slice(-2)}}
  </div>
</template>
<script>

export default {
  name: 'compTime',
  data: () => ({
    days: '0',
    hours: '00',
    mins: '00',
    seconds: '00',
    timer: null,
    curTime: 0,
  }),
  props: {
    time:{
      type:[Number,String],
      default:0
    },
    refreshCounter:{
      type:[Number,String],
      default:0
    },
    end:{
      type:[Number,String],
      default:0
    },
    isMilliSecond:{
      type:Boolean,
      default: false
    }
  },
  //傳入數據處理
  computed:{
    duration(){
      if(this.end){

        let end = String(this.end).length >= 13 ? +this.end : +this.end * 1000
        end -= Date.now()
        return (end / 1000).toFixed(0)
      }
      const time = this.isMilliSecond ? Math.round(+this.time/1000):Math.round(+this.time)
      return time
    }
  },
  mounted() {
    this.countDown()
  },
  watch:{
    duration(){
      this.countDown()
    },
    refreshCounter(){
      this.countDown()
    }
  },
  methods:{
    //總啟動
    countDown(){
      this.curTime = Date.now()
      this.getTime(this.duration)
    },
    //定時器方法,定時獲取時間
    getTime(duration){
      this.timer && clearTimeout(this.timer)
      if(duration < 0){
        return
      }
      const { dd,hh,mm,ss } = this.durationForMatter(duration)
      this.days = dd || 0
      this.hours = hh || 0
      this.mins = mm || 0
      this.seconds = ss || 0
      this.timer = setTimeout(()=>{
        const now = Date.now()
        const diffTime = Math.floor((now - this.curTime) / 1000)
        const step = diffTime > 1?diffTime:1
        this.curTime = now
        this.getTime(duration - step)
      },1000)
    },
    durationForMatter(time){
      if(!time) return { ss:0 }
      let t = time
      const ss = t % 60
      t = (t - ss) / 60
      if(t < 1) return { ss }
      const mm = t % 60
      t = (t - mm) / 60
      if(t < 1)return { mm,ss }
      const hh = t % 24
      t = (t - hh) / 24
      if(t< 1)return { hh,mm,ss }
      const dd = t
      return { dd,hh,mm,ss }
    }
  }
};
</script>
<style lang='stylus' scoped>
 .time-box
   width 100%
   line-height 100px
   font-weight bold
   font-size 30px
   text-align center
   background white
</style>


