在上篇文章中,我為構建自定義端點可視化圖奠定了基礎,正如我在第一篇文章中展示的那樣。該圖顯示了端點路由的不同部分:文字值,參數,動詞約束和產生結果的端點: 在本文中,我將展示如何通過創建一個自定義的DfaGraphWriter來為自己的應用程式創建一個端點圖。 這篇文章使用了本系列前幾篇文章中的技巧 ...
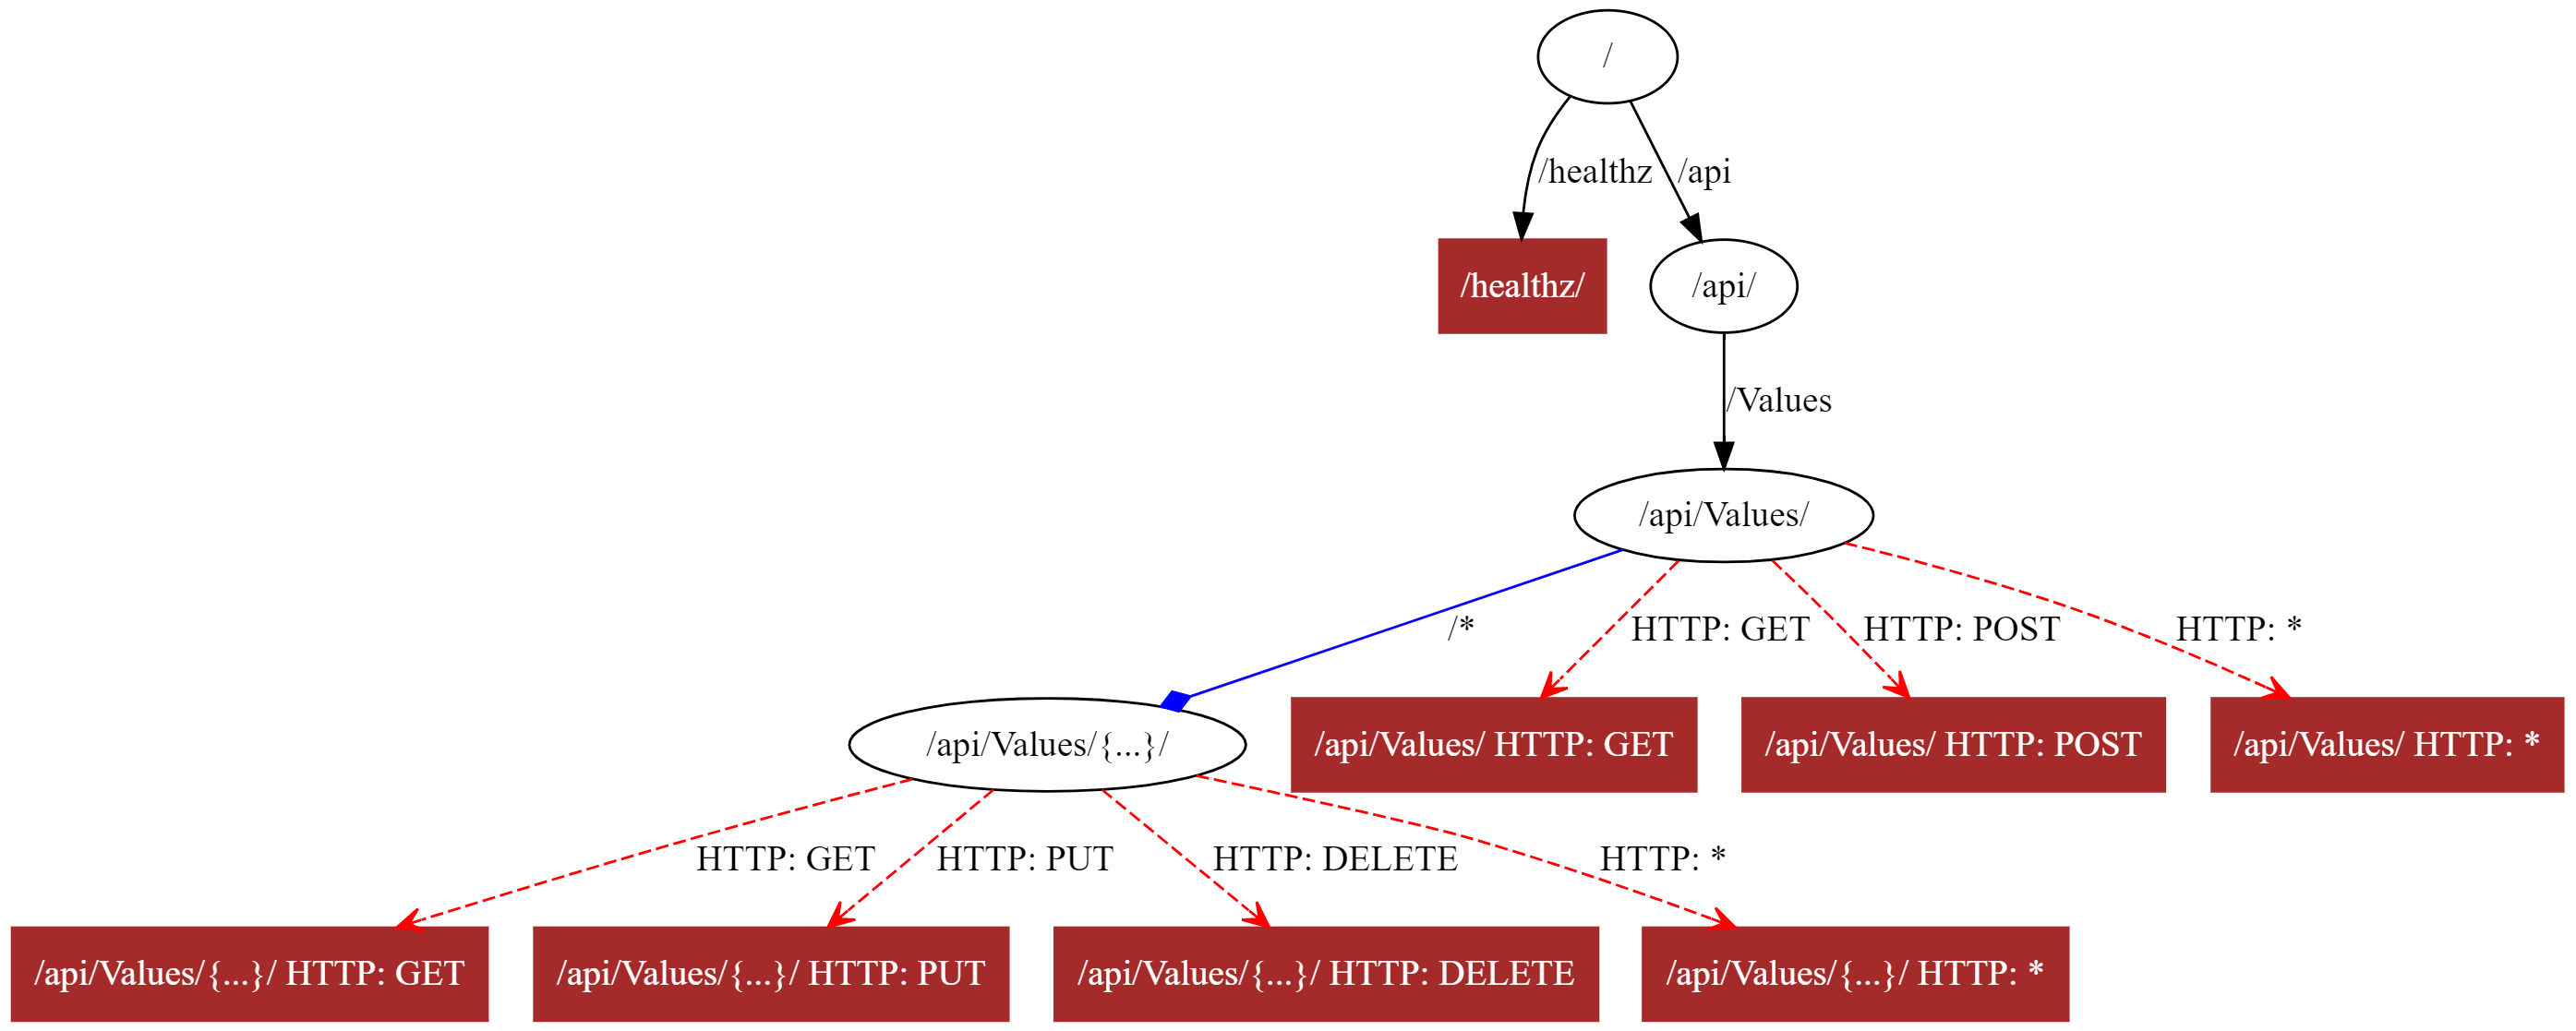
在上篇文章中,我為構建自定義端點可視化圖奠定了基礎,正如我在第一篇文章中展示的那樣。該圖顯示了端點路由的不同部分:文字值,參數,動詞約束和產生結果的端點:

在本文中,我將展示如何通過創建一個自定義的DfaGraphWriter來為自己的應用程式創建一個端點圖。
這篇文章使用了本系列前幾篇文章中的技巧和類,因此我強烈建議在繼續之前先閱讀這些技巧和類。
作者:依樂祝
原文鏈接:https://andrewlock.net/creating-a-custom-endpoint-visualization-graph/
為端點圖添加配置
我們首先要看的是如何配置最終端點圖的外觀。我們將為兩種類型的節點和四種類型的邊緣添加配置。邊是:
- 文字邊緣:路線部分,例如
api和values中的文字匹配api/values/{id}。 - 參數邊緣:路線的參數化部分,例如
{id}route中api/values/{id}。 - 捕獲所有邊:與“全部捕獲”路由參數相對應的邊,例如
{**slug}。 - 策略邊緣:與URL以外的其他約束相對應的邊緣。例如,圖中的基於HTTP謂詞的邊
HTTP: GET。
節點是:
- 匹配節點:與端點匹配關聯的節點,因此將生成響應。
- 預設節點:不與端點匹配關聯的節點。
每個節點和邊都可以具有任意數量的Graphviz屬性來控制其顯示。下麵的GraphDisplayOptions顯示了我在本文開始時用於生成圖形的預設值:
public class GraphDisplayOptions
{
    /// <summary>
    /// Additional display options for literal edges
    /// </summary>
    public string LiteralEdge { get; set; } = string.Empty;

    /// <summary>
    /// Additional display options for parameter edges
    /// </summary>
    public string ParametersEdge { get; set; } = "arrowhead=diamond color=\"blue\"";

    /// <summary>
    /// Additional display options for catchall parameter edges
    /// </summary>
    public string CatchAllEdge { get; set; } = "arrowhead=odot color=\"green\"";

    /// <summary>
    /// Additional display options for policy edges
    /// </summary>
    public string PolicyEdge { get; set; } = "color=\"red\" style=dashed arrowhead=open";

    /// <summary>
    /// Additional display options for node which contains a match
    /// </summary>
    public string MatchingNode { get; set; } = "shape=box style=filled color=\"brown\" fontcolor=\"white\"";

    /// <summary>
    /// Additional display options for node without matches
    /// </summary>
    public string DefaultNode { get; set; } = string.Empty;
}
我們現在可以使用這個對象來控制顯示,並使用上一篇文章中所示的ImpromptuInterface“代理”技術來創建我們的自定義圖形編寫器。
創建自定義的DfaGraphWriter
我們的自定義圖形編輯器(巧妙地稱為CustomDfaGraphWriter)在很大程度上基於包含在ASP.NET Core中的DfaGraphWriter。該類的主體與原始類相同,但有以下更改:
- 將
GraphDisplayOptions註入類中以自定義顯示。 - 使用ImpromptuInterface庫來處理內部
DfaMatcherBuilder和DfaNode類,如上一篇文章中所示。 - 自定義
WriteNode函數以使用我們的自定義樣式。 - 添加一個
Visit函數來處理IDfaNode介面,而不是在內部DfaNode類上使用Visit()方法。
CustomDfaGraphWriter的全部代碼如下所示,重點是主Write()功能。我保持了與原始版本幾乎相同的實現,只是更新了我們必須更新的部分。
public class CustomDfaGraphWriter
{
    // Inject the GraphDisplayOptions
    private readonly IServiceProvider _services;
    private readonly GraphDisplayOptions _options;
    public CustomDfaGraphWriter(IServiceProvider services, GraphDisplayOptions options)
    {
        _services = services;
        _options = options;
    }

    public void Write(EndpointDataSource dataSource, TextWriter writer)
    {
        // Use ImpromptuInterface to create the required dependencies as shown in previous post
        Type matcherBuilder = typeof(IEndpointSelectorPolicy).Assembly
            .GetType("Microsoft.AspNetCore.Routing.Matching.DfaMatcherBuilder");

        // Build the list of endpoints used to build the graph
        var rawBuilder = _services.GetRequiredService(matcherBuilder);
        IDfaMatcherBuilder builder = rawBuilder.ActLike<IDfaMatcherBuilder>();

        // This is the same logic as the original graph writer
        var endpoints = dataSource.Endpoints;
        for (var i = 0; i < endpoints.Count; i++)
        {
            if (endpoints[i] is RouteEndpoint endpoint && (endpoint.Metadata.GetMetadata<ISuppressMatchingMetadata>()?.SuppressMatching ?? false) == false)
            {
                builder.AddEndpoint(endpoint);
            }
        }

        // Build the raw tree from the registered routes
        var rawTree = builder.BuildDfaTree(includeLabel: true);
        IDfaNode tree = rawTree.ActLike<IDfaNode>();

        // Store a list of nodes that have already been visited
        var visited = new Dictionary<IDfaNode, int>();

        // Build the graph by visiting each node, and calling WriteNode on each
        writer.WriteLine("digraph DFA {");
        Visit(tree, WriteNode);
        writer.WriteLine("}");

        void WriteNode(IDfaNode node)
        {
            /* Write the node to the TextWriter */
            /* Details shown later in this post*/
        }
    }

    static void Visit(IDfaNode node, Action<IDfaNode> visitor)
    {
        /* Recursively visit each node in the tree. */
        /* Details shown later in this post*/
    }
}
為了簡潔起見,我在這裡省略了Visit和 WriteNode函數,但是我們會儘快對其進行研究。我們將從Visit函數開始,因為該函數最接近原始函數。
更新Visit函數以與IDfaNode一起使用
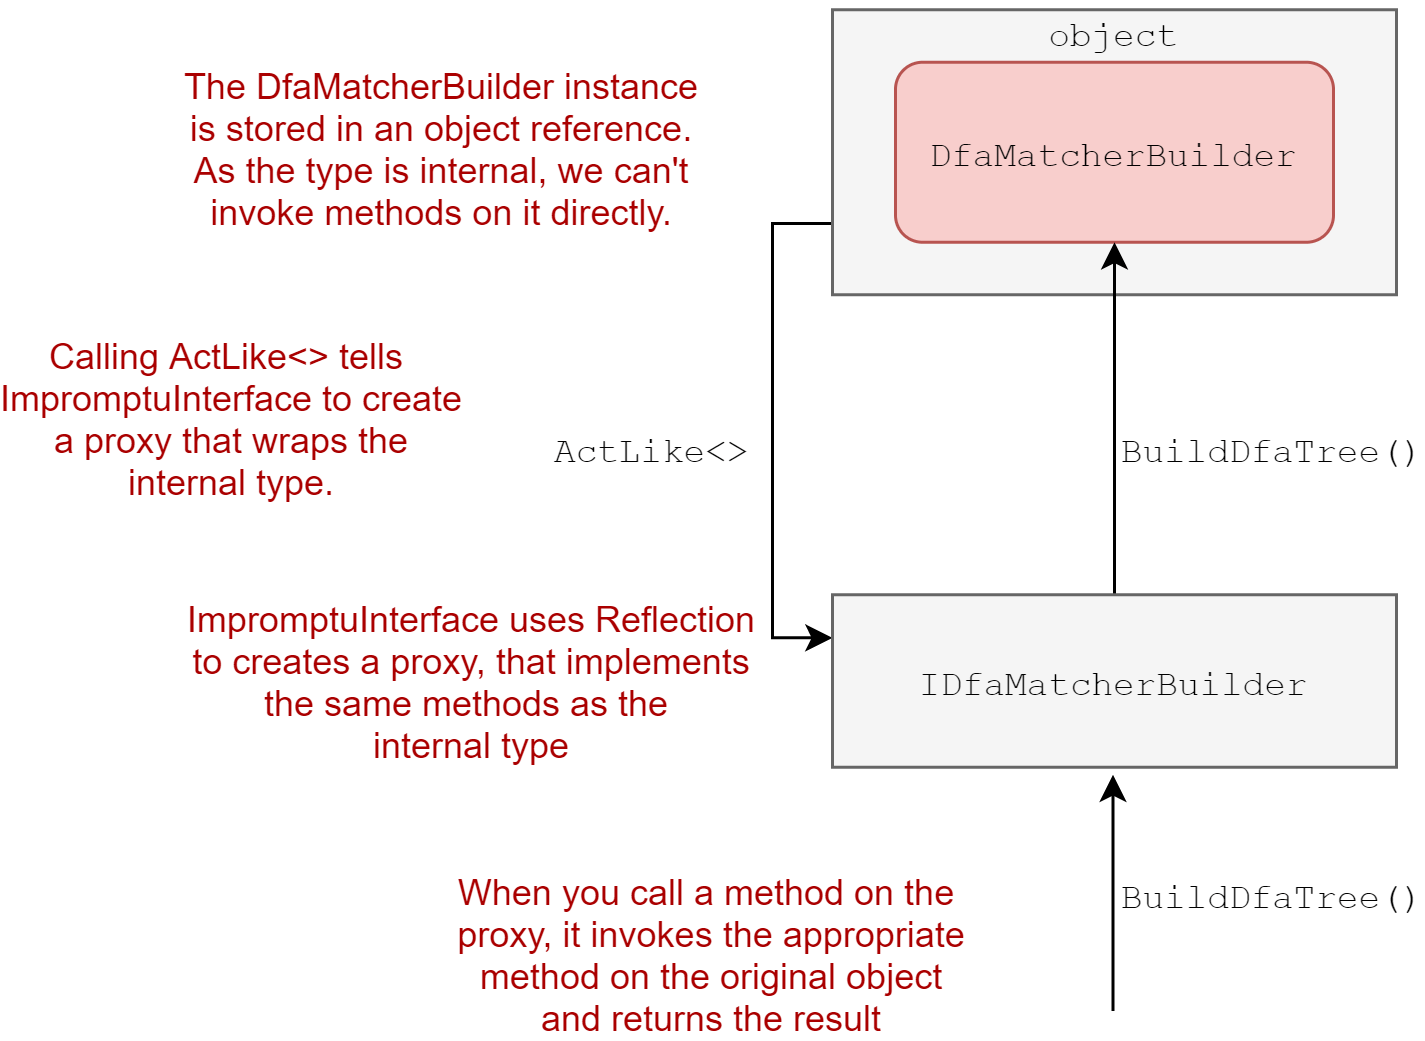
正如我在上一篇文章中所討論的,創建自定義DfaGraphWriter的最大問題之一是它對內部類的使用。為瞭解決這個問題,我使用ImpromptuInterface創建了包裝原始對象的代理對象:

原始的Visit()方法是DfaNode類中的方法。它遞歸地訪問端點樹中的每個節點,為每個節點調用一個提供的Action<>函數。
由於
DfaNode是internal,我在CustomDfaGraphWriter中實現了一個靜態的Visit來代替。
我們的定製實現大體上與原始實現相同,但是我們必須在“原始”DfaNodes和我們的IDfaNode代理之間進行一些有點困難的轉換。更新後的方法如下所示。該方法接受兩個參數,即被檢查的節點,以及在每個參數上運行的Action<>。
static void Visit(IDfaNode node, Action<IDfaNode> visitor)
{
    // Does the node of interest have any nodes connected by literal edges?
    if (node.Literals?.Values != null)
    {
        // node.Literals is actually a Dictionary<string, DfaNode>
        foreach (var dictValue in node.Literals.Values)
        {
            // Create a proxy for the child DfaNode node and visit it
            IDfaNode value = dictValue.ActLike<IDfaNode>();
            Visit(value, visitor);
        }
    }

    // Does the node have a node connected by a parameter edge?
    // The reference check breaks any cycles in the graph
    if (node.Parameters != null && !ReferenceEquals(node, node.Parameters))
    {
        // Create a proxy for the DfaNode node and visit it
        IDfaNode parameters = node.Parameters.ActLike<IDfaNode>();
        Visit(parameters, visitor);
    }

    // Does the node have a node connected by a catch-all edge?
    // The refernece check breaks any cycles in the graph
    if (node.CatchAll != null && !ReferenceEquals(node, node.CatchAll))
    {
        // Create a proxy for the DfaNode node and visit it
        IDfaNode catchAll = node.CatchAll.ActLike<IDfaNode>();
        Visit(catchAll, visitor);
    }

    // Does the node have a node connected by a policy edges?
    if (node.PolicyEdges?.Values != null)
    {
        // node.PolicyEdges is actually a Dictionary<object, DfaNode>
        foreach (var dictValue in node.PolicyEdges.Values)
        {
            IDfaNode value = dictValue.ActLike<IDfaNode>();
            Visit(value, visitor);
        }
    }

    // Write the node using the provided Action<>
    visitor(node);
}
Visit函數使用post-order遍歷,因此在使用visitor函數編寫節點之前,它首先“深入”地遍歷節點的子節點。這與原始DfaNode.Visit()功能相同。
我們現在快到了。我們有一個類,它構建端點節點樹,遍歷樹中的所有節點,併為每個節點運行一個函數。剩下的就是定義訪問者函數WriteNode()。
定義自定義WriteNode函數
我們終於到了最重要的部分,控制了端點圖的顯示方式。到目前為止,所有自定義和努力都是使我們能夠自定義WriteNode功能。
WriteNode()是一個局部函數,它使用點圖描述語言將一個節點連同任何連接的邊一起寫入TextWriter輸出。
我們的自定義WriteNode()函數與原始函數幾乎相同。有兩個主要區別:
- 原始的圖形編寫器使用
DfaNodes,我們必須轉換為使用IDfaNode代理。 - 原始圖形編寫器對所有節點和邊使用相同的樣式。我們根據配置的
GraphDisplayOptions定製節點和邊的顯示。
由於
WriteNode是一個局部函數,它可以從封閉函數訪問變數。這包括writer參數(用於將圖形寫入輸出)和以前寫入節點的已訪問字典。
下麵顯示了我們的方法(已被大量註釋)的自定義版本WriteNode()。
void WriteNode(IDfaNode node)
{
    // add the node to the visited node dictionary if it isn't already
    // generate a zero-based integer label for the node
    if (!visited.TryGetValue(node, out var label))
    {
        label = visited.Count;
        visited.Add(node, label);
    }

    // We can safely index into visited because this is a post-order traversal,
    // all of the children of this node are already in the dictionary.

    // If this node is linked to any nodes by a literal edge
    if (node.Literals != null)
    {
        foreach (DictionaryEntry dictEntry in node.Literals)
        {
            // Foreach linked node, get the label for the edge and the linked node
            var edgeLabel = (string)dictEntry.Key;
            IDfaNode value = dictEntry.Value.ActLike<IDfaNode>();
            int nodeLabel = visited[value];

            // Write an edge, including our custom styling for literal edges
            writer.WriteLine($"{label} -> {nodeLabel} [label=\"/{edgeLabel}\" {_options.LiteralEdge}]");
        }
    }

    // If this node is linked to a nodes by a parameter edge
    if (node.Parameters != null)
    {
        IDfaNode parameters = node.Parameters.ActLike<IDfaNode>();
        int nodeLabel = visited[catchAll];

        // Write an edge labelled as /* using our custom styling for parameter edges
        writer.WriteLine($"{label} -> {nodeLabel} [label=\"/**\" {_options.CatchAllEdge}]");
    }

    // If this node is linked to a catch-all edge
    if (node.CatchAll != null && node.Parameters != node.CatchAll)
    {
        IDfaNode catchAll = node.CatchAll.ActLike<IDfaNode>();
        int nodeLabel = visited[catchAll];

        // Write an edge labelled as /** using our custom styling for catch-all edges
        writer.WriteLine($"{label} -> {nodelLabel} [label=\"/**\" {_options.CatchAllEdge}]");
    }

    // If this node is linked to any Policy Edges
    if (node.PolicyEdges != null)
    {
        foreach (DictionaryEntry dictEntry in node.PolicyEdges)
        {
            // Foreach linked node, get the label for the edge and the linked node
            var edgeLabel = (object)dictEntry.Key;
            IDfaNode value = dictEntry.Value.ActLike<IDfaNode>();
            int nodeLabel = visited[value];

            // Write an edge, including our custom styling for policy edges
            writer.WriteLine($"{label} -> {nodeLabel} [label=\"{key}\" {_options.PolicyEdge}]");
        }
    }

    // Does this node have any associated matches, indicating it generates a response?
    var matchCount = node?.Matches?.Count ?? 0;

    var extras = matchCount > 0
        ? _options.MatchingNode // If we have matches, use the styling for response-generating nodes...
        : _options.DefaultNode; // ...otherwise use the default style

    // Write the node to the graph output
    writer.WriteLine($"{label} [label=\"{node.Label}\" {extras}]");
}
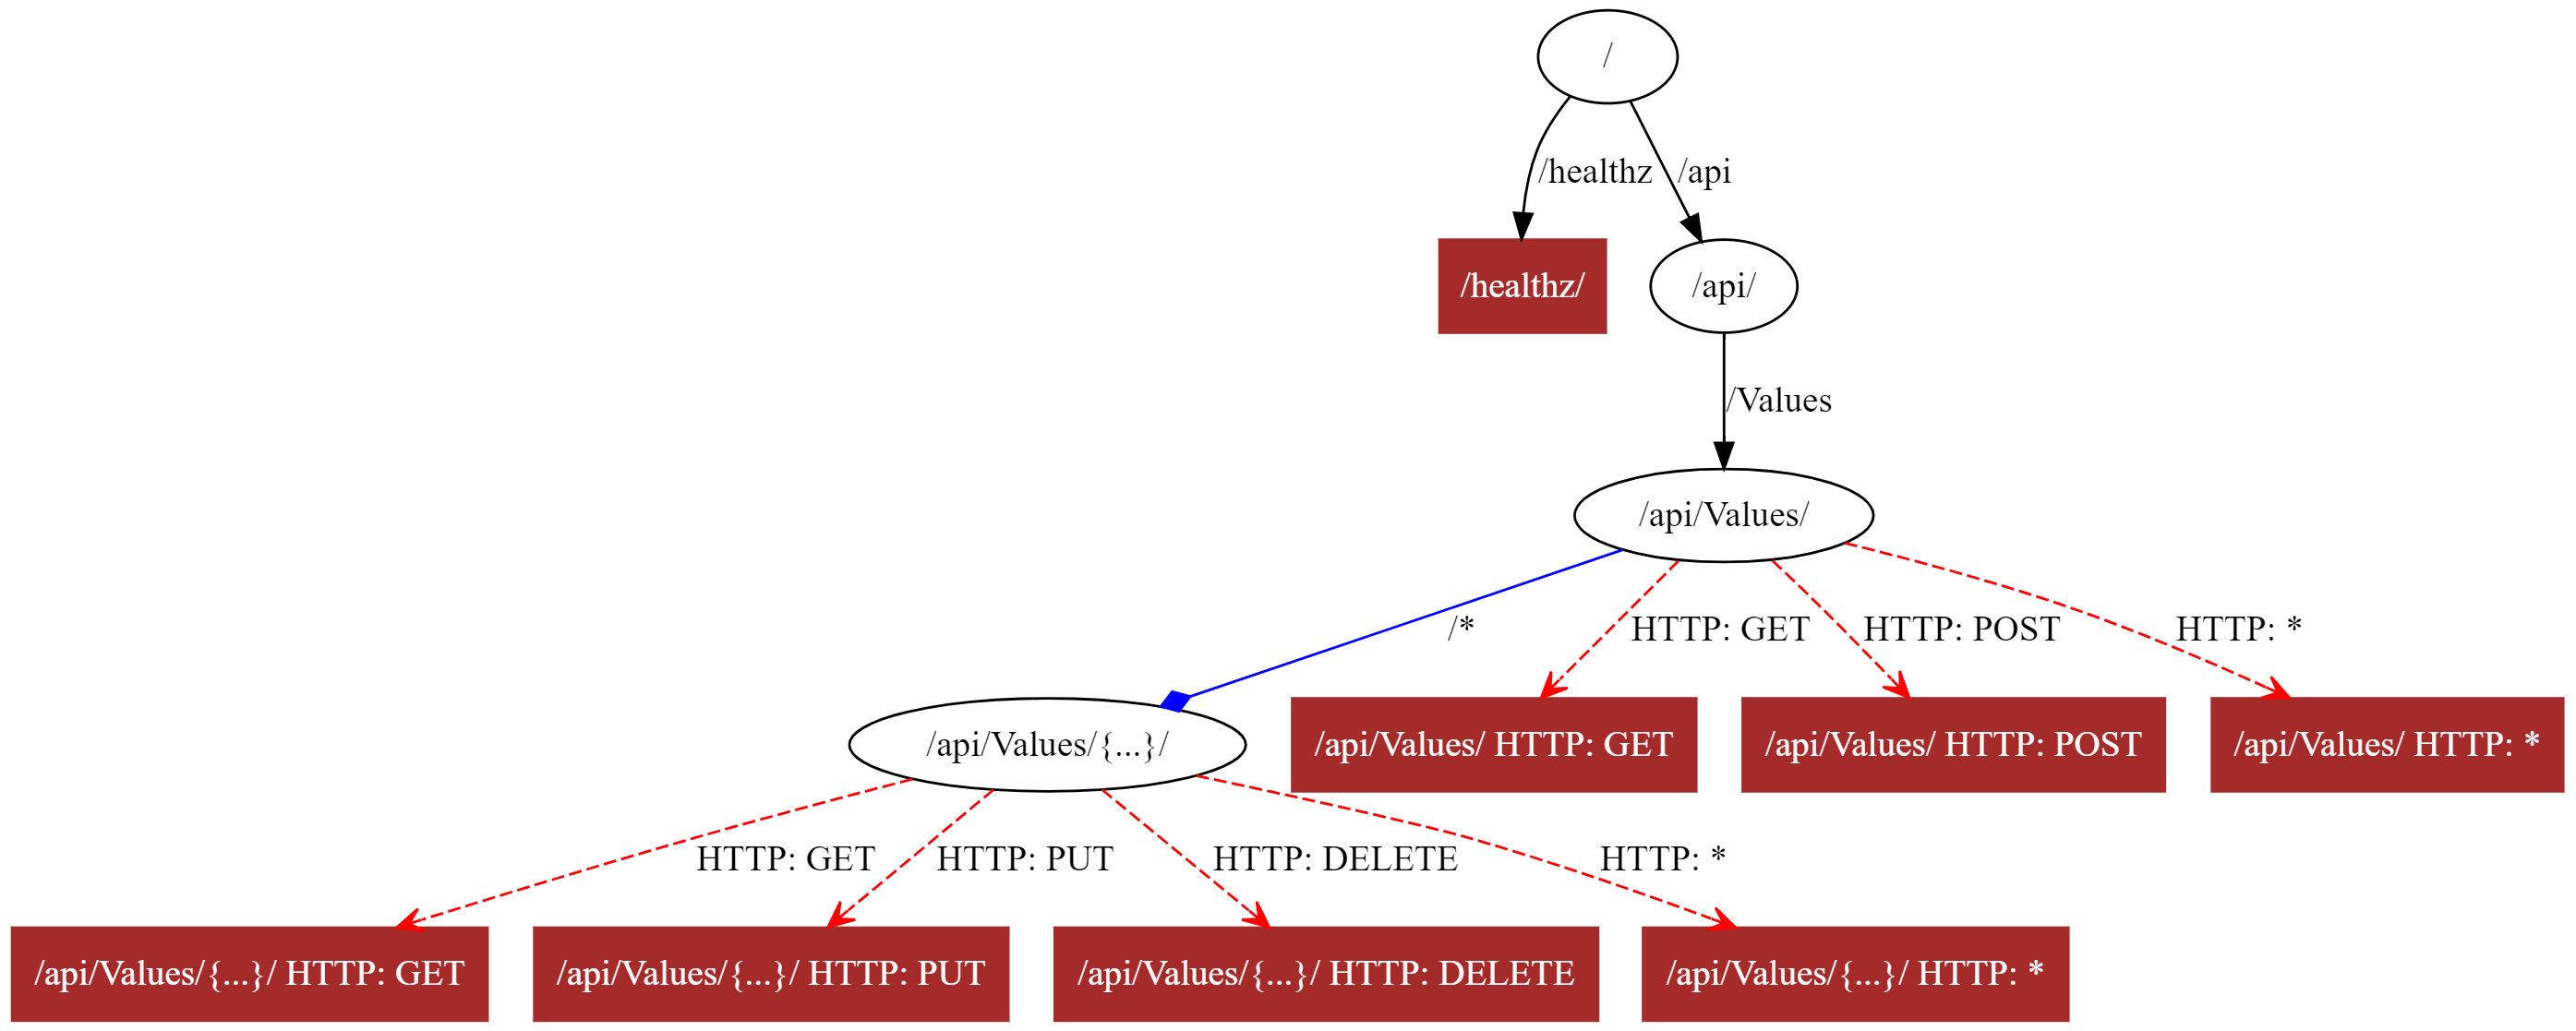
由於我們將節點從“葉”節點寫回到樹的根的方式,因此跟蹤這些交互的流程可能會有些混亂。例如,如果我們看一下本文開頭顯示的基本應用程式的輸出,您會看到“葉子”端點都被首先寫入:healthz運行狀況檢查端點和終端匹配生成路徑最長的端點:
digraph DFA {
  1 [label="/healthz/" shape=box style=filled color="brown" fontcolor="white"]
  2 [label="/api/Values/{...}/ HTTP: GET" shape=box style=filled color="brown" fontcolor="white"]
  3 [label="/api/Values/{...}/ HTTP: PUT" shape=box style=filled color="brown" fontcolor="white"]
  4 [label="/api/Values/{...}/ HTTP: DELETE" shape=box style=filled color="brown"  fontcolor="white"]
  5 [label="/api/Values/{...}/ HTTP: *" shape=box style=filled color="brown" fontcolor="white"]
  6 -> 2 [label="HTTP: GET" color="red" style=dashed arrowhead=open]
  6 -> 3 [label="HTTP: PUT" color="red" style=dashed arrowhead=open]
  6 -> 4 [label="HTTP: DELETE" color="red" style=dashed arrowhead=open]
  6 -> 5 [label="HTTP: *" color="red" style=dashed arrowhead=open]
  6 [label="/api/Values/{...}/"]
  7 [label="/api/Values/ HTTP: GET" shape=box style=filled color="brown" fontcolor="white"]
  8 [label="/api/Values/ HTTP: POST" shape=box style=filled color="brown" fontcolor="white"]
  9 [label="/api/Values/ HTTP: *" shape=box style=filled color="brown" fontcolor="white"]
  10 -> 6 [label="/*" arrowhead=diamond color="blue"]
  10 -> 7 [label="HTTP: GET" color="red" style=dashed arrowhead=open]
  10 -> 8 [label="HTTP: POST" color="red" style=dashed arrowhead=open]
  10 -> 9 [label="HTTP: *" color="red" style=dashed arrowhead=open]
  10 [label="/api/Values/"]
  11 -> 10 [label="/Values"]
  11 [label="/api/"]
  12 -> 1 [label="/healthz"]
  12 -> 11 [label="/api"]
  12 [label="/"]
}
即使首先將葉節點寫入圖形輸出,但Graphviz可視化工具通常會以葉節點在底部,邊緣朝下的方式繪製圖形。您可以在https://dreampuf.github.io/GraphvizOnline/線上顯示圖形:

如果要更改圖形的呈現方式,可以自定義GraphDisplayOptions。如果使用我在上一篇文章中描述的“測試”方法,則可以在生成圖形時直接傳遞這些選項。如果使用的是“中間件”方法,則可以改為使用IOptions<>系統進行GraphDisplayOptions註冊,並使用配置系統控制顯示。
摘要
在這篇文章中,我展示瞭如何創建自定義的DfaGraphWriter來控制如何生成應用程式的端點圖。為了與internal內部類進行互操作,我們使用了ImpromptuInterface,如在上篇文章所示,創建代理,我們可以互動。然後,我們必須編寫一個自定義Visit()函數來使用IDfaNode代理。最後,我們創建了一個自定義WriteNode函數,該函數使用在GraphDisplayOptions對象中定義的自定義設置來顯示不同類型的節點和邊。


