Django rest framework源碼分析(1) 認證 一、基礎 1.1.安裝 兩種方式: github pip直接安裝 pip install djangorestframework 1.2.需要先瞭解的一些知識 理解下麵兩個知識點非常重要,django-rest-framework源碼中 ...
Django rest framework源碼分析(1)----認證
一、基礎
1.1.安裝
兩種方式:
- github
- pip直接安裝
pip install djangorestframework
1.2.需要先瞭解的一些知識
理解下麵兩個知識點非常重要,django-rest-framework源碼中到處都是基於CBV和麵向對象的封裝
(1)面向對象封裝的兩大特性
把同一類方法封裝到類中

將數據封裝到對象中
(2)CBV
基於反射實現根據請求方式不同,執行不同的方法
原理:url-->view方法-->dispatch方法(反射執行其它方法:GET/POST/PUT/DELETE等等)
二、簡單實例
2.1.settings
先創建一個project和一個app(我這裡命名為API)
首先要在settings的app中添加
INSTALLED_APPS = [
    'rest_framework',
]
2.2.url
from django.contrib import admin
from django.urls import path
from API.views import AuthView

urlpatterns = [
    path('admin/', admin.site.urls),
    path('api/v1/auth/',AuthView.as_view()),
]
2.3.models
一個保存用戶的信息
一個保存用戶登錄成功後的token
from django.db import models

class UserInfo(models.Model):
    USER_TYPE = (
        (1,'普通用戶'),
        (2,'VIP'),
        (3,'SVIP')
    )

    user_type = models.IntegerField(choices=USER_TYPE)
    username = models.CharField(max_length=32)
    password = models.CharField(max_length=64)

class UserToken(models.Model):
    user = models.OneToOneField(UserInfo,on_delete=models.CASCADE)
    token = models.CharField(max_length=64)
2.4.views
用戶登錄(返回token並保存到資料庫)
from django.shortcuts import render
from django.http import JsonResponse
from rest_framework.views import APIView
from API import models

def md5(user):
    import hashlib
    import time
    #當前時間,相當於生成一個隨機的字元串
    ctime = str(time.time())
    m = hashlib.md5(bytes(user,encoding='utf-8'))
    m.update(bytes(ctime,encoding='utf-8'))
    return m.hexdigest()

class AuthView(object):
    def post(self,request,*args,**kwargs):
        ret = {'code':1000,'msg':None}
        try:
            user = request._request.POST.get('username')
            pwd = request._request.POST.get('password')
            obj = models.UserInfo.objects.filter(username=user,password=pwd).first()
            if not obj:
                ret['code'] = 1001
                ret['msg'] = '用戶名或密碼錯誤'
            #為用戶創建token
            token = md5(user)
            #存在就更新,不存在就創建
            models.UserToken.objects.update_or_create(user=obj,defaults={'token':token})
            ret['token'] = token
        except Exception as e:
            ret['code'] = 1002
            ret['msg'] = '請求異常'
        return JsonResponse(ret)
2.5.利用postman發請求

如果用戶名和密碼正確的話 會生成token值,下次該用戶再登錄時,token的值就會更新
資料庫中可以看到token的值

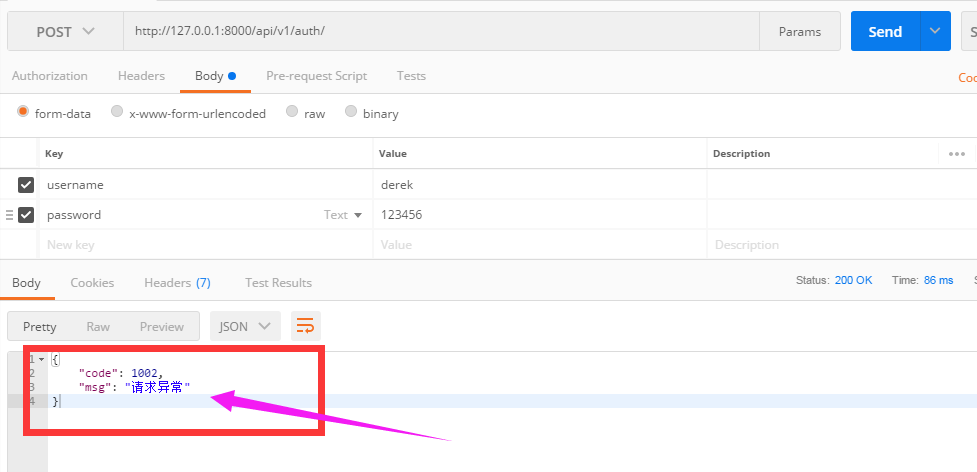
當用戶名或密碼錯誤時,拋出異常
三、添加認證
基於上面的例子,添加一個認證的類
3.1.url
path('api/v1/order/',OrderView.as_view()),
3.2.views
from django.shortcuts import render,HttpResponse
from django.http import JsonResponse
from rest_framework.views import APIView
from API import models
from rest_framework.request import Request
from rest_framework import exceptions
from rest_framework.authentication import BasicAuthentication

ORDER_DICT = {
    1:{
        'name':'apple',
        'price':15
    },
    2:{
        'name':'dog',
        'price':100
    }
}

def md5(user):
    import hashlib
    import time
    #當前時間,相當於生成一個隨機的字元串
    ctime = str(time.time())
    m = hashlib.md5(bytes(user,encoding='utf-8'))
    m.update(bytes(ctime,encoding='utf-8'))
    return m.hexdigest()

class AuthView(object):
    '''用於用戶登錄驗證'''
    def post(self,request,*args,**kwargs):
        ret = {'code':1000,'msg':None}
        try:
            user = request._request.POST.get('username')
            pwd = request._request.POST.get('password')
            obj = models.UserInfo.objects.filter(username=user,password=pwd).first()
            if not obj:
                ret['code'] = 1001
                ret['msg'] = '用戶名或密碼錯誤'
            #為用戶創建token
            token = md5(user)
            #存在就更新,不存在就創建
            models.UserToken.objects.update_or_create(user=obj,defaults={'token':token})
            ret['token'] = token
        except Exception as e:
            ret['code'] = 1002
            ret['msg'] = '請求異常'
        return JsonResponse(ret)


class Authentication(APIView):
    '''認證'''
    def authenticate(self,request):
        token = request._request.GET.get('token')
        token_obj = models.UserToken.objects.filter(token=token).first()
        if not token_obj:
            raise exceptions.AuthenticationFailed('用戶認證失敗')
        #在rest framework內部會將這兩個欄位賦值給request,以供後續操作使用
        return (token_obj.user,token_obj)

    def authenticate_header(self, request):
        pass

class OrderView(APIView):
    '''訂單相關業務'''

    authentication_classes = [Authentication,]    #添加認證
    def get(self,request,*args,**kwargs):
        #request.user
        #request.auth
        ret = {'code':1000,'msg':None,'data':None}
        try:
            ret['data'] = ORDER_DICT
        except Exception as e:
            pass
        return JsonResponse(ret)
3.3用postman發get請求
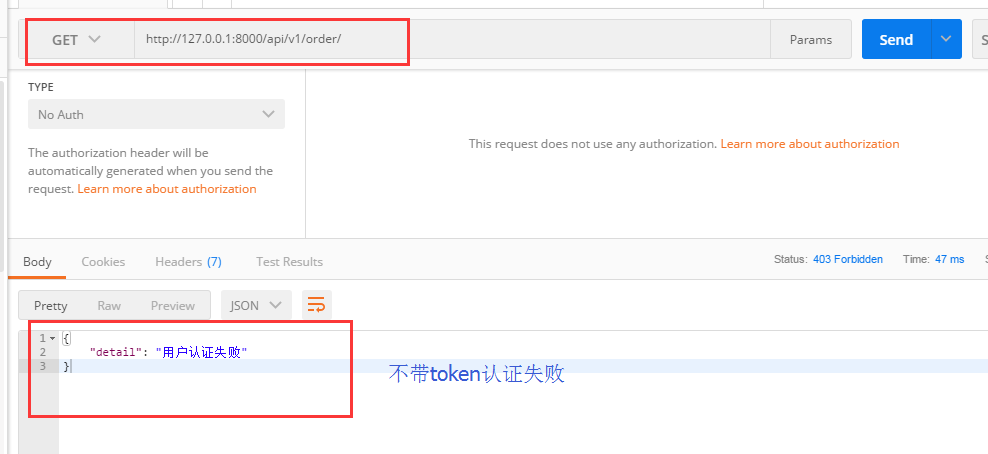
請求的時候沒有帶token,可以看到會顯示“用戶認證失敗”

這樣就達到了認證的效果,django-rest-framework的認證是怎麼實現的呢,下麵基於這個例子來剖析drf的源碼。
四、drf的認證源碼分析
源碼流程圖
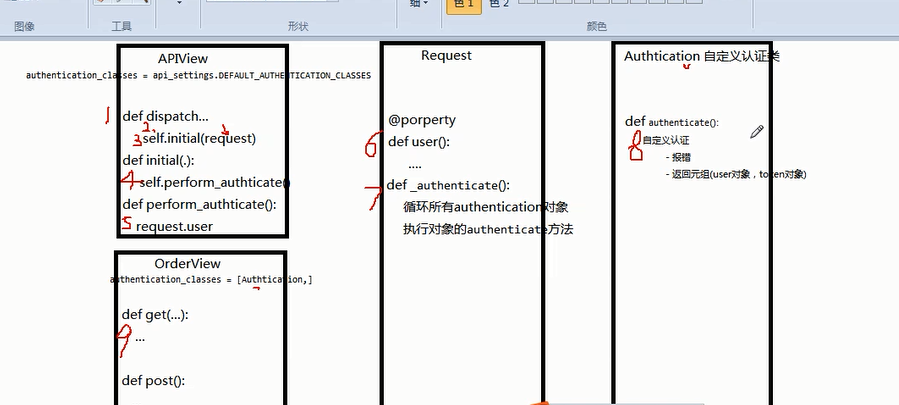
請求先到dispatch
dispatch()主要做了兩件事
- 封裝request
- 認證
具體看我寫的代碼裡面的註釋
def dispatch(self, request, *args, **kwargs):
	"""
	`.dispatch()` is pretty much the same as Django's regular dispatch,
	but with extra hooks for startup, finalize, and exception handling.
	 """
	self.args = args
    self.kwargs = kwargs
    #對原始request進行加工,豐富了一些功能
    #Request(
    #     request,
    #     parsers=self.get_parsers(),
    #     authenticators=self.get_authenticators(),
    #     negotiator=self.get_content_negotiator(),
    #     parser_context=parser_context
    # )
    #request(原始request,[BasicAuthentications對象,])
    #獲取原生request,request._request
    #獲取認證類的對象,request.authticators
    #1.封裝request
    request = self.initialize_request(request, *args, **kwargs)
    self.request = request
    self.headers = self.default_response_headers  # deprecate?

    try:
        #2.認證
        self.initial(request, *args, **kwargs)

        # Get the appropriate handler method
        if request.method.lower() in self.http_method_names:
            handler = getattr(self, request.method.lower(),
                                  self.http_method_not_allowed)
        else:
            handler = self.http_method_not_allowed

        response = handler(request, *args, **kwargs)

	except Exception as exc:
        response = self.handle_exception(exc)

	self.response = self.finalize_response(request, response, *args, **kwargs)
    return self.response
4.1.reuqest
(1)initialize_request()
可以看到initialize()就是封裝原始request
def initialize_request(self, request, *args, **kwargs):
    """
    Returns the initial request object.
    """
    parser_context = self.get_parser_context(request)

    return Request(
        request,
        parsers=self.get_parsers(),
        #[BasicAuthentication(),],把對象封裝到request裡面了
        authenticators=self.get_authenticators(),
        negotiator=self.get_content_negotiator(), parser_context=parser_context )
(2)get_authenticators()
通過列表生成式,返回對象的列表
def get_authenticators(self):
    """
    Instantiates and returns the list of authenticators that this view can use.
    """
    return [auth() for auth in self.authentication_classes]
(3)authentication_classes
APIView裡面有個 authentication_classes 欄位
可以看到預設是去全局的配置文件找(api_settings)
class APIView(View):

    # The following policies may be set at either globally, or per-view.
    renderer_classes = api_settings.DEFAULT_RENDERER_CLASSES
    parser_classes = api_settings.DEFAULT_PARSER_CLASSES
    authentication_classes = api_settings.DEFAULT_AUTHENTICATION_CLASSES
    throttle_classes = api_settings.DEFAULT_THROTTLE_CLASSES
    permission_classes = api_settings.DEFAULT_PERMISSION_CLASSES
    content_negotiation_class = api_settings.DEFAULT_CONTENT_NEGOTIATION_CLASS
    metadata_class = api_settings.DEFAULT_METADATA_CLASS
    versioning_class = api_settings.DEFAULT_VERSIONING_CLASS
4.2.認證
self.initial(request, *args, **kwargs)
def dispatch(self, request, *args, **kwargs):
    """
    `.dispatch()` is pretty much the same as Django's regular dispatch,
    but with extra hooks for startup, finalize, and exception handling.
    """
    self.args = args
    self.kwargs = kwargs
    #對原始request進行加工,豐富了一些功能
    #Request(
    #     request,
    #     parsers=self.get_parsers(),
    #     authenticators=self.get_authenticators(),
    #     negotiator=self.get_content_negotiator(),
    #     parser_context=parser_context
    # )
    #request(原始request,[BasicAuthentications對象,])
    #獲取原生request,request._request
    #獲取認證類的對象,request.authticators
    #1.封裝request
    request = self.initialize_request(request, *args, **kwargs)
    self.request = request
    self.headers = self.default_response_headers  # deprecate?

    try:
        #2.認證
        self.initial(request, *args, **kwargs)

        # Get the appropriate handler method
        if request.method.lower() in self.http_method_names:
            handler = getattr(self, request.method.lower(),
                                  self.http_method_not_allowed)
        else:
            handler = self.http_method_not_allowed

        response = handler(request, *args, **kwargs)

	except Exception as exc:
        response = self.handle_exception(exc)

	self.response = self.finalize_response(request, response, *args, **kwargs)
    return self.response
(1)initial()
主要看 self.perform_authentication(request),實現認證
def initial(self, request, *args, **kwargs):
    """
    Runs anything that needs to occur prior to calling the method handler.
    """
    self.format_kwarg = self.get_format_suffix(**kwargs)

    # Perform content negotiation and store the accepted info on the request
    neg = self.perform_content_negotiation(request)
    request.accepted_renderer, request.accepted_media_type = neg

    # Determine the API version, if versioning is in use.
    version, scheme = self.determine_version(request, *args, **kwargs)
    request.version, request.versioning_scheme = version, scheme

    # Ensure that the incoming request is permitted
    #3.實現認證
    self.perform_authentication(request)
    self.check_permissions(request)
    self.check_throttles(request)
(2)perform_authentication()
調用了request.user
def perform_authentication(self, request):
    """
    Perform authentication on the incoming request.

	Note that if you override this and simply 'pass', then authentication
	will instead be performed lazily, the first time either
	`request.user` or `request.auth` is accessed.
	"""
    request.user
(3)user
request.user的request的位置

點進去可以看到Request有個user方法,加 @property 表示調用user方法的時候不需要加括弧“user()”,可以直接調用:request.user
@property
def user(self):
    """
    Returns the user associated with the current request, as authenticated
    by the authentication classes provided to the request.
    """
    if not hasattr(self, '_user'):
        with wrap_attributeerrors():
            #獲取認證對象,進行一步步的認證
            self._authenticate()
    return self._user
(4)_authenticate()
迴圈所有authenticator對象
def _authenticate(self):
    """
    Attempt to authenticate the request using each authentication instance
    in turn.
    """
    #迴圈認證類的所有對象
    #執行對象的authenticate方法
    for authenticator in self.authenticators:
        try:
            #執行認證類的authenticate方法
            #這裡分三種情況
            #1.如果authenticate方法拋出異常,self._not_authenticated()執行
            #2.有返回值,必須是元組:(request.user,request.auth)
            #3.返回None,表示當前認證不處理,等下一個認證來處理
            user_auth_tuple = authenticator.authenticate(self)
        except exceptions.APIException:
            self._not_authenticated()
            raise

        if user_auth_tuple is not None:
            self._authenticator = authenticator
            self.user, self.auth = user_auth_tuple
            return

	self._not_authenticated()
返回值就是例子中的:
token_obj.user-->>request.user
token_obj-->>request.auth
#在rest framework內部會將這兩個欄位賦值給request,以供後續操作使用
return (token_obj.user,token_obj)     #例子中的return
當都沒有返回值,就執行self._not_authenticated(),相當於匿名用戶,沒有通過認證
def _not_authenticated(self):
    """
    Set authenticator, user & authtoken representing an unauthenticated request.

	Defaults are None, AnonymousUser & None.
	"""
    self._authenticator = None

    if api_settings.UNAUTHENTICATED_USER:
        self.user = api_settings.UNAUTHENTICATED_USER()   #AnonymousUser匿名用戶
    else:
        self.user = None

	if api_settings.UNAUTHENTICATED_TOKEN:
        self.auth = api_settings.UNAUTHENTICATED_TOKEN()  #None
	else:
        self.auth = None
面向對象知識:
子類繼承 父類,調用方法的時候:
- 優先去自己裡面找有沒有這個方法,有就執行自己的
- 只有當自己裡面沒有這個方法的時候才會去父類找
因為authenticate方法我們自己寫,所以當執行authenticate()的時候就是執行我們自己寫的認證
父類中的authenticate方法
def authenticate(self, request):
    return (self.force_user, self.force_token)
我們自己寫的
class Authentication(APIView):
    '''用於用戶登錄驗證'''
    def authenticate(self,request):
        token = request._request.GET.get('token')
        token_obj = models.UserToken.objects.filter(token=token).first()
        if not token_obj:
            raise exceptions.AuthenticationFailed('用戶認證失敗')
        #在rest framework內部會將這兩個欄位賦值給request,以供後續操作使用
        return (token_obj.user,token_obj)
認證的流程就是上面寫的,弄懂了原理,再寫代碼就更容易理解為什麼了。
4.3.配置文件
繼續解讀源碼

預設是去全局配置文件中找,所以我們應該在settings.py中配置好路徑
api_settings源碼
api_settings = APISettings(None, DEFAULTS, IMPORT_STRINGS)

def reload_api_settings(*args, **kwargs):
    setting = kwargs['setting']
    if setting == 'REST_FRAMEWORK':
        api_settings.reload()
setting中‘REST_FRAMEWORK’中找
全局配置方法:
API文件夾下麵新建文件夾utils,再新建auth.py文件,裡面寫上認證的類
settings.py
#設置全局認證
REST_FRAMEWORK = {
    "DEFAULT_AUTHENTICATION_CLASSES":['API.utils.auth.Authentication',]   #裡面寫你的認證的類的路徑
}
auth.py
# API/utils/auth.py

from rest_framework import exceptions
from API import models


class Authentication(object):
    '''用於用戶登錄驗證'''
    def authenticate(self,request):
        token = request._request.GET.get('token')
        token_obj = models.UserToken.objects.filter(token=token).first()
        if not token_obj:
            raise exceptions.AuthenticationFailed('用戶認證失敗')
        #在rest framework內部會將這兩個欄位賦值給request,以供後續操作使用
        return (token_obj.user,token_obj)

    def authenticate_header(self, request):
        pass
在settings裡面設置的全局認證,所有業務都需要經過認證,如果想讓某個不需要認證,只需要在其中添加下麵的代碼:
authentication_classes = [] #裡面為空,代表不需要認證
from django.shortcuts import render,HttpResponse
from django.http import JsonResponse
from rest_framework.views import APIView
from API import models
from rest_framework.request import Request
from rest_framework import exceptions
from rest_framework.authentication import BasicAuthentication

ORDER_DICT = {
    1:{
        'name':'apple',
        'price':15
    },
    2:{
        'name':'dog',
        'price':100
    }
}

def md5(user):
    import hashlib
    import time
    #當前時間,相當於生成一個隨機的字元串
    ctime = str(time.time())
    m = hashlib.md5(bytes(user,encoding='utf-8'))
    m.update(bytes(ctime,encoding='utf-8'))
    return m.hexdigest()

class AuthView(APIView):
    '''用於用戶登錄驗證'''

    authentication_classes = []    #裡面為空,代表不需要認證

    def post(self,request,*args,**kwargs):
        ret = {'code':1000,'msg':None}
        try:
            user = request._request.POST.get('username')
            pwd = request._request.POST.get('password')
            obj = models.UserInfo.objects.filter(username=user,password=pwd).first()
            if not obj:
                ret['code'] = 1001
                ret['msg'] = '用戶名或密碼錯誤'
            #為用戶創建token
            token = md5(user)
            #存在就更新,不存在就創建
            models.UserToken.objects.update_or_create(user=obj,defaults={'token':token})
            ret['token'] = token
        except Exception as e:
            ret['code'] = 1002
            ret['msg'] = '請求異常'
        return JsonResponse(ret)


class OrderView(APIView):
    '''訂單相關業務'''


    def get(self,request,*args,**kwargs):
        # self.dispatch
        #request.user
        #request.auth
        ret = {'code':1000,'msg':None,'data':None}
        try:
            ret['data'] = ORDER_DICT
        except Exception as e:
            pass
        return JsonResponse(ret)

API/view.py代碼
再測試一下我們的代碼
不帶token發請求
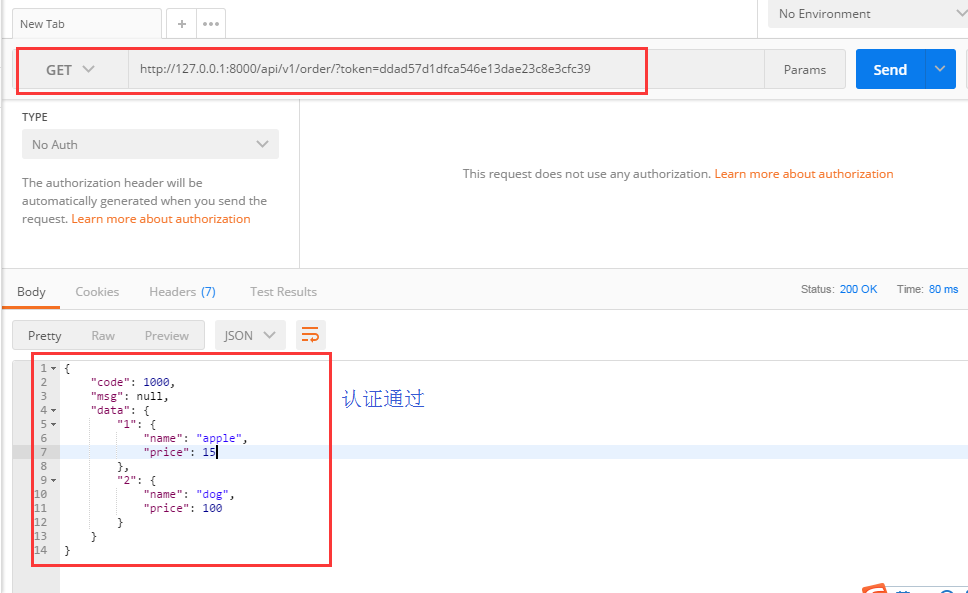
帶token發請求
五、drf的內置認證
rest_framework裡面內置了一些認證,我們自己寫的認證類都要繼承內置認證類 "BaseAuthentication"
4.1.BaseAuthentication源碼:
class BaseAuthentication(object):
    """
    All authentication classes should extend BaseAuthentication.
    """

    def authenticate(self, request):
        """
        Authenticate the request and return a two-tuple of (user, token).
        """
        #內置的認證類,authenticate方法,如果不自己寫,預設則拋出異常
        raise NotImplementedError(".authenticate() must be overridden.")

    def authenticate_header(self, request):
        """
        Return a string to be used as the value of the `WWW-Authenticate`
        header in a `401 Unauthenticated` response, or `None` if the
        authentication scheme should return `403 Permission Denied` responses.
        """
        #authenticate_header方法,作用是當認證失敗的時候,返回的響應頭
        pass
4.2.修改自己寫的認證類
自己寫的Authentication必須繼承內置認證類BaseAuthentication
# API/utils/auth/py

from rest_framework import exceptions
from API import models
from rest_framework.authentication import BaseAuthentication


class Authentication(BaseAuthentication):
    '''用於用戶登錄驗證'''
    def authenticate(self,request):
        token = request._request.GET.get('token')
        token_obj = models.UserToken.objects.filter(token=token).first()
        if not token_obj:
            raise exceptions.AuthenticationFailed('用戶認證失敗')
        #在rest framework內部會將這兩個欄位賦值給request,以供後續操作使用
        return (token_obj.user,token_obj)

    def authenticate_header(self, request):
        pass
4.3.其它內置認證類
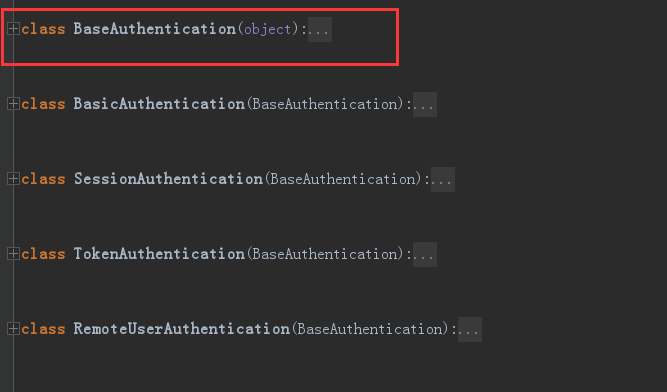
rest_framework裡面還內置了其它認證類,我們主要用到的就是BaseAuthentication,剩下的很少用到
六、總結
自己寫認證類方法梳理
(1)創建認證類
- 繼承BaseAuthentication --->>1.重寫authenticate方法;2.authenticate_header方法直接寫pass就可以(這個方法必須寫)
(2)authenticate()返回值(三種)
- None ----->>>當前認證不管,等下一個認證來執行
- raise exceptions.AuthenticationFailed('用戶認證失敗') # from rest_framework import exceptions
- 有返回值元祖形式:(元素1,元素2) #元素1複製給request.user; 元素2複製給request.auth
(3)局部使用
- authentication_classes = [BaseAuthentication,]
(4)全局使用
#設置全局認證
REST_FRAMEWORK = {
    "DEFAULT_AUTHENTICATION_CLASSES":['API.utils.auth.Authentication',]
}
源碼流程
--->>dispatch
--封裝request
---獲取定義的認證類(全局/局部),通過列表生成式創建對象
---initial
----peform_authentication
-----request.user (每部迴圈創建的對象)


