登錄功能實現起來有哪些常用的方式,大家首先想到的肯定是cookie或session或cookie+session,當然還有其他模式,今天主要探討一下在Asp.net core 2.0下實現以cookie登錄授權,與net freamwork框架下常用的開發方式有所不同的是以前開發不管是webform... ...
1.登錄的實現
登錄功能實現起來有哪些常用的方式,大家首先想到的肯定是cookie或session或cookie+session,當然還有其他模式,今天主要探討一下在Asp.net core 2.0下實現以cookie登錄授權,與net freamwork框架下常用的開發方式有所不同的是以前開發不管是webform還是mvc模式,大多數開發者會封裝成第三方操作類,方便項目全局調用;在net core 2.0 下的登錄方式發生了點變化,大概流程是先通過依賴註入相關配置,再通過Action登錄授權,然後Authentication相關屬性認證,具體怎麼實現讓我們一起一步步操作一下。
2.Cookie開發回顧
進行net core 2.0 cookie編程前,首先回顧一下原來做asp.net項目開發常用的操作cookie封裝的一些封裝。封裝好的cookiehelper類庫,可以很方便的在項目中調用,如寫入cookie的時候直接調用CookieHelper.WriteCookie(名稱,值)這樣key/value形式寫入cookie,讀取cookie的時候直接使用CookieHelper.GetCookie(名稱)就可以獲取到cookie值。

using System;
using System.Collections.Generic;
using System.Text;
using System.Text.RegularExpressions;
using System.IO;
using System.Net;
using System.Configuration;
using System.Web;
using System.Security.Cryptography;

namespace ZZ.Common
{
    public class CookieHelper
    {
/// <summary>
        /// 寫cookie值
        /// </summary>
        /// <param name="strName">名稱</param>
        /// <param name="strValue">值</param>
        public static void WriteCookie(string strName, string strValue)
        {
            HttpCookie cookie = HttpContext.Current.Request.Cookies[strName];
            if (cookie == null)
            {
                cookie = new HttpCookie(strName);
            }
            cookie.Value = UrlEncode(strValue);
            HttpContext.Current.Response.AppendCookie(cookie);
        }

        /// <summary>
        /// 寫cookie值
        /// </summary>
        /// <param name="strName">名稱</param>
        /// <param name="strValue">值</param>
        public static void WriteCookie(string strName, string key, string strValue)
        {
            HttpCookie cookie = HttpContext.Current.Request.Cookies[strName];
            if (cookie == null)
            {
                cookie = new HttpCookie(strName);
            }
            cookie[key] = UrlEncode(strValue);
            HttpContext.Current.Response.AppendCookie(cookie);
        }

        /// <summary>
        /// 寫cookie值
        /// </summary>
        /// <param name="strName">名稱</param>
        /// <param name="strValue">值</param>
        public static void WriteCookie(string strName, string key, string strValue, int expires)
        {
            HttpCookie cookie = HttpContext.Current.Request.Cookies[strName];
            if (cookie == null)
            {
                cookie = new HttpCookie(strName);
            }
            cookie[key] = UrlEncode(strValue);
            cookie.Expires = DateTime.Now.AddMinutes(expires);
            HttpContext.Current.Response.AppendCookie(cookie);
        }

        /// <summary>
        /// 寫cookie值
        /// </summary>
        /// <param name="strName">名稱</param>
        /// <param name="strValue">值</param>
        /// <param name="strValue">過期時間(分鐘)</param>
        public static void WriteCookie(string strName, string strValue, int expires)
        {
            HttpCookie cookie = HttpContext.Current.Request.Cookies[strName];
            if (cookie == null)
            {
                cookie = new HttpCookie(strName);
            }
            cookie.Value = UrlEncode(strValue);
            cookie.Expires = DateTime.Now.AddMinutes(expires);
            HttpContext.Current.Response.AppendCookie(cookie);
        }

        /// <summary>
        /// 讀cookie值
        /// </summary>
        /// <param name="strName">名稱</param>
        /// <returns>cookie值</returns>
        public static string GetCookie(string strName)
        {
            if (HttpContext.Current.Request.Cookies != null && HttpContext.Current.Request.Cookies[strName] != null)
                return UrlDecode(HttpContext.Current.Request.Cookies[strName].Value.ToString());
            return "";
        }

        /// <summary>
        /// 讀cookie值
        /// </summary>
        /// <param name="strName">名稱</param>
        /// <returns>cookie值</returns>
        public static string GetCookie(string strName, string key)
        {
            if (HttpContext.Current.Request.Cookies != null && HttpContext.Current.Request.Cookies[strName] != null && HttpContext.Current.Request.Cookies[strName][key] != null)
                return UrlDecode(HttpContext.Current.Request.Cookies[strName][key].ToString());

            return "";
        }
    }
}
CookieHelper
3.NET Core2.0 下Cookie的使用
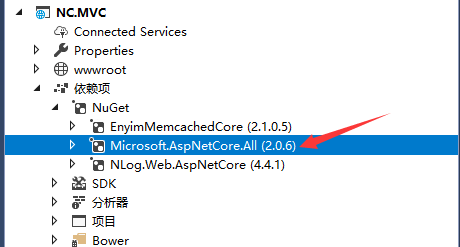
3.1添加Nuget相關依賴


我這裡使用 Microsoft.AspNetCore.All大而全的,逐項引用這裡不做過多探討,適合自己的就是最好的。
參照搜狐網上看到的一段話:
Microsoft.AspNetCore.All包,它是一個元數據包,包含了大量的東西,其中包括:Authorization, Authentication, Identity, CORS, Localization, Logging, Razor, Kestrel 等,除了這些它還附加了 EntityFramework, SqlServer, Sqlite 等包。有些同學可能會覺得這樣會引用了很多項目中使用不到的程式集,導致發佈後的程式變得很龐大,不過我要告訴你不必擔心,發佈後的程式集不但不會變得很大,反而會小很多,因為 Microsoft 把所有的這些依賴全部都集成到了sdk中,也就是說當你安裝sdk的之後,MVC相關的包就已經安裝到了你的系統上。
3.2配置
3.2.1首先在Startup.cs中ConfigureServices添加Cookie中間件,使用自定義Scheme
    //Cookie(1)添加 Cookie 服務
    services.AddAuthentication(CookieAuthenticationDefaults.AuthenticationScheme)
            //後臺管理員cookie服務
            .AddCookie(AdminAuthorizeAttribute.AdminAuthenticationScheme, options =>
            {
                options.LoginPath = "/admin/Login/Index";//登錄路徑
                options.LogoutPath = "/admin/Login/LogOff";//退出路徑
                options.AccessDeniedPath = new PathString("/Error/Forbidden");//拒絕訪問頁面
                options.Cookie.Path = "/";
            })
            //前臺用戶cookie服務
            .AddCookie(UserAuthorizeAttribute.UserAuthenticationScheme, options =>
            {
                options.LoginPath = "/Login/Index";
                options.LogoutPath = "/Login/LogOff";
                options.AccessDeniedPath = new PathString("/Error/Forbidden");//拒絕訪問頁面
                options.Cookie.Path = "/";
            });
在ConfigureServices方法中添加授權支持,並添加使用Cookie的方式,配置登錄頁面、登出頁面和沒有許可權時的跳轉頁面。AdminAuthorizeAttribute、UserAuthorizeAttribute為自定義AuthorizeAttribute類,兩個登錄方案,同時類中實現虛方法OnAuthorization過濾,如果系統中只有一個登錄授權全部使用預設即可。
      //Cookie(1)添加 Cookie 服務
      services.AddAuthentication(CookieAuthenticationDefaults.AuthenticationScheme)
            //後臺管理員cookie服務
            .AddCookie(CookieAuthenticationDefaults.AuthenticationScheme, options =>
            {
                options.LoginPath = "/admin/Login/Index";//登錄路徑
                options.LogoutPath = "/admin/Login/LogOff";//退出路徑
                options.AccessDeniedPath = new PathString("/Error/Forbidden");//拒絕訪問頁面
                options.Cookie.Path = "/";
            });

3.2.2在Configure使用Cookie中間件
public void Configure(IApplicationBuilder app, IHostingEnvironment env, ILoggerFactory loggerFactory)

{

            //Cookie(2)使用Cookie的中間件

            app.UseAuthentication();

}
3.3[自定義AuthorizeAttribute]特性
添加一個登錄方案(Scheme)
CookieAuthenticationDefaults.AuthenticationScheme,這是系統已經定義好的一個預設的登錄方案,添加一個新的來實現一個不同的身份登錄。代碼如下:
using Microsoft.AspNetCore.Authentication;
using Microsoft.AspNetCore.Authorization;
using Microsoft.AspNetCore.Http;
using Microsoft.AspNetCore.Mvc;
using Microsoft.AspNetCore.Mvc.Abstractions;
using Microsoft.AspNetCore.Mvc.Filters;
using System;
using System.Collections.Generic;
using System.Linq;
using System.Threading.Tasks;

namespace NC.MVC
{
    /// <summary>
    /// 跳過檢查屬性
    /// </summary>
    [AttributeUsage(AttributeTargets.Class | AttributeTargets.Method, AllowMultiple = false, Inherited = true)]
    public sealed class SkipUserAuthorizeAttribute : Attribute, IFilterMetadata
    {
    }
    /// <summary>
    /// 前臺登錄驗證
    /// </summary>
    [AttributeUsage(AttributeTargets.Class | AttributeTargets.Method, Inherited = true, AllowMultiple = true)]
    public class UserAuthorizeAttribute : AuthorizeAttribute, IAuthorizationFilter
    {
        public const string UserAuthenticationScheme = "UserAuthenticationScheme";//自定義一個預設的登錄方案
        public UserAuthorizeAttribute()
        {
            this.AuthenticationSchemes = UserAuthenticationScheme;
        }
        public virtual void OnAuthorization(AuthorizationFilterContext filterContext)
        {
            //獲取對應Scheme方案的登錄用戶呢?使用HttpContext.AuthenticateAsync
            var authenticate = filterContext.HttpContext.AuthenticateAsync(UserAuthorizeAttribute.UserAuthenticationScheme);
            //authenticate.Wait();
            if (authenticate.Result.Succeeded || this.SkipUserAuthorize(filterContext.ActionDescriptor))
            {
                return;
            }
            //如果是預設Scheme可以使用
            //if (filterContext.HttpContext.User.Identity.IsAuthenticated || this.SkipUserAuthorize(filterContext.ActionDescriptor))
            //{
            //    return;
            //}

              HttpRequest httpRequest = filterContext.HttpContext.Request;
            string url = filterContext.HttpContext.Content("~/login");
                url = string.Concat(url, "?returnUrl=", httpRequest.Path);

                RedirectResult redirectResult = new RedirectResult(url);
                filterContext.Result = redirectResult;
                return;
        }

        protected virtual bool SkipUserAuthorize(ActionDescriptor actionDescriptor)
        {
            bool skipAuthorize = actionDescriptor.FilterDescriptors.Where(a => a.Filter is SkipUserAuthorizeAttribute).Any();
            if (skipAuthorize)
            {
                return true;
            }

            return false;
        }
    }
}
這裡有一個點需要註意登錄多個用戶,filterContext.HttpContext.User.Identity這裡會預設AddAuthentication(Scheme)中的Scheme, 網上看到“如果你的Controller或者Action上有使用AuthorizeAttribute,那這個Attribute使用的登錄方案是哪個,則這個HttpContext.User對應的就是那個方案的登錄用戶。如果沒有使用,則AddAuthentication()方法預設指它的方案(Scheme)所登錄的用戶,就是這個HttpContext.User”這裡跟我實際測試的有所不同,大家可以多測試一下。
所以獲取對應方案的登錄用戶,這裡用的是
var authenticate = filterContext.HttpContext.AuthenticateAsync(UserAuthorizeAttribute.UserAuthenticationScheme);
if (authenticate.Result.Succeeded){return;}
如果您有更好的方案請留言告知!
3.4登錄授權實現
配置文件中處理完成之後,接下來就是在登錄Action中實現登錄。添加一個Controller,如LoginController,再添加一個Action,如 Login,所配置的路由,要與上面的配置對應,不然跳轉登錄時會跳錯頁面。
下麵展示前臺會員登錄類:
using System;
using System.Collections.Generic;
using System.Linq;
using System.Security.Claims;
using System.Threading.Tasks;
using Microsoft.AspNetCore.Authentication;
using Microsoft.AspNetCore.Authentication.Cookies;
using Microsoft.AspNetCore.Mvc;

namespace NC.MVC.Controllers
{
    public class LoginController : Controller
    {
        public IActionResult Index()
        {
            return View();
        }
        /// <summary>
        /// 用戶登錄
        /// </summary>
        /// <param name="userName">用戶ID</param>
        /// <param name="passWord">用戶密碼</param>
        /// <param name="rememberMe">是否記住密碼</param>
        /// <returns></returns>
        [HttpPost]
        public IActionResult Login(string userName, string passWord, string rememberMe, string txtCode)
        {
            var user = new ClaimsPrincipal(
             new ClaimsIdentity(new[]
             {
                        new Claim("UserName","UserNameValue"),
                        new Claim("UserPwd","UserPwdValue"),
             }, UserAuthorizeAttribute.UserAuthenticationScheme)
            );
            HttpContext.SignInAsync(UserAuthorizeAttribute.UserAuthenticationScheme, user, new AuthenticationProperties
            {
                ExpiresUtc = DateTime.UtcNow.AddMinutes(60),// 有效時間
                //ExpiresUtc = DateTimeOffset.Now.Add(TimeSpan.FromDays(7)), // 有效時間
                IsPersistent = true,
                AllowRefresh = false
            });
            return new RedirectResult("~/Home/Index");//登錄成功
        }
    }
}
這裡要註意的是HttpContext.SignInAsync(AuthenticationType,…) 所設置的Scheme一定要與前面的配置一樣,這樣對應的登錄授權才會生效。
3.5認證驗證
登錄完成後,進入需要授權才能進入的管理頁面,在做限制的Controller上加上[自定義AuthorizeAttribute]特性來做限制。這裡我們自定義了兩個AuthorizeAttribute;UserAuthorizeAttribute和AdminAuthorizeAttribute,結合3.3的實現,我們使用UserAuthorizeAttribute在Contoller或Action上加特性。這裡我們先在HomeController上加上[UserAuthorize]
using Microsoft.AspNetCore.Mvc;
using System.Data;
using Microsoft.Extensions.Logging;
using Microsoft.AspNetCore.Authorization;

namespace NC.MVC.Controllers
{
    [UserAuthorize]
    public class HomeController : Controller
  {
        public IActionResult Index()
        {
           return View();
     }
  }
}
3.6退出登錄
如果是多用戶登錄的系統,退出的時候需要指定方案退出。
public async Task Logout(string returnurl)
{
    await HttpContext.SignOutAsync(UserAuthorizeAttribute.UserAuthenticationScheme);
    return Redirect(returnurl ?? "~/");
}
4.總結
以上就是我對net core 2.0 cookie授權登錄實際編程測試遇到的坑點以及編程過程中用到的部分代碼,後端管理員登錄相關代碼以及AdminAuthorizeAttribute和前端會員UserAuthorizeAttribute代碼基本一致,這裡限於時間及篇幅不做過多處理,自己動手是學習技術最快的方式,沒有之一。
在進行netcore2.0編程或者學習的時候,一定要拋卻固有的一些編程形式、思維。新的事物總會對舊有規則,舊有思維產生一定的衝擊,一定要學會適應,提醒大家同時警醒自己。Net core 開源跨平臺總的來說是屬於是良性的變化,變得更方便,更容易擴展,NET陣營需要我們大家共同去努力。
感謝ace chloe core開源、zkea cms core開源,在學習Asp.Net Core 2.0開發的時候網上資料相對較少,找了很多資料,有很多大牛的文章代碼對我幫助很大,寫博的時候很多創意、文章忘記出處,以後會留意。整理此篇備忘,希望對你有些許幫助。


