一、瞭解SpringMVC運行流程及九大組件 1、SpringMVC 的運行流程 · 用戶發送請求至前端控制器DispatcherServlet · DispatcherServlet收到請求調用HandlerMapping處理器映射器。 · 處理器映射器根據請求url找到具體的處理器,生成處理器對 ...
一、瞭解SpringMVC運行流程及九大組件
1、SpringMVC 的運行流程

-
· 用戶發送請求至前端控制器DispatcherServlet
-
· DispatcherServlet收到請求調用HandlerMapping處理器映射器。
-
· 處理器映射器根據請求url找到具體的處理器,生成處理器對象及處理器攔截器(如果有則生成)一併返回給DispatcherServlet。
-
· DispatcherServlet通過HandlerAdapter處理器適配器調用處理器
-
· 執行處理器(Controller,也叫後端控制器)。
-
· Controller執行完成返回ModelAndView
-
· HandlerAdapter將controller執行結果● ModelAndView返回給DispatcherServlet
-
· DispatcherServlet將ModelAndView傳給● ViewReslover視圖解析器
-
· ViewReslover解析後返回具體View
-
· DispatcherServlet對View進行渲染視圖(即將模型數據填充至視圖中)。
-
· DispatcherServlet響應用戶。
從上面可以看出,DispatcherServlet有接受請求,響應結果,轉發等作用。有了DispatcherServlet之後,可以減少組件之間的耦合度。
2、SpringMVC 的九大組件

protected void initStrategies(ApplicationContext context) {
//用於處理上傳請求。處理方法是將普通的request包裝成MultipartHttpServletRequest,後者可以直接調用getFile方法獲取File.
initMultipartResolver(context);

//SpringMVC主要有兩個地方用到了Locale:一是ViewResolver視圖解析的時候;二是用到國際化資源或者主題的時候。
initLocaleResolver(context);

//用於解析主題。SpringMVC中一個主題對應一個properties文件,裡面存放著跟當前主題相關的所有資源、
//如圖片、css樣式等。SpringMVC的主題也支持國際化,
initThemeResolver(context);

//用來查找Handler的。
initHandlerMappings(context);

//從名字上看,它就是一個適配器。Servlet需要的處理方法的結構卻是固定的,都是以request和response為參數的方法。
//如何讓固定的Servlet處理方法調用靈活的Handler來進行處理呢?這就是HandlerAdapter要做的事情
initHandlerAdapters(context);

//其它組件都是用來幹活的。在幹活的過程中難免會出現問題,出問題後怎麼辦呢?
//這就需要有一個專門的角色對異常情況進行處理,在SpringMVC中就是HandlerExceptionResolver。
initHandlerExceptionResolvers(context);

//有的Handler處理完後並沒有設置View也沒有設置ViewName,這時就需要從request獲取ViewName了,
//如何從request中獲取ViewName就是RequestToViewNameTranslator要做的事情了。
initRequestToViewNameTranslator(context);

//ViewResolver用來將String類型的視圖名和Locale解析為View類型的視圖。
//View是用來渲染頁面的,也就是將程式返回的參數填入模板里,生成html(也可能是其它類型)文件。
initViewResolvers(context);

//用來管理FlashMap的,FlashMap主要用在redirect重定向中傳遞參數。
initFlashMapManager(context);
}
View Code
二、自己實現 SpringMVC 功能分析
本篇文章只實現 SpringMVC 的配置載入、實例化掃描的包、HandlerMapping 的 url 映射到對應的Controller 的 method 上、異常的攔截和動態調用後返回結果輸出給瀏覽器的功能。其餘 SpringMVC 功能讀者可以嘗試自己實現。
1、讀取配置

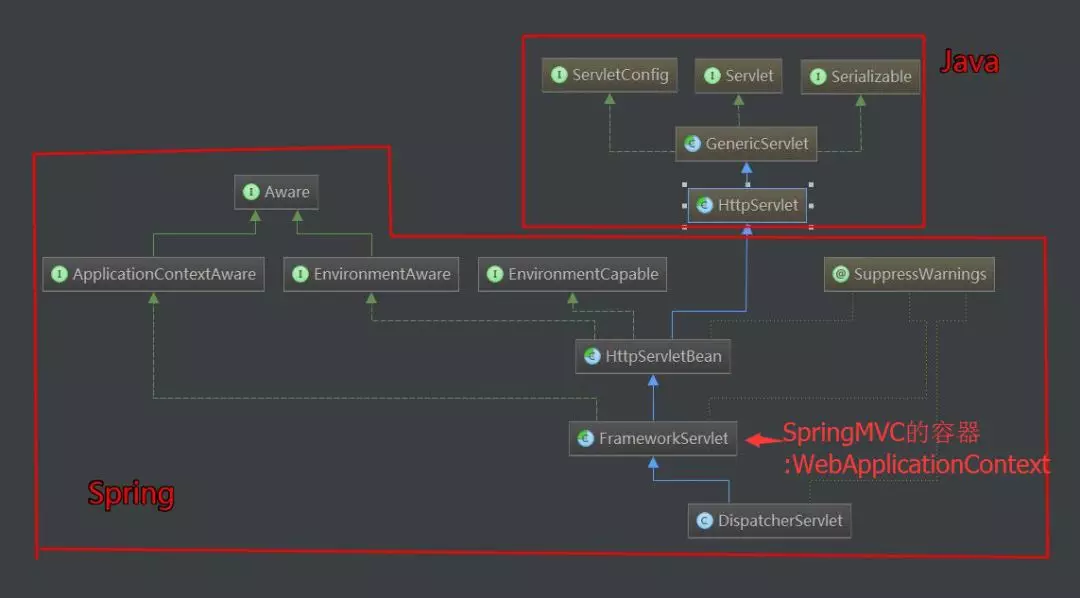
從圖中可以看出,SpringMVC本質上是一個Servlet,這個 Servlet 繼承自 HttpServlet。
FrameworkServlet負責初始化SpringMVC的容器,並將Spring容器設置為父容器。因為本文只是實現SpringMVC,對於Spring容器不做過多講解(有興趣同學可以看看博主另一篇文章:向spring大佬低頭--大量源碼流出解析)。
為了讀取web.xml中的配置,我們用到ServletConfig這個類,它代表當前Servlet在web.xml中的配置信息。通過web.xml中載入我們自己寫的MyDispatcherServlet和讀取配置文件。
2、初始化階段
在上文中,我們知道了DispatcherServlet的initStrategies方法會初始化9大組件,但是本文將實現一些SpringMVC的最基本的組件而不是全部,按順序包括:
· 載入配置文件
· 掃描用戶配置包下麵所有的類
· 拿到掃描到的類,通過反射機制,實例化。並且放到ioc容器中(Map的鍵值對 beanName-bean) beanName預設是首字母小寫
· 初始化HandlerMapping,這裡其實就是把url和method對應起來放在一個k-v的Map中,在運行階段取出
3、運行階段
每一次請求將會調用doGet或doPost方法,所以統一運行階段都放在doDispatch方法里處理,它會根據url請求去HandlerMapping中匹配到對應的Method,然後利用反射機制調用Controller中的url對應的方法,並得到結果返回。按順序包括以下功能:
· 異常的攔截
· 獲取請求傳入的參數並處理參數
· 通過初始化好的handlerMapping中拿出url對應的方法名,反射調用
三、手寫 SpringMVC 框架
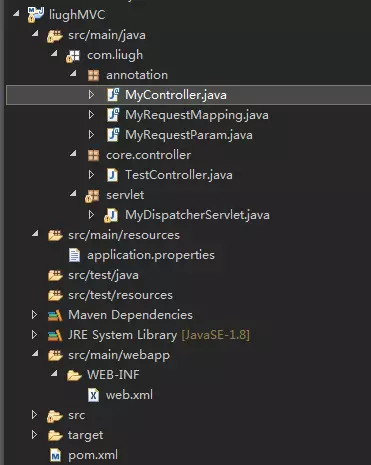
工程文件及目錄:

首先,新建一個maven項目,在pom.xml中導入以下依賴。為了方便,博主直接導入了Springboot的web包,裡面有我們需要的所有web開發的東西:

<project xmlns="http://maven.apache.org/POM/4.0.0" xmlns:xsi="http://www.w3.org/2001/XMLSchema-instance" xsi:schemaLocation="http://maven.apache.org/POM/4.0.0 http://maven.apache.org/xsd/maven-4.0.0.xsd">
  <modelVersion>4.0.0</modelVersion>
  <groupId>com.liugh</groupId>
  <artifactId>liughMVC</artifactId>
  <version>0.0.1-SNAPSHOT</version>
  <packaging>war</packaging>

 <dependencyManagement>
<dependencies>
    <dependency>
        <groupId>org.springframework.boot</groupId>
        <artifactId>spring-boot-dependencies</artifactId>
        <version>1.4.3.RELEASE</version>
        <type>pom</type>
        <scope>import</scope>
    </dependency>
</dependencies>
</dependencyManagement>
<properties>
    <project.build.sourceEncoding>UTF-8</project.build.sourceEncoding>
    <maven.compiler.source>1.8</maven.compiler.source>
    <maven.compiler.target>1.8</maven.compiler.target>
    <java.version>1.8</java.version>
</properties>
<dependencies>
  <dependency>
            <groupId>org.springframework.boot</groupId>
            <artifactId>spring-boot-starter-web</artifactId>
        </dependency>
    </dependencies>
</project>
View Code
接著,我們在WEB-INF下創建一個web.xml,如下配置:

<?xml version="1.0" encoding="UTF-8"?>
<web-app xmlns:xsi="http://www.w3.org/2001/XMLSchema-instance"
xmlns="http://java.sun.com/xml/ns/javaee" xmlns:web="http://java.sun.com/xml/ns/javaee/web-app_2_5.xsd"
xsi:schemaLocation="http://java.sun.com/xml/ns/javaee http://java.sun.com/xml/ns/javaee/web-app_3_0.xsd"
version="3.0">
<servlet>
    <servlet-name>MySpringMVC</servlet-name>
    <servlet-class>com.liugh.servlet.MyDispatcherServlet</servlet-class>
    <init-param>
    <param-name>contextConfigLocation</param-name>
    <param-value>application.properties</param-value>
    </init-param>
    <load-on-startup>1</load-on-startup>
</servlet>
<servlet-mapping>
    <servlet-name>MySpringMVC</servlet-name>
    <url-pattern>/*</url-pattern>
</servlet-mapping>

</web-app>
View Code
application.properties文件中只是配置要掃描的包到SpringMVC容器中。
scanPackage=com.liugh.core
創建自己的Controller註解,它只能標註在類上面:

package com.liugh.annotation;

import java.lang.annotation.Documented;
import java.lang.annotation.ElementType;
import java.lang.annotation.Retention;
import java.lang.annotation.RetentionPolicy;
import java.lang.annotation.Target;

@Target(ElementType.TYPE)
@Retention(RetentionPolicy.RUNTIME)
@Documented
public @interface MyController {
/**
     * 表示給controller註冊別名
     * @return
     */
    String value() default "";

}
View Code
RequestMapping註解,可以在類和方法上:

package com.liugh.annotation;

import java.lang.annotation.Documented;
import java.lang.annotation.ElementType;
import java.lang.annotation.Retention;
import java.lang.annotation.RetentionPolicy;
import java.lang.annotation.Target;

@Target({ElementType.TYPE,ElementType.METHOD})
@Retention(RetentionPolicy.RUNTIME)
@Documented
public @interface MyRequestMapping {
/**
     * 表示訪問該方法的url
     * @return
     */
    String value() default "";

}
View Code
RequestParam註解,只能註解在參數上

package com.liugh.annotation;

import java.lang.annotation.Documented;
import java.lang.annotation.ElementType;
import java.lang.annotation.Retention;
import java.lang.annotation.RetentionPolicy;
import java.lang.annotation.Target;

@Target(ElementType.PARAMETER)
@Retention(RetentionPolicy.RUNTIME)
@Documented
public @interface MyRequestParam {
/**
     * 表示參數的別名,必填
     * @return
     */
    String value();

}
View Code
然後創建MyDispatcherServlet這個類,去繼承HttpServlet,重寫init方法、doGet、doPost方法,以及加上我們第二步分析時要實現的功能:

package com.liugh.servlet;

import java.io.File;
import java.io.IOException;
import java.io.InputStream;
import java.lang.reflect.Method;
import java.net.URL;
import java.util.ArrayList;
import java.util.Arrays;
import java.util.HashMap;
import java.util.List;
import java.util.Map;
import java.util.Map.Entry;
import java.util.Properties;

import javax.servlet.ServletConfig;
import javax.servlet.ServletException;
import javax.servlet.http.HttpServlet;
import javax.servlet.http.HttpServletRequest;
import javax.servlet.http.HttpServletResponse;

import com.liugh.annotation.MyController;
import com.liugh.annotation.MyRequestMapping;

public class MyDispatcherServlet extends HttpServlet{
private Properties properties = new Properties();
private List<String> classNames = new ArrayList<>();
private Map<String, Object> ioc = new HashMap<>();
private Map<String, Method> handlerMapping = new  HashMap<>();
private Map<String, Object> controllerMap  =new HashMap<>();

@Override
public void init(ServletConfig config) throws ServletException {
    //1.載入配置文件
    doLoadConfig(config.getInitParameter("contextConfigLocation"));
    //2.初始化所有相關聯的類,掃描用戶設定的包下麵所有的類
    doScanner(properties.getProperty("scanPackage"));
    //3.拿到掃描到的類,通過反射機制,實例化,並且放到ioc容器中(k-v  beanName-bean) beanName預設是首字母小寫
    doInstance();
    //4.初始化HandlerMapping(將url和method對應上)
    initHandlerMapping();
}

@Override
protected void doGet(HttpServletRequest req, HttpServletResponse resp) throws ServletException, IOException {
    this.doPost(req,resp);
}

@Override
protected void doPost(HttpServletRequest req, HttpServletResponse resp) throws ServletException, IOException {
    try {
        //處理請求
        doDispatch(req,resp);
    } catch (Exception e) {
        resp.getWriter().write("500!! Server Exception");
}

}
private void doDispatch(HttpServletRequest req, HttpServletResponse resp) throws Exception {
    if(handlerMapping.isEmpty()){
        return;
    }
    String url =req.getRequestURI();
    String contextPath = req.getContextPath();
    url=url.replace(contextPath, "").replaceAll("/+", "/");
    if(!this.handlerMapping.containsKey(url)){
    resp.getWriter().write("404 NOT FOUND!");
    return;
}
Method method =this.handlerMapping.get(url);
//獲取方法的參數列表
Class<?>[] parameterTypes = method.getParameterTypes();
//獲取請求的參數
Map<String, String[]> parameterMap = req.getParameterMap();
//保存參數值
Object [] paramValues= new Object[parameterTypes.length];
//方法的參數列表
        for (int i = 0; i<parameterTypes.length; i++){
            //根據參數名稱,做某些處理
            String requestParam = parameterTypes[i].getSimpleName();


            if (requestParam.equals("HttpServletRequest")){
                //參數類型已明確,這邊強轉類型
            paramValues[i]=req;
                continue;
            }
            if (requestParam.equals("HttpServletResponse")){
            paramValues[i]=resp;
                continue;
            }
            if(requestParam.equals("String")){
            for (Entry<String, String[]> param : parameterMap.entrySet()) {
         String value =Arrays.toString(param.getValue()).replaceAll("\[|\]", "").replaceAll(",\s", ",");
         paramValues[i]=value;
         }
            }
        }
//利用反射機制來調用
    try {
       method.invoke(this.controllerMap.get(url), paramValues);//obj是method所對應的實例 在ioc容器中
    } catch (Exception e) {
        e.printStackTrace();
    }
}


private void  doLoadConfig(String location){
//把web.xml中的contextConfigLocation對應value值的文件載入到留裡面
InputStream resourceAsStream = this.getClass().getClassLoader().getResourceAsStream(location);
try {
//用Properties文件載入文件里的內容
properties.load(resourceAsStream);
} catch (IOException e) {
e.printStackTrace();
}finally {
//關流
if(null!=resourceAsStream){
try {
resourceAsStream.close();
} catch (IOException e) {
e.printStackTrace();
}
}
}
}
private void doScanner(String packageName) {
//把所有的.替換成/
URL url  =this.getClass().getClassLoader().getResource("/"+packageName.replaceAll("\.", "/"));
File dir = new File(url.getFile());
for (File file : dir.listFiles()) {
if(file.isDirectory()){
//遞歸讀取包
doScanner(packageName+"."+file.getName());
}else{
String className =packageName +"." +file.getName().replace(".class", "");
classNames.add(className);
}
}
}
private void doInstance() {
if (classNames.isEmpty()) {
return;
}
for (String className : classNames) {
try {
//把類搞出來,反射來實例化(只有加@MyController需要實例化)
Class<?> clazz =Class.forName(className);
   if(clazz.isAnnotationPresent(MyController.class)){
ioc.put(toLowerFirstWord(clazz.getSimpleName()),clazz.newInstance());
}else{
continue;
}
} catch (Exception e) {
e.printStackTrace();
continue;
}
}
}


private void initHandlerMapping(){
if(ioc.isEmpty()){
return;
}
try {
for (Entry<String, Object> entry: ioc.entrySet()) {
Class<? extends Object> clazz = entry.getValue().getClass();
if(!clazz.isAnnotationPresent(MyController.class)){
continue;
}
//拼url時,是controller頭的url拼上方法上的url
String baseUrl ="";
if(clazz.isAnnotationPresent(MyRequestMapping.class)){
MyRequestMapping annotation = clazz.getAnnotation(MyRequestMapping.class);
baseUrl=annotation.value();
}
Method[] methods = clazz.getMethods();
for (Method method : methods) {
if(!method.isAnnotationPresent(MyRequestMapping.class)){
continue;
}
MyRequestMapping annotation = method.getAnnotation(MyRequestMapping.class);
String url = annotation.value();
url =(baseUrl+"/"+url).replaceAll("/+", "/");
handlerMapping.put(url,method);
controllerMap.put(url,clazz.newInstance());
System.out.println(url+","+method);
}
}
} catch (Exception e) {
e.printStackTrace();
}
}


/**
* 把字元串的首字母小寫
* @param name
* @return
*/
private String toLowerFirstWord(String name){
char[] charArray = name.toCharArray();
charArray[0] += 32;
return String.valueOf(charArray);
}
}
View Code
這裡我們就開發完了自己的SpringMVC,現在我們測試一下:

package com.liugh.core.controller;

import java.io.IOException;

import javax.servlet.http.HttpServletRequest;
import javax.servlet.http.HttpServletResponse;

import com.liugh.annotation.MyController;
import com.liugh.annotation.MyRequestMapping;
import com.liugh.annotation.MyRequestParam;

@MyController
@MyRequestMapping("/test")
public class TestController {

@MyRequestMapping("/doTest")
    public void test1(HttpServletRequest request, HttpServletResponse response,
    @MyRequestParam("param") String param){
 System.out.println(param);
    try {
            response.getWriter().write( "doTest method success! param:"+param);
        } catch (IOException e) {
            e.printStackTrace();
        }
    }


@MyRequestMapping("/doTest2")
    public void test2(HttpServletRequest request, HttpServletResponse response){
        try {
            response.getWriter().println("doTest2 method success!");
        } catch (IOException e) {
            e.printStackTrace();
        }
    }
}
View Code
訪問http://localhost:8080/liughMVC/test/doTest?param=liugh如下:

訪問一個不存在的試試:

----【轉】


