準備工作 IDEA 2019.3.1 MySql 8.0.17 Tomcat 7.0.9 開始步驟 一、創建一個項目,添加Web支持 點擊菜單:File NEW Project 1380074/202002/1380074 20200205231042588 855824854.png) 選擇左側的 ...
準備工作
IDEA 2019.3.1
MySql 8.0.17
Tomcat 7.0.9
開始步驟
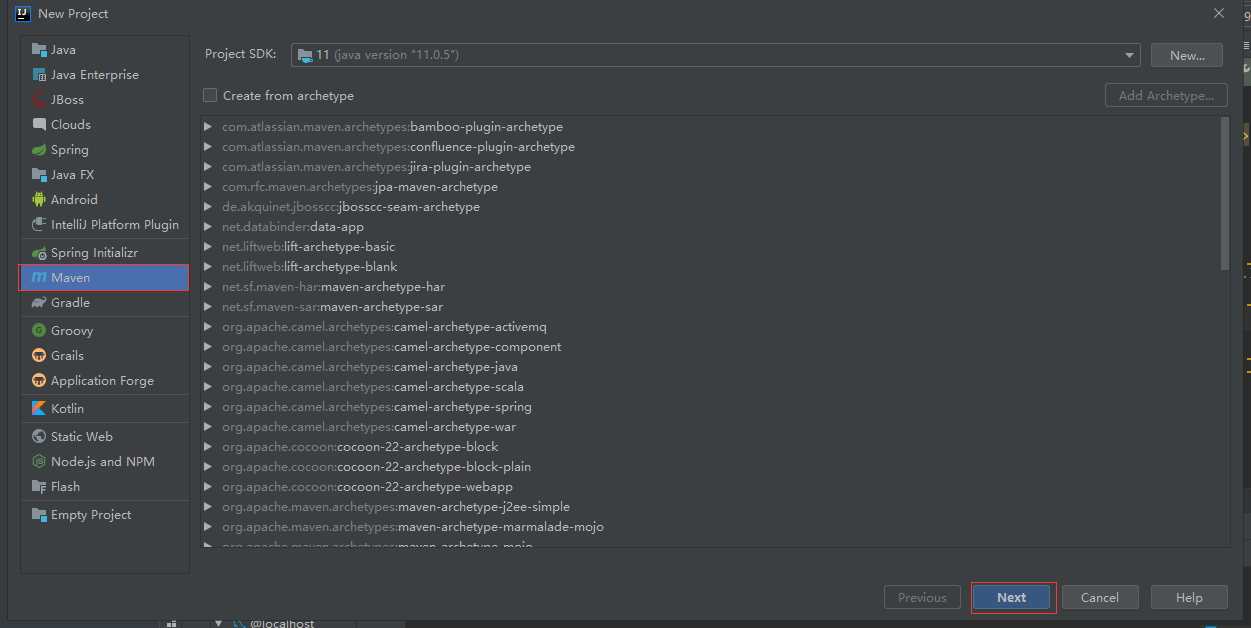
一、創建一個項目,添加Web支持
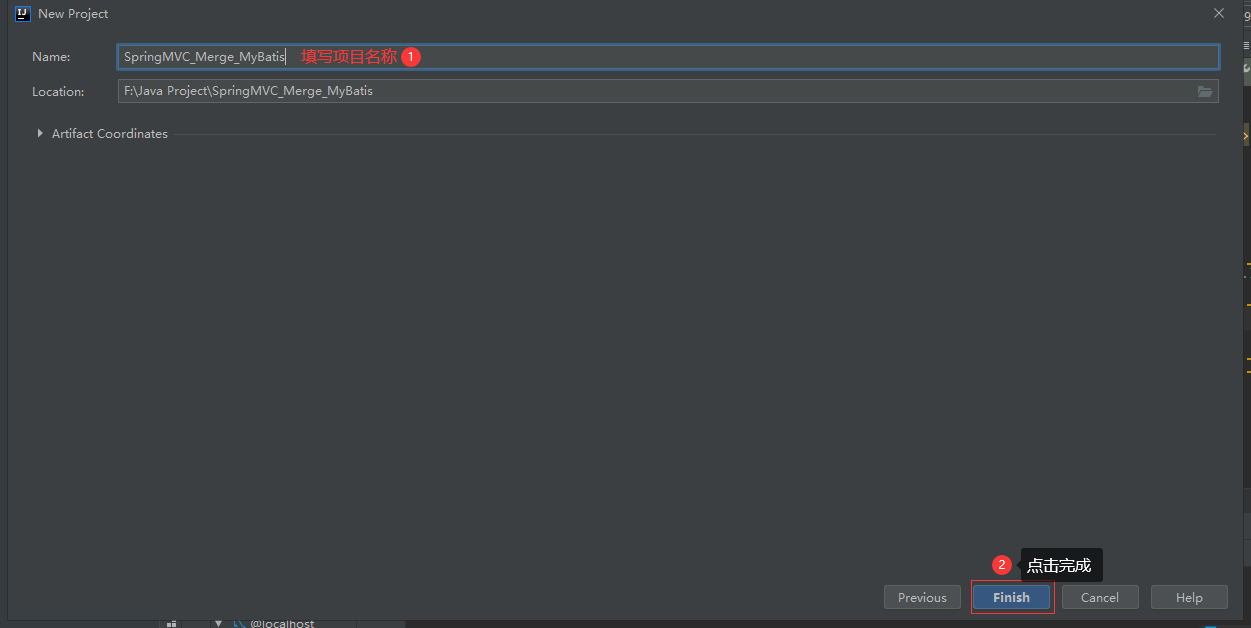
點擊菜單:File->NEW->Project

選擇左側的Maven項目,這裡的 Create from archetype先不要選擇,然後點擊Next
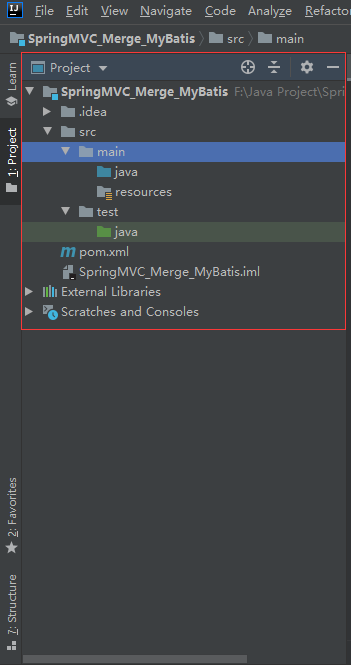
項目建好之後,目錄結構如下:
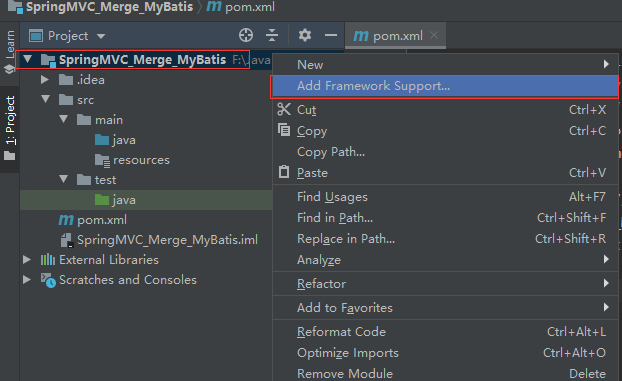
在項目上右鍵單擊,彈出菜單,選擇 Add Framework Support
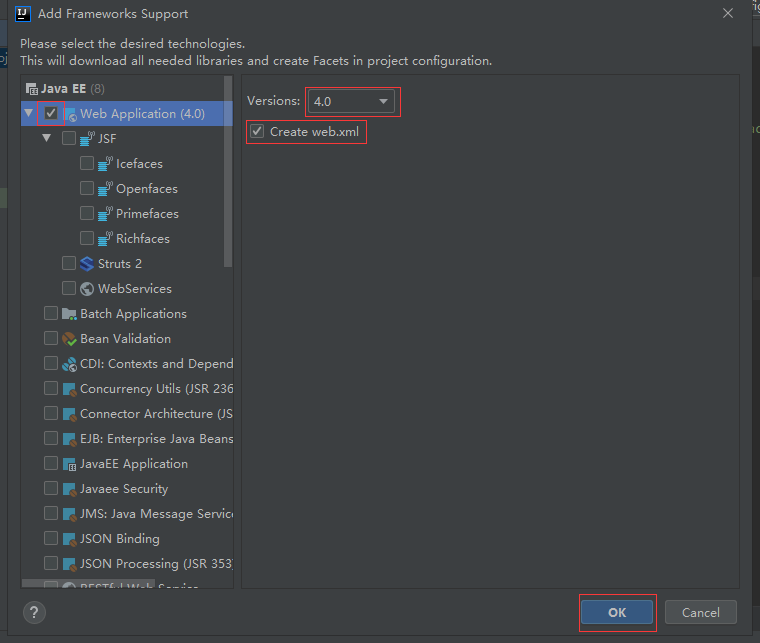
彈出如下界面,勾選左側的Web Application(4.0),點擊OK
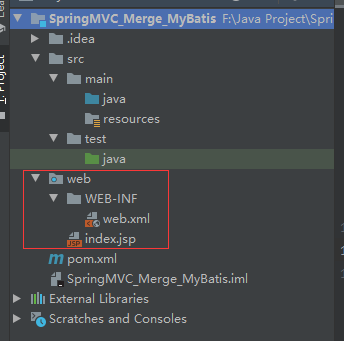
點擊OK之後,可以看到項目的目錄結構有web文件夾了
二、項目搭建
1.資料庫
新建資料庫,創建一個student表,並插入幾條數據
create table test.student
(
    id integer auto_increment primary key ,
    name varchar(50),
    age int,
    detail varchar(200)
)

insert into test.student(name,age,detail) values
('Tony1',18,'Tony1 is handsome');
insert into test.student(name,age,detail) values
('Tony2',19,'Tony2 is more handsome');
insert into test.student(name,age,detail) values
('Tony2',20,'Tony3 is most handsome');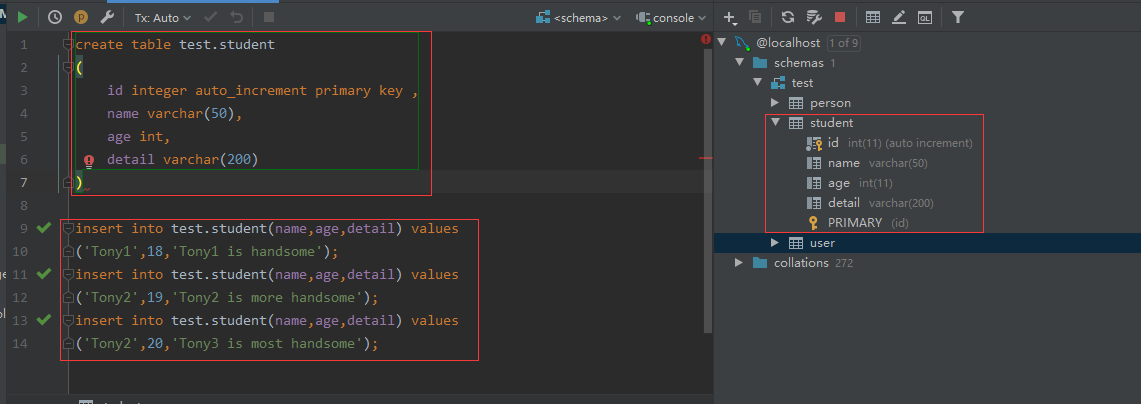
2.項目目錄
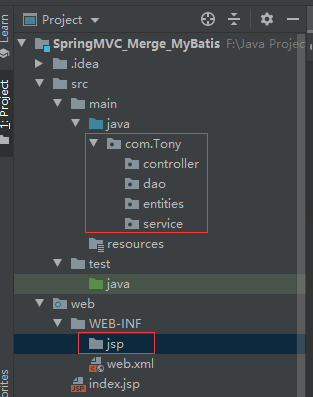
在項目結構的/src/main/java文件夾下創建一個包,並添加dao,service,entities,controller這四個文件夾,在/web/WEB-INF目錄下添加jsp文件夾:
3.配置文件
本項目總共有7個配置文件:
web.xml:項目的配置文件
applicationContext.xml:spring總的配置文件,會引用controller/service/dao的配置文件
spring-controller.xml:controller層的配置文件
spring-service.xml:service層的配置文件
spring-dao.xml:dao層的配置文件,同時配置,mybatis的配置掃描
db.properties:資料庫配置文件,被dao引用
StudentDao.xml:mybatis實體類映射文件
4.maven配置
引入springmvc ,mybatis所需的包,配置如下:
<dependencies>
        <!--Junit-->
        <dependency>
            <groupId>junit</groupId>
            <artifactId>junit</artifactId>
            <version>4.12</version>
        </dependency>
        <!--資料庫驅動-->
        <dependency>
            <groupId>mysql</groupId>
            <artifactId>mysql-connector-java</artifactId>
            <version>5.1.47</version>
        </dependency>
        <!-- 資料庫連接池 -->
        <dependency>
            <groupId>com.mchange</groupId>
            <artifactId>c3p0</artifactId>
            <version>0.9.5.2</version>
        </dependency>

        <!--Servlet - JSP -->
        <dependency>
            <groupId>javax.servlet</groupId>
            <artifactId>servlet-api</artifactId>
            <version>2.5</version>
        </dependency>
        <dependency>
            <groupId>javax.servlet.jsp</groupId>
            <artifactId>jsp-api</artifactId>
            <version>2.2</version>
        </dependency>
        <dependency>
            <groupId>javax.servlet</groupId>
            <artifactId>jstl</artifactId>
            <version>1.2</version>
        </dependency>

        <!--Mybatis-->
        <dependency>
            <groupId>org.mybatis</groupId>
            <artifactId>mybatis</artifactId>
            <version>3.5.2</version>
        </dependency>
        <dependency>
            <groupId>org.mybatis</groupId>
            <artifactId>mybatis-spring</artifactId>
            <version>2.0.2</version>
        </dependency>

        <!--Spring-->
        <dependency>
            <groupId>org.springframework</groupId>
            <artifactId>spring-webmvc</artifactId>
            <version>5.1.9.RELEASE</version>
        </dependency>
        <dependency>
            <groupId>org.springframework</groupId>
            <artifactId>spring-jdbc</artifactId>
            <version>5.1.9.RELEASE</version>
        </dependency>
        <dependency>
            <groupId>org.springframework</groupId>
            <artifactId>spring-context</artifactId>
            <version>5.1.9.RELEASE</version>
        </dependency>
        <dependency>
            <groupId>org.projectlombok</groupId>
            <artifactId>lombok</artifactId>
            <version>1.18.10</version>
        </dependency>

    </dependencies>
解決資源文件的依賴問題:
<build>
        <resources>
            <resource>
                <directory>src/main/java</directory>
                <includes>
                    <include>**/*.properties</include>
                    <include>**/*.xml</include>
                </includes>
                <filtering>false</filtering>
            </resource>
            <resource>
                <directory>src/main/resources</directory>
                <includes>
                    <include>**/*.properties</include>
                    <include>**/*.xml</include>
                </includes>
                <filtering>false</filtering>
            </resource>
        </resources>
    </build>
三、代碼編寫
1.在entities包中添加Student類:
package com.Tony.entities;

public class Student {
    private int id;

    public int getId() {
        return id;
    }

    public void setId(int id) {
        this.id = id;
    }

    public String getName() {
        return name;
    }

    public void setName(String name) {
        this.name = name;
    }

    public int getAge() {
        return age;
    }

    public void setAge(int age) {
        this.age = age;
    }

    public String getDetail() {
        return detail;
    }

    public void setDetail(String detail) {
        this.detail = detail;
    }

    private String name;
    private int age;
    private String detail;
}
2.在dao包中添加StudentDao介面:
package com.Tony.dao;

import com.Tony.entities.Student;

import java.util.List;

public interface StudentDao {
    Student findStudentById(int id);
    List<Student> findAllStudent();

    int deleteStudent(int id);

    int updateStudent(Student student);

    int addStudent(Student student);
}
3.在dao中添加StudentDao.xml 映射文件
<?xml version="1.0" encoding="UTF-8"?>
<!DOCTYPE mapper PUBLIC "-//mybatis.org//DTD Mapper 3.0//EN" "http://mybatis.org/dtd/mybatis-3-mapper.dtd">
<mapper namespace="com.Tony.dao.StudentDao">
    <select id="findStudentById" parameterType="int" resultType="com.Tony.entities.Student">
        select * from test.student where id=#{id}
    </select>

    <select id="findAllStudent" resultType="com.Tony.entities.Student">
        select * from test.student
    </select>

    <delete id="deleteStudent" parameterType="int">
        delete from test.student where id=#{id}
    </delete>

    <update id="updateStudent" parameterType="com.Tony.entities.Student">
        update test.student set name=#{name},age=#{age},detail=#{detail} where id=#{id}
    </update>

    <insert id="addStudent" parameterType="com.Tony.entities.Student">
        insert into test.student(name,age,detail) values
        (#{name},#{age},#{detail})
    </insert>
</mapper>
4.在service包中添加StudentService介面和其實現類StudentServiceImpl:
StudentService:
package com.Tony.service;

import com.Tony.entities.Student;

import java.util.List;

public interface StudentService {
    Student findStudentById(int id);
    List<Student> findAllStudent();

    int deleteStudent(int id);

    int updateStudent(Student student);

    int addStudent(Student student);
}
StudentServiceImpl:
package com.Tony.service;

import com.Tony.dao.StudentDao;
import com.Tony.entities.Student;
import org.springframework.beans.factory.annotation.Autowired;
import org.springframework.stereotype.Service;

import java.util.List;

@Service
public class StudentServiceImpl implements StudentService {

    @Autowired
    private StudentDao studentDao;

    public Student findStudentById(int id) {
        return this.studentDao.findStudentById(id);
    }

    public List<Student> findAllStudent() {
        return this.studentDao.findAllStudent();
    }

    public int deleteStudent(int id) {
        return this.studentDao.deleteStudent(id);
    }

    public int updateStudent(Student student) {
        return this.studentDao.updateStudent(student);
    }

    public int addStudent(Student student) {
        return this.studentDao.addStudent(student);
    }
}
5.在controller包中添加StudentController,並添加showAllStudent介面:
package com.Tony.controller;

import com.Tony.entities.Student;
import com.Tony.service.StudentService;
import org.springframework.beans.factory.annotation.Autowired;
import org.springframework.stereotype.Controller;
import org.springframework.ui.Model;
import org.springframework.web.bind.annotation.RequestMapping;

import java.util.List;

@Controller
@RequestMapping("/student")
public class StudentController {

    @Autowired
    private StudentService studentService;

    @RequestMapping("/showAllStudent")
    public String showAllStudent(Model model)
    {
        List<Student> list=studentService.findAllStudent();
        model.addAttribute("list",list);
        return "allStudent";
    }
}
6.在/web/WEB-INF/jsp/文件夾中添加allStudent.jsp頁面:
<%@ taglib prefix="c" uri="http://java.sun.com/jsp/jstl/core" %>
<%@ page contentType="text/html;charset=UTF-8" language="java" %>
<html>
<head>
    <title>顯示所有的學生</title>
</head>
<body>
    <table>
        <thead>
        <tr>
            <td>學生ID</td>
            <td>學生姓名</td>
            <td>學生年齡</td>
            <td>學生明細</td>
        </tr>
        </thead>
        <tbody>
        <c:forEach var="student" items="${requestScope.get('list')}">
            <tr>
                <td>${student.id}</td>
                <td>${student.name}</td>
                <td>${student.age}</td>
                <td>${student.detail}</td>
            </tr>
        </c:forEach>
        </tbody>
    </table>
</body>
</html>
四、配置文件
1.db.properties
jdbc.url=jdbc:mysql://localhost:3306/test
jdbc.username=root
jdbc.password=123456
jdbc.driver=com.mysql.jdbc.Driver
2.spring-dao.xml
<?xml version="1.0" encoding="UTF-8"?>
<beans xmlns="http://www.springframework.org/schema/beans"
       xmlns:xsi="http://www.w3.org/2001/XMLSchema-instance"
       xmlns:context="http://www.springframework.org/schema/context"
       xsi:schemaLocation="http://www.springframework.org/schema/beans
        http://www.springframework.org/schema/beans/spring-beans.xsd
        http://www.springframework.org/schema/context
        https://www.springframework.org/schema/context/spring-context.xsd">

    <context:property-placeholder location="classpath:db.properties"></context:property-placeholder>

    <bean id="dataSource" class="com.mchange.v2.c3p0.ComboPooledDataSource">
        <property name="driverClass" value="${jdbc.driver}"></property>
        <property name="user" value="${jdbc.username}"></property>
        <property name="password" value="${jdbc.password}"></property>
        <property name="jdbcUrl" value="${jdbc.url}"></property>
    </bean>

    <bean id="sqlSessionFactory" class="org.mybatis.spring.SqlSessionFactoryBean">
        <property name="dataSource" ref="dataSource"></property>
    </bean>

    <bean class="org.mybatis.spring.mapper.MapperScannerConfigurer">
        <property name="sqlSessionFactoryBeanName" value="sqlSessionFactory"></property>
        <property name="basePackage" value="com.Tony.dao"></property>
    </bean>
</beans>
3.spring-service.xml
<?xml version="1.0" encoding="UTF-8"?>
<beans xmlns="http://www.springframework.org/schema/beans"
       xmlns:xsi="http://www.w3.org/2001/XMLSchema-instance"
       xmlns:context="http://www.springframework.org/schema/context"
       xmlns:cache="http://www.springframework.org/schema/cache"
       xsi:schemaLocation="http://www.springframework.org/schema/beans
        http://www.springframework.org/schema/beans/spring-beans.xsd
        http://www.springframework.org/schema/context
        http://www.springframework.org/schema/context/spring-context.xsd
        http://www.springframework.org/schema/cache
        http://www.springframework.org/schema/cache/spring-cache.xsd">
        <context:component-scan base-package="com.Tony.service"></context:component-scan>
</beans>
4.spring-controller.xml
<?xml version="1.0" encoding="UTF-8"?>
<beans xmlns="http://www.springframework.org/schema/beans"
       xmlns:xsi="http://www.w3.org/2001/XMLSchema-instance"
       xmlns:context="http://www.springframework.org/schema/context"
       xmlns:mvc="http://www.springframework.org/schema/mvc"
       xsi:schemaLocation="http://www.springframework.org/schema/beans
    http://www.springframework.org/schema/beans/spring-beans.xsd
    http://www.springframework.org/schema/context
    http://www.springframework.org/schema/context/spring-context.xsd
    http://www.springframework.org/schema/mvc
    https://www.springframework.org/schema/mvc/spring-mvc.xsd">
    <!--掃描@controller註解-->
    <context:component-scan base-package="com.Tony.controller"></context:component-scan>

    <!--@RequestMapping生效-->
    <mvc:annotation-driven></mvc:annotation-driven>

    <bean id="internalResourceViewResolver" class="org.springframework.web.servlet.view.InternalResourceViewResolver">
        <property name="prefix" value="/WEB-INF/jsp/"></property>
        <property name="suffix" value=".jsp"></property>
    </bean>

</beans>
5.applicationContext.xml
<?xml version="1.0" encoding="UTF-8"?>
<beans xmlns="http://www.springframework.org/schema/beans"
xmlns:xsi="http://www.w3.org/2001/XMLSchema-instance"
xsi:schemaLocation="http://www.springframework.org/schema/beans
http://www.springframework.org/schema/beans/spring-beans.xsd">
<import resource="classpath:spring-controller.xml"></import>
<import resource="classpath:spring-dao.xml"></import>
<import resource="classpath:spring-service.xml"></import>
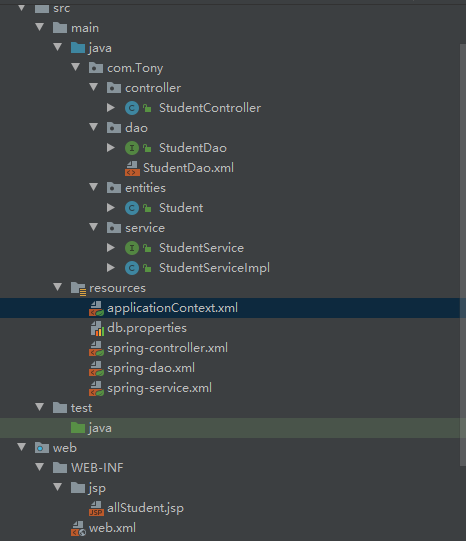
</beans>最後,整個項目的目錄結構如下:
五、配置Tomcat
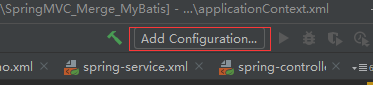
點擊上方的AddConfiguration按鈕
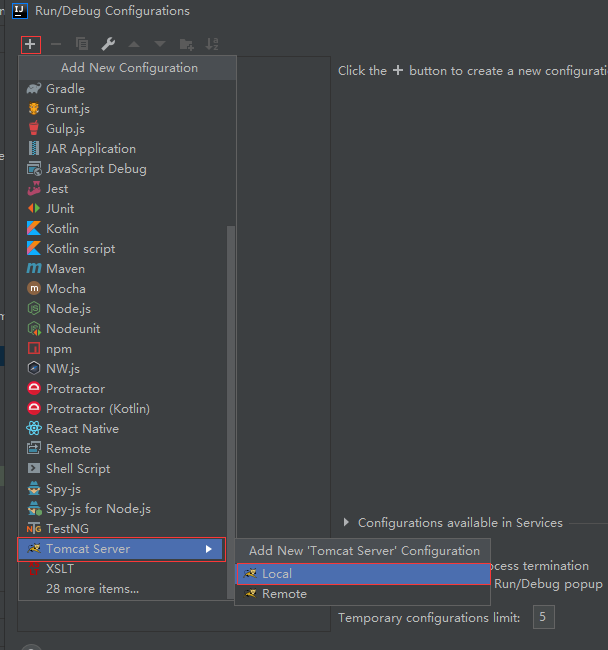
彈出如下界面,點擊+號,選擇Tomcat Server->Local
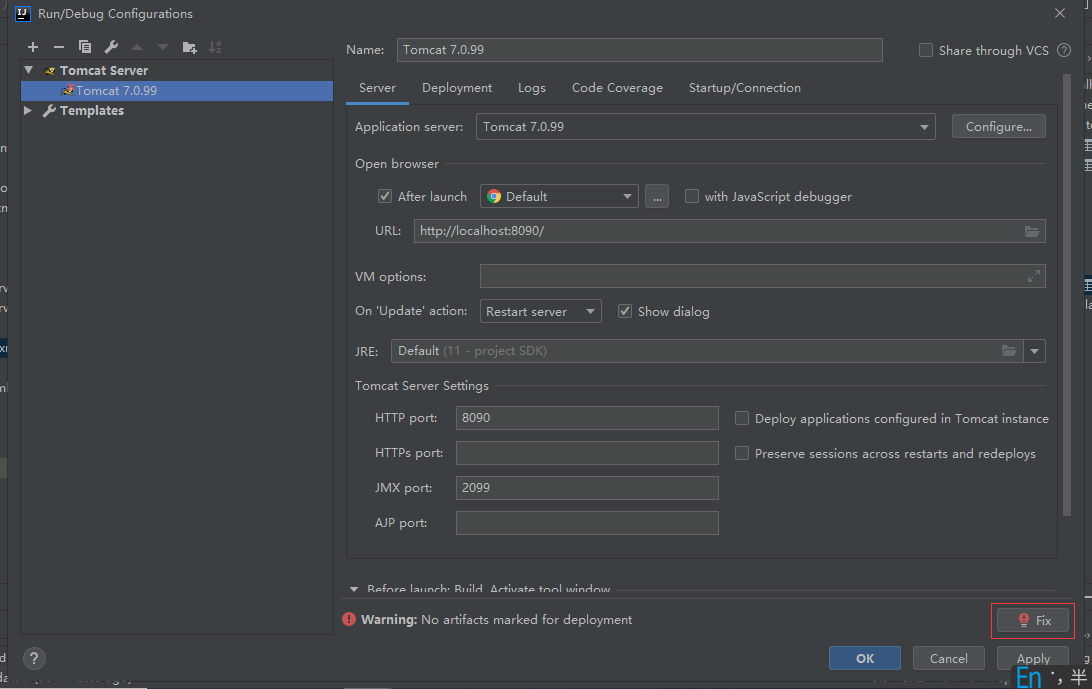
彈出如下界面,點擊fix:
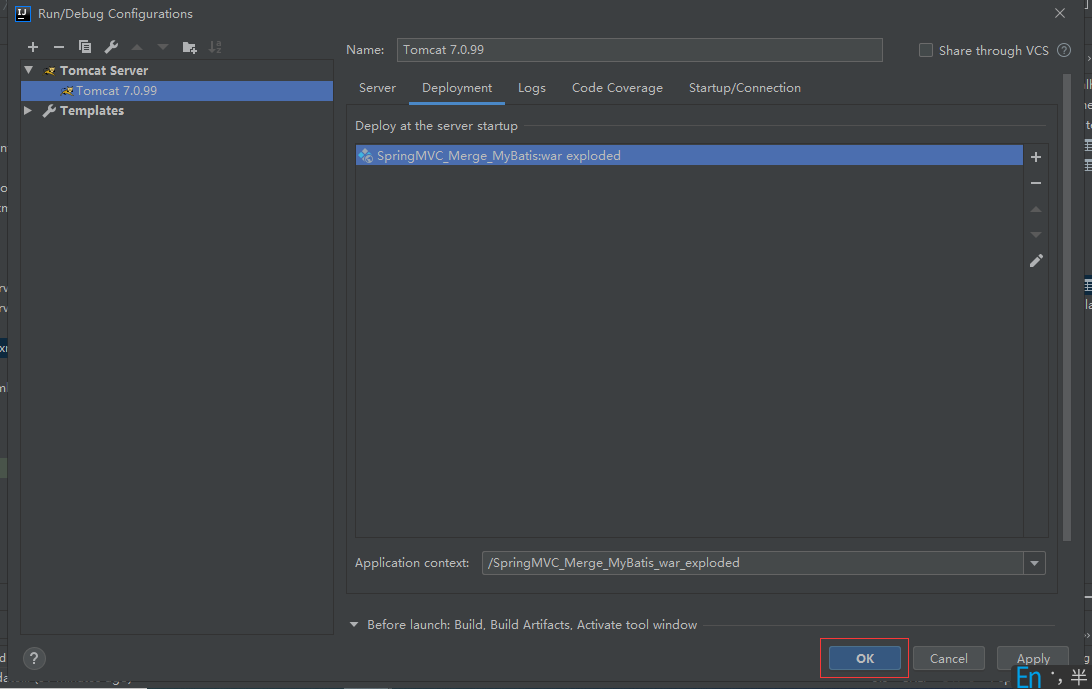
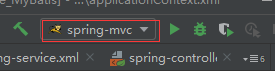
配置後,這裡就看得到剛配置的Tomcat伺服器名了:
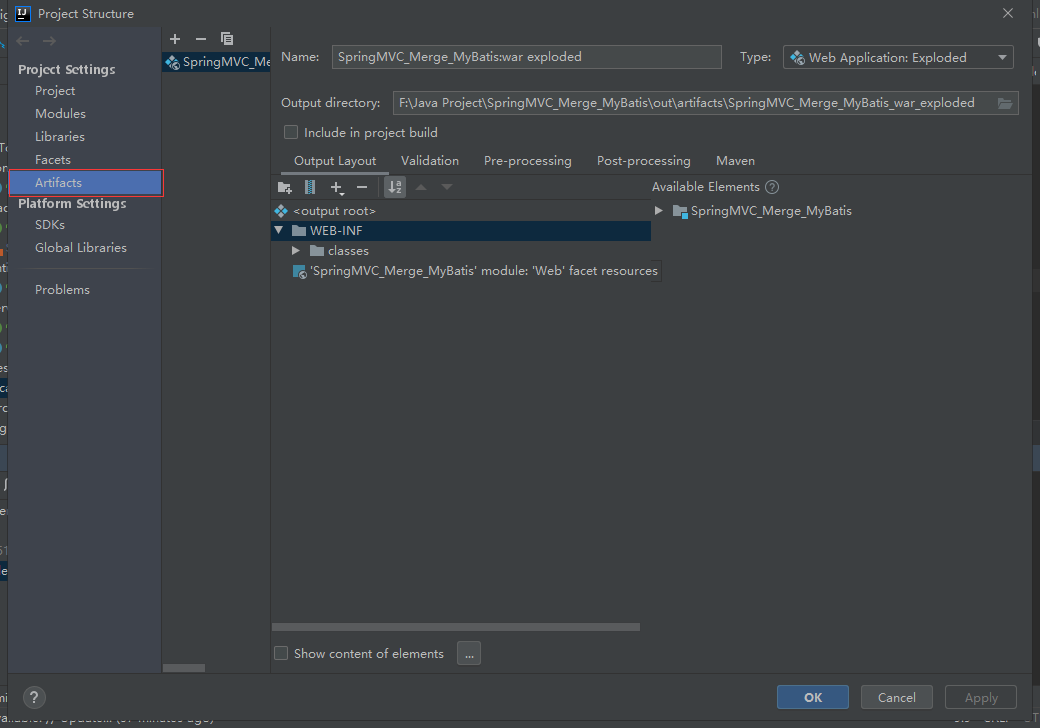
六、配置打包的Artifacts:
點擊菜單File->Project Structure:

彈出如下界面,選擇左側的Artifacts:
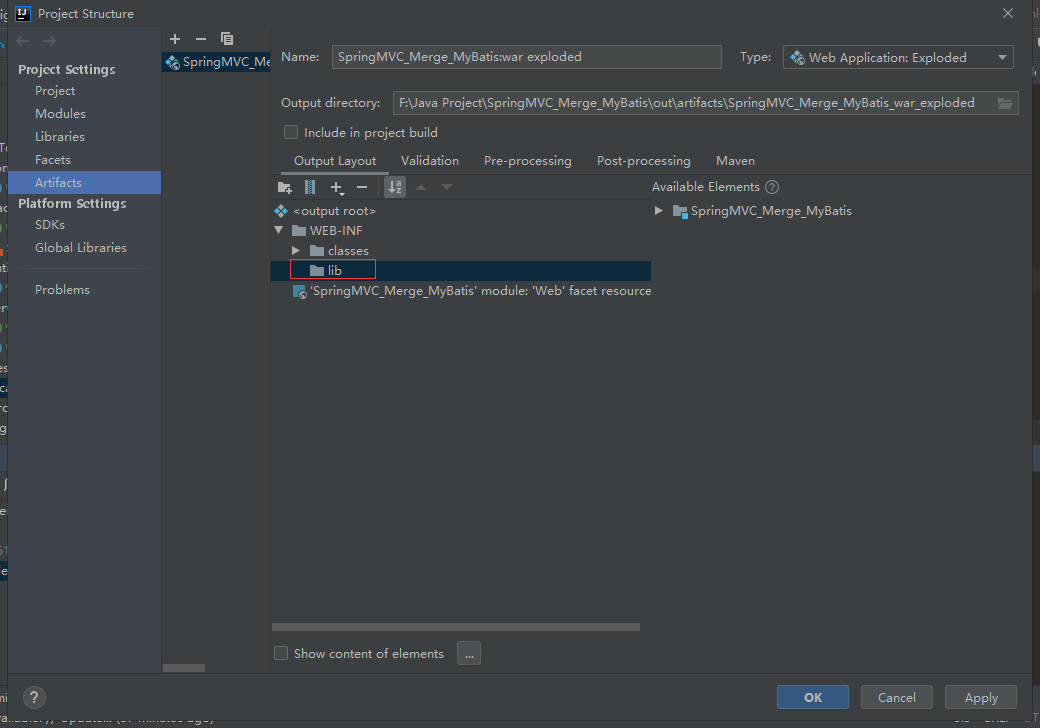
在Output Layout的WEB-INF下新建一個lib文件夾(註意此處必須是lib,全部是小寫,寫錯了會導致出各種錯誤):
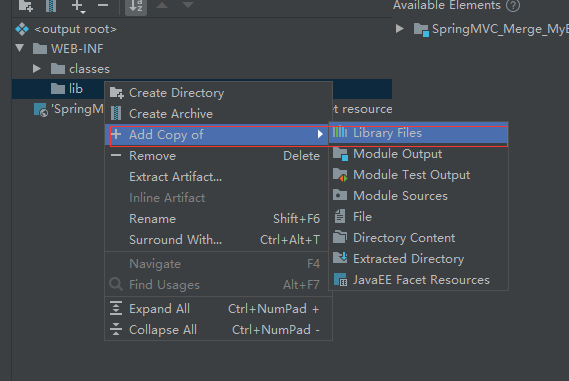
選中lib文件夾,右鍵單擊,彈出菜單,選擇Add Copy of->Library Files:


七、運行項目:
點擊如下的播放按鈕運行項目,運行起來之後,IDEA會自動打開瀏覽器

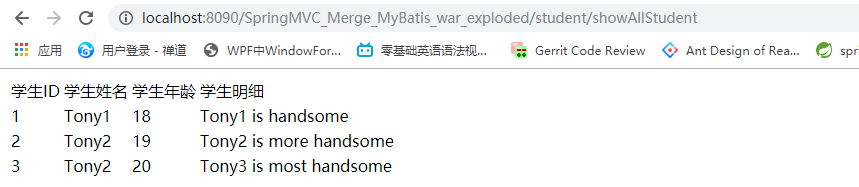
打開瀏覽器之後,預設是如下的網址:

我們需要加上顯示所有學生的網址,然後按回車鍵,就可以顯示所有的學生了:
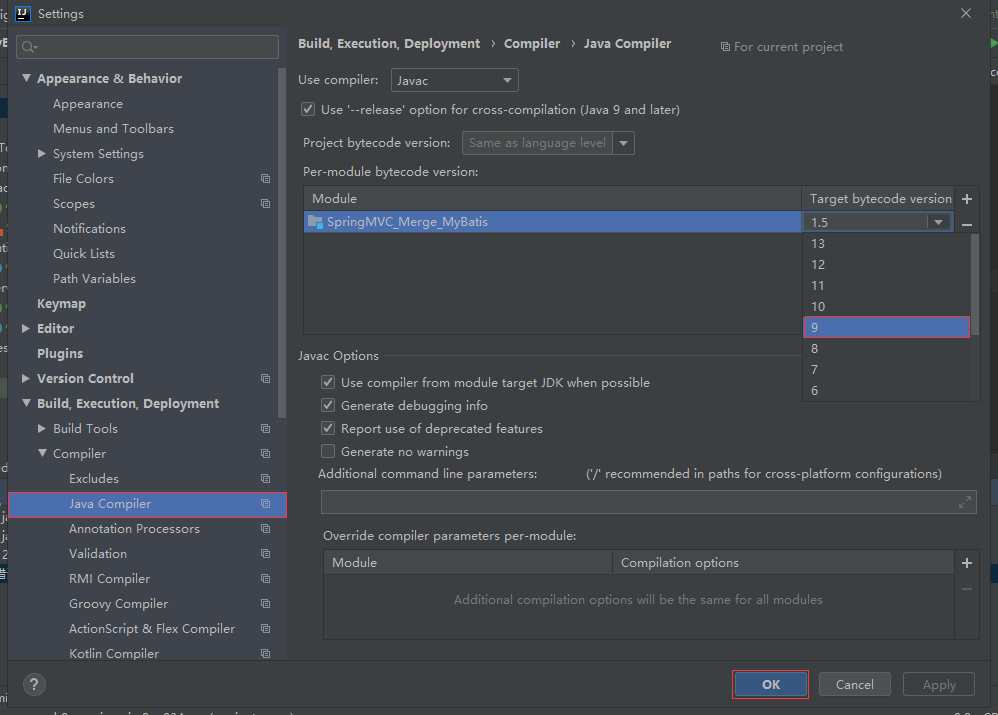
八、各種問題排查
1.不支持發行版本5:
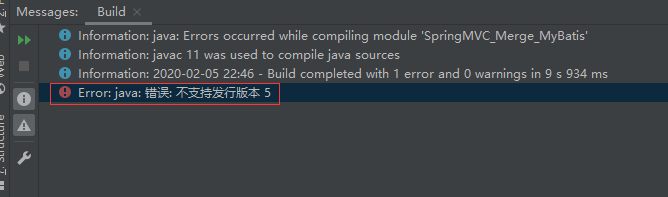
解決辦法:
點擊菜單:File->Setting,彈出如下界面,選擇左邊的Build,Execution,Deployment->Compiler->Java Compiler,
將項目的target bytecode version從1.5改為9