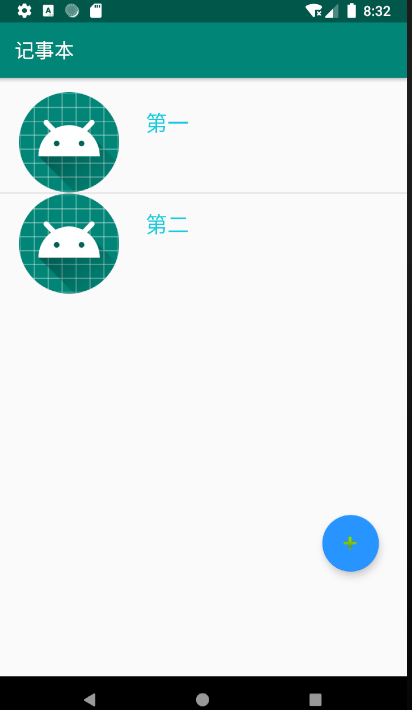
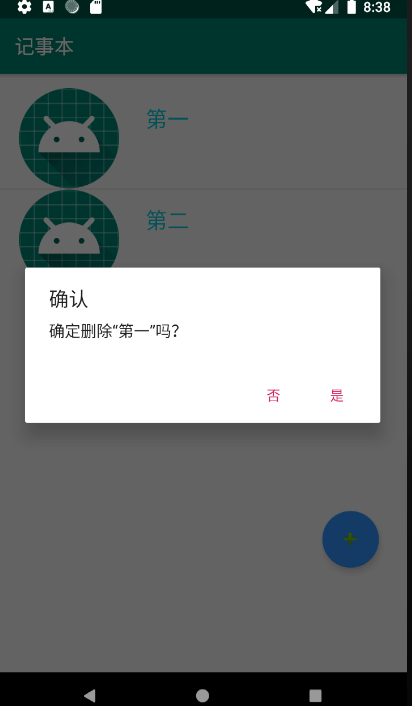
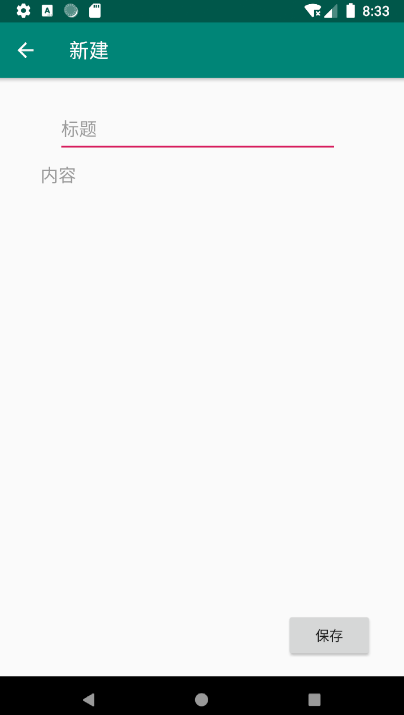
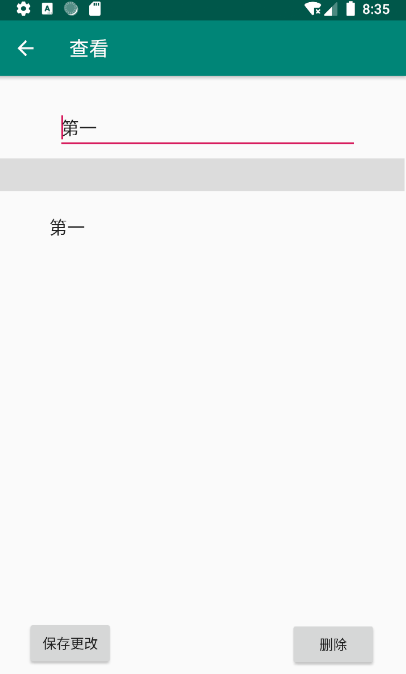
這幾天用自己目前掌握的安卓開發知識製作了一個記事本小程式,在這裡分享一下開發流程,希望可以幫到和我一樣的初學者。 開發工具為Android studio,後臺語言為java,使用的資料庫為安卓的SQLite資料庫,功能及效果圖如下: 主界面,長按可刪除: 點擊加號添加: 主頁面點擊查看,此頁面含修改 ...
這幾天用自己目前掌握的安卓開發知識製作了一個記事本小程式,在這裡分享一下開發流程,希望可以幫到和我一樣的初學者。
開發工具為Android studio,後臺語言為java,使用的資料庫為安卓的SQLite資料庫,功能及效果圖如下:
主界面,長按可刪除:
點擊加號添加:
主頁面點擊查看,此頁面含修改和刪除功能:
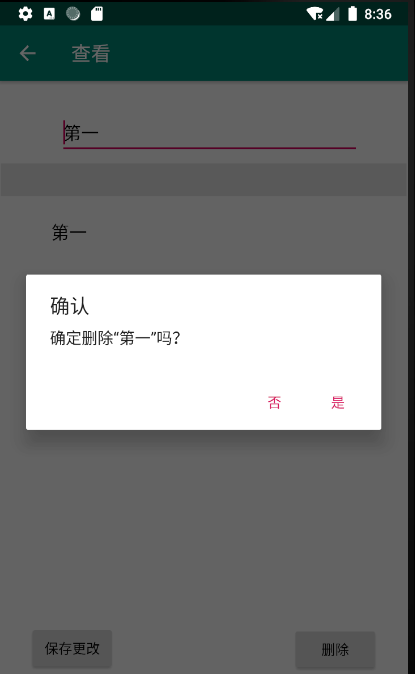
主要使用的技術:數據存儲使用的資料庫存儲,我之前的博客有講過安卓SQLite的基礎操作;數據的顯示用的是ListView部件,數據傳輸用的是intent技術,頁面間的跳轉也是藉助intent;主頁點擊某一行,就通過intent傳遞其id到查看頁,並根據id從資料庫中讀取數據進行顯示,刪除也是根據id進行資料庫操作。
整個項目文件已經同步到github需要的請自取https://github.com/liuleliu/textbook
下麵是主要代碼:
資料庫輔助類:
package com.example.myapplication;
import android.content.Context;
import android.database.sqlite.SQLiteDatabase;
import android.database.sqlite.SQLiteOpenHelper;
public class DataBaseHelp extends SQLiteOpenHelper{
    private static final String DATABASENAME ="tip1";//資料庫名稱
    private static final int DATABASEVERSION =1;//資料庫版本
    private static final String TABLENAME="tip1";//表名
    public DataBaseHelp(Context context)//定義構造
    {
    super(context,DATABASENAME,null,DATABASEVERSION);    //調用父類構造
    }
    public void onCreate(SQLiteDatabase db)
    {
        String sql="CREATE TABLE "+TABLENAME+"("+
                "id   INTEGER PRIMARY KEY AUTOINCREMENT,"+                   //設置自動增長列
                "name  VARCHAR(50) NOT NULL,"+
                "text  VARCHAR(50) NOT NULL)";
    db.execSQL(sql);    //執行sql語句
    }
    public void onUpgrade(SQLiteDatabase db,int oldVersion,int newVersion)
    {
        String sql="DROP TABLE IF EXISTS "+TABLENAME;
        db.execSQL(sql);
        this.onCreate(db);//創建表

    }
}
操作類
package com.example.myapplication;
import android.database.Cursor;
import android.database.sqlite.SQLiteDatabase;

import java.util.ArrayList;
import java.util.HashMap;
import java.util.List;
import java.util.Map;

public class OperateTable {
    private static final String TABLENAME ="tip1";
    private SQLiteDatabase db=null;
    public OperateTable(SQLiteDatabase db)
    {
        this.db=db;
    }
    public void insert(String name,String text)
    {
        String sql="INSERT INTO "+TABLENAME+" (name,text) VALUES ('"+name+"','"+text+"')";
        this.db.execSQL(sql);


    }
    public void delete(String id)
    {
        String sql="DELETE FROM "+TABLENAME+" WHERE id='"+id+"'";
        this.db.execSQL(sql);


    }
    public void updata(String id,String name,String text)
    {
        String sql="UPDATE "+TABLENAME+" SET name ='"+name+"',text='"+text+"' WHERE id='"+id+"'";
        this.db.execSQL(sql);
    }
    public List<Map<String,Object>> getdata()
    {List<Map<String,Object>>list=new ArrayList<Map<String,Object>>();
        Map<String,Object> map=new HashMap<String,Object>();

        String sql="SELECT id,name,text FROM "+TABLENAME;
        Cursor result =this.db.rawQuery(sql,null);
        for(result.moveToFirst();!result.isAfterLast();result.moveToNext())
        {
            map=new HashMap<String,Object>();
            map.put("id",result.getInt(0));
            map.put("tt",result.getString(1));
            list.add(map);
        }
        return  list;}
        public tip t(String id)
        {
            tip t=new tip();

            String sql="SELECT name,text FROM "+TABLENAME+" WHERE id ='"+id+"'";
            Cursor result =this.db.rawQuery(sql,null);
            result.moveToFirst();
            t.setName(result.getString(0));
            t.setText(result.getString(1));
            return t;
        }
}
主頁的數據顯示以及互動涉及到了ListView的使用
數據的更新要重載onResume()函數來實現
佈局:
<?xml version="1.0" encoding="utf-8"?>
<androidx.constraintlayout.widget.ConstraintLayout xmlns:android="http://schemas.android.com/apk/res/android"
    xmlns:app="http://schemas.android.com/apk/res-auto"
    xmlns:tools="http://schemas.android.com/tools"
    android:id="@+id/linearLayout2"
    android:layout_width="match_parent"
    android:layout_height="match_parent"
    android:orientation="vertical">

    <com.google.android.material.floatingactionbutton.FloatingActionButton
        android:id="@+id/add"
        android:layout_width="59dp"
        android:layout_height="57dp"
        android:layout_marginEnd="28dp"
        android:clickable="true"
        app:backgroundTint="#2894FF"
        app:layout_constraintBottom_toBottomOf="parent"
        app:layout_constraintEnd_toEndOf="parent"
        app:layout_constraintTop_toTopOf="parent"
        app:layout_constraintVertical_bias="0.807"
        app:srcCompat="@android:drawable/ic_input_add" />

    <ListView
        android:id="@+id/vi"
        android:layout_width="wrap_content"
        android:layout_height="wrap_content"
        android:layout_marginTop="20dp"
        android:layout_marginBottom="389dp"
        app:layout_constraintBottom_toTopOf="@+id/add"
        app:layout_constraintStart_toStartOf="parent"
        app:layout_constraintTop_toTopOf="parent"
        app:layout_constraintVertical_bias="0.034"></ListView>

</androidx.constraintlayout.widget.ConstraintLayout>
下麵這個是每一行的佈局
    <TextView
        android:id="@+id/id"
        android:layout_width="wrap_content"
        android:layout_height="wrap_content"
        android:layout_marginStart="39dp"
        android:layout_marginBottom="24dp"
        android:text="TextView"
        android:textColor="#00000000"
        app:layout_constraintBottom_toBottomOf="@+id/pic"
        app:layout_constraintStart_toStartOf="parent" />

    <ImageView
        android:id="@+id/pic"
        android:layout_width="142dp"
        android:layout_height="101dp"
        android:src="@mipmap/ic_launcher_round"
        app:layout_constraintStart_toStartOf="parent"
        app:layout_constraintTop_toTopOf="parent" />

</androidx.constraintlayout.widget.ConstraintLayout>
然後是在主類中的操作,為ListView賦值,設置交互事件(單機,長按)
package com.example.myapplication;

import androidx.appcompat.app.AlertDialog;
import androidx.appcompat.app.AppCompatActivity;

import android.content.DialogInterface;
import android.content.Intent;
import android.database.sqlite.SQLiteOpenHelper;
import android.os.Bundle;
import android.view.View;
import android.widget.AdapterView;
import android.widget.ListView;
import android.widget.SimpleAdapter;
import android.widget.Toast;

import com.google.android.material.floatingactionbutton.FloatingActionButton;

import java.util.ArrayList;
import java.util.HashMap;
import java.util.List;
import java.util.Map;

public class MainActivity extends AppCompatActivity {
private OperateTable mytable =null;
private SQLiteOpenHelper helper=null;
private FloatingActionButton add=null;
private String info=null;
    @Override
    protected void onCreate(Bundle savedInstanceState) {
        super.onCreate(savedInstanceState);
        setContentView(R.layout.main);

        helper=new DataBaseHelp(this);
        helper.getWritableDatabase();
        MainActivity.this.mytable=new OperateTable(MainActivity.this.helper.getWritableDatabase());


        SimpleAdapter adapter = new SimpleAdapter(this,this.mytable.getdata(), R.layout.activity_main
                , new String[]{"id","tt"},
                new int[]{R.id.id,R.id.tt});
        ListView listView=(ListView)findViewById(R.id.vi);
        add=(FloatingActionButton)findViewById(R.id.add);
listView.setAdapter(adapter);
listView.setOnItemClickListener(new OnItemClick());//註冊單擊監聽
listView.setOnItemLongClickListener(new OnItemLongClick());//註冊長按監聽
add.setOnClickListener(new View.OnClickListener() {
    @Override
    public void onClick(View v) {
        Intent it=new Intent(MainActivity.this,add.class);
        MainActivity.this.startActivity(it);
    }
});
    }

    private class OnItemClick implements AdapterView.OnItemClickListener
    { public void onItemClick(AdapterView<?>arg0, View arg1, int arg2, long arg3){
        ListView list = (ListView) findViewById(R.id.vi);
        HashMap<String,Object> map=(HashMap<String,Object>)list.getItemAtPosition(arg2);

        info=map.get("id").toString();
        Intent it=new Intent(MainActivity.this,receive.class);
        it.putExtra("info",info);//傳輸數據到receive
        MainActivity.this.startActivity(it);


    }


    }
    private class OnItemLongClick implements AdapterView.OnItemLongClickListener
    {
        public boolean onItemLongClick(AdapterView<?>arg0, View arg1, int arg2, long arg3){

            ListView list = (ListView) findViewById(R.id.vi);
            HashMap<String,Object> map=(HashMap<String,Object>)list.getItemAtPosition(arg2);
            String name;
            info=map.get("id").toString();
            name=map.get("tt").toString();
            AlertDialog myAlertDialog = new AlertDialog.Builder(MainActivity.this)
                    .setTitle("確認" )
                    .setMessage("確定刪除“"+name+"”嗎?" )
                    .setPositiveButton("是" , new DialogInterface.OnClickListener() {
                        public void onClick(DialogInterface dialog, int whichButton) {
                            mytable.delete(info);
                            Toast.makeText(getApplicationContext(),"刪除成功",Toast.LENGTH_SHORT).show();
                            onResume();
                        }
                    })
                    .setNegativeButton("否" , null)
                    .show();

            return true;


        }

    }

//每次回到主頁就會執行,用於更新數據
    public void onResume() {
        super.onResume();  // Always call the superclass method first

        SimpleAdapter adapter = new SimpleAdapter(this,MainActivity.this.mytable.getdata(), R.layout.activity_main
                , new String[]{"id","tt"},
                new int[]{R.id.id,R.id.tt});
        ListView listView=(ListView)findViewById(R.id.vi);
        add=(FloatingActionButton)findViewById(R.id.add);
        listView.setAdapter(adapter);
        listView.setOnItemClickListener(new OnItemClick());
        add.setOnClickListener(new View.OnClickListener() {
            @Override
            public void onClick(View v) {
                Intent it=new Intent(MainActivity.this,add.class);
                MainActivity.this.startActivity(it);
            }
        });
    }

}
添加比較簡單,就是獲取數據並調用資料庫操作保存數據
佈局
<?xml version="1.0" encoding="utf-8"?>
<androidx.constraintlayout.widget.ConstraintLayout xmlns:android="http://schemas.android.com/apk/res/android"
    xmlns:app="http://schemas.android.com/apk/res-auto"
    xmlns:tools="http://schemas.android.com/tools"
    android:id="@+id/linearLayout3"
    android:layout_width="match_parent"
    android:layout_height="match_parent">

    <EditText
        android:id="@+id/aname"
        android:layout_width="283dp"
        android:layout_height="0dp"
        android:layout_marginStart="60dp"
        android:layout_marginTop="26dp"
        android:layout_marginBottom="461dp"
        android:hint="標題"
        android:maxLines="1"
        android:maxLength="25"
        app:layout_constraintBottom_toTopOf="@+id/save"
        app:layout_constraintStart_toStartOf="parent"
        app:layout_constraintTop_toTopOf="parent"></EditText>

    <EditText
        android:id="@+id/atext"
        android:layout_width="335dp"
        android:layout_height="426dp"
        android:layout_marginStart="43dp"
        android:layout_marginBottom="84dp"
        android:hint="內容"
        android:minLines="5"
        android:gravity="top"
        android:background="@null"
        app:layout_constraintBottom_toBottomOf="parent"
        app:layout_constraintStart_toStartOf="parent"
        app:layout_constraintTop_toBottomOf="@+id/aname"></EditText>

    <Button
        android:id="@+id/save"
        android:layout_width="wrap_content"
        android:layout_height="wrap_content"
        android:layout_marginBottom="17dp"
        android:text="保存"
        app:layout_constraintBottom_toBottomOf="parent"
        app:layout_constraintEnd_toEndOf="@+id/atext"
        app:layout_constraintTop_toBottomOf="@+id/aname" />

</androidx.constraintlayout.widget.ConstraintLayout>
活動類
package com.example.myapplication;
import androidx.appcompat.app.AppCompatActivity;

import android.database.sqlite.SQLiteOpenHelper;
import android.os.Bundle;
import android.view.View;
import android.widget.Button;
import android.widget.EditText;


import android.widget.Toast;


public class add extends AppCompatActivity {
private  OperateTable mytable =null;
    private  SQLiteOpenHelper helper=null;

    private EditText name=null;
    private EditText text=null;
    private  Button save=null;
    @Override
    protected void onCreate(Bundle savedInstanceState) {
        super.onCreate(savedInstanceState);
        setContentView(R.layout.add);

        this.name=(EditText)super.findViewById(R.id.aname);
        this.text=(EditText)super.findViewById(R.id.atext);
        Button save=( Button) super.findViewById(R.id.save);

        helper=new DataBaseHelp(this);
        helper.getWritableDatabase();
        mytable=new OperateTable(helper.getWritableDatabase());
        save.setOnClickListener(new View.OnClickListener() {
            @Override
            public void onClick(View v) {
                if(name.getText().toString().equals("")){Toast.makeText(getApplicationContext(),"請輸入標題",Toast.LENGTH_SHORT).show();}
               else{ mytable.insert(name.getText().toString(),text.getText().toString());//保存數據
                Toast.makeText(getApplicationContext(),"保存成功",Toast.LENGTH_SHORT).show();
                add.this.finish();//結束當前Activity,返回主頁面}

            }
        });

    }


}
查看頁,接收來自主頁通過intent傳來的id,獲取相應數據並顯示
佈局:
<?xml version="1.0" encoding="utf-8"?>
<androidx.constraintlayout.widget.ConstraintLayout xmlns:android="http://schemas.android.com/apk/res/android"
    xmlns:app="http://schemas.android.com/apk/res-auto"
    xmlns:tools="http://schemas.android.com/tools"
    android:id="@+id/linearLayout"
    android:layout_width="match_parent"
    android:layout_height="match_parent"
    android:orientation="vertical">

    <EditText
        android:id="@+id/name"
        android:layout_width="303dp"
        android:layout_height="46dp"
        android:layout_marginStart="60dp"
        android:layout_marginTop="36dp"
        android:layout_marginBottom="14dp"
        android:hint="標題"
        android:text="TextView"
        android:maxLength="25"
        app:layout_constraintBottom_toTopOf="@+id/divider"
        app:layout_constraintStart_toStartOf="parent"
        app:layout_constraintTop_toTopOf="parent" />

    <EditText
        android:id="@+id/text"
        android:layout_width="308dp"
        android:layout_height="400dp"
        android:layout_marginStart="52dp"
        android:layout_marginEnd="52dp"
        android:layout_marginBottom="63dp"
        android:background="@null"
        android:gravity="top"
        android:hint="內容"
        android:minLines="5"
        android:text="TextView"
        app:layout_constraintBottom_toBottomOf="parent"
        app:layout_constraintEnd_toEndOf="parent"
        app:layout_constraintHorizontal_bias="0.0"
        app:layout_constraintStart_toStartOf="parent"
        app:layout_constraintTop_toBottomOf="@+id/name"
        app:layout_constraintVertical_bias="1.0" />

    <View
        android:id="@+id/divider"
        android:layout_width="0dp"
        android:layout_height="0dp"
        android:layout_marginStart="1dp"
        android:layout_marginTop="83dp"
        android:layout_marginEnd="1dp"
        android:layout_marginBottom="433dp"

        android:background="?android:attr/listDivider"
        app:layout_constraintBottom_toTopOf="@+id/delete"
        app:layout_constraintEnd_toEndOf="parent"
        app:layout_constraintHorizontal_bias="0.0"
        app:layout_constraintStart_toStartOf="parent"
        app:layout_constraintTop_toTopOf="parent" />

    <Button
        android:id="@+id/delete"
        android:layout_width="wrap_content"
        android:layout_height="wrap_content"
        android:layout_marginEnd="29dp"
        android:layout_marginBottom="6dp"
        android:text="刪除"
        app:layout_constraintBottom_toBottomOf="parent"
        app:layout_constraintEnd_toEndOf="parent"
        app:layout_constraintTop_toBottomOf="@+id/divider" />

    <Button
        android:id="@+id/edit"
        android:layout_width="wrap_content"
        android:layout_height="wrap_content"
        android:layout_marginStart="29dp"
        android:layout_marginBottom="7dp"
        android:text="保存更改"
        app:layout_constraintBottom_toBottomOf="parent"
        app:layout_constraintStart_toStartOf="parent" />
</androidx.constraintlayout.widget.ConstraintLayout>
活動類
package com.example.myapplication;
import androidx.appcompat.app.AlertDialog;
import androidx.appcompat.app.AppCompatActivity;

import android.content.DialogInterface;
import android.database.sqlite.SQLiteOpenHelper;
import android.os.Bundle;
import android.view.View;
import android.widget.Button;
import android.widget.EditText;
import android.widget.TextView;
import android.content.Intent;
import android.widget.Toast;

public class receive extends AppCompatActivity {

    private EditText name=null;
    private EditText text=null;
    private Button delete=null;
    private Button edit=null;
    private OperateTable mytable =null;
    private SQLiteOpenHelper helper=null;
    private String info=null;
    @Override
    protected void onCreate(Bundle savedInstanceState) {
        super.onCreate(savedInstanceState);
        setContentView(R.layout.receive);

        this.name=(EditText)super.findViewById(R.id.name);
        this.text=(EditText)super.findViewById(R.id.text);
        this.delete=(Button)super.findViewById(R.id.delete);
        this.edit=(Button)super.findViewById(R.id.edit);

    Intent it=super.getIntent();
    info=it.getStringExtra("info");//獲取主頁傳遞的id

        helper=new DataBaseHelp(this);
        helper.getWritableDatabase();
      mytable=new OperateTable(helper.getWritableDatabase());
    tip t=mytable.t(info);
   name.setText(t.getName());
   text.setText(t.getText());
   delete.setOnClickListener(new View.OnClickListener() {
       @Override
       public void onClick(View v) {
           AlertDialog myAlertDialog = new AlertDialog.Builder(receive.this)
                   .setTitle("確認" )
                   .setMessage("確定刪除“"+name.getText()+"”嗎?" )
                   .setPositiveButton("是" , new DialogInterface.OnClickListener() {
                       public void onClick(DialogInterface dialog, int whichButton) {
                           mytable.delete(info);
                           Toast.makeText(getApplicationContext(),"刪除成功",Toast.LENGTH_SHORT).show();
                         receive.this.finish();
                       }
                   })
                   .setNegativeButton("否" , null)
                   .show();
       }
   });
   edit.setOnClickListener(new View.OnClickListener() {
       @Override
       public void onClick(View v) {
           mytable.updata(info,name.getText().toString(),text.getText().toString());
           Toast.makeText(getApplicationContext(),"修改成功",Toast.LENGTH_SHORT).show();
           receive.this.finish();
       }
   });
    }


}


