
multipart/form-data 在使用包含文件上傳控制項的表單時,必須使用autocomplete="on" 自動補全功能novalidate 不驗證 <form enctype="multipart/form-data" novalidate autocomplete="on"></form ...
multipart/form-data 在使用包含文件上傳控制項的表單時,必須使用
autocomplete="on" 自動補全功能
novalidate 不驗證
<form enctype="multipart/form-data" novalidate autocomplete="on"></form>
placeholder
required 必填
autofocus 預設聚焦
pattern 正則驗證
<input type="text" name="gonghao" required autofocus placeholder="請輸入工號" pattern="^\d{5}[imooc]$">
dataList對選擇框的記憶
list記憶內容
        <input type="text" list="tips">
        <dataList id="tips">
            <option value="erwerewr"></option>
            <option value="erwerew2r"></option>
            <option value="erwerew2r"></option>
            <option value="erwerewr"></option>
        </dataList>
html5約束驗證API
id.validity獲取驗證約束
console.log(username.validity);
如果輸入值長度大於要求的長度,則截取要求的長度部分
    <input type="number" id="numbers" oninput="checkLength(this,5)" step="0.01" />
    function checkLength(obj, length) {
        if (obj.value.length > length) {
            obj.value = obj.value.substr(0, length);
        }
    }
valueMissing => required
typeMismatch => HTML類型,如email
rangeUnderflow => min
        <input type="text" required pattern="^\d{4}$" oninput="checkit(this)" placeholder="請輸入代碼">
-----------------------
        function checkit(obj){
            console.log(obj.validity);
            var it = obj.validity;
            if (true===it.valueMissing) {
                obj.setCustomValidity("不能為空");
            }else{
                if (true===it.patternMismatch) {
                    obj.setCustomValidity("必須是4個數字");
                }else{
                    obj.setCustomValidity("");
                }
            }
        }
checkValidity()滿足約束返回true,否則false
    if (username.checkValidity()) {
        alert("用戶名符合");
    } else {
        alert("不符合");
    }
自帶驗證美化
:required
:optional
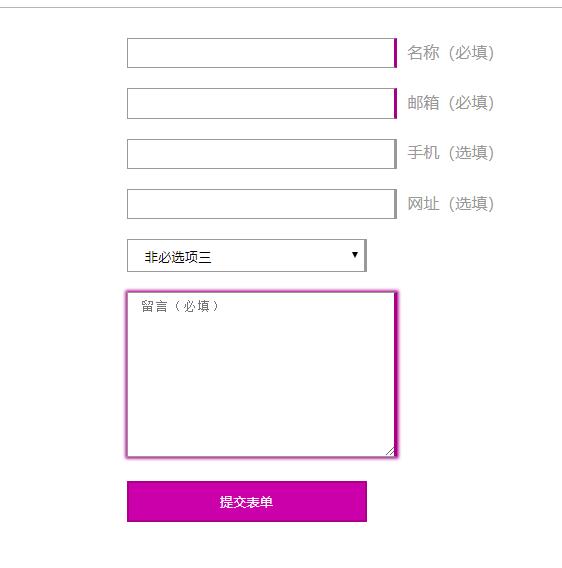
<!DOCTYPE html>
<html lang="en">
<head>
    <meta charset="UTF-8">
    <title></title>
    <style>
        .container{
            max-width:400px;
            margin:20px auto;
        }
        input,select,textarea{
            width: 240px;
            margin:10px 0;
            border:1px solid #999;
            padding: .5em 1em;
        }
        label{
            color:#999;
            margin-left: 10px;
        }
        input:required,textarea:required{
            border-right:3px solid #aa0088;
        }
        input:optional,select:optional{
            border-right:3px solid #999;
        }
        input:required +label::after{
            content: "(必填)"
        }
        input:optional +label::after{
            content: "(選填)"
        }
        input:focus,select:focus,textarea:focus{
            outline:0;
        }
        input:required:focus,textarea:required:focus{
            box-shadow: 0 0 3px 1px #aa0088;
        }
        input:optional:focus,select:required:focus{
            box-shadow: 0 0 3px 1px #999;
        }
        input[type="submit"]{
            background-color: #cc00aa;
            border: 2px solid #aa0088;
            padding:10px 0;
            color:#fff;
        }
        input[type="submit"]:hover{
            background-color:#aa0088;
        }
    </style>
</head>
<body>
    <!-- <div class="contenteditable"></div> -->
    <div class="container">
        <form action="#">
            <input type="name" required><label>名稱</label>
            <input type="email" required><label>郵箱</label>
            <input type="tel"><label>手機</label>
            <input type="url"><label>網址</label>
            <select name="" id="">
                <option value="">非必選項一</option>
                <option value="">非必選項二</option>
                <option value="">非必選項三</option>
                <option value="">非必選項四</option>
            </select>
            <textarea name="#" cols="30" rows="10" placeholder="留言(必填)" required></textarea>
            <input type="submit" value="提交表單">
        </form>
    </div>
</body>
</html>
:valid
:invalid
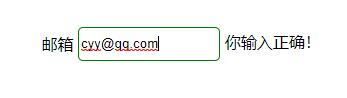
<!DOCTYPE html>
<html lang="en">
<head>
    <meta charset="UTF-8">
    <title>純CSS表單驗證美化(invalid和valid)應用案例</title>
    <style>
        .container{
            margin:100px;
            position:relative;
        }
        input{
            border: 1px solid #999;
            outline:0;
            width:140px;
            height:30px;
            line-height:30px;text-indent:36px;transition: all .3s;
            border-radius:5px;
        }
        span.title{
            position:absolute;
            line-height:30px;
            height: 30px;
            left:2px;
            top:2px;
            transition:all .3s;
        }
        input:focus,input:hover{
            text-indent:2px;
        }
        input:focus+span.title,input:hover+span.title{
            transform:translateX(-120%)
        }
        input:valid ~label::after{
            content: "你輸入正確!"
        }
        input:invalid ~label::after{
            content: "你郵箱錯誤!"
        }
        input:valid{
            border:1px solid green;
        }
        input:invalid{
            border:1px solid red;
        }
    </style>
</head>
<body>
    <div class="container">
        <input id="mail" type="email" required placeholder="輸入郵箱">
        <span class="title">郵箱</span>
        <label for="mail"></label>
    </div>
</body>
</html>
oninvalid
oninput
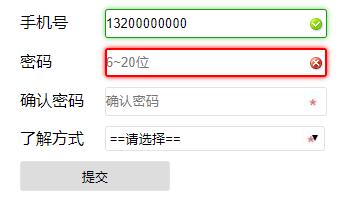
<!DOCTYPE html>
<html>
<head>
    <meta charset="utf-8">
    <meta http-equiv="X-UA-Compatible" content="IE=edge">
    <title>html5表單美化綜合案例</title>
    <meta name="viewport" content="initial-scale=1, maximum-scale=1">
</head>
<style>
.onelist {
    margin: 10px 0 5px 12px;
}

.onelist label {
    width: 80px;
    display: inline-block
}

.onelist input,
.onelist select {
    height: 25px;
    line-height: 25px;
    width: 220px;
    border-radius: 3px;
    border: 1px solid #e2e2e2;
}

.onelist input[type="submit"] {
    width: 150px;
    height: 30px;
    line-height: 30px;
}

select:required,
input:required,
textarea:required {
    background: #fff url(../img/star.jpg) no-repeat 99% center;
}

select:required:valid,
input:required:valid,
textarea:required:valid {
    background: #fff url(../img/right.png) no-repeat 99% center;
    box-shadow: 0 0 5px #5cd053;
    border-color: #28921f;
}

select:focus:invalid,
input:focus:invalid,
textarea:focus:invalid {
    background: #fff url(../img/error.png) no-repeat 99% center;
    box-shadow: 0 0 5px red;
    border-color: red;
    outline: red solid 1px;
}
</style>

<body>
    <form class="myform" onsubmit="return checkForm();" method="post">
        <div class="onelist">
            <label for="UserName">手機號</label>
            <input name="UserName" id="UserName" type="text" placeholder="請輸入手機號碼" pattern="^1[0-9]{10}$" required oninvalid="this.setCustomValidity('請輸入正確的號碼');" oninput="setCustomValidity('')">
        </div>
        <div class="onelist">
            <label for="Password">密碼</label>
            <input name="Password" id="Password" type="password" placeholder="6~20位" class="" pattern="^[a-zA-Z0-9]\w{5,19}$" required oninvalid="this.setCustomValidity('請輸入正確密碼');" oninput="setCustomValidity('')" onchange="checkPassword()">
        </div>
        <div class="onelist">
            <label for="Repassword">確認密碼</label>
            <input name="Repassword" id="Repassword" type="password" placeholder="確認密碼" class="" required onchange="checkPassword()">
        </div>
        <div class="onelist">
            <label for="Repassword">瞭解方式</label>
            <select name="konw" required>
                <option value="">==請選擇==</option>
                <option value="1">搜索引擎</option>
                <option value="2">朋友圈</option>
                <option value="3">朋友推廣</option>
                <option value="4">廣告投放</option>
            </select>
        </div>
        <div class="onelist">
            <input type="submit" value="提交">
        </div>
    </form>
    <script type="text/javascript">
    function checkPassword() {
        var pass1 = document.getElementById("Password");
        var pass2 = document.getElementById("Repassword");

        if (pass1.value != pass2.value)
            // 設置自定義驗證約束提示信息
            pass2.setCustomValidity("兩次輸入的密碼不匹配");
        else
            pass2.setCustomValidity("");
    }
    </script>
</body>
</html>
預設氣泡修改
event.preventDefault(); 阻止預設氣泡

<!DOCTYPE html>
<html lang="en">

<head>
    <meta charset="UTF-8">
    <meta name="viewport" content="width=device-width, initial-scale=1.0, user-scalable=0, minimum-scale=1.0, maximum-scale=1.0">
    <title>表單驗證預設樣式修改</title>
</head>
<style>
    .oneline{line-height: 1.5;margin:10px auto;}
    .oneline label{width:100px;text-indent: 15px;font-size:14px;font-family: "Microsoft Yahei";display: inline-block;}
    .oneline .sinput{width:60%;height:30px;border-radius: 6px;border:1px solid #e2e2e2;}
    .oneline input[type="submit"]{margin-left:20px;width:80px;height:30px;border:0;background-color:#5899d0;color:#fff;font-size:14px;border-radius: 6px;}
    .error-message{color:red; font-size:12px;text-indent:108px;}
</style>

<body>
    <form id="forms">
        <div class="oneline">
            <label for="name">用戶名:</label>
            <input id="name" name="name" class="sinput" required>
        </div>
        <div class="oneline">
            <label for


