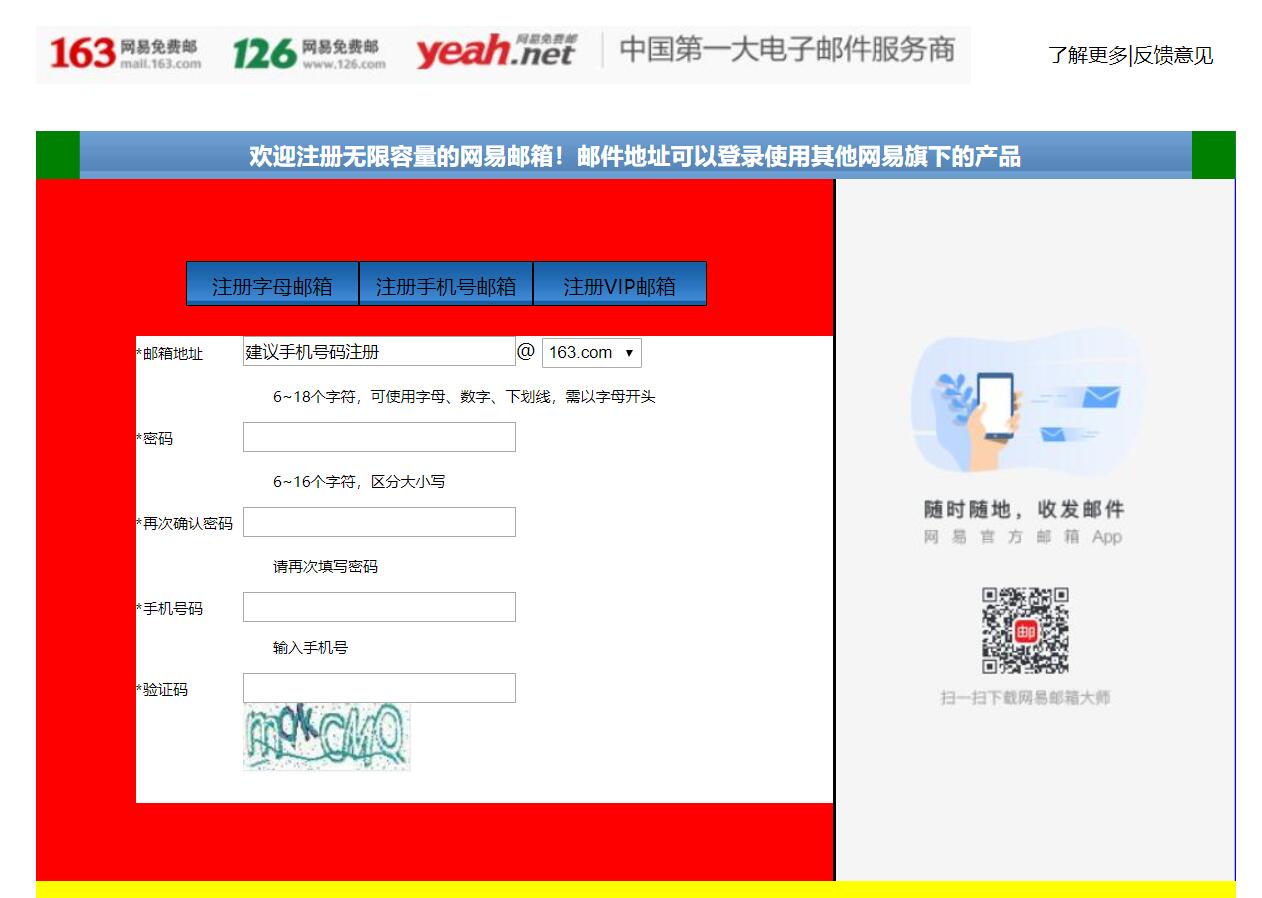
一、又學一招:想要讓兩個盒子高度對齊,那麼讓他們浮動起來 <!DOCTYPE html> <html lang="en"> <head> <meta charset="UTF-8"> <title>D139_FrameworkeOfNeteasyInterface</title> <style> . ...
一、又學一招:想要讓兩個盒子高度對齊,那麼讓他們浮動起來
<!DOCTYPE html> <html lang="en"> <head> <meta charset="UTF-8"> <title>D139_FrameworkeOfNeteasyInterface</title> <style> .header{ width:960px; height:80px; /*background-color: red;*/ margin: 0 auto; overflow: hidden; padding-top:14px; box-sizing: border-box;/*這裡我們採用內上邊距的辦法將logo擠下去達到垂直居中的目的*/ /*同時這個box-sizing的屬性就是將這個header固定住,不讓他因為內邊距而變化大小了*/ } .content{ width: 960px; height: 600px; background-color: blue; margin: 0 auto; } .footer{ width: 960px; height: 48px; background-color: yellow; margin: 0 auto ; } .header .logo{ width:748px; height: 47px; background:url("image/netEasyLogo.jpg") no-repeat 0 0;/*從圖片的坐標(0,0)開始鋪,no-repeat就是只鋪這一張不要多鋪*/ /*margin-top: 12px;*/ float:left; } .header .links{ height: 42px; width: 150px; /*background-color: red;*/ float:right; } .header .logo a { width:156px; height:45px;/*測量出那一塊區域,然後這一塊區域都是超級鏈接*/ /*background-color: red;*/ display: inline-block;/*轉換為行內塊級標簽*/ } .header .links a{ text-decoration:none;/*去掉下劃線*/ font-size: 16px; color:black; line-height: 45px;/*這裡複習了文字不能居中,使用這個屬性讓它和links盒子的高度一致,那就做到文字在盒子中居中*/ text-align: right;/*複習了文字右對齊*/ } .content{ width: 960px; height: 600px; } .content .top{ width: 960px; height: 38px; /*background-color: red;*/ background: url("image/wangyi_center.jpg") 0 0;/*讓這張小圖片把top這個區域全部鋪滿*/ } .content .bottom{ width: 960px; height: 562px; /*background-color: green;*/ } /*下麵這兩個屬性設置,就是為了content的top部的兩邊能使用我們指定的格式,我們採用的盒子嵌套盒子來進行背景的演示*/ .content .top .left{ width:960px; height: 38px; background:url("image/line_left.jpg") no-repeat left 0 ; /*display: inline;*/ } .content .top .left .right{ width:960px; height: 38px; background:url("image/line_left.jpg") no-repeat right 0 ; } .content .top .left .right h3{ color: white; line-height:38px;/*設置行高就是為了讓文字能夠在top條中垂直居中*/ text-align: center;/*文字水平居中,當然我們也可以設置margin-left來設置左邊距,但是一旦解析度改變將導致網頁變形*/ } .content .bottom .article{ width:638px; height: 562px; background-color: red; float:left;/*這裡填寫了這個float屬性才行,並且右面的盒子也需要float屬性,div是行內標簽,不寫float會另起一行*/ box-sizing: border-box;/*這個設置是為了讓外面的大盒子不會因為設置內邊距,而導致外面的的大盒子變形*/ padding-top:50px;/*這裡我們設置了內邊距,那麼裡面的內容就可以從這裡面進行配置了,一開始我想到的是不設置這個內邊距*/ /*讓裡面的東西有外邊距,當然這樣也可以達到效果,但是有一個缺點,裡面的每一個盒子都要單獨設置外邊距,相比設置*/ /*外面盒子的內邊距會更加省力,而且裡面的內容,自然而然就會對齊*/ padding-left: 80px; } .content .bottom .aside{ width: 320px;/*這裡我們本來寫的322,但是發現寫上322就會造成aside這個圖片溢出到下麵了,原來是左邊距有2px.這樣*/ /*320+2+638=960就正好了,溢出原因就是float屬性導致的,達到了962,就裝不下了*/ height: 562px; /*background-color: green;*/ background:url("image/content_aside.jpg") no-repeat 0; float:right; border-left:2px black solid; } .content .article .articletop{ width: 560px; height: 60px; /*background-color: yellow;*/ } .content .article .articletop ul{ width: 511px; height: 34px; /*background-color: tomato;*/ list-style:none;/*這個屬性是為了去掉li的小圓點*/ } .content .article .articletop ul li{ float:left; width: 137px; height: 34px; /*background-color: skyblue;*/ line-height: 37px; text-align: center;/*文字水平居中*/ background:url("image/content_article.jpg") 0 0; border:1px solid black; } .content .article .articlebottom{ width: 560px; height: 373px; background-color: white; } .content .article .articlebottom .line{ width: 413px; height: 28px; /*background-color: yellow;*/ } .content .article .articlebottom .line span{ float:left; height: 28px; width: 80px; font-size:12px; line-height:28px; text-align:left; } .content .article .articlebottom .line .star{ width: 6px; float:left; } .content .article .artilclebottom .line div{ float: left; height: 28px; height: 333px; } .content .bottom .articlebottom .line input{ width: 214px; height: 18px; } .content .bottom .articlebottom .line select{ width: 80px; height: 24px; } .content .bottom .articlebottom p{ /*text-align: left;*/ font-size: 12px; margin-left: 110px; } </style> </head> <body> <div class="header"> <div class="logo" > <a href="https://www.163.com/" title="網易163免費郵箱"></a><a href="https://www.126.com/" title="網易126免費郵箱"></a><a href="#" title="網易yeah免費郵箱"></a> <!--複習了a標簽的使用,title就是指滑鼠放到超鏈接上就會顯示的文字--> </div> <div class="links"> <a href="http://www.baidu.com">瞭解更多</a>|<a href="#">反饋意見</a> </div> </div> <div class="content"> <div class="top"> <div class="left"> <div class="right"><h3>歡迎註冊無限容量的網易郵箱!郵件地址可以登錄使用其他網易旗下的產品</h3></div> </div> </div> <div class="bottom"> <div class="article"> <div class="articletop"> <ul> <li>註冊字母郵箱</li><!--看到導航條就應該想到ul.li--> <li>註冊手機號郵箱</li> <li>註冊VIP郵箱</li> </ul> </div> <div class="articlebottom"> <div class="line"> <span class="star">*</span><!--這裡的星號代表必填項--><span>郵箱地址</span> <div> <input type="text" value="建議手機號碼註冊">@ <select> <option value="163.com">163.com</option><!--複習了選項的標簽select和Option,這裡的value是傳給瀏覽器的--> <option value="126.com">126.com</option> <option value="lnj.net">lnj.net</option> </select> </div> </div> <p>6~18個字元,可使用字母、數字、下劃線,需以字母開頭</p> <div class="line"> <span class="star">*</span><span>密碼</span> <div> <input type="password"> </div> </div> <p>6~16個字元,區分大小寫</p> <div class="line"> <span class="star">*</span><span>再次確認密碼</span> <div> <input type="password"><!--這裡複習了密碼的輸入方法--> </div> </div> <p>請再次填寫密碼</p> <dic class="line"> <span class="star">*</span><span>手機號碼</span> <div> <input type="number"> </div> </dic> <p>輸入手機號</p> <div class="line"> <span class="star">*</span><span>驗證碼</span> <div> <input type="text"><img src="image/yanzhengma.jpg" alt=""> </div> </div> </div> </div> <div class="aside"></div> </div> </div> <div class="footer"></div> </body> </html>

三、源碼:
D139_FrameworkeOfNeteasyInterface.html
地址:
https://github.com/ruigege66/HTML_learning/blob/master/D139_FrameworkeOfNeteasyInterface.html
2.CSDN:https://blog.csdn.net/weixin_44630050
3.博客園:https://www.cnblogs.com/ruigege0000/
4.歡迎關註微信公眾號:傅里葉變換,個人賬號,僅用於技術交流,後臺回覆“禮包”獲取Java大數據學習視頻禮包


