簡介 .net core使用ocelot 第一篇 簡單使用 .net core使用ocelot 第二篇 身份驗證使用 .net core使用ocelot 第三篇 日誌記錄 .net core使用ocelot 第四篇 限流熔斷 .net core使用ocelot 第五篇 服務質量 .net core使 ...
簡介
.net core使用ocelot---第一篇 簡單使用
.net core使用ocelot---第二篇 身份驗證使用
.net core使用ocelot---第三篇 日誌記錄
.net core使用ocelot---第四篇 限流熔斷
.net core使用ocelot---第五篇 服務質量
.net core使用ocelot---第六篇 負載均衡
.net core使用ocelot---第七篇 服務發現
本文我們介紹Ocelot使用consul實現服務發現。
我將使用Ocelot的13.5.2版本向您展示此功能。
Step1
啟動Consul
在本次演示,我將使用Docker運行consul的實例。(你也可以自己安裝consul,不需要docker)
docker run -p 8500:8500 consul
啟動後,我們會看到下麵的結果。

Step2
新建一個在consul註冊了的API服務。
為了演示,我將創建兩個Web API項目,它們埠不一樣但服務名一樣。
編寫控制器的代碼如下:
[Route("api/[controller]")]
[ApiController]
public class ValuesController : ControllerBase
{
    // GET api/values
    [HttpGet]
    public ActionResult<IEnumerable<string>> Get()
    {
        var port = Request.Host.Port;

        return new string[] { "value1", "value2", port.Value.ToString() };
    }
}
接下來將它註冊到consul,下麵的代碼,打個樣。
public static class AppExtensions
{
    public static IServiceCollection AddConsulConfig(this IServiceCollection services, IConfiguration configuration)
    {
        services.AddSingleton<IConsulClient, ConsulClient>(p => new ConsulClient(consulConfig =>
        {
            var address = configuration.GetValue<string>("Consul:Host");
            consulConfig.Address = new Uri(address);
        }));
        return services;
    }

    public static IApplicationBuilder UseConsul(this IApplicationBuilder app)
    {
        var consulClient = app.ApplicationServices.GetRequiredService<IConsulClient>();
        var logger = app.ApplicationServices.GetRequiredService<ILoggerFactory>().CreateLogger("AppExtensions");
        var lifetime = app.ApplicationServices.GetRequiredService<IApplicationLifetime>();

        if (!(app.Properties["server.Features"] is FeatureCollection features)) return app;

        var addresses = features.Get<IServerAddressesFeature>();
        var address = addresses.Addresses.First();

        Console.WriteLine($"address={address}");

        var uri = new Uri(address);
        var registration = new AgentServiceRegistration()
        {
            ID = $"MyService-{uri.Port}",
            // servie name
            Name = "MyService",
            Address = $"{uri.Host}",
            Port = uri.Port
        };

        logger.LogInformation("Registering with Consul");
        consulClient.Agent.ServiceDeregister(registration.ID).ConfigureAwait(true);
        consulClient.Agent.ServiceRegister(registration).ConfigureAwait(true);

        lifetime.ApplicationStopping.Register(() =>
        {
            logger.LogInformation("Unregistering from Consul");
            consulClient.Agent.ServiceDeregister(registration.ID).ConfigureAwait(true);
        });

        return app;
    }
}
我們還得修改Startup.cs以便可註冊。
public class Startup
{
    public Startup(IConfiguration configuration)
    {
        Configuration = configuration;
    }

    public IConfiguration Configuration { get; }

    public void ConfigureServices(IServiceCollection services)
    {
        services.AddConsulConfig(Configuration);
        services.AddMvc().SetCompatibilityVersion(CompatibilityVersion.Version_2_2);
    }

    public void Configure(IApplicationBuilder app, IHostingEnvironment env)
    {
        if (env.IsDevelopment())
        {
            app.UseDeveloperExceptionPage();
        }

        app.UseConsul();

        app.UseMvc();
    }
}
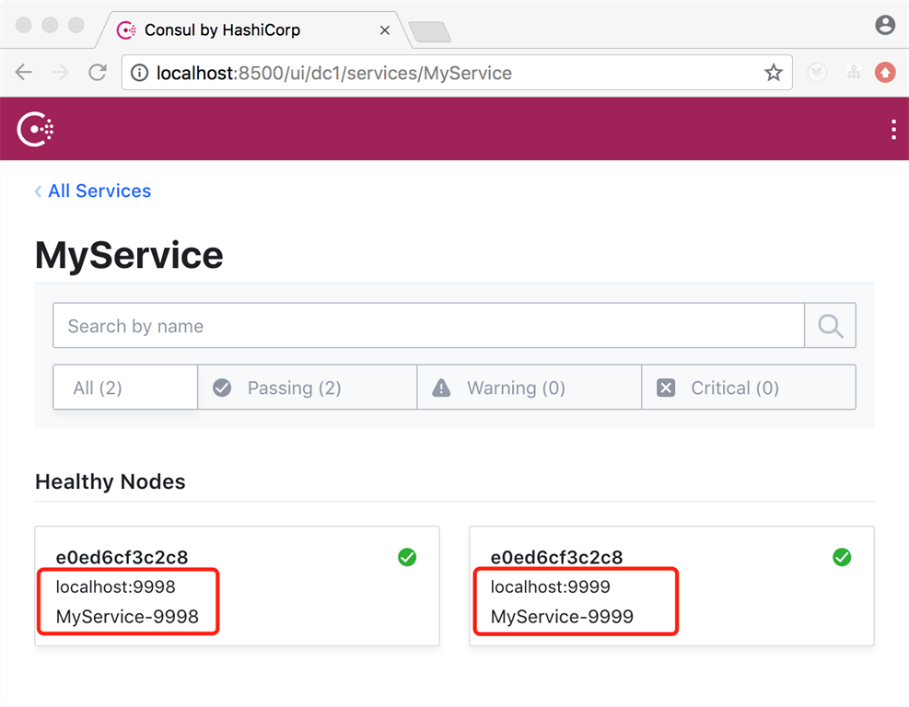
當我們啟動我們的項目,會在Consul發現名為MyServices的實例,它包括兩個節點。

為了看看新服務的具體細節,點開MyService,我們會看到兩個節點的具體信息。

接下來創建APIGateway
Step3
通過.NET Core CLI 添加下麵的包
dotnet add package Ocelot --version 13.5.2
dotnet add package Ocelot.Provider.Consul --version 13.5.2
新建ocelot.json,內容如下。
{
    "ReRoutes": [
      {
        "UseServiceDiscovery": true,
        "DownstreamPathTemplate": "/{url}",
        "DownstreamScheme": "http",
        "ServiceName": "MyService",
        "LoadBalancerOptions": {
          "Type": "RoundRobin"
        },
        "UpstreamPathTemplate": "/{url}",
        "UpstreamHttpMethod": [ "Get" ],
        "ReRoutesCaseSensitive": false
      }
    ],
    "GlobalConfiguration": {
      "ServiceDiscoveryProvider": {
        "Host": "localhost",
        "Port": 8500,
        "Type":"PollConsul",
        "PollingInterval": 100
      }
    }
}
使用服務發現我們在GlobalConfiguration中添加ServiceDiscoveryProvider節點。
|
名稱 |
描述 |
|
Host |
表明Consul的主機 |
|
Port |
指明Consul的埠 |
|
Type |
1. Consul, 意味每次請求Ocelot會從consul獲得服務信息。 2. PollConsul, 意味著Ocelot將向Consul推薦最新的服務信息 |
|
PollingInterval |
告訴Ocelot多長時間調用Consul來更改服務配置 |
在這裡,ReRoute依然很重要。因為它告訴Ocelot,當發出請求時我們希望使用的服務名稱和負載均衡器。 如果未指定負載均衡器,則Ocelot將不會對請求進行負載均衡。
設置此選項後,Ocelot將從服務中查找下游主機和埠,發現提供程式,並查找任何可用服務的負載均衡請求。
最後,我們需要在program.cs 中配置Ocelot。
public class Program
{
    public static void Main(string[] args)
    {
        CreateWebHostBuilder(args).Build().Run();
    }

    public static IWebHostBuilder CreateWebHostBuilder(string[] args) =>
        WebHost.CreateDefaultBuilder(args)
         .UseUrls("http://*:9000")
         .ConfigureAppConfiguration((hostingContext, config) =>
         {
            config
                .SetBasePath(hostingContext.HostingEnvironment.ContentRootPath)
                .AddJsonFile("ocelot.json")
                .AddEnvironmentVariables();
         })
        .ConfigureServices(services =>
        {
            services.AddOcelot()
                .AddConsul();
        })
        .Configure(app =>
        {
            app.UseOcelot().Wait();
        });
}
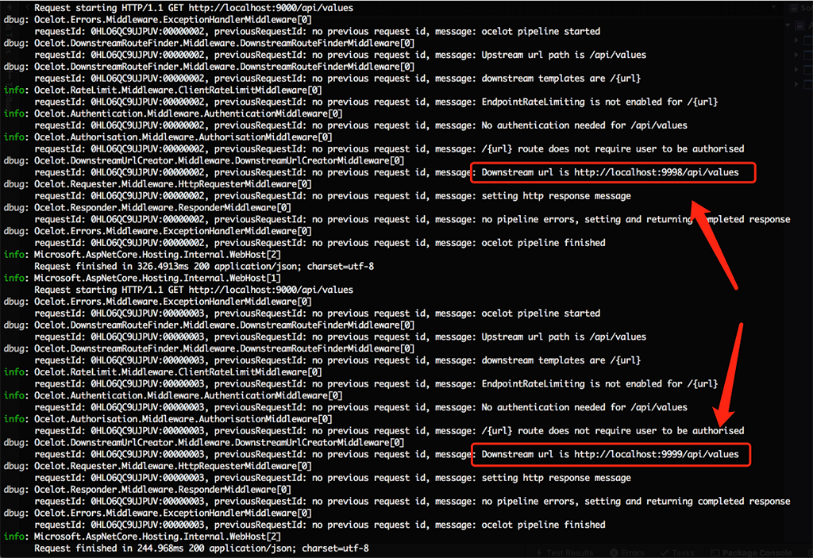
啟動APIGateway,訪問http://localhost:9000/api/values.

看一下列印的日誌。請求的詳細信息都在控制台顯示。

源碼在此
網盤鏈接:https://pan.baidu.com/s/17sqfGcYx8yEHRL_LwKAUlA
提取碼:p3d0
總結
在這篇文章中我們學習了ocelot使用consul實現服務發現簡單的例子。完結!!!!


