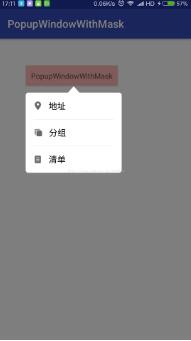
先看效果圖: BasePopupWindowWithMask.class TestPopupWindow.class pop_layout.xml pop_background.xml 1 <?xml version="1.0" encoding="utf-8"?> 2 <shape xmlns:a ...
先看效果圖:

BasePopupWindowWithMask.class
 1 package com.example.popupwindowwithmask;
 2
 3 import android.content.Context;
 4 import android.graphics.PixelFormat;
 5 import android.graphics.drawable.ColorDrawable;
 6 import android.os.IBinder;
 7 import android.view.KeyEvent;
 8 import android.view.View;
 9 import android.view.WindowManager;
10 import android.widget.PopupWindow;
11
12 /**
13  * Created by kk on 2017/7/22.
14  */
15
16 public abstract class BasePopupWindowWithMask extends PopupWindow {
17  protected Context context;
18  private WindowManager windowManager;
19  private View maskView;
20
21  public BasePopupWindowWithMask(Context context) {
22   super(context);
23   this.context = context;
24   windowManager = (WindowManager) context.getSystemService(Context.WINDOW_SERVICE);
25   setContentView(initContentView());
26   setHeight(initHeight());
27   setWidth(initWidth());
28   setOutsideTouchable(true);
29   setFocusable(true);
30   setTouchable(true);
31   setBackgroundDrawable(new ColorDrawable());
32  }
33
34  protected abstract View initContentView();
35
36  protected abstract int initHeight();
37
38  protected abstract int initWidth();
39
40  @Override
41  public void showAsDropDown(View anchor) {
42   addMask(anchor.getWindowToken());
43   super.showAsDropDown(anchor);
44  }
45
46  private void addMask(IBinder token) {
47   WindowManager.LayoutParams wl = new WindowManager.LayoutParams();
48   wl.width = WindowManager.LayoutParams.MATCH_PARENT;
49   wl.height = WindowManager.LayoutParams.MATCH_PARENT;
50   wl.format = PixelFormat.TRANSLUCENT;//不設置這個彈出框的透明遮罩顯示為黑色
51   wl.type = WindowManager.LayoutParams.TYPE_APPLICATION_PANEL;//該Type描述的是形成的視窗的層級關係
52   wl.token = token;//獲取當前Activity中的View中的token,來依附Activity
53   maskView = new View(context);
54   maskView.setBackgroundColor(0x7f000000);
55   maskView.setFitsSystemWindows(false);
56   maskView.setOnKeyListener(new View.OnKeyListener() {
57    @Override
58    public boolean onKey(View v, int keyCode, KeyEvent event) {
59     if (keyCode == KeyEvent.KEYCODE_BACK) {
60      removeMask();
61      return true;
62     }
63     return false;
64    }
65   });
66   /**
67    * 通過WindowManager的addView方法創建View,產生出來的View根據WindowManager.LayoutParams屬性不同,效果也就不同了。
68    * 比如創建系統頂級視窗,實現懸浮視窗效果!
69    */
70   windowManager.addView(maskView, wl);
71  }
72
73  private void removeMask() {
74   if (null != maskView) {
75    windowManager.removeViewImmediate(maskView);
76    maskView = null;
77   }
78  }
79
80  @Override
81  public void dismiss() {
82   removeMask();
83   super.dismiss();
84  }
85 }
TestPopupWindow.class
  1 package com.example.popupwindowwithmask;
  2
  3 import android.content.Context;
  4 import android.view.LayoutInflater;
  5 import android.view.View;
  6 import android.view.WindowManager;
  7
  8 /**
  9  * Created by kk on 2017/7/22.
 10  */
 11
 12 public class TestPopupWindow extends BasePopupWindowWithMask {
 13  private int[] mIds;
 14  private View contentView;
 15  private OnItemClickListener listener;
 16
 17  public interface OnItemClickListener {
 18   void OnItemClick(View v);
 19  }
 20
 21  public void setOnItemClickListener(OnItemClickListener listener) {
 22   this.listener = listener;
 23  }
 24
 25  public TestPopupWindow(Context context, int[] mIds) {
 26   super(context);
 27   this.mIds = mIds;
 28
 29   initListener();
 30  }
 31
 32  @Override
 33  protected View initContentView() {
 34   contentView = LayoutInflater.from(context).inflate(R.layout.pop_layout, null, false);
 35   return contentView;
 36  }
 37
 38  private void initListener() {
 39   for (int i = 0; i < mIds.length; i++) {
 40    contentView.findViewById(mIds[i]).setOnClickListener(new View.OnClickListener() {
 41     @Override
 42     public void onClick(View v) {
 43      if (null != listener) {
 44       listener.OnItemClick(v);
 45      }
 46      dismiss();
 47     }
 48    });
 49   }
 50  }
 51  @Override
 52  protected int initHeight() {
 53   return WindowManager.LayoutParams.WRAP_CONTENT;
 54  }
 55  @Override
 56  protected int initWidth() {
 57   return (int) (0.5 * UIUtils.getScreenWidth(context));
 58  }
 59 }
 60 MainActivity.class
 61 ?
 62 1
 63 2
 64 3
 65 4
 66 5
 67 6
 68 7
 69 8
 70 9
 71 10
 72 11
 73 12
 74 13
 75 14
 76 15
 77 16
 78 17
 79 18
 80 19
 81 20
 82 21
 83 22
 84 23
 85 24
 86 25
 87 26
 88 27
 89 28
 90 29
 91 30
 92 31
 93 32
 94 33
 95 34
 96 35
 97 36
 98 37
 99 38
100 39
101 40
102 41
103 42
104 43
105 44
106 45
107 package com.example.popupwindowwithmask;
108
109 import android.os.Bundle;
110 import android.support.v7.app.AppCompatActivity;
111 import android.view.View;
112 import android.widget.TextView;
113 import android.widget.Toast;
114
115 public class MainActivity extends AppCompatActivity {
116  private TextView textView;
117
118  @Override
119  protected void onCreate(Bundle savedInstanceState) {
120   super.onCreate(savedInstanceState);
121   setContentView(R.layout.activity_main);
122   textView = (TextView) findViewById(R.id.tv_popup);
123
124
125   final TestPopupWindow testPopupWindow = new TestPopupWindow(this, new int[]{R.id.pop_location, R.id.pop_group, R.id.pop_list});
126
127   textView.setOnClickListener(new View.OnClickListener() {
128    @Override
129    public void onClick(View v) {
130     testPopupWindow.showAsDropDown(textView);
131    }
132   });
133
134   testPopupWindow.setOnItemClickListener(new TestPopupWindow.OnItemClickListener() {
135    @Override
136    public void OnItemClick(View v) {
137     switch (v.getId()) {
138      case R.id.pop_location:
139       Toast.makeText(MainActivity.this, "地址", Toast.LENGTH_SHORT).show();
140       break;
141      case R.id.pop_group:
142       Toast.makeText(MainActivity.this, "分組", Toast.LENGTH_SHORT).show();
143       break;
144      case R.id.pop_list:
145       Toast.makeText(MainActivity.this, "清單", Toast.LENGTH_SHORT).show();
146       break;
147     }
148    }
149   });
150  }
151 }
pop_layout.xml
 1 <?xml version="1.0" encoding="utf-8"?>
 2 <RelativeLayout xmlns:android="http://schemas.android.com/apk/res/android"
 3  android:layout_width="wrap_content"
 4  android:layout_height="wrap_content">
 5
 6  <RelativeLayout
 7   android:layout_width="wrap_content"
 8   android:layout_height="wrap_content">
 9
10   <RelativeLayout
11    android:id="@+id/rl_indicator"
12    android:layout_width="match_parent"
13    android:layout_height="wrap_content"
14    android:gravity="center_horizontal">
15
16    <ImageView
17     android:layout_width="wrap_content"
18     android:layout_height="12dp"
19     android:scaleType="fitCenter"
20     android:src="@drawable/filter_arrow_up" />
21   </RelativeLayout>
22
23   <LinearLayout
24    android:layout_width="wrap_content"
25    android:layout_height="150dp"
26    android:layout_below="@+id/rl_indicator"
27    android:background="@drawable/pop_background"
28    android:gravity="center_horizontal"
29    android:orientation="vertical"
30    android:paddingLeft="15dp"
31    android:paddingRight="15dp">
32
33    <TextView
34     android:id="@+id/pop_location"
35     android:layout_width="match_parent"
36     android:layout_height="0dp"
37     android:layout_weight="1"
38     android:drawableLeft="@mipmap/fault_equipment_location_icon"
39     android:drawablePadding="12dp"
40     android:gravity="center_vertical"
41     android:text="地址"
42     android:textColor="#000"
43     android:textSize="16sp" />
44
45    <View
46     android:layout_width="match_parent"
47     android:layout_height="0.3dp"
48     android:background="#D2D2D2" />
49
50    <TextView
51     android:id="@+id/pop_group"
52     android:layout_width="match_parent"
53     android:layout_height="0dp"
54
55     android:layout_weight="1"
56     android:drawableLeft="@mipmap/fault_equipment_grouping_icon"
57     android:drawablePadding="12dp"
58     android:gravity="center_vertical"
59     android:text="分組"
60     android:textColor="#000"
61     android:textSize="16sp" />
62
63    <View
64     android:layout_width="match_parent"
65     android:layout_height="0.3dp"
66     android:background="#D2D2D2" />
67
68    <TextView
69     android:id="@+id/pop_list"
70     android:layout_width="match_parent"
71     android:layout_height="0dp"
72     android:layout_weight="1"
73     android:drawableLeft="@mipmap/fault_equipment_list_icon"
74     android:drawablePadding="12dp"
75     android:gravity="center_vertical"
76     android:text="清單"
77     android:textColor="#000"
78     android:textSize="16sp" />
79
80   </LinearLayout>
81  </RelativeLayout>
82 </RelativeLayout>
pop_background.xml
1 <?xml version="1.0" encoding="utf-8"?>
2 <shape xmlns:android="http://schemas.android.com/apk/res/android">
3  <solid android:color="#ffffff" />
4  <corners
5   android:radius="5dp" />
6 </shape>
UIUtils.class
 1 package com.example.popupwindowwithmask;
 2
 3 import android.content.Context;
 4
 5 /**
 6  * Created by kk on 2017/7/22.
 7  */
 8
 9 public class UIUtils {
10  /**
11   * 獲得屏幕寬度
12   *
13   * @param context
14   * @return
15   */
16  public static int getScreenWidth(Context context) {
17   return context.getResources().getDisplayMetrics().widthPixels;
18  }
19
20  /**
21   * 獲得屏幕高度
22   *
23   * @param context
24   * @return
25   */
26  public static int getScreenHeight(Context context) {
27   return context.getResources().getDisplayMetrics().heightPixels;
28  }
29
30 }
https://github.com/ganchuanpu/AndroidPopupWindowWithMask.git


