
[toc] 前言 Composite設計模式,將物體組合成一個樹結構,讓單個對象和組合對象使用起來都一樣,組合對象負責將實際的操作分發給每一個組件。 這篇博文分析了安卓的View相關的類,它們可以說是用了Composite設計模式。其中分析View的measure,layout,draw是如何從組合 ...
目錄
前言
Composite設計模式,將物體組合成一個樹結構,讓單個對象和組合對象使用起來都一樣,組合對象負責將實際的操作分發給每一個組件。
這篇博文分析了安卓的View相關的類,它們可以說是用了Composite設計模式。其中分析View的measure,layout,draw是如何從組合對象分發給單個對象。
安卓View的實現
Android Framework中View相關的類,就是用Composite設計模式組織起來的。由於這涉及到了很多份源代碼,如果一頭扎進去看源碼,心中想必是一團亂麻(碼)。咱們帶著問題去看源代碼,效率會高一點。下麵的問題分成兩個類別。關於View流程的問題,每一個幾乎都可以寫一篇很長的博文,網上的大神們寫了許多,這裡我就簡單的概括它的核心要義,截取看到的源代碼。為了對Composite設計模式有一個更好的認識,這裡還是要去認識一下View這個類。
關於View的流程的:
- Android中,View扮演著什麼樣的角色?
- 日常開發中常常見到的setContentView做了什麼事情?如何將xml文件變成對象的?
- View的繪製流程?
關於設計模式的:
- View是怎麼樣使用了Composite設計模式的?它定義了哪些介面?
- 哪些View的子類具有容器性質的?它如何實現的add, remove, getChildren?
- 哪些View的子類是基本的組件?它如何實現View定義的方法?
View
廢話不多說,先來一段官方文檔。
This class represents the basic building block for user interface components. A View occupies a rectangular area on the screen and is responsible for drawing and event handling. View is the base class for widgets, which are used to create interactive UI components (buttons, text fields, etc.). The ViewGroup subclass is the base class for layouts, which are invisible containers that hold other Views (or other ViewGroups) and define their layout properties.
View是構建UI組件的基本單元,是一個負責繪製(drawing)和事件處理(event handling)的方形區域。View是一些widgets的基類,widgets代表著Composite設計模式中的基本組件。View是ViewGroup的基類,ViewGroup是一個不可見的佈局容器,在Composite設計模式中代表著容器。
Beyond setContentView
setContentView做了什麼事情?
這裡主要參考[1]。
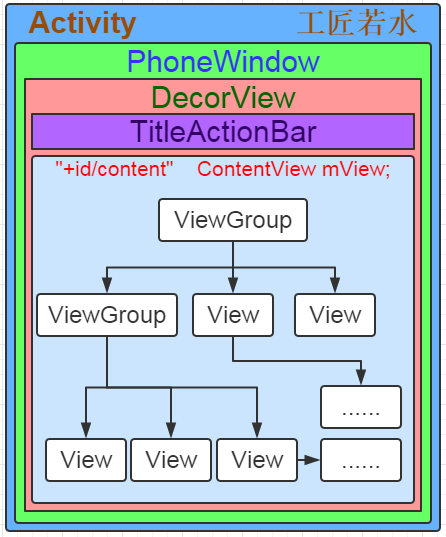
先來看看[1]繪製的層次結構。這裡的層級關係是,外面的框框包含裡面的框框的引用。比如Activity裡面有一個Window對象,PhoneWindow裡面有一個DecorView對象。
這裡給出一個類圖,關註其中的數據結構和依賴關係。
大致流程
這裡大概講一講流程,具體的細節要進入到下麵的源代碼去看。
結合類圖來看這個分析。首先在Activity中調用setContentView之後,Activity里調用Window的setContentView。實際的工作在PhoneWindow中進行。第一次調用,主要做三件事情。一,初始化mDecor和mContentParent。這個通過調用installDecor來完成。二,通過LayoutInflater將setContentView的參數(layoutResID)指向的這個資源,設置到mContentParent里。三,增加回調函數。
@Override
public void setContentView(int layoutResID) {
    // Note: FEATURE_CONTENT_TRANSITIONS may be set in the process of installing the window
    // decor, when theme attributes and the like are crystalized. Do not check the feature
    // before this happens.
    if (mContentParent == null) {
        installDecor();
    } else if (!hasFeature(FEATURE_CONTENT_TRANSITIONS)) {
        mContentParent.removeAllViews();
    }

    if (hasFeature(FEATURE_CONTENT_TRANSITIONS)) {
        final Scene newScene = Scene.getSceneForLayout(mContentParent, layoutResID,
                getContext());
        transitionTo(newScene);
    } else {
        mLayoutInflater.inflate(layoutResID, mContentParent);
    }
    mContentParent.requestApplyInsets();
    final Callback cb = getCallback();
    if (cb != null && !isDestroyed()) {
        cb.onContentChanged();
    }
    mContentParentExplicitlySet = true;
}
installDecor函數
這裡進一步分析一,installDecor函數。installDecor做兩件事情:1,初始化mDecor;2,初始化mContentParent。
private void installDecor() {
    mForceDecorInstall = false;
    if (mDecor == null) {
        mDecor = generateDecor(-1);
        mDecor.setDescendantFocusability(ViewGroup.FOCUS_AFTER_DESCENDANTS);
        mDecor.setIsRootNamespace(true);
        if (!mInvalidatePanelMenuPosted && mInvalidatePanelMenuFeatures != 0) {
            mDecor.postOnAnimation(mInvalidatePanelMenuRunnable);
        }
    } else {
        mDecor.setWindow(this);
    }
    if (mContentParent == null) {
        mContentParent = generateLayout(mDecor);
        ...
    }
}
使用generateDecor函數初始化mDecor
generateDecor函數相當於一個工廠方法。獲取Context之後,調用DecorView的構造器
protected DecorView generateDecor(int featureId) {
    // System process doesn't have application context and in that case we need to directly use
    // the context we have. Otherwise we want the application context, so we don't cling to the
    // activity.
    Context context;
    if (mUseDecorContext) {
        Context applicationContext = getContext().getApplicationContext();
        if (applicationContext == null) {
            context = getContext();
        } else {
            context = new DecorContext(applicationContext, getContext());
            if (mTheme != -1) {
                context.setTheme(mTheme);
            }
        }
    } else {
        context = getContext();
    }
    return new DecorView(context, featureId, this, getAttributes());
}
使用generateLayout函數初始化mContentParent
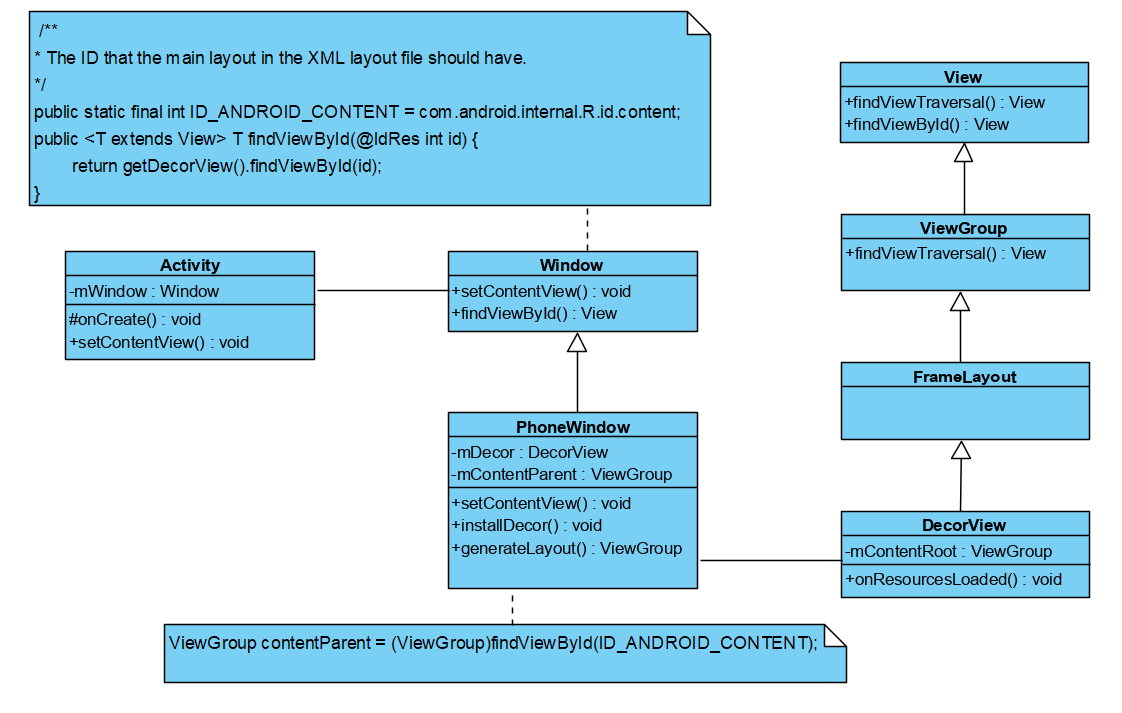
初始化各種參數,最後根據調用Window的getLocalFeatures方法獲取features。根據features去找到一個R.layout,這個layout就是mDecor的佈局了。調用DecorView的onResourcesLoaded函數來設置mDecor的mContentRoot。設置好了mDecor之後,調用Window的findViewById,初始化contentParent。
protected ViewGroup generateLayout(DecorView decor) {
    ...

    int layoutResource;
    int features = getLocalFeatures();
    // System.out.println("Features: 0x" + Integer.toHexString(features));
    if ((features & (1 << FEATURE_SWIPE_TO_DISMISS)) != 0) {
        layoutResource = R.layout.screen_swipe_dismiss;
        setCloseOnSwipeEnabled(true);
    }
    else if...

    ...
    mDecor.startChanging();
    mDecor.onResourcesLoaded(mLayoutInflater, layoutResource);

    ViewGroup contentParent = (ViewGroup)findViewById(ID_ANDROID_CONTENT);
    ...
    mDecor.finishChanging();

    return contentParent;
}
DecorView.java
void onResourcesLoaded(LayoutInflater inflater, int layoutResource) {
    if (mBackdropFrameRenderer != null) {
        loadBackgroundDrawablesIfNeeded();
        mBackdropFrameRenderer.onResourcesLoaded(
                this, mResizingBackgroundDrawable, mCaptionBackgroundDrawable,
                mUserCaptionBackgroundDrawable, getCurrentColor(mStatusColorViewState),
                getCurrentColor(mNavigationColorViewState));
    }

    mDecorCaptionView = createDecorCaptionView(inflater);
    final View root = inflater.inflate(layoutResource, null);
    if (mDecorCaptionView != null) {
        if (mDecorCaptionView.getParent() == null) {
            addView(mDecorCaptionView,
                    new ViewGroup.LayoutParams(MATCH_PARENT, MATCH_PARENT));
        }
        mDecorCaptionView.addView(root,
                new ViewGroup.MarginLayoutParams(MATCH_PARENT, MATCH_PARENT));
    } else {

        // Put it below the color views.
        addView(root, 0, new ViewGroup.LayoutParams(MATCH_PARENT, MATCH_PARENT));
    }
    mContentRoot = (ViewGroup) root;
    initializeElevation();
}
層級結構如何?
[1]中給出了一個圖。想要自己看看這個圖的方法,單步調試進入了Window.java之後,監視getWindow().getDecorView(),可以看到它的結構。
DecorView內有個ViewGroup成員mContentRoot。DecorView使用了裝飾者模式,這裡暫且不講。把握好ViewGroup的結構,mContentRoot就是下麵的這個結構,首先它本身是一個LinearLayout,然後它有mChildren數組,其中的一個成員是我們setContentView輸入的layout文件載入的地方。需要註意的是ID_ANDROID_CONTENT指向的,mContentRoot的一個children,它是FrameLayout佈局,是PhoneWindow的mContentParent。
android.widget.LinearLayout{375bc8 V.E...... ......I. 0,0-0,0}
|----- android.view.ViewStub{55a31c3 G.E...... ......I. 0,0-0,0 #1020192 android:id/action_mode_bar_stub}
|----- android.widget.FrameLayout{262ca40 V.E...... ......I. 0,0-0,0 #1020002 android:id/content}
|------|----- android.support.constraint.ConstraintLayout{46206e9 V.E...... ......I. 0,0-0,0}
如何將xml文件變成對象的?
前面很多地方都看到了LayoutInflater,使用這個類,可以將佈局資源文件轉為對象,這些對象像一棵樹一樣被組織起來。這裡就不講具體的代碼分析了(看[1]有詳細的分析),我們講講前面調用到這個類的inflate方法時候的意義。下麵截取兩行,我們需要搞清楚兩個問題:
- inflate方法的第二個參數的意義
- infalte返回值的意義
PhoneWindow.java
mLayoutInflater.inflate(layoutResID, mContentParent);

DecorView.java
final View root = inflater.inflate(layoutResource, null);
下麵的內容節選自LayoutInflater.java。分析:這個方法是上面兩個調用指向的,意義很明顯,如果第一個參數為ViewGroup,那麼我們將parse出來的View加入到ViewGroup的孩子中。如果第二個參數為null,那麼我們直接返回parse出來的東西。下麵有一句註釋值得註意:Temp is the root view that was found in the xml。
結合之前的代碼,我們可以知道mDecor的mContentRoot,是根據Window的features找到的xml的root view。PhoneWindow的mContentParent,是根據Window的ID_ANDROID_CONTENT找到的View,指向的是mContentRoot的下的main layout。mContentParent是一個FrameLayout,然後將我們開發中的佈局文件(如activity_main.xml)加入到這個Framelayout的下麵。
public View inflate(XmlPullParser parser, @Nullable ViewGroup root, boolean attachToRoot) {
    synchronized (mConstructorArgs) {
        ...
        try {
            ...
            if (TAG_MERGE.equals(name)) {
                ...
            } else {
                // Temp is the root view that was found in the xml
                final View temp = createViewFromTag(root, name, inflaterContext, attrs);

                ViewGroup.LayoutParams params = null;
                ...
                // We are supposed to attach all the views we found (int temp)
                // to root. Do that now.
                if (root != null && attachToRoot) {
                    root.addView(temp, params);
                }

                // Decide whether to return the root that was passed in or the
                // top view found in xml.
                if (root == null || !attachToRoot) {
                    result = temp;
                }
            }

        }
        ...
        return result;
    }
}
小結
跳轉來跳轉去的,細節很多。這些細節終將被遺忘,我們能從這裡獲取到什麼知識呢?或者能獲取到對開發有幫助的哪些結論呢?
清楚了它的層次結構,知道我們的佈局文件最終是在什麼地方。大致瞭解這個流程。
[1]中提到的一些對開發有幫助的結論,具體看[1]。
- 減少佈局的嵌套
- 使用ViewStub,預載入。[2]舉了一個例子。ViewStub設置好要inflate的xml文件之後,調用inflate或者setVisibity來進行載入。
- 使用merge屬性,減少嵌套。
View的繪製流程
先來一段官方文檔[4]。
When an Activity receives focus, it will be requested to draw its layout. The Android framework will handle the procedure for drawing, but the Activity must provide the root node of its layout hierarchy.
Drawing begins with the root node of the layout. It is requested to measure and draw the layout tree. Drawing is handled by walking the tree and rendering each View that intersects the invalid region. In turn, each ViewGroup is responsible for requesting each of its children to be drawn (with the draw() method) and each View is responsible for drawing itself. Because the tree is traversed pre-order, this means that parents will be drawn before (i.e., behind) their children, with siblings drawn in the order they appear in the tree.
Drawing the layout is a two pass process: a measure pass and a layout pass.
The measuring pass is implemented in measure(int, int) and is a top-down traversal of the View tree. Each View pushes dimension specifications down the tree during the recursion. At the end of the measure pass, every View has stored its measurements. The second pass happens in layout(int, int, int, int) and is also top-down. During this pass each parent is responsible for positioning all of its children using the sizes computed in the measure pass.
當獲取到focus的時候,請求繪製layout。先序遍歷這個layout的樹結構,調用measure和layout兩個過程。在這兩個過程之後是draw。(文檔的一部分,intersects the invalid,和無效區域判交,有點奇怪?)draw的過程是,每個ViewGroup調用它的孩子的draw方法,每個View本身負責draw。
三個流程
後面主要參考[3]。
[3]中,總結了每個View都要經過的三個主要的階段:measure, layout, draw。
三個過程的作用:
measure: Measure the view and its content to determine the measured width and the measured height.測量整個View及其內容的寬度和高度。
layout: Assign a size and position to a view and all of its descendants. In this phase, each parent calls layout on all of its children to position them.給View分配大小和位置,如果是一個Parent,那麼還要給它的Children放置位置。
draw: Manually render this view (and all of its children) to the given Canvas.渲染View及其children的內容。
三個過程如何觸發
[3]中,分析了在setContentView,調用到了這些過程。
這裡有一個疑惑,如果是這之後已經調用了measure,那麼為什麼在setContentView這個函數之後,獲取width和height,得到0呢?
後來在[3]下麵的評論里,找到了[5],指出了[3]中微小的錯誤,專門分析了何時繪製View。。
[5]對為什麼onCreate沒有觸發這三個流程,再補充一篇[6]。
[6]給出了結論:
- setContentView() 只是把 View 添加到 DecorView 上
- onResume() 中 ViewRootImpl 和 DecorView 做了關聯
- requestLayout() 和 invalidate() 會觸發 ViewRootImpl 繪製 View
Measure
具體請參見[3]。
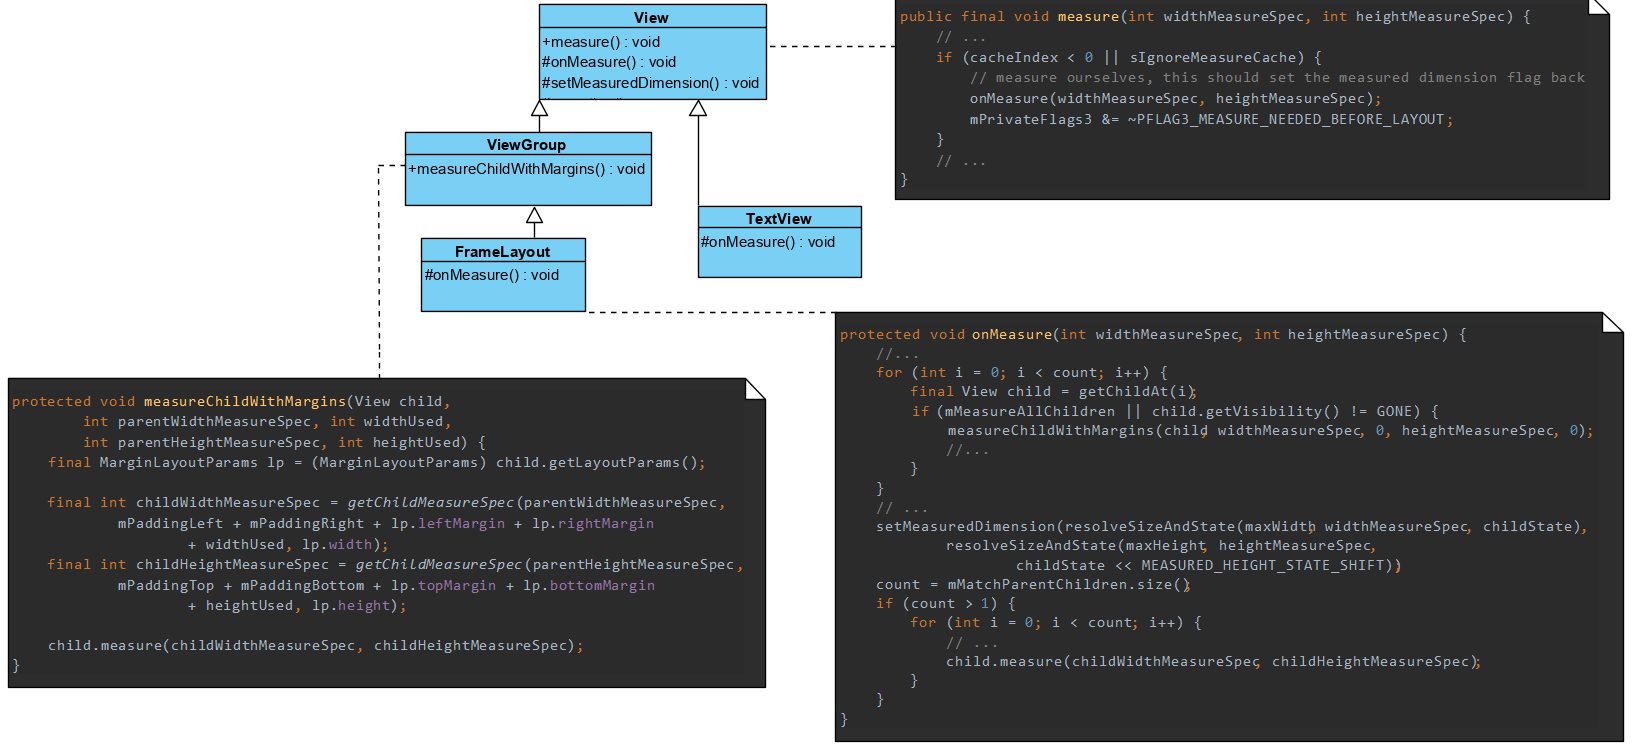
View中的measure方法是final的,子類不能覆蓋,這個方法裡面有一段調用了onMeasure方法,子類通過覆蓋onMeasure來實現自己的測量邏輯。
比如TextView自己實現的邏輯(這裡就不給了),比如FrameLayout自己實現的onMeasure。
FrameLayout是一個ViewGroup,它的onMeasure主要的任務是遍歷mChildren去measure。如果有match_parent屬性的children,重新設定MeasureSpec來measure。
Layout
調用的思路和邏輯基本和measure一樣。這裡也沒什麼好說的,直接拿來[3]的結論。
- View.layout方法可被重載,ViewGroup.layout為final的不可重載,ViewGroup.onLayout為abstract的,子類必須重載實現自己的位置邏輯。
- measure操作完成後得到的是對每個View經測量過的measuredWidth和measuredHeight,layout操作完成之後得到的是對每個View進行位置分配後的mLeft、mTop、mRight、mBottom,這些值都是相對於父View來說的。
- 凡是layout_XXX的佈局屬性基本都針對的是包含子View的ViewGroup的,當對一個沒有父容器的View設置相關layout_XXX屬性是沒有任何意義的
- 使用View的getWidth()和getHeight()方法來獲取View測量的寬高,必須保證這兩個方法在onLayout流程之後被調用才能返回有效值。
Draw
再次引用[3]的結論:
- 如果該View是一個ViewGroup,則需要遞歸繪製其所包含的所有子View。
- View預設不會繪製任何內容,真正的繪製都需要自己在子類中實現。
- View的繪製是藉助onDraw方法傳入的Canvas類來進行的。
- 區分View動畫和ViewGroup佈局動畫,前者指的是View自身的動畫,可以通過setAnimation添加,後者是專門針對ViewGroup顯示內部子視圖時設置的動畫,可以在xml佈局文件中對ViewGroup設置layoutAnimation屬性(譬如對LinearLayout設置子View在顯示時出現逐行、隨機、下等顯示等不同動畫效果)。
- 在獲取畫布剪切區(每個View的draw中傳入的Canvas)時會自動處理掉padding,子View獲取Canvas不用關註這些邏輯,只用關心如何繪製即可。
- 預設情況下子View的ViewGroup.drawChild繪製順序和子View被添加的順序一致,但是你也可以重載ViewGroup.getChildDrawingOrder()方法提供不同順序。
關於第6點,補充一下,官方文檔提到的,draw的順序是先序遍歷。
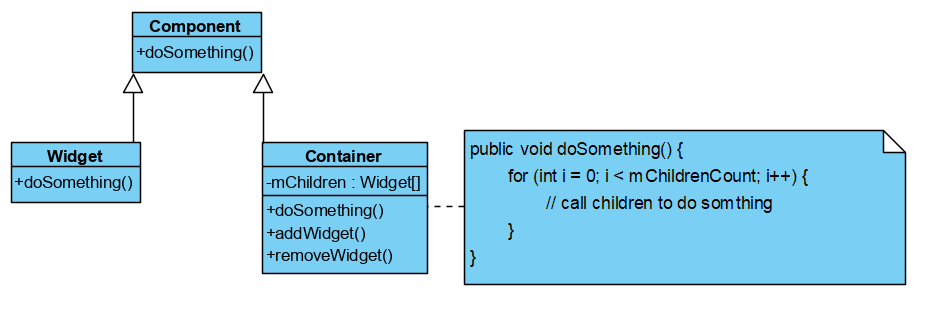
Composite設計模式
是時候回到我們的設計模式上來了。
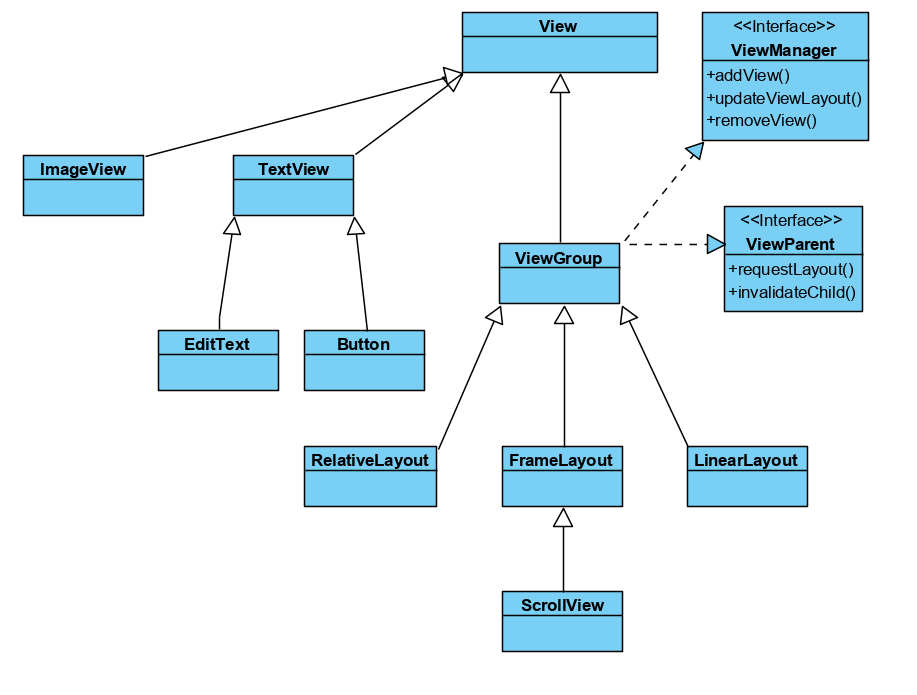
下麵分析View的繪製是如何使用Composite設計模式的。首先,對於所有的View子類,它們都有一些公共的方法measure, layout, draw。不管是單個對象還是組合對象,使用這些方法的邏輯是一樣的。就好像單個對象和組合對象是一樣的。其次,對於組合對象,這裡是ViewGroup,定義了介面ViewManager要實現。內部是一些組合對象需要擁有的方法,比如添加View,移除View。然而,既然View定義了measure, layout, draw為final方法,那麼單個對象和組合對象不就沒有區別了嗎?組合對象又要怎麼調用孩子去doSomething呢?其實,在View中定義了onMeasure, onLayout, onDraw三個方法,在measure, layout, draw的調用過程中,都會去調用對應的onXXX。這樣繼承View的單個對象實現自己的邏輯,繼承View的組合對象不僅要實現自己的邏輯,還有實現對孩子們的調用。
measure, layout, draw的調用
View內部定義了三個方法,measure, layout, draw。這三個都做到了對擴展開發,對修改封閉。每個View要有自己的measure,layout邏輯,該怎麼辦呢?
解決辦法就是View中的measure和layout去調用一個可以覆蓋的方法onMeasure,onLayout。在本質上,onMeasure, onLayout, onDraw這三個方法的作用是擴展View。
ViewGroup中沒有具體的onMeasure和onLayout,一個Layout繼承ViewGroup,實現自己的onMeasure和onLayout。這樣就可以定義出很多不同種類的layout結構,比如RelativeLayout,LinearLayout。相對佈局和線性佈局,它們都要有自己的layout邏輯,這些都放到onLayout中自己去定義。在定義自己的layout邏輯之外,還要負責調用孩子的measure方法,layout方法。
draw的邏輯有些許不一樣。View中定義了draw的邏輯,裡面有一些通用的邏輯,下麵截取了View中的註釋。2~5步,如果需要就跳過。對於第4步,View定義了dispatchDraw的空方法,ViewGroup覆蓋它來實現調用孩子的draw方法。
/*
* Draw traversal performs several drawing steps which must be executed
* in the appropriate order:
*
*      1. Draw the background
*      2. If necessary, save the canvas' layers to prepare for fading
*      3. Draw view's content
*      4. Draw children
*      5. If necessary, draw the fading edges and restore layers
*      6. Draw decorations (scrollbars for instance)
*/
總結
Composite設計模式,核心要義在於,不管是單個對象,還是組合對象,使用起來都一樣。
這篇博客分析了Android的View類,它的實現就是Composite設計模式。
設計模式,它是前人總結出來的打怪(解決問題)的套路。有些時候一直在使用一些套路,但是沒有意識到。於是有人總結出來,下一次遇到同一個問題的時候,相似的情景,用這個套路就可以很好的切入問題。
這篇博客寫的又臭又長,難免存在錯誤,歡迎理性討論。如果能指正我的錯誤,那是我最大的榮幸。
參考鏈接
- https://blog.csdn.net/yanbober/article/details/45970721
- https://droidyue.com/blog/2016/09/11/using-viewstub-in-android-to-improve-layout-performance/
- https://blog.csdn.net/yanbober/article/details/46128379
- https://developer.android.com/guide/topics/ui/how-android-draws
- https://www.jianshu.com/p/c5d200dde486
- https://juejin.im/post/5a61973bf265da3e2d338196


