
1.什麼是SpringMVC? SpringMVC是Spring框架內置的MVC的實現。SpringMVC就是一個Spring內置的MVC框架。MVC框架,它解決WEB開發中常見的問題(參數接收、文件上傳、表單驗證、國際化等等),而且使用簡單,與Spring無縫集成。 支持 RESTful風格的 U ...
1.什麼是SpringMVC?
SpringMVC是Spring框架內置的MVC的實現。SpringMVC就是一個Spring內置的MVC框架。
MVC框架,它解決WEB開發中常見的問題(參數接收、文件上傳、表單驗證、國際化等等),而且使用簡單,與Spring無縫集成。 支持 RESTful風格的 URL 請求 。
採用了鬆散耦合可插拔組件結構,比其他 MVC 框架更具擴展性和靈活性。
2.SpringMVC底層實現
在沒有使用SpringMVC之前我們都是使用的Servlet在做Web開發。但是使用Servlet開發在接受請求數據參數,數據共用,頁面跳轉等操作相對比較複雜。
SpringMVC底層就是的Servlet,SpringMVC就是對Servlet進行更深層次的封裝。
3.SpringMVC入門示例
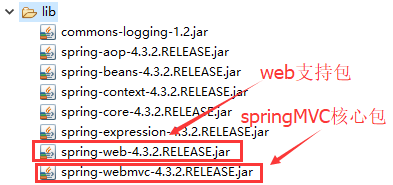
1.導入jar包
2.編寫Controller控制器(與以前servlet類似)
創建一個類實現Controller即可
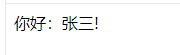
public class HelloController implements Controller {

    @Override
    public ModelAndView handleRequest(HttpServletRequest request, HttpServletResponse response) throws Exception {

        ModelAndView mv = new ModelAndView(); //ModelAndView對象封裝了Model數據和View信息

        mv.addObject("username", "張三");// 共用數據

        mv.setViewName("/WEB-INF/hello.jsp");// 設置跳轉頁面

        return mv;
    }
}
3.在springmvc.xml配置 Controller
<?xml version="1.0" encoding="UTF-8"?>
<beans xmlns="http://www.springframework.org/schema/beans"
    xmlns:p="http://www.springframework.org/schema/p"
    xmlns:context="http://www.springframework.org/schema/context"
    xmlns:aop="http://www.springframework.org/schema/aop"
    xmlns:tx="http://www.springframework.org/schema/tx"
    xmlns:xsi="http://www.w3.org/2001/XMLSchema-instance"
    xsi:schemaLocation="
        http://www.springframework.org/schema/beans
        http://www.springframework.org/schema/beans/spring-beans.xsd
        http://www.springframework.org/schema/context
        http://www.springframework.org/schema/context/spring-context.xsd
        http://www.springframework.org/schema/aop
        http://www.springframework.org/schema/aop/spring-aop.xsd
        http://www.springframework.org/schema/tx
        http://www.springframework.org/schema/tx/spring-tx.xsd
        ">
        <!--配置springMVC控制器
        name : 給當前控制器取的一個名字,相當於Servlet中的資源名稱,以便瀏覽器訪問,必須以斜杠/開頭,
            建議使用 name屬性,不要使用id,因為早期版本 id 不支持特殊字元 如 /斜杠
      -->
    <bean name="/hello" class="com.gjs.controller.HelloController"/>
</beans>
4.在web.xml中配置前端控制器關聯springmvc.xml
<?xml version="1.0" encoding="UTF-8"?>
<web-app xmlns:xsi="http://www.w3.org/2001/XMLSchema-instance" xmlns="http://java.sun.com/xml/ns/javaee" xsi:schemaLocation="http://java.sun.com/xml/ns/javaee http://java.sun.com/xml/ns/javaee/web-app_3_0.xsd" version="3.0">
  <display-name>springMVC1-入門</display-name>
  <welcome-file-list>
    <welcome-file>index.html</welcome-file>
    <welcome-file>index.htm</welcome-file>
    <welcome-file>index.jsp</welcome-file>
    <welcome-file>default.html</welcome-file>
    <welcome-file>default.htm</welcome-file>
    <welcome-file>default.jsp</welcome-file>
  </welcome-file-list>
  <!-- 配置springmvc框架,web.xml是項目入口,訪問項目最先進入 web.xml -->

  <!--
      配置springmvc的前端控制器(總控)
      配置前端控制器以後,用戶瀏覽器的所有請求全部走SpringMVC,如果不配(預設走servlet)
       springmvc底層是基於servlet
   -->
   <servlet>
        <servlet-name>MVC</servlet-name>
        <servlet-class>org.springframework.web.servlet.DispatcherServlet</servlet-class>

        <!-- 讀取配置文件 -->
        <init-param>
            <param-name>contextConfigLocation</param-name>
            <param-value>classpath:springmvc.xml</param-value>
        </init-param>
        <!-- 是否在啟動時載入控制器
              1:是,在伺服器啟動以後立即創建對象
              -1:否(預設),用戶第一次訪問時候才創建-->
        <load-on-startup>1</load-on-startup>
   </servlet>

   <servlet-mapping>
           <servlet-name>MVC</servlet-name>
           <url-pattern>/</url-pattern>
   </servlet-mapping>
</web-app>
5.配置到Tomcat上並啟動
6.結果
4.SpringMVC的全註解開發(一般都用註解不會用xml方式)
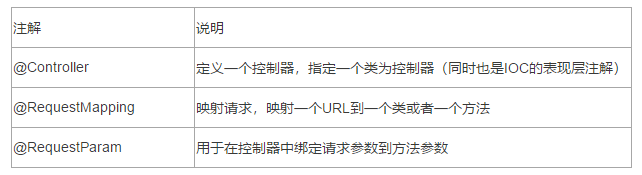
4.1 SpringMVC中的常用註解
4.2 SpringMVC使用註解步驟
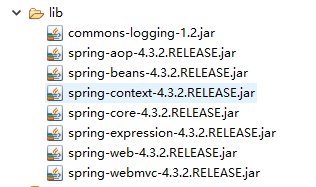
1.導入相關jar包
2.在springmvc.xml中配置註解掃描及MVC註解支持
<?xml version="1.0" encoding="UTF-8"?>
<beans xmlns="http://www.springframework.org/schema/beans"
    xmlns:p="http://www.springframework.org/schema/p"
    xmlns:context="http://www.springframework.org/schema/context"
    xmlns:aop="http://www.springframework.org/schema/aop"
    xmlns:tx="http://www.springframework.org/schema/tx"
    xmlns:mvc="http://www.springframework.org/schema/mvc"
    xmlns:xsi="http://www.w3.org/2001/XMLSchema-instance"
    xsi:schemaLocation="
        http://www.springframework.org/schema/beans
        http://www.springframework.org/schema/beans/spring-beans.xsd
        http://www.springframework.org/schema/context
        http://www.springframework.org/schema/context/spring-context.xsd
        http://www.springframework.org/schema/aop
        http://www.springframework.org/schema/aop/spring-aop.xsd
        http://www.springframework.org/schema/tx
        http://www.springframework.org/schema/tx/spring-tx.xsd
        http://www.springframework.org/schema/mvc
        http://www.springframework.org/schema/mvc/spring-mvc.xsd

        ">
        <!-- 配置要進行註解包掃描的位置 -->
        <context:component-scan base-package="com.gjs"/>
        <!-- 開啟MVC註解支持, 同時還支持返回json數據-->
        <mvc:annotation-driven/>
</beans>
3.在web.xml中配置前端控制器
<?xml version="1.0" encoding="UTF-8"?>
<web-app xmlns:xsi="http://www.w3.org/2001/XMLSchema-instance" xmlns="http://java.sun.com/xml/ns/javaee" xsi:schemaLocation="http://java.sun.com/xml/ns/javaee http://java.sun.com/xml/ns/javaee/web-app_3_0.xsd" version="3.0">
  <display-name>springMVC1-入門</display-name>
  <welcome-file-list>
    <welcome-file>index.html</welcome-file>
    <welcome-file>index.htm</welcome-file>
    <welcome-file>index.jsp</welcome-file>
    <welcome-file>default.html</welcome-file>
    <welcome-file>default.htm</welcome-file>
    <welcome-file>default.jsp</welcome-file>
  </welcome-file-list>
  <!-- 配置springmvc框架,web.xml是項目入口,訪問項目最先進入 web.xml -->

  <!--
      配置springmvc的前端控制器(總控)
      配置前端控制器以後,用戶瀏覽器的所有請求全部走SpringMVC,如果不配(預設走servlet)
       springmvc底層是基於servlet
   -->
   <servlet>
        <servlet-name>MVC</servlet-name>
        <servlet-class>org.springframework.web.servlet.DispatcherServlet</servlet-class>

        <!-- 讀取配置文件 -->
        <init-param>
            <param-name>contextConfigLocation</param-name>
            <param-value>classpath:springmvc.xml</param-value>
        </init-param>
        <!-- 是否啟動時載入,1:是,-1:否-->
        <load-on-startup>1</load-on-startup>
   </servlet>

   <servlet-mapping>
           <servlet-name>MVC</servlet-name>
           <url-pattern>/</url-pattern>
   </servlet-mapping>
</web-app>
4.Controller控制器
package com.gjs.controller;

import org.springframework.stereotype.Controller;
import org.springframework.web.bind.annotation.RequestMapping;
import org.springframework.web.servlet.ModelAndView;

@Controller // 聲明當前類為控制器
public class HelloController {

    @RequestMapping("hello")
    public ModelAndView hello() {

        ModelAndView mv = new ModelAndView();// ModelAndView對象封裝了Model數據和View信息

        mv.addObject("username", "李四");// 共用數據

        mv.setViewName("/WEB-INF/hello.jsp");// 設置跳轉頁面

        return mv;
    }

}
5.SpringMVC執行流程和原理
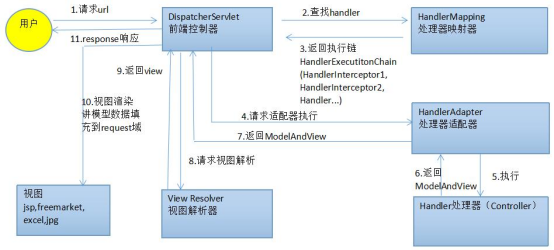
5.1SpringMVC流程:
01、用戶發送出請求到前端控制器DispatcherServlet。
02、DispatcherServlet收到請求調用HandlerMapping(處理器映射器)。
03、HandlerMapping找到具體的處理器(可查找xml配置或註解配置),生成處理器對象及處理器攔截器(如果有),再一起返回給DispatcherServlet。
04、DispatcherServlet調用HandlerAdapter(處理器適配器)。
05、HandlerAdapter經過適配調用具體的處理器(Handler/Controller)。
06、Controller執行完成返回ModelAndView對象。
07、HandlerAdapter將Controller執行結果ModelAndView返回給DispatcherServlet。
08、DispatcherServlet將ModelAndView傳給ViewReslover(視圖解析器)。
09、ViewReslover解析後返回具體View(視圖)。
10、DispatcherServlet根據View進行渲染視圖(即將模型數據填充至視圖中)。
11、DispatcherServlet響應用戶。
5.2 涉及組件分析:
1、前端控制器DispatcherServlet(不需要程式員開發),由框架提供,在web.xml中配置。
作用:接收請求,響應結果,相當於轉發器,中央處理器。
2、處理器映射器HandlerMapping(不需要程式員開發),由框架提供。
作用:根據請求的url查找Handler(處理器/Controller),可以通過XML和註解方式來映射。
3、處理器適配器HandlerAdapter(不需要程式員開發),由框架提供。
作用:按照特定規則(HandlerAdapter要求的規則)去執行Handler。
4、處理器Handler(也稱之為Controller,需要工程師開發)
註意:編寫Handler時按照HandlerAdapter的要求去做,這樣適配器才可以去正確執行Handler。
作用:接受用戶請求信息,調用業務方法處理請求,也稱之為後端控制器。
5、視圖解析器ViewResolver(不需要程式員開發),由框架提供
作用:進行視圖解析,把邏輯視圖名解析成真正的物理視圖。
SpringMVC框架支持多種View視圖技術,包括:jstlView、freemarkerView、pdfView等。
6、視圖View(需要工程師開發)
作用:把數據展現給用戶的頁面
View是一個介面,實現類支持不同的View技術(jsp、freemarker、pdf等)
具體組件的配置相關,請查閱 spring-webmvc-4.3.2.RELEASE.jar 包下麵 org/springframework/web/servlet/DispatcherServlet.properties 的相關配置
6.對靜態資源訪問
按照第3和第4點的配置,會出現靜態資源無法訪問的情況(如html頁面)。原因是在web.xml中配置的前端控制器的映射路徑(<url-pattern>)為“/”,而Tomcat中對靜態資源處理的servlet的的映射路徑也是“/”。也就是說,我們配置SpringMVC中的DispatcherServlet的映射路徑覆蓋了Tomcat預設對靜態資源的處理的路徑。
Tomcat部分源碼:
<servlet>
        <servlet-name>default</servlet-name>
        <servlet-class>org.apache.catalina.servlets.DefaultServlet</servlet-class>
        <init-param>
            <param-name>debug</param-name>
            <param-value>0</param-value>
        </init-param>
        <init-param>
            <param-name>listings</param-name>
            <param-value>false</param-value>
        </init-param>
        <load-on-startup>1</load-on-startup>
    </servlet>

    <servlet-mapping>
        <servlet-name>default</servlet-name>
        <url-pattern>/</url-pattern>
    </servlet-mapping>
解決方案:
方案一:如果SpringMVC要配置為/,那麼就得設置Dispatcherservlet對靜態資源進行支持。
在SpringMVC的配置文件中添加以下代碼開啟對靜態資源的訪問
<mvc:default-servlet-handler/>
方案二:SpringMVC映射路徑不要配置為/ (也不要配置為/* ,/*會匹配所有url)
實際開發中一般推薦使用 *.尾碼 如 *.do *.action
<servlet-mapping>
           <servlet-name>MVC</servlet-name>
           <url-pattern>*.do</url-pattern>
   </servlet-mapping>
註:訪問時以.do結尾的url訪問,配置方法的映射路徑時可以不加.do(建議不加)
7.Spring請求響應
7.1.@RequestMapping
@RequestMapping註解主要用於設置SpringMVC請求的映射路徑
所謂的映射路徑,就是匹配請求路徑和執行方法關係的路徑.
請求路徑:http://localhost:8080/springmvc/method1.do
映射路徑:@RequestMapping(value="/method1") (“value=”可以省略)
@RequestMapping 用於貼在控制器的類上或者方法上面
如果是貼在控制器的類上面,那麼在訪問這個類的方法之前必須先加上類上的對應的名稱類似於 項目下麵的 模塊名稱
如果貼在方法上面,就是訪問此方法的資源名稱
@Controller
@RequestMapping("/request")  //訪問時候必須加上,類似模塊名稱
public class RequestController {
    @RequestMapping(value="/method1") //資源名稱
    public void method1() {
    }
}
訪問地址 : http://localhost:8080/springmvc/request/method1.do
7.2兩種限制
SpringMVC支持對請求的限制.如果不滿足限制的條件,就不讓訪問執行方法。這樣做,大大提高了執行方法的安全性。
主要的限制有兩種:方法限制(method),參數限制
1.方法限制:
設置請求的method類型(get/post)。如果發送過來的請求與方法設置的method不一樣,就不能訪問執行方法。
/*
     * @RequestMapping 請求映射註解
     * value : 請求的url地址映射,沒有其他參數時“value=”可以省略,有其他參數就不能省略
     * method :限定請求方式 GET /POST  預設沒有限制get/post都可以
     * params : 請求參數的限制:  必須有什麼參數,必須沒有什麼參數,參數的值必須是什麼
     */
    @RequestMapping(value="/login1",method=RequestMethod.POST)
    public ModelAndView login(HttpServletRequest request,HttpServletResponse reponse,HttpSession sesion ) {
        String username = request.getParameter("username");
        String password = request.getParameter("password");

        System.out.println(username);
        System.out.println(password);
        return null;

    }
<%-- EL表達式獲取上下文路徑 : ${pageContext.request.contextPath} --%>
    <h4>登錄頁面</h4>
    <form action="${pageContext.request.contextPath}/request/login1.do"
        method="get">
        賬號:<input name="username"><br>
            密碼:<input type="password" name="pwd"><br>
        <button type="submit">登錄</button>
    </form>
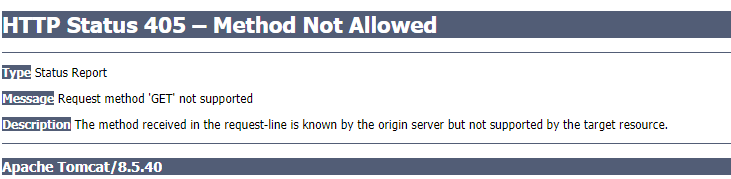
不支持請求方法“GET”
2.參數限制
限制請求裡面必須包括哪些參數,或不包括哪些哪些,參數必須包括哪些值,不包括哪些值
限制參數格式:
1.參數必須包括:params={"username","password"}
2.參數不能包括:params={"!userid"}
3參數值必須是指定的值:params={"username=zhangsan"})
4.參數值必須不是指定的值:params={"userid!=123"})
/*
     * @RequestMapping
     * 請求映射註解
     * value : 請求的url地址映射,沒有其他參數時“value=”可以省略,有其他參數就不能省略
     * method :限定請求方式 GET /POST  預設沒有限制get/post都可以
     * params : 請求參數的限制:  必須有什麼參數,必須沒有什麼參數,參數的值必須是什麼
     */
    @RequestMapping(value="/login2",params={"username","password"})
    public ModelAndView login(HttpServletRequest request,HttpServletResponse reponse,HttpSession sesion ) {
        String username = request.getParameter("username");
        String password = request.getParameter("password");

        System.out.println(username);
        System.out.println(password);
        return null;

    }
<%@ page language="java" contentType="text/html; charset=UTF-8"
    pageEncoding="UTF-8"%>

<!DOCTYPE html>
<html>
<head>
<meta charset="UTF-8">
<title>登錄</title>
</head>
<body>
    <%-- EL表達式獲取上下文路徑 : ${pageContext.request.contextPath} --%>
    <h4>登錄頁面</h4>
    <form action="${pageContext.request.contextPath}/request/login2.do"
        method="post">
        賬號:<input name="username"><br>
         密碼:<input type="password" name="pwd"><br>
        <button type="submit">登錄</button>
    </form>
</body>
</html>
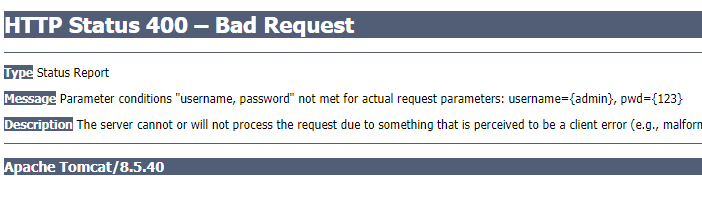
參數條件“username, password”不滿足,實際請求參數:username={admin}, pwd={123}
7.3SpringMVC方法參數註入
SpringMVC的方法預設可以註入 JavaWeb開發常用的數據共用對象,如:HttpServletRequest 、HttpServletResponse、HttpSession。獲取這些共用對象以後,就可以向之前的Servlet一樣,做任何數據共用以及頁面跳轉操作
8.數據綁定
8.1.數據綁定是什麼
SpringMVC的數據綁定就是將請求帶過來的表單數據綁定到執行方法的參數變數。
實際開發中,SpringMVC作為表現層框架,肯定會接受前臺頁面傳遞過來的參數,SpringMVC提供了豐富的接受參數的方法
8.2 接受參數的方法
1. 使用HttpServletRequest對象(C)
SpringMVC可以註入HttpServletRequest對象,直接使用getParameter()接受參數,但一般不會這種方法,還用這種方法接收參數的話使用SpringMVC的意義就不大,這種方法瞭解即可。
<!--  原始方式request.getParameter() -->
    <fieldset>
        <legend> 原始方式request.getParameter()</legend>
        <form action="${pageContext.request.contextPath}/request/method1.do"
            method="get">
            賬號: <input name="username"><br>
                    年齡: <input name="age"><br>
            <button type="submit">提交</button>
        </form>
    </fieldset>
@RequestMapping("/method1")
    public ModelAndView method1(HttpServletRequest request) {
        String username = request.getParameter("username");
        String age = request.getParameter("age");

        System.out.println(username);
        System.out.println(age);
        return null;
    }
2. 方法形參與請求參數同名
在方法形參上,聲明和表單欄位名相同的參數名(可以進行自動同名匹配,然後註入)
<fieldset>
    <legend>方法形參與前臺參數同名</legend>
    <form action="${pageContext.request.contextPath}/request/method2.do"
        method="post">
        賬號: <input name="username"><br>
            年齡: <input name="age"><br>
        <button type="submit">提交</button>
    </form>
</fieldset>
@RequestMapping("/method2")
public ModelAndView method2(String username, Integer age) {
    System.out.println(username);
    System.out.println(age);
    return null;
}
3.方法形參與請求參數不同名
方法形參與表單欄位名參數名不同是,要使用 @RequestParam註解 綁定請求參數到方法參數
<fieldset>
        <legend>方法形參與前臺參數不同名</legend>
        <form action="${pageContext.request.contextPath}/request/method3.do"
            method="post">
            賬號: <input name="name"><br>
                    年齡: <input name="age"><br>
            <button type="submit">提交</button>
        </form>
 </fieldset>
@RequestMapping("/method3")
    public ModelAndView method3(@RequestParam("name") String username, Integer age) {
        System.out.println(username);
        System.out.println(age);
        return null;
}
4.接收數組
<fieldset>
        <legend>接收數組或集合</legend>
        <form action="${pageContext.request.contextPath}/request/method4.do"
            method="post">
            賬號: <input name="username"><br> 年齡: <input name="age"><br>
            愛好: <input type="checkbox" name="hobbys" value="java">java <input
                type="checkbox" name="hobbys" value="C">C <input
                type="checkbox" name="hobbys" value="C++">C++<br />
            <button type="submit">提交</button>
        </form>
 </fieldset>
@RequestMapping("/method4")
    public ModelAndView method4(String username, Integer age, String[] hobbys) {
        System.out.println(username);
        System.out.println(age);
        System.out.println(Arrays.toString(hobbys));
        return null;
 }
如果後臺接收的屬性名與前臺不一致需要在數組前面加上@RequestParam註解
5.接收對象
在實際開發中經常需要把接收的參數封裝到javaBaen對象中。springMVC提供了直接接收javaBaen對象的方式,直接把javaBaen對象作為方法的形參,從前臺接收到的參數就會自動映射註入到對象中,但必須保證javaBaen對象的屬性名與從前臺接收到的參數名一致,否則就無法映射
package com.gjs.pojo;

import java.util.Arrays;

public class User {
    private String username;
    private String password;
    private String email;
    private String phone;
    private String[] hobby;
    public String getUsername() {
        return username;
    }
    public void setUsername(String username) {
        this.username = username;
    }
    public String getPassword() {
        return password;
    }
    public void setPassword(String password) {
        this.password = password;
    }
    public String getEmail() {
        return email;
    }
    public void setEmail(String email) {
        this.email = email;
    }
    public String getPhone() {
        return phone;
    }
    public void setPhone(String phone) {
        this.phone = phone;
    }
    public String[] getHobby() {
        return hobby;
    }
    public void setHobby(String[] hobby) {
        this.hobby = hobby;
    }
    public User() {
        super();
    }
    public User(String username, String password, String email, String phone, String[] hobby) {
        super();
        this.username = username;
        this.password = password;
        this.email = email;
        this.phone = phone;
        this.hobby = hobby;
    }
    @Override
    public String toString() {
        return "User [username=" + username + ", password=" + password + ", email=" + email + ", phone=" + phone
                + ", hobby=" + Arrays.toString(hobby) + "]";
    }

}
<fieldset>
        <legend>接受對象,表單參數名必須和後臺pojo對象對應的屬性名相同</legend>
        <form action="${pageContext.request.contextPath}/request/method5.do"
            method="get">
            賬號: <input name="username"><br>
            密碼: <input    type="password" name="password"><br>
            郵箱: <input    name="email"><br>
            電話: <input name="phone"><br>
            愛好:<input type="checkbox" name="hobby" value="java">java
            <input type="checkbox" name="hobby" value="C">C
            <input type="checkbox" name="hobby" value="C++">C++<br />
            <button type="submit">提交</button>
        </form>
</fieldset>
    //接受對象,直接在方法的參數上面註入pojo對象,pojo對象的屬性和表單的參數名必須一樣
    @RequestMapping("/method5")
    public ModelAndView method5(User user) {
        System.out.println(user);
        return null;
    }
6.接受參數封裝成Map集合
有的時候我們需要接收多個參數,但又不想使用對象接收,這時可以用Map集合接收。只需要把map集合作為方法參數註入然後在map參數前面加上@RequestParam 註解即可, SpringMVC在接受表單參數時候回自動創建一個map集合, 並且把表單的參數名作為map的key,參數值作為map的value。使用map集合可以接受任意個數的參數,但需要註意map只能接受單個值的參數,接收數組類型的參數只會接收第一個元素
    <fieldset>
        <legend>接受參數封裝成Map集合</legend>
        <form action="${pageContext.request.contextPath}/request/method6.do" method="post">
            賬號: <input name="username"><br>
            密碼: <input name="password"><br>
            郵箱: <input name="email"><br>
            電話: <input name="phone"><br>
            愛好:<input type="checkbox" name="hobby" value="java">java
            <input type="checkbox" name="hobby" value="C">C
            <input type="checkbox" name="hobby" value="C++">C++<br />
            <button type="submit">提交</button>
        </form>
    </fieldset>
    @RequestMapping("/method6")
    public ModelAndView method6(@RequestParam Map<String, Object> paramsMap) {
        System.out.println(paramsMap);
        return null;
    }
7.RESTFUL風格支持
RESTFUL介紹:
REST(英文:Representational State Transfer,簡稱REST)描述了一個架構樣式的網路系統,比如 web 應用程式。它首次出現在 2000 年 Roy Fielding 的博士論文中,他是 HTTP 規範的主要編寫者之一。在目前主流的三種Web服務交互方案中,REST相比於SOAP(Simple Object Access protocol,簡單對象訪問協議)以及XML-RPC更加簡單明瞭,REST都傾向於用更加簡單輕量的方法設計和實現。值得註意的是REST並沒有一個明確的標準,而更像是一種設計的風格。
RESTful一種軟體架構風格、設計風格,而不是標準,只是提供了一組設計原則和約束條件。它主要用於客戶端和伺服器交互類的軟體。基於這個風格設計的軟體可以更簡潔,更有層次,更易於實現緩存等機制。
參數傳遞方法 GET
例如:根據商品id查詢對應的商品信息(京東網站)
如果按照我們web開發應該是將商品id通過get方法跟在地址後面
普通方式 https://item.jd.com?product_id=100000287117 京東不支持
但是京東不是使用的此種方式,使用的 RESTFUL風格
RESTful風格 : https://item.jd.com/100000287117.html
示例代碼:
@PathVariable用於將請求URL中的模板變數(動態參數)映射到功能處理方法的參數上。
// RESTful風格
@RequestMapping(value = "/method7/{product_id}.html")
public ModelAndView method7(@PathVariable("product_id") Integer product_id) {
System.out.println(product_id);//1231323123
return null;
}
訪問地址:localhost:8080/springmvc/request/method7/1231323123.html
註:.html 的url會被Tomcat當做靜態資源處理了,所以配置springmvc的前端控制器時映射路徑要陪 / ,然後再配置開啟對靜態資源的訪問 <mvc:default-servlet-handler/>
使用RESTful優勢
1.可以讓頁面偽靜態,頁面訪問感覺像在訪問靜態html頁面,實際上訪問時動態頁面(偽靜態)
2.方便搜索引擎的SEO優化(html頁面在搜索引擎搜索結果比較靠前)
9.請求中文亂碼問題
SpringMVC預設接受的參數是ISO-8859-1編碼參數,單位元組,不支持中文。Spring提供了一個過濾器 org.springframework.web.filter.CharacterEncodingFilter 可以讓開發者自定義請求參數的字元編碼。
在web.xml中配置過濾器
      <filter>
          <filter-name>CharacterEncodingFilter</filter-name>
          <filter-class>org.springframework.web.filter.CharacterEncodingFilter</filter-class>
          <!-- 使用初始化參數設置字元集 -->
          <init-param>
              <param-name>encoding</param-name>
              <param-value>utf-8</param-value>
          </init-param>
      </filter>
      <filter-mapping>
          <filter-name>CharacterEncodingFilter</filter-name>
          <!-- 過濾所有請求 -->
          <url-pattern>/*</url-pattern>
      </filter-mapping>
如果是get方式還需要修改Tomcat的配置:修改tomcat/conf/server.xml,在<Connector> 標簽中添加屬性useBodyEncodingForURI="true"(Tomcat 8之後版本可不改,預設就是utf-8)
useBodyEncodingForURI="true":是否設置用request的字元集對URL提交的數據和表單中GET方式提交的數據進行重新編碼
10.響應傳值方式
10.1使用原始servlet的請求和響應對象進行頁面跳轉和數據共用
    @RequestMapping("method1")
    public void method1(HttpServletRequest request, HttpServletResponse response) throws ServletException, IOException {
        //數據共用
        request.setAttribute("username", "張三");

        //請求轉發
        //request.getRequestDispatcher("/WEB-INF/response.jsp").forward(request, response);

        //url重定向(可以跨域訪問)
        response.sendRedirect("http://www.baidu.com");
    }
10.2返回ModelAndView類型進行頁面跳轉和數據共用
ModelAndView :模型和視圖。Spring提供此對象可以集中管理共用數據操作和設置跳轉視圖操作。但 ModelAndView 只能使用請求轉發。
    @RequestMapping("method2")
    public ModelAndView method2() {
        ModelAndView mv = new ModelAndView();
        mv.addObject("username", "李四");    //數據共用
        mv.setViewName("/WEB-INF/response.jsp");//設置視圖地址
        return mv;
    }
10.3 通過Model方式-設置共用數據
直接將需要共用的數據封裝到Model對象,方法返回值(String字元串)為需要跳轉的地址。 預設使用請求轉發
    @RequestMapping("method3")
    public String method3(Model m) {
        m.addAttribute("username", "王五");    //數據共用
        return "/WEB-INF/response.jsp";        //返回視圖地址
    }
10.4 配置視圖解析器

視圖解析器的配置
<!-- 配置SpringMVC的視圖解析器 -->
    <bean class="org.springframework.web.servlet.view.InternalResourceViewResolver">

        <!-- 配置視圖首碼 -->
        <property name="prefix" value="/WEB-INF/"/>

        <!-- 配置視圖尾碼 -->
        <property name="suffix" value=".jsp"/>

    </bean>
配置視圖解析器後的代碼
Controller方法返回字元串表示邏輯視圖名,通過視圖解析器解析為物理視圖地址。
此時預設的物理視圖地址為:視圖首碼+邏輯視圖名稱+視圖尾碼
    @RequestMapping("method2")
    public ModelAndView method2() {
        ModelAndView mv = new ModelAndView();
        mv.addObject("username", "李四");        //數據共用
        //配置視圖解析器之前
        //mv.setViewName("/WEB-INF/response.jsp");//設置視圖地址
        //配置視圖解析器之後:配置一個邏輯視圖名稱
        mv.setViewName("response");
        return mv;
    }


    @RequestMapping("method3")
    public String method3(Model m) {
        m.addAttribute("username", "王五");    //數據共用
        //配置視圖解析器之前
        //return "/WEB-INF/response.jsp";        //返回視圖地址
        //配置視圖解析器之後:返回一個邏輯視圖名稱
        return "response";
    }
10.5 自定義請求轉發和重定向跳轉的頁面
如果直接使用視圖解析器的配置開發,那麼必須保證視圖解析器首碼目錄下麵有對應的頁面文件才能跳轉,否則報錯。
預設頁面跳轉也只能使用請求轉發跳轉,不能使用重定向 需要解決問題: 除了使用視圖解析器對應規則的開發,用戶還得自定義跳轉方式,和自定義跳轉頁面 方案:
使用視圖解析器的 請求轉發和重定向配置,可以打破預設的規則
spring源碼:
public static final String REDIRECT_URL_PREFIX = "redirect:";
public static final String FORWARD_URL_PREFIX = "forward:";
重定向:redirect:
請求轉發:forward:
示例代碼:
    // 自定義請求轉發頁面跳轉的地址 : forward: 跳轉的地址
    @RequestMapping("method4")
    public String method4(Model m) {
        m.addAttribute("username", "趙六");
        return "forward:/WEB-INF/response.jsp";
    }

    // 自定義重定向頁面跳轉的地址 redirect: 跳轉的地址
    @RequestMapping("method5")
    public String method5(Model m) {
        return "redirect:http://www.baidu.com";
    }
10.6 返回對象進行頁面跳轉和數據共用
返回對象預設使用就是請求轉發,跳轉的頁面規則 :視圖解析器首碼 + 模塊名+@RequestMapping的值 + 尾碼。返回的對象即共用的數據,共用的名稱預設為對象類型的首字母小寫。可以使用@ModelAttribute("設置共用模型的屬性名稱")
    @RequestMapping("method6")
    @ModelAttribute("userKey") //設置共用模型的屬性名稱
    public User method6() {
        User user = new User("馬七","123", "[email protected]", "1", null);
        return user;
    }
10.7 轉換JSON數據
在web開發中,前臺頁面經常會發送ajax請求從後臺請求數據,ajax請求給前臺的數據一般都是json 數據。
SpringMVC支持自動將對象轉換JSON格式的數據響應給客戶端
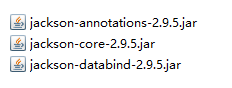
SpringMVC預設使用的是 jackson 作為對象轉json的工具
先導入jackson的jar包
下載地址:https://mvnrepository.com/search?q=jackson
使用@ResponseBody註解方法的返回值會以字元串的形式返回,springMVC會自己調用jackson 把對象轉換成json字元串
@RequestMapping("/getObjectByJson")
    @ResponseBody //將方法的返回值以字元串的形式返回
    public User getObjectByJson() {
        User user = new User();
        user.setUsername("小明");
        user.setPassword("123");
        user.setPhone("135xxxx");
        user.setEmail("[email protected]");
        return user;
    }

    @RequestMapping("/getListtByJson")
    @ResponseBody
    public List<User> getListByJson() {

        List<User> users = new ArrayList<>();
        for (int i = 0; i < 10; i++) {
            User user = new User();
            user.setUsername("小明 : "+i);
            user.setPassword("123 :"+i);
            user.setPhone("135xxxx :"+i);
            user.setEmail( "[email protected]");
            users.add(user);
        }

        return users;
    }
11. 文件上傳
在web開發中一般都會有文件上傳的操作
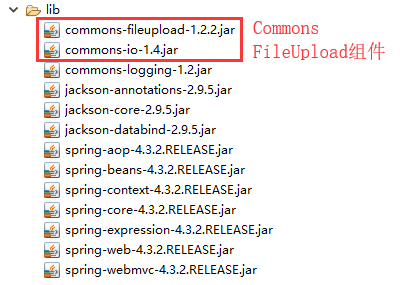
一般在JavaWeb開發中文件上傳使用的 Apache組織的Commons FileUpload組件
SpringMVC中使用 MultipartFile file對象接受上傳文件,必須保證 後臺參數的名稱和表單提交的文件的名稱一致
文件上傳必須條件
1.表單必須post
2.表單必須有 file 文件域
3.表單的 enctype="multipart/form-data"
11.1 單個文件上傳
步驟:
1.導入相關jar包
2.在springmvc.xml中配置上傳解析器
property的value用來設置上傳文件的最大尺寸,其他配置為固定配置
<!-- 配置文件上傳解析器:bean的名字是固定的,底層使用的名稱註入 -->
<bean id="multipartResolver" class="org.springframework.web.multipart.commons.CommonsMultipartResolver">
<!-- 設置上傳文件的最大尺寸為1MB -->
<property name="maxUploadSize" value="#{1024 * 1024}"></property>
</bean>
3.jsp代碼
<fieldset>
        <legend>單個文件上傳</legend>
        <form action="${pageContext.request.contextPath}/upload.do" method="post" enctype="multipart/form-data">
            姓名: <input name="username"><br>
            頭像: <input type="file" name="headImg"><br>
            <button type="submit">提交</button>
        </form>
    </fieldset>
<fieldset>
4.後臺代碼
SpringMVC中使用 MultipartFile對象接受上傳文件,必須保證 後臺方法MultipartFile 參數的名稱和表單提交的文件的名稱一致
     //SpringMVC中使用  MultipartFile對象接受上傳文件,必須保證 後臺參數的名稱和表單提交的文件的名稱一致
        @RequestMapping("/upload")
        public String singleUpload(MultipartFile headImg,@RequestParam("username")String username) throws IOException {

            System.out.println(headImg.getName());//獲取上傳文件的表單參數名稱

                    System.out.println(headImg.getContentType());//MIME類型:如html的MIME類型為text/html,用於確定文件屬於哪一類型的
            System.out.println(headImg.getSize());//文件大小
            System.out.println(headImg.getOriginalFilename());//獲取上傳文件的完整名稱
            //獲取上傳文件對應的輸入流
            //InputStream in = headImg.getInputStream();

            //創建一個磁碟目錄(文件夾)用於保存文件
            File destFile= new File("D:/upload");
            if(!destFile.exists()) {    //判斷文件夾是否存在
                destFile.mkdir();
            }
            //使用uuid作為文件隨機名稱
            String fileName = UUID.randomUUID().toString().replaceAll("-", "");
            //使用FileNameUtils獲取上傳文件名的尾碼
            String extension = FilenameUtils.getExtension(headImg.getOriginalFilename());// jpg , png 等等
            //創建新的文件名稱
            String newFileName = fileName + "."+extension;

            //創建要保存文件的File對象
            File file = new File(destFile, newFileName);
            //保存文件到本地磁碟
            headImg.transferTo(file);

            return "redirect:/upload.jsp";
        }
11.2 多文件上傳
  <fieldset>
        <legend>多個文件上傳</legend>
        <form name="files" action="${pageContext.request.contextPath}/uploads.do" method="post" enctype="multipart/form-data">
            文件1: <input type="file" name="headImgs"><br>
            文件2: <input type="file" name="headImgs"><br>
            文件3: <input type="file" name="headImgs"><br>
            <button type="submit">提交</button>
        </form>
    </fieldset>
        @RequestMapping("/uploads")
        public String singleUploads(MultipartFile[] headImgs) throws  IOException {
            //創建一個磁碟目錄(

