
因為之前用nuxt開發過應用程式,但是nuxt早就達到了開箱即用的目的,所以一直對vue ssr的具體實現存在好奇。 完整代碼可以查看 "https://github.com/jinghaoo/vuessr template" 構建步驟 我們通過上圖可以看到,vue ssr 也是離不開 的打包。 利 ...
因為之前用nuxt開發過應用程式,但是nuxt早就達到了開箱即用的目的,所以一直對vue ssr的具體實現存在好奇。
完整代碼可以查看 https://github.com/jinghaoo/vuessr-template
構建步驟
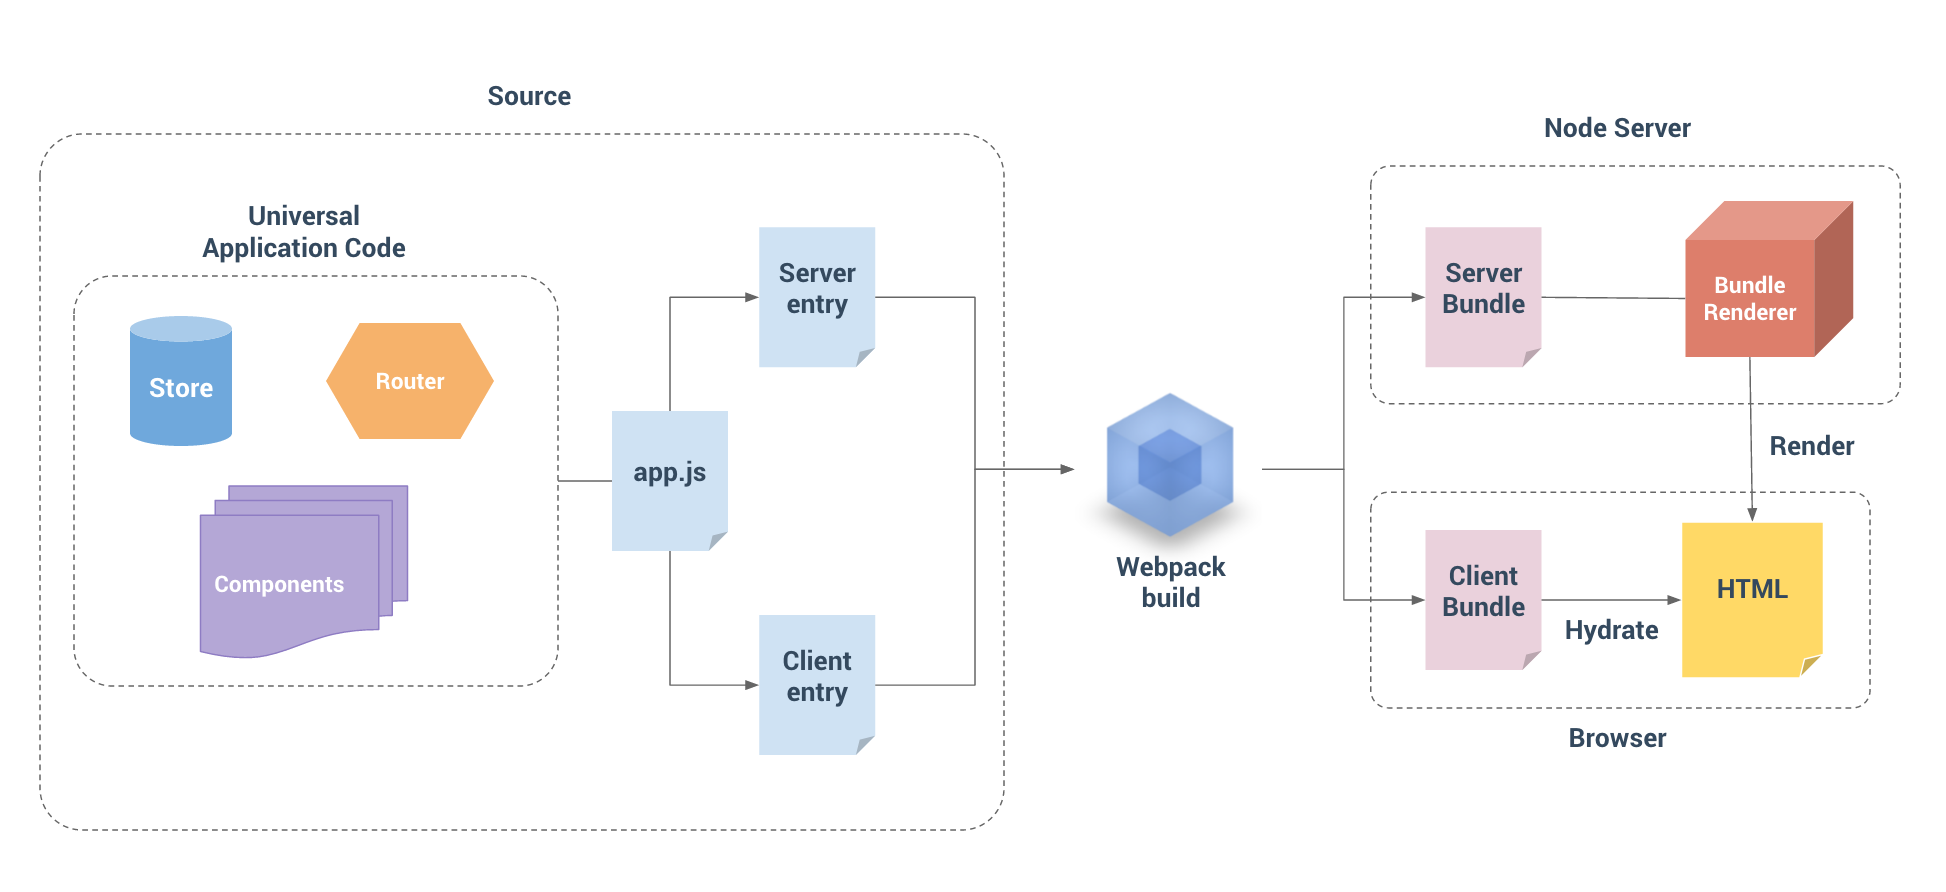
我們通過上圖可以看到,vue ssr 也是離不開 webpack 的打包。
利用 webpack的打包將 vue 應用程式生成 Server Bundle 和 Client Bundle。 有了Client manifest (Client Bundle的產物)和 Server Bundle,Bundle Renderer 現在具有了伺服器和客戶端的構建信息,因此它可以自動推斷和註入資源預載入 / 數據預取指令(preload / prefetch directive),以及 css 鏈接 / script 標簽到所渲染的 HTML。
項目結構

build 文件構建配置
public 模板文件
src 項目文件
通過上面可以看出整體和平時的vue項目區別不是很大,主要集中在 build 中 存在了 webpack.server.config.js 文件 以及 src 文件下的 entry-client.js 和 entry-server.js, 在這裡特殊說下 src 下的 app.js 和 template.html 與我們平時寫的vue項目中的也有所區別。
template.html
<!DOCTYPE html>
<html lang="en">
  <head><title>Hello</title></head>
  <body>
    <!--vue-ssr-outlet-->
  </body>
</html>
當在渲染 Vue 應用程式時,renderer 只會生成 HTML 標記, 我們需要用一個額外的 HTML 頁麵包裹容器,來包裹生成的 HTML 標記,一般直接在創建 renderer 時提供一個頁面模板。
- 註意
<!--vue-ssr-outlet-->註釋 這裡將是應用程式 HTML 標記註入的地方。
app.js
  import Vue from 'vue'
  import App from './App.vue'
  import { createRouter } from '@/router'

  import { createStore } from '@/store'
  import { sync } from 'vuex-router-sync'

  // 導出一個工廠函數,用於創建新的
  // 應用程式、router 和 store 實例
  export function createApp () {
    // 創建 router 實例
    const router = createRouter()
    // 創建 store 實例
    const store = createStore()

    // 同步路由狀態(route state)到 store
    sync(store, router)

    const app = new Vue({
      // 根實例簡單的渲染應用程式組件。
      router,
      store,
      render: h => h(App)
    })

    return { app, router, store }
}在伺服器端渲染(SSR),本質上是在渲染應用程式的"快照",所以如果應用程式依賴於一些非同步數據,那麼在開始渲染過程之前,需要先預取和解析好這些數據。
而且對於客戶端渲染,在掛載 (mount) 到客戶端應用程式之前,客戶端需要獲取到與伺服器端應用程式完全相同的數據。
為瞭解決以上問題,獲取的數據需要位於視圖組件之外,即放置在專門的數據預取存儲容器(data store)或"狀態容器(state container))"中。首先,在伺服器端,我們可以在渲染之前預取數據,並將數據填充到 store 中。此外,我們將在 HTML 中序列化(serialize)和內聯預置(inline)狀態。這樣,在掛載(mount)到客戶端應用程式之前,可以直接從 store 獲取到內聯預置(inline)狀態。
當編寫純客戶端 (client-only) 代碼時,我們習慣於每次在新的上下文中對代碼進行取值。但是,Node.js 伺服器是一個長期運行的進程。當我們的代碼進入該進程時,它將進行一次取值並留存在記憶體中。這意味著如果創建一個單例對象,它將在每個傳入的請求之間共用。
我們為每個請求創建一個新的根 Vue 實例。這與每個用戶在自己的瀏覽器中使用新應用程式的實例類似。如果我們在多個請求之間使用一個共用的實例,很容易導致交叉請求狀態污染 (cross-request state pollution)。
因此,我們不應該直接創建一個應用程式實例,而是應該暴露一個可以重覆執行的工廠函數,為每個請求創建新的應用程式實例。
entry-client.js
import { createApp } from '@/app'

const { app, router, store } = createApp()

if (window.__INITIAL_STATE__) {
  store.replaceState(window.__INITIAL_STATE__)
}

router.onReady(() => {
  // 添加路由鉤子函數,用於處理 asyncData.
  // 在初始路由 resolve 後執行,
  // 以便我們不會二次預取(double-fetch)已有的數據。
  // 使用 `router.beforeResolve()`,以便確保所有非同步組件都 resolve。
  router.beforeResolve((to, from, next) => {
    const matched = router.getMatchedComponents(to)
    const prevMatched = router.getMatchedComponents(from)

    // 我們只關心非預渲染的組件
    // 所以我們對比它們,找出兩個匹配列表的差異組件
    let diffed = false
    const activated = matched.filter((c, i) => {
      return diffed || (diffed = (prevMatched[i] !== c))
    })

    if (!activated.length) {
      return next()
    }

    // 這裡如果有載入指示器 (loading indicator),就觸發

    Promise.all(activated.map(c => {
      if (c.asyncData) {
        return c.asyncData({ store, route: to })
      }
    })).then(() => {

      // 停止載入指示器(loading indicator)

      next()
    }).catch(next)
  })

  app.$mount('#app')
})
當服務端渲染完畢後,Vue 在瀏覽器端接管由服務端發送的靜態 HTML,使其變為由 Vue 管理的動態 DOM (即:客戶端激活)。
entry-server.js
import { createApp } from '@/app'

const isDev = process.env.NODE_ENV !== 'production'

// This exported function will be called by `bundleRenderer`.
// This is where we perform data-prefetching to determine the
// state of our application before actually rendering it.
// Since data fetching is async, this function is expected to
// return a Promise that resolves to the app instance.
export default context => {
  return new Promise((resolve, reject) => {
    const s = isDev && Date.now()
    const { app, router, store } = createApp()

    const { url } = context

    const { fullPath } = router.resolve(url).route

    if (fullPath !== url) {
      return reject({ url: fullPath })
    }

    // set router's location
    router.push(url)
    console.log(router)


    // wait until router has resolved possible async hooks
    router.onReady(() => {
      const matchedComponents = router.getMatchedComponents()

      console.log(matchedComponents)
      // no matched routes
      if (!matchedComponents.length) {
        return reject({ code: 404 })
      }
      // Call fetchData hooks on components matched by the route.
      // A preFetch hook dispatches a store action and returns a Promise,
      // which is resolved when the action is complete and store state has been
      // updated.

      Promise.all(matchedComponents.map(({ asyncData }) => asyncData && asyncData({
        store,
        route: router.currentRoute
      }))).then(() => {
        isDev && console.log(`data pre-fetch: ${Date.now() - s}ms`)
        // After all preFetch hooks are resolved, our store is now
        // filled with the state needed to render the app.
        // Expose the state on the render context, and let the request handler
        // inline the state in the HTML response. This allows the client-side
        // store to pick-up the server-side state without having to duplicate
        // the initial data fetching on the client.
        context.state = store.state
        resolve(app)
      }).catch(reject)
    }, reject)
  })
}
可以通過路由獲得與 router.getMatchedComponents() 相匹配的組件,如果組件暴露出 asyncData,就調用這個方法。然後我們需要將解析完成的狀態,附加到渲染上下文(render context)中。
當使用 template 時,context.state 將作為 window.__INITIAL_STATE__ 狀態,自動嵌入到最終的 HTML 中。而在客戶端,在掛載到應用程式之前,store 就應該獲取到狀態。
server.js
const fs = require('fs')
const path = require('path')
const LRU = require('lru-cache')
const express = require('express')
const compression = require('compression')
const microcache = require('route-cache')
const resolve = file => path.resolve(__dirname, file)
const { createBundleRenderer } = require('vue-server-renderer')

const isProd = process.env.NODE_ENV === 'production'
const useMicroCache = process.env.MICRO_CACHE !== 'false'
const serverInfo =
  `express/${require('express/package.json').version} ` +
  `vue-server-renderer/${require('vue-server-renderer/package.json').version}`

const app = express()

function createRenderer (bundle, options) {
  // https://github.com/vuejs/vue/blob/dev/packages/vue-server-renderer/README.md#why-use-bundlerenderer
  return createBundleRenderer(bundle, Object.assign(options, {
    // for component caching
    cache: LRU({
      max: 1000,
      maxAge: 1000 * 60 * 15
    }),
    // this is only needed when vue-server-renderer is npm-linked
    basedir: resolve('./dist'),
    // recommended for performance
    runInNewContext: false
  }))
}

let renderer
let readyPromise
const templatePath = resolve('./public/index.template.html')
if (isProd) {
  // In production: create server renderer using template and built server bundle.
  // The server bundle is generated by vue-ssr-webpack-plugin.
  const template = fs.readFileSync(templatePath, 'utf-8')
  const bundle = require('./dist/vue-ssr-server-bundle.json')
  // The client manifests are optional, but it allows the renderer
  // to automatically infer preload/prefetch links and directly add <script>
  // tags for any async chunks used during render, avoiding waterfall requests.
  const clientManifest = require('./dist/vue-ssr-client-manifest.json')
  renderer = createRenderer(bundle, {
    template,
    clientManifest
  })
} else {
  // In development: setup the dev server with watch and hot-reload,
  // and create a new renderer on bundle / index template update.
  readyPromise = require('./build/setup-dev-server')(
    app,
    templatePath,
    (bundle, options) => {
      renderer = createRenderer(bundle, options)
    }
  )
}

const serve = (path, cache) => express.static(resolve(path), {
  maxAge: cache && isProd ? 1000 * 60 * 60 * 24 * 30 : 0
})

app.use(compression({ threshold: 0 }))
app.use('/dist', serve('./dist', true))
app.use('/public', serve('./public', true))
app.use('/manifest.json', serve('./manifest.json', true))
app.use('/service-worker.js', serve('./dist/service-worker.js'))

// since this app has no user-specific content, every page is micro-cacheable.
// if your app involves user-specific content, you need to implement custom
// logic to determine whether a request is cacheable based on its url and
// headers.
// 1-second microcache.
// https://www.nginx.com/blog/benefits-of-microcaching-nginx/
app.use(microcache.cacheSeconds(1, req => useMicroCache && req.originalUrl))

function render (req, res) {
  const s = Date.now()

  res.setHeader("Content-Type", "text/html")
  res.setHeader("Server", serverInfo)

  const handleError = err => {
    if (err.url) {
      res.redirect(err.url)
    } else if (err.code === 404) {
      res.status(404).send('404 | Page Not Found')
    } else {
      // Render Error Page or Redirect
      res.status(500).send('500 | Internal Server Error')
      console.error(`error during render : ${req.url}`)
      console.error(err.stack)
    }
  }

  const context = {
    title: 'Vue HN 2.0', // default title
    url: req.url
  }
  renderer.renderToString(context, (err, html) => {
    if (err) {
      return handleError(err)
    }
    res.send(html)
    if (!isProd) {
      console.log(`whole request: ${Date.now() - s}ms`)
    }
  })
}

app.get('*', isProd ? render : (req, res) => {
  readyPromise.then(() => render(req, res))
})

const port = process.env.PORT || 8888
app.listen(port, () => {
  console.log(`server started at localhost:${port}`)
})
通過 vue-server-renderer 將我們打包出來的 server bundle 渲染成 html 返迴響應。
伺服器代碼使用了一個 * 處理程式,它接受任意 URL。這允許我們將訪問的 URL 傳遞到我們的 Vue 應用程式中,然後對客戶端和伺服器復用相同的路由配置。
構建代碼
webpack.base.config.js
const path = require('path')
const webpack = require('webpack')
const ExtractTextPlugin = require('extract-text-webpack-plugin')
const FriendlyErrorsPlugin = require('friendly-errors-webpack-plugin')
const { VueLoaderPlugin } = require('vue-loader')

const isProd = process.env.NODE_ENV === 'production'

module.exports = {
  devtool: isProd
    ? false
    : '#cheap-module-source-map',
  output: {
    path: path.resolve(__dirname, '../dist'),
    publicPath: '/dist/',
    filename: '[name].[chunkhash].js'
  },
  mode: isProd ? 'production' : 'development',
  resolve: {
    alias: {
      'public': path.resolve(__dirname, '../public'),
      vue$: 'vue/dist/vue.esm.js',
      '@': path.resolve('src')
    },
    extensions: ['.js', '.vue', '.json']
  },
  module: {
    noParse: /es6-promise\.js$/, // avoid webpack shimming process
    rules: [
      {
        test: /\.vue$/,
        loader: 'vue-loader',
        options: {
          compilerOptions: {
            preserveWhitespace: false
          }
        }
      },
      {
        test: /\.js$/,
        loader: 'babel-loader',
        exclude: /node_modules/
      },
      {
        test: /\.(png|jpg|gif|svg)$/,
        loader: 'url-loader',
        options: {
          limit: 10000,
          name: '[name].[ext]?[hash]'
        }
      },
      {
        test: /\.styl(us)?$/,
        use: isProd
          ? ExtractTextPlugin.extract({
            use: [
              {
                loader: 'css-loader',
                options: { minimize: true }
              },
              'stylus-loader'
            ],
            fallback: 'vue-style-loader'
          })
          : ['vue-style-loader', 'css-loader', 'stylus-loader']
      },
    ]
  },
  performance: {
    hints: false
  },
  plugins: isProd
    ? [
      new VueLoaderPlugin(),
      // new webpack.optimize.UglifyJsPlugin({
      //   compress: { warnings: false }
      // }),
      new webpack.optimize.ModuleConcatenationPlugin(),
      new ExtractTextPlugin({
        filename: 'common.[chunkhash].css'
      })
    ]
    : [
      new VueLoaderPlugin(),
      new FriendlyErrorsPlugin()
    ]
}
基礎構建過程
webpack.client.config.js
const webpack = require('webpack')
const merge = require('webpack-merge')
const baseConfig = require('./webpack.base.config')
const VueSSRClientPlugin = require('vue-server-renderer/client-plugin')

module.exports = merge(baseConfig, {
  entry: {
    app: './src/entry-client.js'
  },
  plugins: [
    new webpack.DefinePlugin({
      'process.env.NODE_ENV': JSON.stringify(process.env.NODE_ENV || 'development'),
      'process.env.VUE_ENV': '"client"'
    }),
    // 重要信息:這將 webpack 運行時分離到一個引導 chunk 中,
    // 以便可以在之後正確註入非同步 chunk。
    // 這也為你的 應用程式/vendor 代碼提供了更好的緩存。
    // new webpack.optimize.CommonsChunkPlugin({
    //   name: "manifest",
    //   minChunks: Infinity
    // }),
    // 此插件在輸出目錄中
    // 生成 `vue-ssr-client-manifest.json`。
    new VueSSRClientPlugin()
  ],
  optimization: {
    // Automatically split vendor and commons
    splitChunks: {
      chunks: 'all',
      name: 'vendors'
    },
    // Keep the runtime chunk seperated to enable long term caching
    runtimeChunk: true
  }
})
配置 client bundle 的構建過程
webpack.server.config.js
const merge = require('webpack-merge')
const nodeExternals = require('webpack-node-externals')
const baseConfig = require('./webpack.base.config')
const VueSSRServerPlugin = require('vue-server-renderer/server-plugin')

module.exports = merge(baseConfig, {
  // 將 entry 指嚮應用程式的 server entry 文件
  entry: './src/entry-server.js',

  // 這允許 webpack 以 Node 適用方式(Node-appropriate fashion)處理動態導入(dynamic import),
  // 並且還會在編譯 Vue 組件時,
  // 告知 `vue-loader` 輸送面向伺服器代碼(server-oriented code)。
  target: 'node',

  // 對 bundle renderer 提供 source map 支持
  devtool: 'source-map',

  // 此處告知 server bundle 使用 Node 風格導出模塊(Node-style exports)
  output: {
    libraryTarget: 'commonjs2'
  },

  // https://webpack.js.org/configuration/externals/#function
  // https://github.com/liady/webpack-node-externals
  // 外置化應用程式依賴模塊。可以使伺服器構建速度更快,
  // 並生成較小的 bundle 文件。
  externals: nodeExternals({
    // 不要外置化 webpack 需要處理的依賴模塊。
    // 你可以在這裡添加更多的文件類型。例如,未處理 *.vue 原始文件,
    // 你還應該將修改 `global`(例如 polyfill)的依賴模塊列入白名單
    whitelist: /\.css$/
  }),

  // 這是將伺服器的整個輸出
  // 構建為單個 JSON 文件的插件。
  // 預設文件名為 `vue-ssr-server-bundle.json`
  plugins: [
    new VueSSRServerPlugin()
  ]
})
配置 server bundle 的構建過程
setup-dev-server.js
const fs = require('fs')
const path = require('path')
const MFS = require('memory-fs')
const webpack = require('webpack')
const chokidar = require('chokidar')
const clientConfig = require('./webpack.client.config')
const serverConfig = require('./webpack.server.config')

const readFile = (fs, file) => {
  try {
    return fs.readFileSync(path.join(clientConfig.output.path, file), 'utf-8')
  } catch (e) { }
}

module.exports = function setupDevServer (app, templatePath, cb) {
  let bundle
  let template
  let clientManifest

  let ready
  const readyPromise = new Promise(r => { ready = r })
  const update = () => {
    if (bundle && clientManifest) {
      ready()
      cb(bundle, {
        template,
        clientManifest
      })
    }
  }

  // read template from disk and watch
  template = fs.readFileSync(templatePath, 'utf-8')
  chokidar.watch(templatePath).on('change', () => {
    template = fs.readFileSync(templatePath, 'utf-8')
    console.log('index.html template updated.')
    update()
  })

  // modify client config to work with hot middleware
  clientConfig.entry.app = ['webpack-hot-middleware/client', clientConfig.entry.app]
  clientConfig.output.filename = '[name].js'
  clientConfig.plugins.push(
    new webpack.HotModuleReplacementPlugin(),
    new webpack.NoEmitOnErrorsPlugin()
  )

  // dev middleware
  const clientCompiler = webpack(clientConfig)
  const devMiddleware = require('webpack-dev-middleware')(clientCompiler, {
    publicPath: clientConfig.output.publicPath,
    noInfo: true
  })
  app.use(devMiddleware)
  clientCompiler.plugin('done', stats => {
    stats = stats.toJson()
    stats.errors.forEach(err => console.error(err))
    stats.warnings.forEach(err => console.warn(err))
    if (stats.errors.length) return
    clientManifest = JSON.parse(readFile(
      devMiddleware.fileSystem,
      'vue-ssr-client-manifest.json'
    ))
    update()
  })

  // hot middleware
  app.use(require('webpack-hot-middleware')(clientCompiler, { heartbeat: 5000 }))

  // watch and update server renderer
  const serverCompiler = webpack(serverConfig)
  const mfs = new MFS()
  serverCompiler.outputFileSystem = mfs
  serverCompiler.watch({}, (err, stats) => {
    if (err) throw err
    stats = stats.toJson()
    if (stats.errors.length) return

    // read bundle generated by vue-ssr-webpack-plugin
    bundle = JSON.parse(readFile(mfs, 'vue-ssr-server-bundle.json'))
    update()
  })

  return readyPromise
}
用於 dev 狀態下 熱更新
到此,基本上上vue ssr的基本結構以瞭解完畢。但是還是有很多可以做的事情,比如類似於 nuxt 的根據文件目錄動態生成 route 等等
後續讓我們繼續探究...
完整代碼可以查看 https://github.com/jinghaoo/vuessr-template


