
版權聲明:本文為HaiyuKing原創文章,轉載請註明出處! 前言 這個Demo只是記錄小米推送的集成,不能運行。 使用步驟 一、項目組織結構圖 註意事項: 1、 導入類文件後需要change包名以及重新import R文件路徑 2、 Values目錄下的文件(strings.xml、dimens. ...
版權聲明:本文為HaiyuKing原創文章,轉載請註明出處!
前言
這個Demo只是記錄小米推送的集成,不能運行。
使用步驟
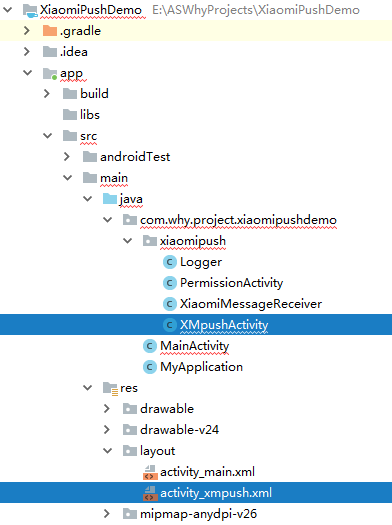
一、項目組織結構圖

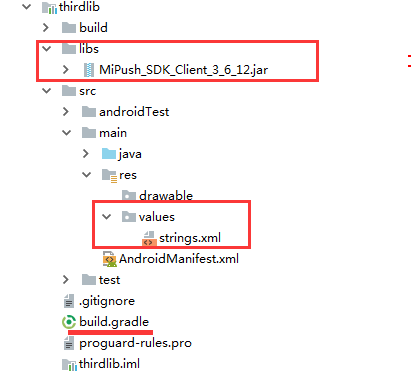
註意事項:
1、 導入類文件後需要change包名以及重新import R文件路徑
2、 Values目錄下的文件(strings.xml、dimens.xml、colors.xml等),如果項目中存在,則複製裡面的內容,不要整個覆蓋
二、導入步驟
2.1、接入準備
參考官網《小米推送服務啟用指南》
註冊小米開發者賬號——》啟用推送
2.2、下載SDK
下載地址:http://admin.xmpush.xiaomi.com/mipush/downpage/
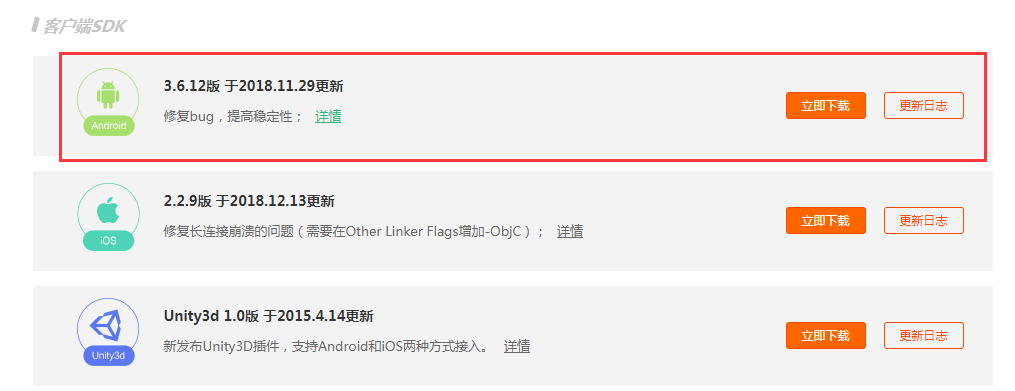
下載後的壓縮包解壓後的目錄:

2.3、集成SDK
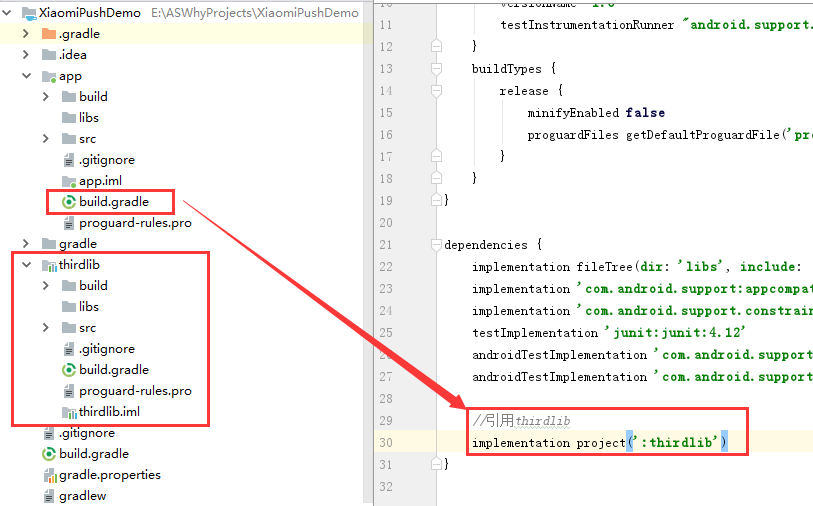
為了便於管理,我在Demo中新建了一個ThirdLib的module,用於集成SDK。
(1)新建ThirdLib的module,併在app的build.gradle中引用
//引用thirdlib
implementation project(':thirdlib')
(2)在ThirdLib這個module中集成SDK
複製MiPush_SDK_Client_x_x_x.jar到工程 libs/ 目錄下;
因為是在thirdlib這個module中集成jar包,所以還需要在thirdlib這個module的build.gradle文件中引用libs目錄下的jar包。
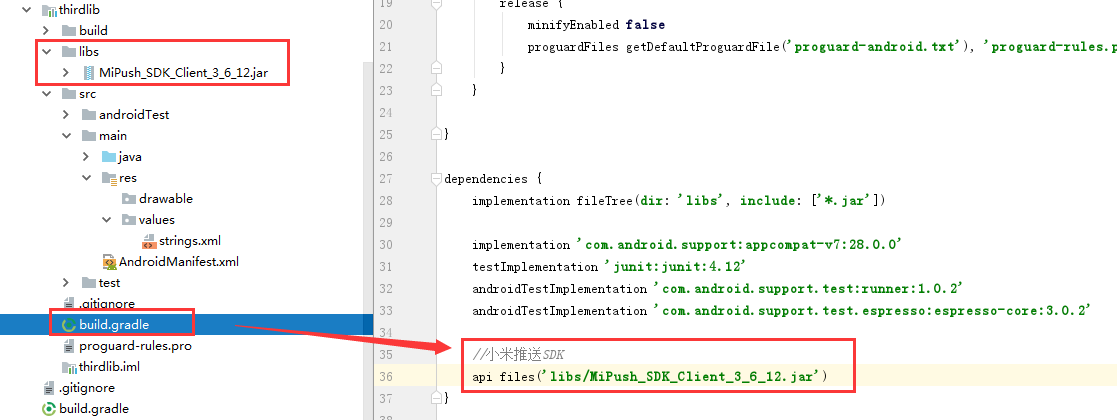
    //小米推送SDK
    api files('libs/MiPush_SDK_Client_3_6_12.jar')
(3)在ThirdLib這個module的res/strings.xml文件中添加以下代碼(用於自定義的XiaomiMessageReceiver中調用)
<resources>
    <string name="app_name">ThirdLib</string>

    <!--=====================================小米推送SDK=====================================-->
    <string name="recv_passthrough_message"> Receive a passthrough message. Content is \"%1$s\"</string>
    <string name="click_notification_message"> Clicked a notification message. Content is \"%1$s\"</string>
    <string name="arrive_notification_message"> Arrived a notification message. Content is \"%1$s\"</string>
    <string name="register_success">Register push success.</string>
    <string name="register_fail">Register push fail.</string>
    <string name="set_alias_success"> Set alias \"%1$s\" success.</string>
    <string name="set_alias_fail"> Set alias fail for %1$s.</string>
    <string name="unset_alias_success"> Unset alias \"%1$s\" success.</string>
    <string name="unset_alias_fail"> Unset alias fail for %1$s.</string>
    <string name="set_account_success"> Set account \"%1$s\" success.</string>
    <string name="set_account_fail"> Set account fail for %1$s.</string>
    <string name="unset_account_success"> Unset account \"%1$s\" success.</string>
    <string name="unset_account_fail"> Unset account fail for %1$s.</string>
    <string name="subscribe_topic_success"> Subscribe topic \"%1$s\" success.</string>
    <string name="subscribe_topic_fail"> Subscribe topic fail for %1$s.</string>
    <string name="unsubscribe_topic_success"> Unsubscribe topic \"%1$s\" success.</string>
    <string name="unsubscribe_topic_fail"> Unsubscribe topic fail for %1$s.</string>
    <string name="set_accept_time_success"> Set accept time %1$s - %2$s success.</string>
    <string name="set_accept_time_fail"> Set accept time fail for %1$s.</string>
</resources>
(4)配置 AndroidManifest.xml【註意是app這個module中的,不是thirdlib這個module中的】
註意下麵標記橙色代碼:
<?xml version="1.0" encoding="utf-8"?>
<manifest xmlns:android="http://schemas.android.com/apk/res/android"
          package="com.why.project.xiaomipushdemo">

    <!-- ======================小米推送SDK====================== -->
    <uses-permission android:name="android.permission.WRITE_EXTERNAL_STORAGE" />
    <uses-permission android:name="android.permission.INTERNET" />
    <uses-permission android:name="android.permission.ACCESS_NETWORK_STATE" />
    <uses-permission android:name="android.permission.ACCESS_WIFI_STATE" />
    <uses-permission android:name="android.permission.READ_PHONE_STATE" />
    <uses-permission android:name="android.permission.GET_TASKS" />
    <!-- the following 2 com.xiaomi.mipushdemo should be changed to your package name -->
    <permission
        android:name="${applicationId}.permission.MIPUSH_RECEIVE"
        android:protectionLevel="signature" />

    <uses-permission android:name="${applicationId}.permission.MIPUSH_RECEIVE" />
    <uses-permission android:name="android.permission.VIBRATE" />

    <application
        android:allowBackup="true"
        android:icon="@mipmap/ic_launcher"
        android:label="@string/app_name"
        android:roundIcon="@mipmap/ic_launcher_round"
        android:supportsRtl="true"
        android:theme="@style/AppTheme">
        <activity android:name=".MainActivity">
            <intent-filter>
                <action android:name="android.intent.action.MAIN"/>

                <category android:name="android.intent.category.LAUNCHER"/>
            </intent-filter>
        </activity>

        <!-- ======================小米推送SDK========================== -->
        <service
            android:name="com.xiaomi.push.service.XMJobService"
            android:enabled="true"
            android:exported="false"
            android:permission="android.permission.BIND_JOB_SERVICE"
            android:process=":pushservice" />

        <service
            android:name="com.xiaomi.push.service.XMPushService"
            android:enabled="true"
            android:process=":pushservice" />

        <service
            android:name="com.xiaomi.mipush.sdk.PushMessageHandler"
            android:enabled="true"
            android:exported="true" />
        <service
            android:name="com.xiaomi.mipush.sdk.MessageHandleService"
            android:enabled="true" />
        <!--自定義一個BroadcastReceiver類:為了接收消息-->
        <receiver
            android:name="com.why.project.xiaomipushdemo.xiaomipush.XiaomiMessageReceiver"
            android:exported="true">
            <intent-filter>
                <action android:name="com.xiaomi.mipush.RECEIVE_MESSAGE" />
            </intent-filter>
            <intent-filter>
                <action android:name="com.xiaomi.mipush.MESSAGE_ARRIVED" />
            </intent-filter>
            <intent-filter>
                <action android:name="com.xiaomi.mipush.ERROR" />
            </intent-filter>
        </receiver>
        <receiver
            android:name="com.xiaomi.push.service.receivers.NetworkStatusReceiver"
            android:exported="true">
            <intent-filter>
                <action android:name="android.net.conn.CONNECTIVITY_CHANGE" />

                <category android:name="android.intent.category.DEFAULT" />
            </intent-filter>
        </receiver>
        <receiver
            android:name="com.xiaomi.push.service.receivers.PingReceiver"
            android:exported="false"
            android:process=":pushservice">
            <intent-filter>
                <action android:name="com.xiaomi.push.PING_TIMER" />
            </intent-filter>
        </receiver>
    </application>

</manifest>
(5)在項目中添加xiaomipush包中的文件

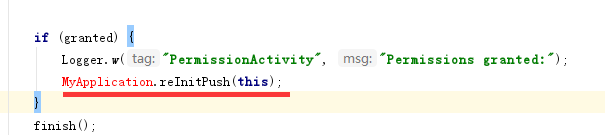
1、PermissionActivity中需要用到自定義MyApplication中的代碼,下一步中會增加,這裡報錯不用管;
2、XiaomiMessageReceiver中使用的到字元串資源在thirdLib中的res/strings.xml文件中定義了;
3、XiaomiMessageReceiver主要通知、消息的回調

(6)初始化SDK
在MyApplication中執行
package com.why.project.xiaomipushdemo;

import android.app.ActivityManager;
import android.app.Application;
import android.content.Context;
import android.os.Process;
import com.xiaomi.mipush.sdk.MiPushClient;

import java.util.List;

/**
 * Created by HaiyuKing
 * Used
 */
public class MyApplication extends Application {

    /*=================小米推送SDK=====================*/
    // user your appid the key.
    private static final String APP_ID = "28823037343464645735";
    // user your appid the key.
    private static final String APP_KEY = "56545654754865";

    @Override
    public void onCreate() {
        super.onCreate();

        initXiaoMiPush();
    }

    //小米推送SDK
    private void initXiaoMiPush(){
        // 註冊push服務,註冊成功後會向DemoMessageReceiver發送廣播
        // 可以從DemoMessageReceiver的onCommandResult方法中MiPushCommandMessage對象參數中獲取註冊信息
        if (shouldInit()) {
            MiPushClient.registerPush(this, APP_ID, APP_KEY);
        }
    }
    //小米推送SDK【用於PermissionActivity中調用】
    public static void reInitPush(Context ctx) {
        MiPushClient.registerPush(ctx.getApplicationContext(), APP_ID, APP_KEY);
    }
    //小米推送SDK相關
    private boolean shouldInit() {
        ActivityManager am = ((ActivityManager) getSystemService(Context.ACTIVITY_SERVICE));
        List<ActivityManager.RunningAppProcessInfo> processInfos = am.getRunningAppProcesses();
        String mainProcessName = getPackageName();
        int myPid = Process.myPid();
        for (ActivityManager.RunningAppProcessInfo info : processInfos) {
            if (info.pid == myPid && mainProcessName.equals(info.processName)) {
                return true;
            }
        }
        return false;
    }
}
三、使用方法(僅供參考)
package com.why.project.xiaomipushdemo;

import android.os.Bundle;
import android.support.v7.app.AppCompatActivity;
import android.text.TextUtils;

import com.xiaomi.mipush.sdk.MiPushClient;

public class MainActivity extends AppCompatActivity {

    @Override
    protected void onCreate(Bundle savedInstanceState) {
        super.onCreate(savedInstanceState);
        setContentView(R.layout.activity_main);

        /*=======================================小米推送SDK相關=============================================*/
        updateJpushDeviceId();
    }

    /*=======================================小米推送SDK相關=============================================*/
    /**更新設備id介面*/
    private void updateJpushDeviceId(){
        //====小米推送SDK相關====
        String regId = MiPushClient.getRegId(MyApplication.getAppContext());
        requestDeviceId(regId);//判斷是請求介面還是彈出對話框
    }

    //請求介面存儲設備id或者token的方法
    private void requestDeviceId(String regId) {

        //首要條件是設備id值或者token值不為空,否則下麵的判斷沒有意義了
        //如果沒有設置過別名,或者則需要設置別名
        //如果伺服器上的deviceID值是空值,表明當前用戶還沒有綁定任何設備,則直接請求介面,不需要彈出對話框;
        //如果伺服器上的deviceID值不為空,並且客戶端獲取的設備id值和伺服器上的deviceID值相同,則不需要彈出對話框,直接請求介面(這個是卸載重新安裝的情況)
        //如果伺服器上的deviceid值不為空,並且客戶端獲取的設備id值和伺服器上的deviceID值不同,則需要彈出對話框(這個是換設備的情況)
        if (!TextUtils.isEmpty(regId)) {
            //如果已經設置過別名(存儲過了設備id值)了,但是當前的別名(設備id值)和伺服器上的不一致,則需要重新設置別名(存儲設備id值)(這個是其他設備上登錄的情況)
        }

        //====小米推送SDK相關====
        //貌似需要每一次都要設置別名
        setAlias(PreferencesUtils.getString(mContext,Globals.USERNAME_KEY));
    }

    // 這是來自 JPush Example 的設置別名的 Activity 里的代碼。一般 App 的設置的調用入口,在任何方便的地方調用都可以。
    private void setAlias(String alias) {
        if (TextUtils.isEmpty(alias)) {
            ToastUtil.showShortToast(getResources().getString(R.string.error_alias_empty));//alias別名不能為空
            return;
        }
        if (!ExampleUtil.isValidTagAndAlias(alias)) {
            ToastUtil.showShortToast(getResources().getString(R.string.error_tag_gs_empty));//格式不對
            return;
        }
        //====小米推送SDK相關====
        MiPushClient.setAlias(MyApplication.getAppContext(), alias, null);
    }
}
四、發送消息


五、實現多個通知在通知欄中並存
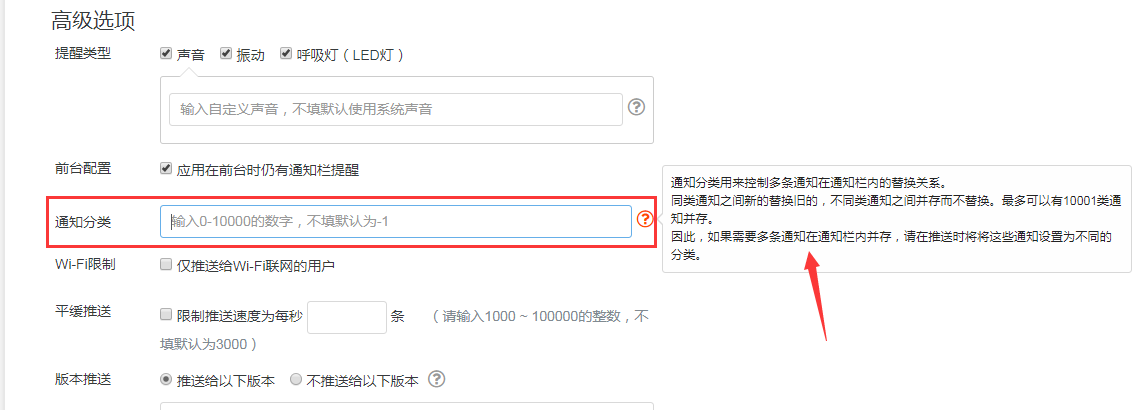
六、實現打開應用內指定頁面的效果
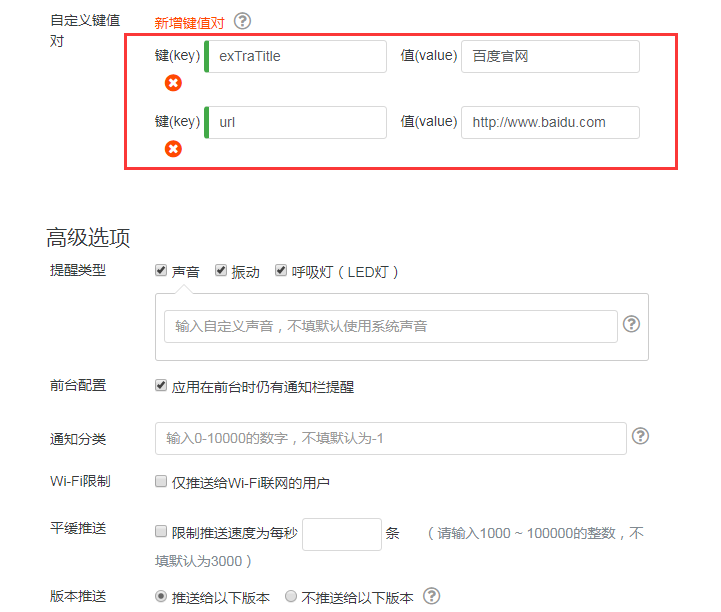
一般由應用客戶端自定義即可,但是有可能會想要實現打開應用內指定頁面。對應的網頁上的設置:

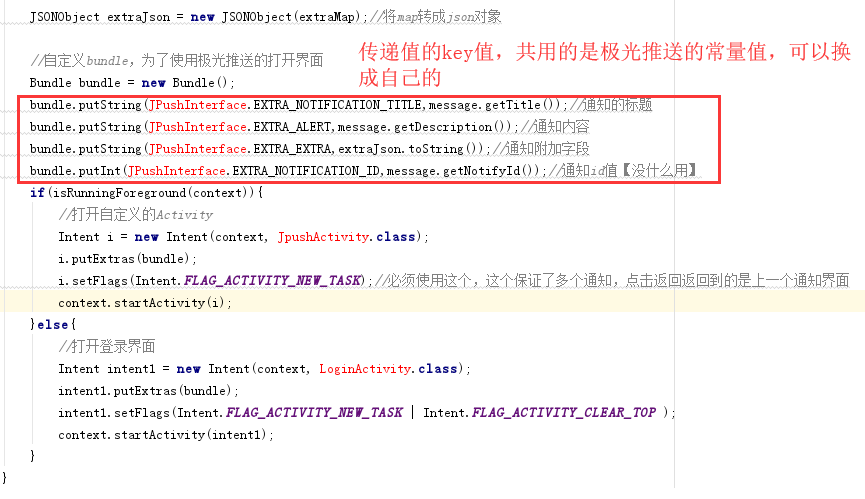
6.1、添加XMPushActivity【一個透明界面,主要用於獲取數據,封裝數據,傳輸數據】


package com.why.project.xiaomipushdemo.xiaomipush;

import android.app.Activity;
import android.content.Context;
import android.content.Intent;
import android.os.Bundle;

import com.why.project.xiaomipushdemo.R;
import com.xiaomi.mipush.sdk.MiPushMessage;
import com.xiaomi.mipush.sdk.PushMessageHelper;

import org.json.JSONObject;

import cn.jpush.android.api.JPushInterface;

/**
 * Created by HaiyuKing
 * Used 小米推送【打開應用內指定頁面】【暫時用不到】
 */
public class XMpushActivity extends Activity {
    private static final String TAG = XMpushActivity.class.getSimpleName();

    private Context mContext;

    @Override
    protected void onCreate(Bundle savedInstanceState) {
        super.onCreate(savedInstanceState);
        setContentView(R.layout.activity_xmpush);

        mContext = this;

        //獲取自定義動作的值
        Intent intent = getIntent();
        String intentUri = intent.toUri(Intent.URI_INTENT_SCHEME);
        LogUtil.e(TAG,"action是:" + intentUri);
        //intent:#Intent;launchFlags=0x10000000;package=com.why.project.xiaomipushdemo;component=com.why.project.xiaomipushdemo/.xiaomipush.XMpushActivity;S.messageId=sdm04994545992668152zH;i.eventMessageType=1000;end

        /*獲取自定義鍵值對的值*/
        MiPushMessage msgContent = (MiPushMessage) intent.getSerializableExtra(PushMessageHelper.KEY_MESSAGE);

        //關閉當前界面,跳轉到指定的界面
        try {
            String title = msgContent.getTitle();
            String content = msgContent.getContent();

            JSONObject extraJson = new JSONObject(msgContent.getExtra());//將map轉成json對象

            Bundle bundle = new Bundle();
            bundle.putString(JPushInterface.EXTRA_NOTIFICATION_TITLE,title);//通知的標題
            bundle.putString(JPushInterface.EXTRA_ALERT,content);//通知內容
            bundle.putString(JPushInterface.EXTRA_EXTRA,extraJson.toString());//通知附加欄位
            bundle.putInt(JPushInterface.EXTRA_NOTIFICATION_ID,msgContent.getNotifyId());//通知id值【沒什麼用】

            Intent i = new Intent(mContext, JpushActivity.class);
            i.putExtras(bundle);
            i.setFlags(Intent.FLAG_ACTIVITY_NEW_TASK);//必須使用這個,這個保證了多個通知,點擊返回返回到的是上一個通知界面
            mContext.startActivity(i);
            finish();

        } catch (Exception e){
            e.printStackTrace();
        }

    }
}
XMpushActivity.java
<?xml version="1.0" encoding="utf-8"?>
<!-- ======================小米推送SDK====================== -->
<android.support.constraint.ConstraintLayout
    xmlns:android="http://schemas.android.com/apk/res/android"
    android:layout_width="match_parent"
    android:layout_height="match_parent">

</android.support.constraint.ConstraintLayout>
activity_xmpush.xml
6.2、在AndroidManifest.xml中添加以下代碼
<?xml version="1.0" encoding="utf-8"?>
<manifest xmlns:android="http://schemas.android.com/apk/res/android"
          package="com.why.project.xiaomipushdemo">

    <!-- ======================小米推送SDK====================== -->
    <uses-permission android:name="android.permission.WRITE_EXTERNAL_STORAGE" />
    <uses-permission android:name="android.permission.INTERNET" />
    <uses-permission android:name="android.permission.ACCESS_NETWORK_STATE" />
    <uses-permission android:name="android.permission.ACCESS_WIFI_STATE" />
    <uses-permission android:name="android.permission.READ_PHONE_STATE" />
    <uses-permission android:name="android.permission.GET_TASKS" />
    <!-- the following 2 com.xiaomi.mipushdemo should be changed to your package name -->
    <permission
        android:name="${applicationId}.permission.MIPUSH_RECEIVE"
        android:protectionLevel="signature" />

    <uses-permission android:name="${applicationId}.permission.MIPUSH_RECEIVE" />
    <uses-permission android:name="android.permission.VIBRATE" />

    <application
        android:name=".MyApplication"
        android:allowBackup="true"
        android:icon="@mipmap/ic_launcher"
        android:label="@string/app_name"
        android:roundIcon="@mipmap/ic_launcher_round"
        android:supportsRtl="true"
        android:theme="@style/AppTheme">
        <activity android:name=".MainActivity">
            <intent-filter>
                <action android:name="android.intent.action.MAIN"/>

                <category android:name="android.intent.category.LAUNCHER"/>
            </intent-filter>
        </activity>

        <!-- ======================小米推送SDK========================== -->
        <service
            android:name="com.xiaomi.push.service.XMJobService"
            android:enabled="true"
            android:exported="false"
            android:permission="android.permission.BIND_JOB_SERVICE"
            android:process=":pushservice" />

        <service
            android:name="com.xiaomi.push.service.XMPushService"
            android:enabled="true"
            android:process=":pushservice" />

        <service
            android:name="com.xiaomi.mipush.sdk.PushMessageHandler"
            android:enabled="true"
            android:exported="true" />
        <service
            android:name="com.xiaomi.mipush.sdk.MessageHandleService"
            android:enabled="true" />
        <!--自定義一個BroadcastReceiver類:為了接收消息-->
        <receiver
            android:name="com.why.project.xiaomipushdemo.xiaomipush.XiaomiMessageReceiver"
            android:exported="true">
            <intent-filter>
                <action android:name="com.xiaomi.mipush.RECEIVE_MESSAGE" />
            </intent-filter>
            <intent-filter>
                <action android:name="com.xiaomi.mipush.MESSAGE_ARRIVED" />
            </intent-filter>
            <intent-filter>
                <action android:name="com.xiaomi.mipush.ERROR" />
            </intent-filter>
        </receiver>
        <receiver
            android:name="com.xiaomi.push.service.receivers.NetworkStatusReceiver"
            android:exported="true">
            <intent-filter>
                <action android:name="android.net.conn.CONNECTIVITY_CHANGE" />

                <category android:name="android.intent.category.DEFAULT" />
            </intent-filter>
        </receiver>
        <receiver
            android:name="com.xiaomi.push.service.receivers.PingReceiver"
            android:exported="false"
            android:process=":pushservice">
            <intent-filter>
                <action android:name="com.xiaomi.push.PING_TIMER" />
            </intent-filter>
        </receiver>
        <!--小米推送【打開應用內指定頁面】【暫時用不到】-->
        <!--intent:#Intent;component=com.why.project.xiaomipushdemo/.xiaomipush.XMpushActivity;end-->
        <activity
            android:name="com.why.project.xiaomipushdemo.xiaomipush.XMpushActivity"
            android:theme="@android:style/Theme.Translucent">
        </activity>
    </application>

</manifest>
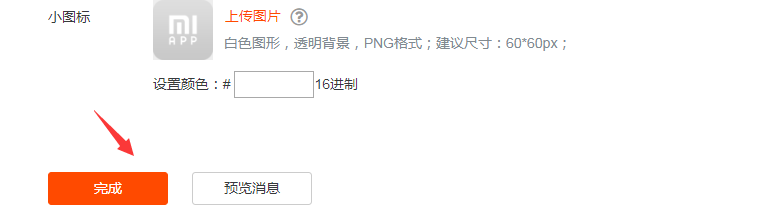
6.3、網頁發送消息(關鍵部分)
intent:#Intent;component=com.why.project.xiaomipushdemo/.xiaomipush.XMpushActivity;end

混淆配置
橙色標記的需要換成實際的路徑:
#=====================小米推送SDK=====================
#這裡com.xiaomi.mipushdemo.DemoMessageRreceiver改成app中定義的完整類名
-keep class com.why.project.xiaomipushdemo.xiaomipush.XiaomiMessageReceiver {*;}
#可以防止一個誤報的 warning 導致無法成功編譯,如果編譯使用的 Android 版本是 23。
-dontwarn com.xiaomi.push.**
參考資料
暫時空缺
項目demo下載地址
鏈接:https://pan.baidu.com/s/1ClztXBTHIgVgY0vzWwnnFQ 提取碼:gne6

