CentOS的配置: 1.給CentOS安裝Zookeeper: 網路配置成僅主機 上傳tar.gz:比如用FTP tar -xvzf ... cd zookeeper mkdir data cd conf mv zoo_sample.cfg zoo.cfg vi zoo.cfg 修改這一行: da ...
CentOS的配置:
1.給CentOS安裝Zookeeper:
網路配置成僅主機
上傳tar.gz:比如用FTP
tar -xvzf ...
cd zookeeper
mkdir data
cd conf
mv zoo_sample.cfg zoo.cfg
vi zoo.cfg
修改這一行:
dataDir=/soft/zookeeper-3.4.6/data
然後就可以運行了:
cd bin
./zkServer.sh start
下麵做一個最基本的Demo,返回一個固定的名稱即可:
服務提供方:
Maven新建項目:

搭建一個基本的Maven架構:
目錄結構:

pom.xml:

<project xmlns="http://maven.apache.org/POM/4.0.0" xmlns:xsi="http://www.w3.org/2001/XMLSchema-instance"
    xsi:schemaLocation="http://maven.apache.org/POM/4.0.0 http://maven.apache.org/xsd/maven-4.0.0.xsd">
    <modelVersion>4.0.0</modelVersion>
    <groupId>org.dreamtech.demo</groupId>
    <artifactId>dubboxdemo-service</artifactId>
    <version>0.0.1-SNAPSHOT</version>
    <packaging>war</packaging>
    <properties>
        <spring.version>4.2.4.RELEASE</spring.version>
    </properties>

    <dependencies>
        <!-- Spring -->
        <dependency>
            <groupId>org.springframework</groupId>
            <artifactId>spring-context</artifactId>
            <version>${spring.version}</version>
        </dependency>
        <dependency>
            <groupId>org.springframework</groupId>
            <artifactId>spring-beans</artifactId>
            <version>${spring.version}</version>
        </dependency>
        <dependency>
            <groupId>org.springframework</groupId>
            <artifactId>spring-webmvc</artifactId>
            <version>${spring.version}</version>
        </dependency>
        <dependency>
            <groupId>org.springframework</groupId>
            <artifactId>spring-jdbc</artifactId>
            <version>${spring.version}</version>
        </dependency>
        <dependency>
            <groupId>org.springframework</groupId>
            <artifactId>spring-aspects</artifactId>
            <version>${spring.version}</version>
        </dependency>
        <dependency>
            <groupId>org.springframework</groupId>
            <artifactId>spring-jms</artifactId>
            <version>${spring.version}</version>
        </dependency>
        <dependency>
            <groupId>org.springframework</groupId>
            <artifactId>spring-context-support</artifactId>
            <version>${spring.version}</version>
        </dependency>

        <!-- dubbo相關 -->
        <dependency>
            <groupId>com.alibaba</groupId>
            <artifactId>dubbo</artifactId>
            <version>2.8.4</version>
        </dependency>
        <dependency>
            <groupId>org.apache.zookeeper</groupId>
            <artifactId>zookeeper</artifactId>
            <version>3.4.6</version>
        </dependency>
        <dependency>
            <groupId>com.github.sgroschupf</groupId>
            <artifactId>zkclient</artifactId>
            <version>0.1</version>
        </dependency>

        <dependency>
            <groupId>javassist</groupId>
            <artifactId>javassist</artifactId>
            <version>3.11.0.GA</version>
        </dependency>

    </dependencies>
    <build>
        <plugins>
            <plugin>
                <groupId>org.apache.maven.plugins</groupId>
                <artifactId>maven-compiler-plugin</artifactId>
                <version>2.3.2</version>
                <configuration>
                    <source>1.7</source>
                    <target>1.7</target>
                </configuration>
            </plugin>
            <plugin>
                <groupId>org.apache.tomcat.maven</groupId>
                <artifactId>tomcat7-maven-plugin</artifactId>
                <configuration>
                    <!-- 指定埠 -->
                    <port>8081</port>
                    <!-- 請求路徑 -->
                    <path>/</path>
                </configuration>
            </plugin>
        </plugins>
    </build>
</project>
View Code
新建web-inf目錄然後加入web.xml:
<?xml version="1.0" encoding="UTF-8"?>
<web-app xmlns:xsi="http://www.w3.org/2001/XMLSchema-instance"
    xmlns="http://java.sun.com/xml/ns/javaee"
    xsi:schemaLocation="http://java.sun.com/xml/ns/javaee http://java.sun.com/xml/ns/javaee/web-app_2_5.xsd"
    version="2.5">
    <!-- 載入spring容器 -->
    <context-param>
        <param-name>contextConfigLocation</param-name>
        <param-value>classpath:applicationContext*.xml</param-value>
    </context-param>
    <listener>
        <listener-class>org.springframework.web.context.ContextLoaderListener</listener-class>
    </listener>
</web-app>
然後Spring配置文件applicationxxx.xml,先寫一個空架子:
<?xml version="1.0" encoding="UTF-8"?>
<beans xmlns="http://www.springframework.org/schema/beans"
    xmlns:xsi="http://www.w3.org/2001/XMLSchema-instance" xmlns:p="http://www.springframework.org/schema/p"
    xmlns:context="http://www.springframework.org/schema/context"
    xmlns:dubbo="http://code.alibabatech.com/schema/dubbo" xmlns:mvc="http://www.springframework.org/schema/mvc"
    xsi:schemaLocation="http://www.springframework.org/schema/beans http://www.springframework.org/schema/beans/spring-beans.xsd
        http://www.springframework.org/schema/mvc http://www.springframework.org/schema/mvc/spring-mvc.xsd
        http://code.alibabatech.com/schema/dubbo http://code.alibabatech.com/schema/dubbo/dubbo.xsd
        http://www.springframework.org/schema/context http://www.springframework.org/schema/context/spring-context.xsd">
</beans>
正式開始寫個Demo:
package org.dreamtech.demo.service;

public interface UserService {
    public String getName();
}
package org.dreamtech.demo.service.impl;

import org.dreamtech.demo.service.UserService;

import com.alibaba.dubbo.config.annotation.Service;

@Service
public class UserServiceImpl implements UserService {

    @Override
    public String getName() {
        return "dreamtech";
    }

}
修改配置文件:zookeeper配為CentOS的IP
<?xml version="1.0" encoding="UTF-8"?>
<beans xmlns="http://www.springframework.org/schema/beans"
    xmlns:xsi="http://www.w3.org/2001/XMLSchema-instance" xmlns:p="http://www.springframework.org/schema/p"
    xmlns:context="http://www.springframework.org/schema/context"
    xmlns:dubbo="http://code.alibabatech.com/schema/dubbo" xmlns:mvc="http://www.springframework.org/schema/mvc"
    xsi:schemaLocation="http://www.springframework.org/schema/beans http://www.springframework.org/schema/beans/spring-beans.xsd
        http://www.springframework.org/schema/mvc http://www.springframework.org/schema/mvc/spring-mvc.xsd
        http://code.alibabatech.com/schema/dubbo http://code.alibabatech.com/schema/dubbo/dubbo.xsd
        http://www.springframework.org/schema/context http://www.springframework.org/schema/context/spring-context.xsd">
<dubbo:application name="dubboxdemo-service"/>
<dubbo:registry address="zookeeper://192.168.25.100:2181"/>
<dubbo:annotation package="org.dreamtech.demo.service.impl"/>
</beans>
運行:Maven Build

運行之後,需要再配置服務消費方
和上邊一樣的新建方式,不過取名為dubboxdemo-web
pom.xml文件有一個地方不一致,需要註意:
            <plugin>
                <groupId>org.apache.tomcat.maven</groupId>
                <artifactId>tomcat7-maven-plugin</artifactId>
                <configuration>
                    <!-- 指定埠 -->
                    <port>8082</port>
                    <!-- 請求路徑 -->
                    <path>/</path>
                </configuration>
            </plugin>
web.xml配置就不一樣了,需要SpringMVC的東西:

<?xml version="1.0" encoding="UTF-8"?>
<web-app xmlns:xsi="http://www.w3.org/2001/XMLSchema-instance"
    xmlns="http://java.sun.com/xml/ns/javaee"
    xsi:schemaLocation="http://java.sun.com/xml/ns/javaee http://java.sun.com/xml/ns/javaee/web-app_2_5.xsd"
    version="2.5">
    <!-- 解決post亂碼 -->
    <filter>
        <filter-name>CharacterEncodingFilter</filter-name>
        <filter-class>org.springframework.web.filter.CharacterEncodingFilter</filter-class>
        <init-param>
            <param-name>encoding</param-name>
            <param-value>utf-8</param-value>
        </init-param>
        <init-param>
            <param-name>forceEncoding</param-name>
            <param-value>true</param-value>
        </init-param>
    </filter>
    <filter-mapping>
        <filter-name>CharacterEncodingFilter</filter-name>
        <url-pattern>/*</url-pattern>
    </filter-mapping>

    <servlet>
        <servlet-name>springmvc</servlet-name>
        <servlet-class>org.springframework.web.servlet.DispatcherServlet</servlet-class>
        <!-- 指定載入的配置文件 ,通過參數contextConfigLocation載入 -->
        <init-param>
            <param-name>contextConfigLocation</param-name>
            <param-value>classpath:springmvc.xml</param-value>
        </init-param>
    </servlet>

    <servlet-mapping>
        <servlet-name>springmvc</servlet-name>
        <url-pattern>*.do</url-pattern>
    </servlet-mapping>
</web-app>
View Code
然後就是在src/main/resources中寫入SpringMVC的配置文件:
<?xml version="1.0" encoding="UTF-8"?>
<beans xmlns="http://www.springframework.org/schema/beans"
    xmlns:xsi="http://www.w3.org/2001/XMLSchema-instance" xmlns:p="http://www.springframework.org/schema/p"
    xmlns:context="http://www.springframework.org/schema/context"
    xmlns:dubbo="http://code.alibabatech.com/schema/dubbo" xmlns:mvc="http://www.springframework.org/schema/mvc"
    xsi:schemaLocation="http://www.springframework.org/schema/beans http://www.springframework.org/schema/beans/spring-beans.xsd
        http://www.springframework.org/schema/mvc http://www.springframework.org/schema/mvc/spring-mvc.xsd
        http://code.alibabatech.com/schema/dubbo http://code.alibabatech.com/schema/dubbo/dubbo.xsd
        http://www.springframework.org/schema/context http://www.springframework.org/schema/context/spring-context.xsd">
    <mvc:annotation-driven >
        <mvc:message-converters register-defaults="false">
            <bean class="org.springframework.http.converter.StringHttpMessageConverter">
                <constructor-arg value="UTF-8" />
            </bean>
        </mvc:message-converters>
    </mvc:annotation-driven>
</beans>
接下來就是編碼:
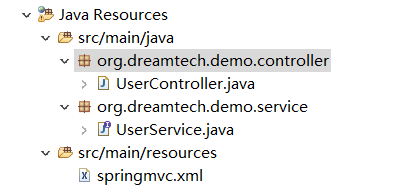
目錄結構如下

package org.dreamtech.demo.controller;

import org.dreamtech.demo.service.UserService;
import org.springframework.stereotype.Controller;
import org.springframework.web.bind.annotation.RequestMapping;
import org.springframework.web.bind.annotation.ResponseBody;

import com.alibaba.dubbo.config.annotation.Reference;

@Controller
@RequestMapping("/user")
public class UserController {
    @Reference
    private UserService userService;
    @RequestMapping("/showName")
    @ResponseBody
    public String showName(){
        return userService.getName();
    }
}
package org.dreamtech.demo.service;

public interface UserService {
    public String getName();
}
註意,只是複製過來了介面,沒有複製實現類
SpringMVC配置稍作修改:
<?xml version="1.0" encoding="UTF-8"?>
<beans xmlns="http://www.springframework.org/schema/beans"
    xmlns:xsi="http://www.w3.org/2001/XMLSchema-instance" xmlns:p="http://www.springframework.org/schema/p"
    xmlns:context="http://www.springframework.org/schema/context"
    xmlns:dubbo="http://code.alibabatech.com/schema/dubbo" xmlns:mvc="http://www.springframework.org/schema/mvc"
    xsi:schemaLocation="http://www.springframework.org/schema/beans http://www.springframework.org/schema/beans/spring-beans.xsd
        http://www.springframework.org/schema/mvc http://www.springframework.org/schema/mvc/spring-mvc.xsd
        http://code.alibabatech.com/schema/dubbo http://code.alibabatech.com/schema/dubbo/dubbo.xsd
        http://www.springframework.org/schema/context http://www.springframework.org/schema/context/spring-context.xsd">
    <mvc:annotation-driven>
        <mvc:message-converters register-defaults="false">
            <bean class="org.springframework.http.converter.StringHttpMessageConverter">
                <constructor-arg value="UTF-8" />
            </bean>
        </mvc:message-converters>
    </mvc:annotation-driven>
    <dubbo:application name="dubboxdemo-web" />
    <dubbo:registry address="zookeeper://192.168.25.100:2181" />
    <dubbo:annotation package="org.dreamtech.demo.controller" />
</beans>
接下來開始測試:
首先要確保CentOS伺服器的Zookeeper正常運行
然後先啟動服務提供方
再啟動服務消費方
訪問http://localhost:8082/user/showName
實際上,遇到了三個大坑,查閱很多資料之後才解決:
1.CentOS埠並沒有開放,開啟命令如下:
firewall-cmd --add-port=2181/tcp
驗證是否成功開啟:
firewall-cmd --query-port=2181/tcp
2.註意這個類,這裡的@Service註解不能導入Spring的!
package org.dreamtech.demo.service.impl;

import org.dreamtech.demo.service.UserService;

import com.alibaba.dubbo.config.annotation.Service;

@Service
public class UserServiceImpl implements UserService {

    @Override
    public String getName() {
        return "dreamtech";
    }

}
3.JDK版本必須是1.7,如果是1.8可能會報錯
正確情況如下:

Dubbox管理中心部署:
使用MVN命令對源碼進行編譯:
mvn package -Dmaven.skip.test=true
編譯後得到一個dubbo-admin.war
在CentOS上部署Tomcat,併在webapps放入dubbo-admin.war
啟動Tomcat: ./startup.sh
開防火牆:
firewall-cmd --add-port=8080/tcp
後來發現這個dubbo-admin無法運行
排錯之後發現是Linux的JDK版本太高
降低版本,之前在etc/profile裡面export的是一個軟鏈接,所以直接刪掉軟鏈接再新建就像
這樣就可以方便地在JDK1.7到1.8之間切換
一切配完,就可以打開[CentOS IP]/dubbo-admin
輸入預設賬戶名,密碼root,進入,即可查看詳情:


