前言 開心一刻 說實話,作為一個宅男,每次被淘寶上的雄性店主追著喊親,親,親,這感覺真是噁心透頂,好像被強吻一樣。。。。。。。。。更煩的是我每次為了省錢,還得用個女號,跟那些店主說:“哥哥包郵嘛麽嘰。”,“哥哥再便宜點唄,我錢不夠了嘛,5555555,”。 知道後的店主 路漫漫其修遠兮,吾將上下而求 ...
前言
開心一刻
說實話,作為一個宅男,每次被淘寶上的雄性店主追著喊親,親,親,這感覺真是噁心透頂,好像被強吻一樣。。。。。。。。。更煩的是我每次為了省錢,還得用個女號,跟那些店主說:“哥哥包郵嘛麽嘰。”,“哥哥再便宜點唄,我錢不夠了嘛,5555555, ”。
”。

知道後的店主
路漫漫其修遠兮,吾將上下而求索!
github:https://github.com/youzhibing
碼雲(gitee):https://gitee.com/youzhibing
問題背景
用過pageHelper的都知道(沒用過的感覺去google下),實現分頁非常簡單,service實現層調用dao(mapper)層之前進行page設置,mapper.xml中不處理分頁,這樣就夠了,就能實現分頁了,具體如下
UserServiceImpl.java
@Override
public PageInfo listUser(int pageNum, int pageSize) {
    PageHelper.startPage(pageNum, pageSize);
    List<User> users = userMapper.listUser();
    PageInfo pageInfo = new PageInfo(users);
    return pageInfo;
}
UserMapper.xml
<select id="listUser" resultType="User">
    SELECT
        id,username,password,salt,state,description
    FROM
        tbl_user
</select>
哎我去,這樣就實現分頁了? 老牛皮了,這是為什麼,這是怎麼做到的? 凡事有果必有因,我們一起來看看這個因到底是什麼
JDK的動態代理
在進入正題之前了,我們先來做下準備,如果對動態代理很熟悉的直接略過往下看,建議還是看看,權且當做熱身
我們來看看JDK下的動態代理的具體實現:proxyDemo,運行ProxyTest的main方法,結果如下

可以看到我們對 張三 進行了增強處理,追加了尾碼:_proxy
Mybatis sql執行流程
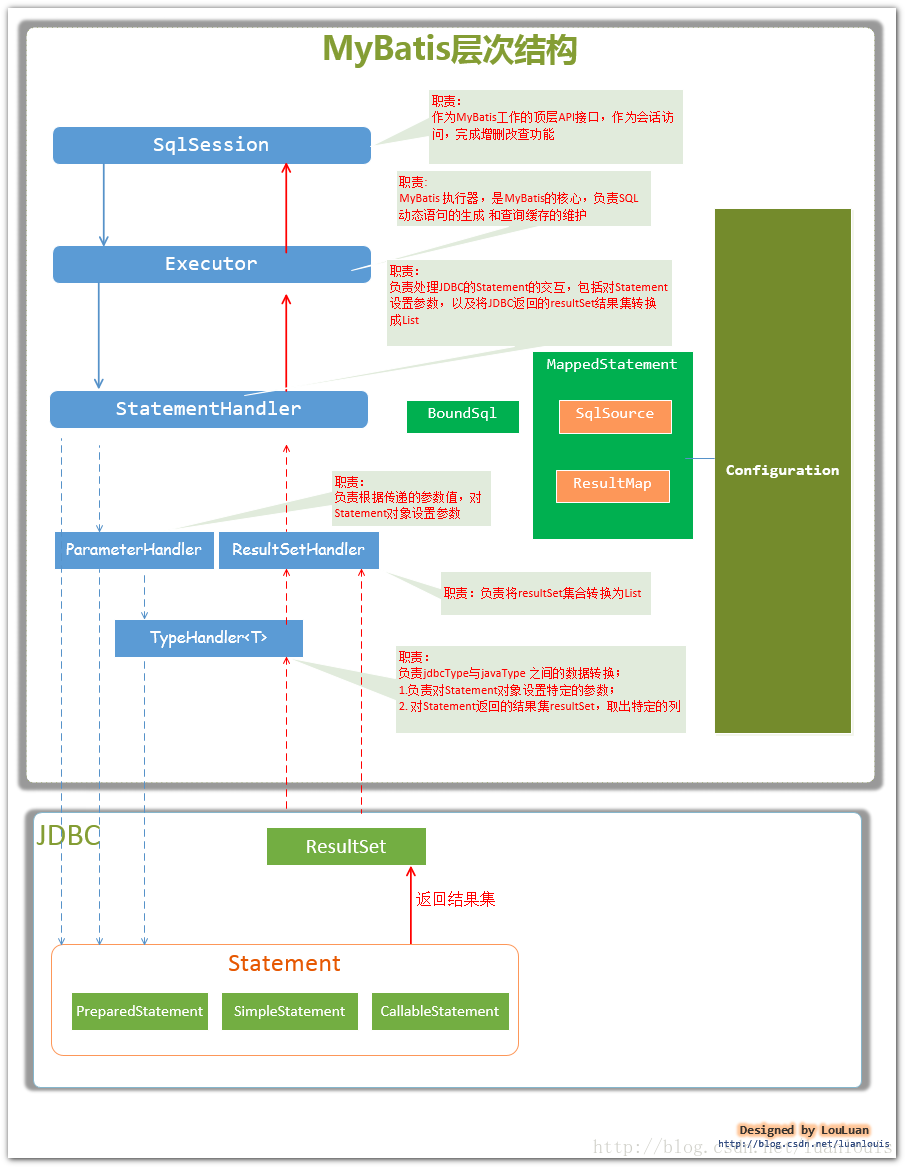
當我們對JDK的動態代理有了一個基本認識之後了,我們再完成個一公裡的慢跑:熟悉Mybatis的sql執行流程。流程圖懶得畫了,有人處理的很優秀了,我引用下

圖片摘至《深入理解mybatis原理》 MyBatis的架構設計以及實例分析
分頁源碼解析
業務代碼中的PageHelper
我們先來跟一跟業務代碼中的PageHelper的代碼
PageHelper.startPage(pageNum, pageSize);
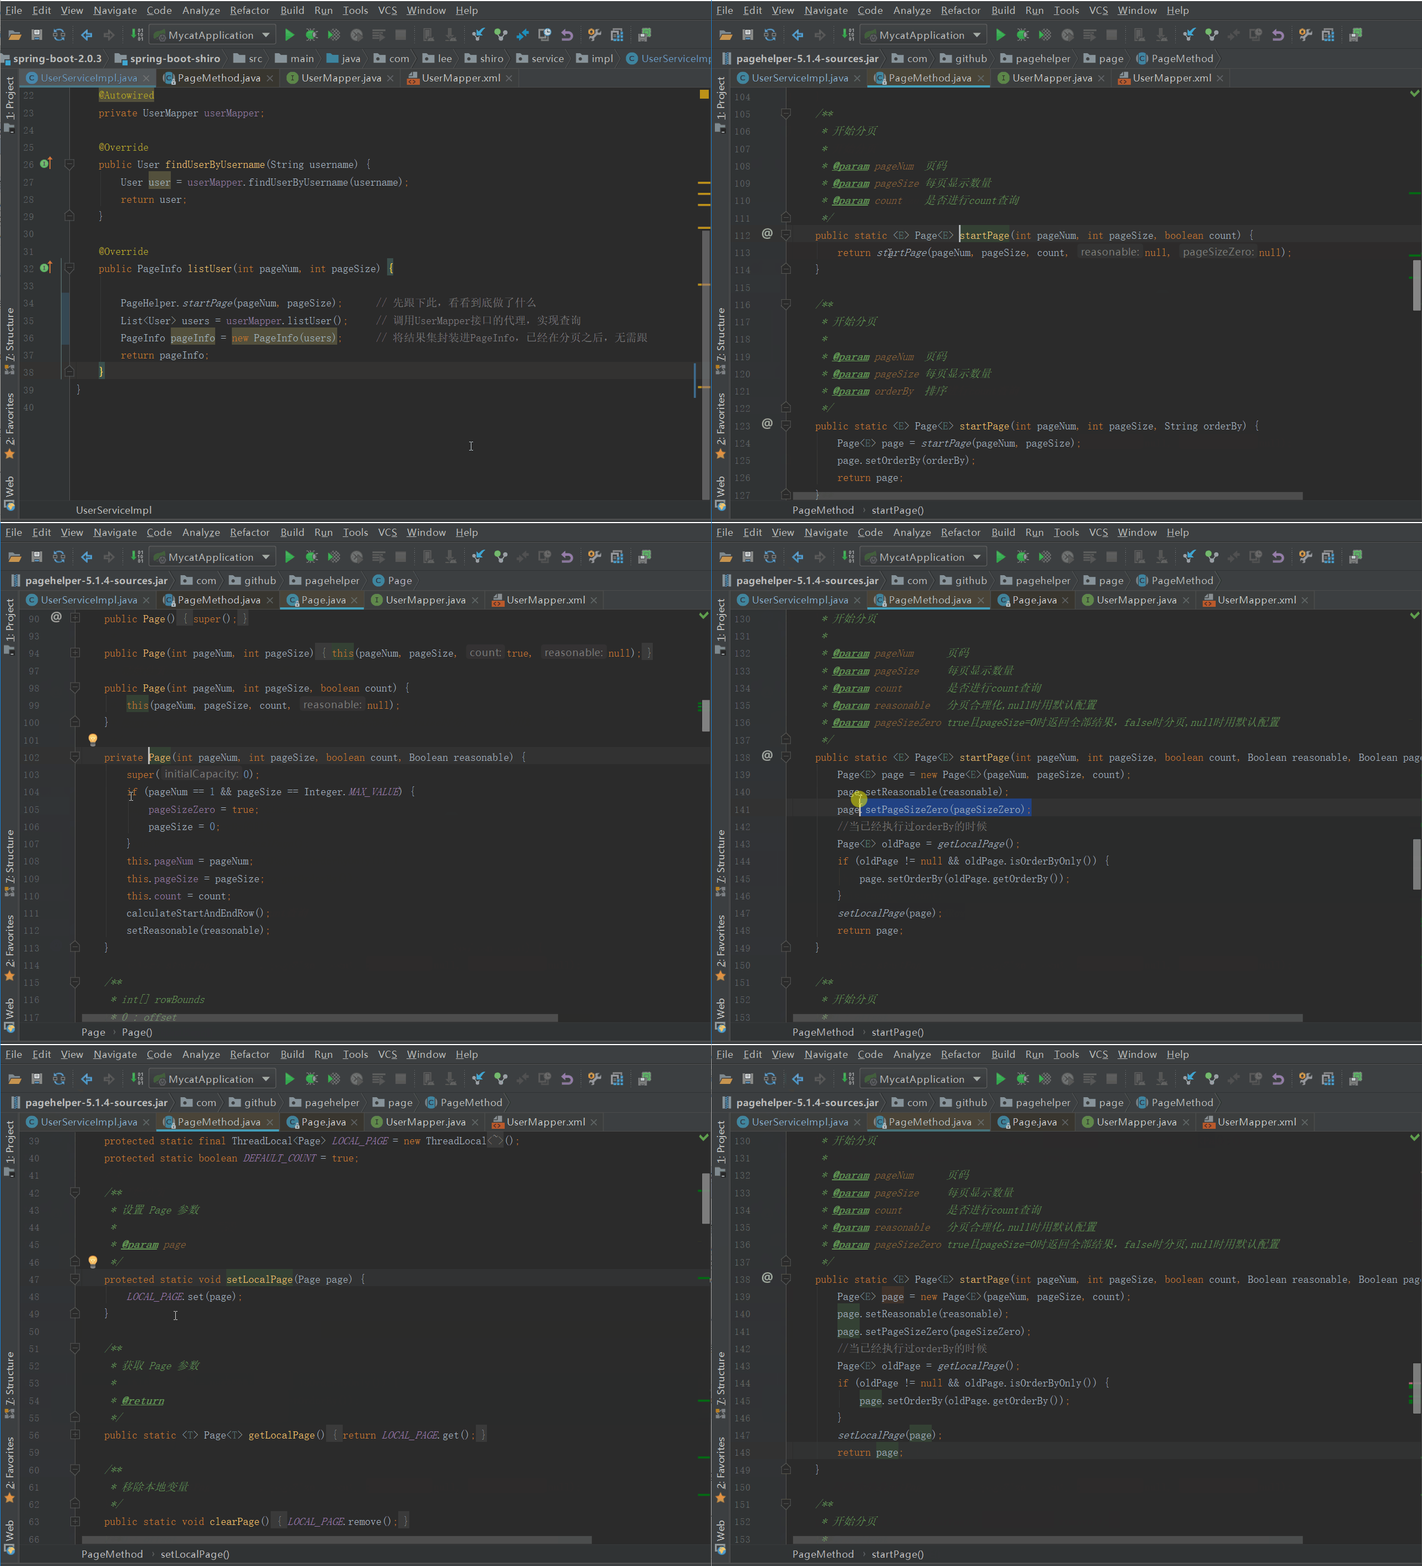
看它到底做了什麼,如下圖

我們發現,進行了Page的相關設置後,將Page放到了當前線程中,沒做其他的什麼,那麼分頁肯定不是在這做的。
PageHelper自動配置
關於怎麼找自動配置類,可參考:spring-boot-2.0.3不一樣系列之源碼篇 - springboot源碼一,絕對有值得你看的地方,此時我們找到了PageHelperAutoConfiguration,源代碼如下

/**
 * 自定註入分頁插件
 *
 * @author liuzh
 */
@Configuration
@ConditionalOnBean(SqlSessionFactory.class)
@EnableConfigurationProperties(PageHelperProperties.class)
@AutoConfigureAfter(MybatisAutoConfiguration.class)
public class PageHelperAutoConfiguration {

    @Autowired
    private List<SqlSessionFactory> sqlSessionFactoryList;

    @Autowired
    private PageHelperProperties properties;

    /**
     * 接受分頁插件額外的屬性
     *
     * @return
     */
    @Bean
    @ConfigurationProperties(prefix = PageHelperProperties.PAGEHELPER_PREFIX)
    public Properties pageHelperProperties() {
        return new Properties();
    }

    @PostConstruct
    public void addPageInterceptor() {
        PageInterceptor interceptor = new PageInterceptor();
        Properties properties = new Properties();
        //先把一般方式配置的屬性放進去
        properties.putAll(pageHelperProperties());
        //在把特殊配置放進去,由於close-conn 利用上面方式時,屬性名就是 close-conn 而不是 closeConn,所以需要額外的一步
        properties.putAll(this.properties.getProperties());
        interceptor.setProperties(properties);
        for (SqlSessionFactory sqlSessionFactory : sqlSessionFactoryList) {
            // 將PageInterceptor實例添加到了Configuration實例的interceptor鏈中
            sqlSessionFactory.getConfiguration().addInterceptor(interceptor);
        }
    }

}
View Code
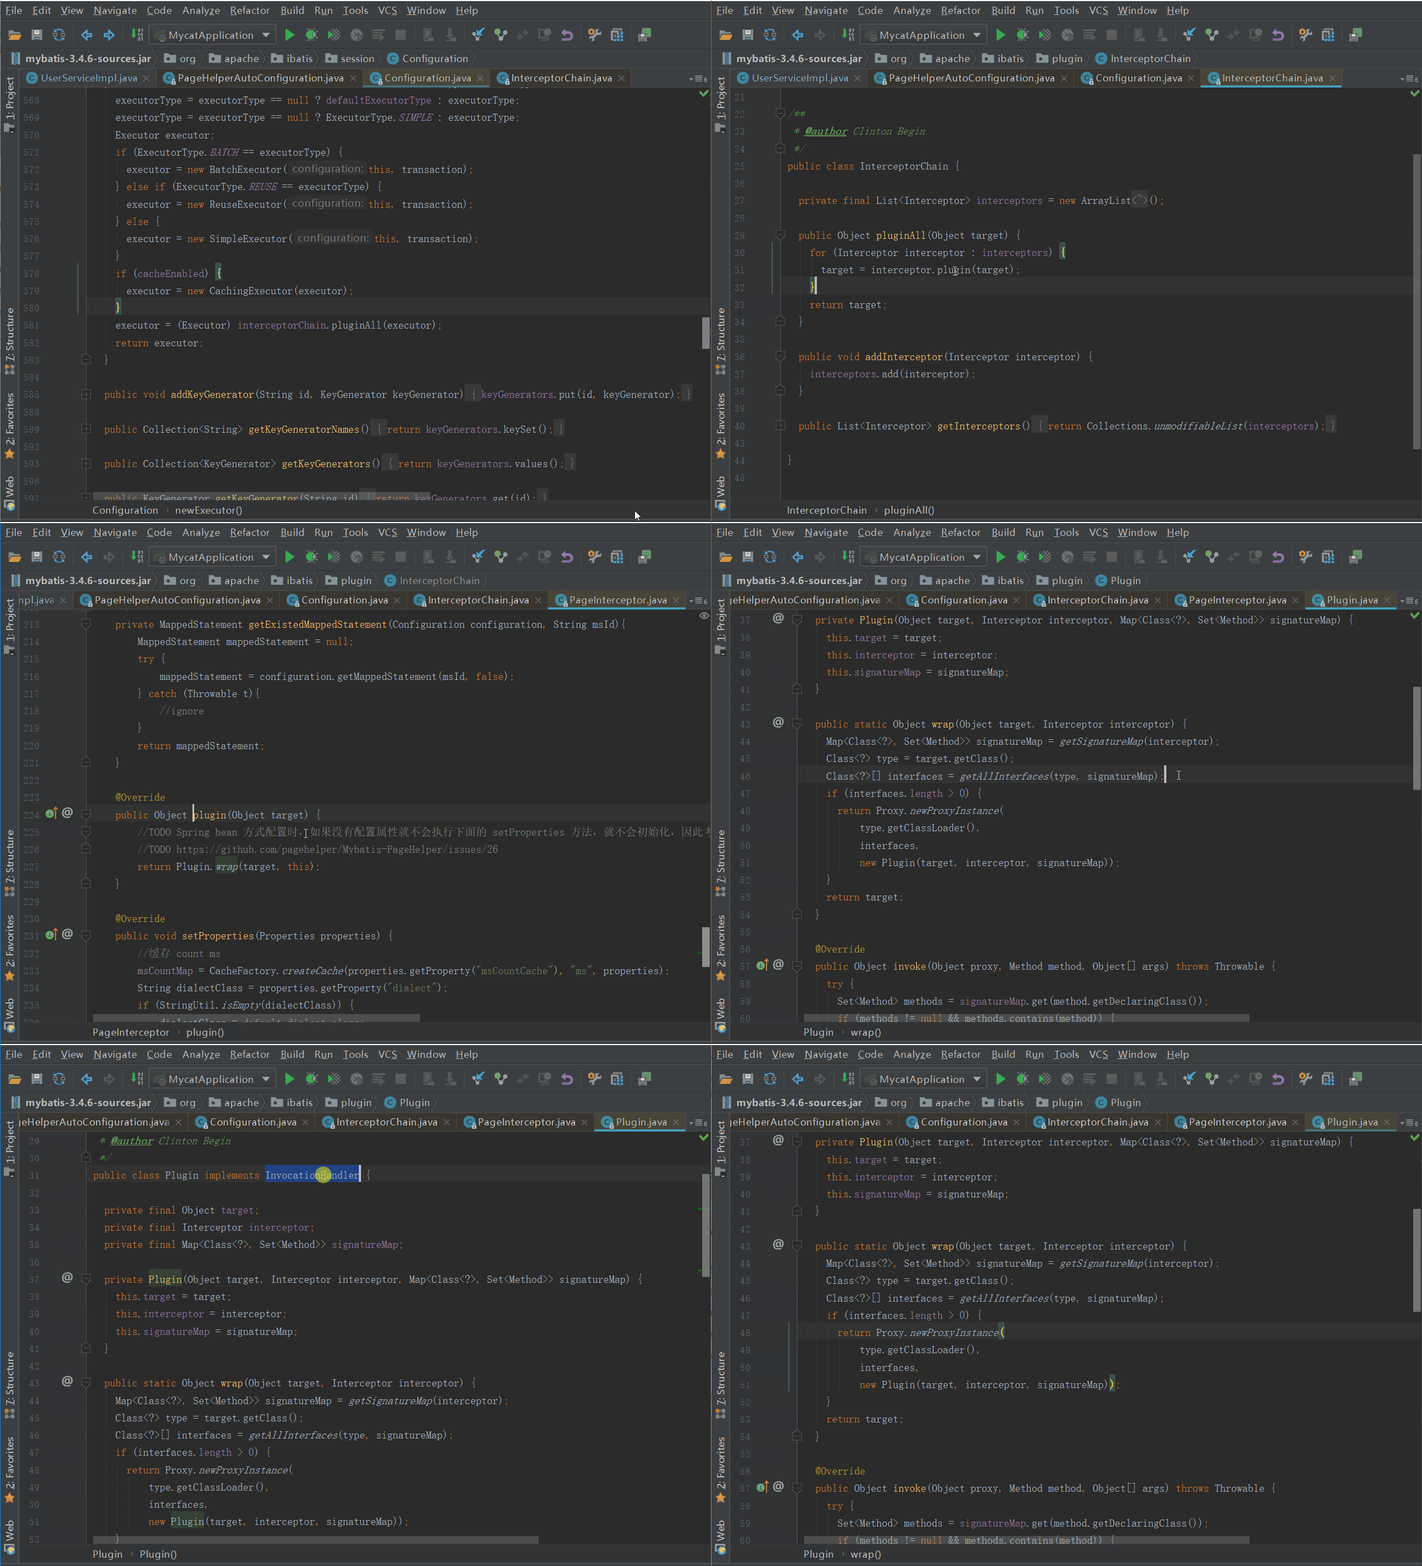
在PageHelperAutoConfiguration的構造方法執行完之後,會執行addPageInterceptor方法,完成配置屬性的註入,並將PageInterceptor實例添加到了Configuration實例的interceptorChain中。
從Mybatis的SQL執行流程圖中可以Mybatis的四大對象Executor、ParameterHandler、ResultSetHandler、StatementHandler,由他們一起合作完成SQL的執行,那麼這四大對象是由誰創建的呢?沒錯,就是Mybatis的配置中心:Configuration,創建源代碼如下:

  public ParameterHandler newParameterHandler(MappedStatement mappedStatement, Object parameterObject, BoundSql boundSql) {
    ParameterHandler parameterHandler = mappedStatement.getLang().createParameterHandler(mappedStatement, parameterObject, boundSql);
    parameterHandler = (ParameterHandler) interceptorChain.pluginAll(parameterHandler);
    return parameterHandler;
  }

  public ResultSetHandler newResultSetHandler(Executor executor, MappedStatement mappedStatement, RowBounds rowBounds, ParameterHandler parameterHandler,
      ResultHandler resultHandler, BoundSql boundSql) {
    ResultSetHandler resultSetHandler = new DefaultResultSetHandler(executor, mappedStatement, parameterHandler, resultHandler, boundSql, rowBounds);
    resultSetHandler = (ResultSetHandler) interceptorChain.pluginAll(resultSetHandler);
    return resultSetHandler;
  }

  public StatementHandler newStatementHandler(Executor executor, MappedStatement mappedStatement, Object parameterObject, RowBounds rowBounds, ResultHandler resultHandler, BoundSql boundSql) {
    StatementHandler statementHandler = new RoutingStatementHandler(executor, mappedStatement, parameterObject, rowBounds, resultHandler, boundSql);
    statementHandler = (StatementHandler) interceptorChain.pluginAll(statementHandler);
    return statementHandler;
  }

  public Executor newExecutor(Transaction transaction) {
    return newExecutor(transaction, defaultExecutorType);
  }

  public Executor newExecutor(Transaction transaction, ExecutorType executorType) {
    executorType = executorType == null ? defaultExecutorType : executorType;
    executorType = executorType == null ? ExecutorType.SIMPLE : executorType;
    Executor executor;
    if (ExecutorType.BATCH == executorType) {
      executor = new BatchExecutor(this, transaction);
    } else if (ExecutorType.REUSE == executorType) {
      executor = new ReuseExecutor(this, transaction);
    } else {
      executor = new SimpleExecutor(this, transaction);
    }
    if (cacheEnabled) {
      executor = new CachingExecutor(executor);
    }
    executor = (Executor) interceptorChain.pluginAll(executor);
    return executor;
  }
View Code
可以看到四大對象創建的最後,都會調用interceptorChain.pluginAll,我們來看看pluginAll方法做了什麼

其中Plugin的wrap方法要註意下

  public static Object wrap(Object target, Interceptor interceptor) {
    // 獲取PageInterceptor的Intercepts註解中@Signature的method,存放到Plugin的signatureMap中
    Map<Class<?>, Set<Method>> signatureMap = getSignatureMap(interceptor);
    Class<?> type = target.getClass();
    // 獲取目標對象實現的全部介面;四大對象是介面,都有預設的子類實現
    // JDK的動態代理只支持介面
    Class<?>[] interfaces = getAllInterfaces(type, signatureMap);
    if (interfaces.length > 0) {
      return Proxy.newProxyInstance(
          type.getClassLoader(),
          interfaces,
          new Plugin(target, interceptor, signatureMap));
    }
    return target;
  }
View Code
pluginAll其實就是給四大對象創建代理,一個Interceptor就會創建一層代理,而我們的PageInterceptor只是其中一層代理;我們接著往下看,Plugin繼承了InvocationHandler,相當於上述:JDK的動態代理示例中的MyInvocationHandler,那麼它的invoke方法肯定會被調用

  @Override
  public Object invoke(Object proxy, Method method, Object[] args) throws Throwable {
    try {
      // 獲取PageInterceptor的Intercepts註解中@Signature的method
      Set<Method> methods = signatureMap.get(method.getDeclaringClass());
      // 當methods包含目標方法時,調用PageInterceptor的intercept方法完成SQL的分頁處理
      if (methods != null && methods.contains(method)) {
        return interceptor.intercept(new Invocation(target, method, args));
      }
      return method.invoke(target, args);
    } catch (Exception e) {
      throw ExceptionUtil.unwrapThrowable(e);
    }
  }
View Code
攔截器:PageInterceptor
上述我們講到了,當匹配時會進入到PageInterceptor的intercept方法中,在解讀intercept方法之前,我們先來看看PageInterceptor類上的註解
@Intercepts(
    {
        // 相當於對Executor的query方法做攔截處理
        @Signature(type = Executor.class, method = "query", args = {MappedStatement.class, Object.class, RowBounds.class, ResultHandler.class}),
        @Signature(type = Executor.class, method = "query", args = {MappedStatement.class, Object.class, RowBounds.class, ResultHandler.class, CacheKey.class, BoundSql.class}),
    }
)
這就標明瞭PageInterceptor攔截的是Executor的query方法;還記上述wrap方法的
Map<Class<?>, Set<Method>> signatureMap = getSignatureMap(interceptor);
嗎?讀取的就是@Intercepts下@Signature中的內容。我們接著看intercept

@Override
public Object intercept(Invocation invocation) throws Throwable {
    try {
        Object[] args = invocation.getArgs();
        MappedStatement ms = (MappedStatement) args[0];
        Object parameter = args[1];
        RowBounds rowBounds = (RowBounds) args[2];
        ResultHandler resultHandler = (ResultHandler) args[3];
        Executor executor = (Executor) invocation.getTarget();
        CacheKey cacheKey;
        BoundSql boundSql;
        //由於邏輯關係,只會進入一次
        if(args.length == 4){
            //4 個參數時
            boundSql = ms.getBoundSql(parameter);
            cacheKey = executor.createCacheKey(ms, parameter, rowBounds, boundSql);
        } else {
            //6 個參數時
            cacheKey = (CacheKey) args[4];
            boundSql = (BoundSql) args[5];
        }
        List resultList;
        //調用方法判斷是否需要進行分頁,如果不需要,直接返回結果
        // 此處會從當前線程取Page信息,還記得什麼時候在哪將Page信息放進當前線程的嗎?
        if (!dialect.skip(ms, parameter, rowBounds)) {
            //反射獲取動態參數
            String msId = ms.getId();
            Configuration configuration = ms.getConfiguration();
            Map<String, Object> additionalParameters = (Map<String, Object>) additionalParametersField.get(boundSql);
            //判斷是否需要進行 count 查詢
            if (dialect.beforeCount(ms, parameter, rowBounds)) {
                String countMsId = msId + countSuffix;
                Long count;
                //先判斷是否存在手寫的 count 查詢
                MappedStatement countMs = getExistedMappedStatement(configuration, countMsId);
                if(countMs != null){
                    count = executeManualCount(executor, countMs, parameter, boundSql, resultHandler);
                } else {
                    countMs = msCountMap.get(countMsId);
                    //自動創建
                    if (countMs == null) {
                        //根據當前的 ms 創建一個返回值為 Long 類型的 ms
                        countMs = MSUtils.newCountMappedStatement(ms, countMsId);
                        msCountMap.put(countMsId, countMs);
                    }
                    count = executeAutoCount(executor, countMs, parameter, boundSql, rowBounds, resultHandler);
                }
                //處理查詢總數
                //返回 true 時繼續分頁查詢,false 時直接返回
                if (!dialect.afterCount(count, parameter, rowBounds)) {
                    //當查詢總數為 0 時,直接返回空的結果
                    return dialect.afterPage(new ArrayList(), parameter, rowBounds);
                }
            }
            //判斷是否需要進行分頁查詢
            if (dialect.beforePage(ms, parameter, rowBounds)) {
                //生成分頁的緩存 key
                CacheKey pageKey = cacheKey;
                //處理參數對象
                parameter = dialect.processParameterObject(ms, parameter, boundSql, pageKey);
                //調用方言獲取分頁 sql
                String pageSql = dialect.getPageSql(ms, boundSql, parameter, rowBounds, pageKey);
                BoundSql pageBoundSql = new BoundSql(configuration, pageSql, boundSql.getParameterMappings(), parameter);
                //設置動態參數
                for (String key : additionalParameters.keySet()) {
                    pageBoundSql.setAdditionalParameter(key, additionalParameters.get(key));
                }
                //執行分頁查詢
                resultList = executor.query(ms, parameter, RowBounds.DEFAULT, resultHandler, pageKey, pageBoundSql);
            } else {
                //不執行分頁的情況下,也不執行記憶體分頁
                resultList = executor.query(ms, parameter, RowBounds.DEFAULT, resultHandler, cacheKey, boundSql);
            }
        } else {
            //rowBounds用參數值,不使用分頁插件處理時,仍然支持預設的記憶體分頁
            resultList = executor.query(ms, parameter, rowBounds, resultHandler, cacheKey, boundSql);
        }
        return dialect.afterPage(resultList, parameter, rowBounds);
    } finally {
        dialect.afterAll();
    }
}
View Code
其中會讀取當前線程中的Page信息,根據Page信息來斷定是否需要分頁;而Page信息就是從我們的業務代碼中存放到當前線程的。PageHelper的作者已經將intercept方法中的註釋寫的非常清楚了,相信大家都能看懂。
到了此刻,相信大家都清楚了,還不清楚的靜下心來好好捋一捋。
總結
1、PageHelper屬於Mybatis插件拓展,也可稱攔截器拓展,是基於Mybatis的Interceptor實現;
2、Page信息是在我們的業務代碼中放到當前線程的,作為後續是否需要分頁的條件;
3、Mybatis創建mapper代理的過程(有空給大家梳理下mapper代理的創建過程)中,也會創建四大對象的代理(有必要的話),而PageInterceptor對應的四大對象的代理會攔截Executor的query方法,將分頁參數添加到目標SQL中;
4、不管我們是否需要分頁,只要我們集成了PageHelper,那麼mapper的代理實現中肯定包含了一層PageHelper的代理(可能是多層代理,包括其他第三方的Mybatis插件,或者我們自定義的Mybatis插件),如果當前線程中設置了Page,那麼就表示需要分頁,PageHelper就會讀取當前線程中的Page信息,將分頁條件添加到目標SQL中(Mysql是後面添加LIMIT,而Oracle則不一樣),那麼此時發送到資料庫的SQL是有分頁條件的,也就完成了分頁處理;
5、@Interceptors、@Signature以及Plugin類,三者配合起來,完成了分頁邏輯的植入,Mybatis這麼做便於拓展,使用起來更靈活,包容性更強;我們自定義插件的話,可以基於此,也可以拋棄這3個類,直接在plugin方法內部根據target實例的類型做相應的操作;個人推薦基於這3個來實現;
6、Mybatis的Interceptor是基於JDK的動態代理,只能針對介面進行處理;另外,當我們進行Mybatis插件開發的時候,需要註意順序問題,可能會與其他的Mybatis插件有衝突。
參考
《深入理解mybatis原理》 MyBatis的架構設計以及實例分析


