介紹 微服務中有關鍵的幾項技術,其中網關和服務服務發現,服務註冊相輔相成。 首先解釋幾個本次教程中需要的術語 網關 Gateway(API GW / API 網關),顧名思義,是企業 IT 在系統邊界上提供給外部訪問內部介面服務的統一入口,簡化了外部由於多服務協同完成任務時的繁瑣配置。網關組件有Ko ...
介紹

微服務中有關鍵的幾項技術,其中網關和服務服務發現,服務註冊相輔相成。
首先解釋幾個本次教程中需要的術語
網關 Gateway(API GW / API 網關),顧名思義,是企業 IT 在系統邊界上提供給外部訪問內部介面服務的統一入口,簡化了外部由於多服務協同完成任務時的繁瑣配置。網關組件有Kong,ocelot,
服務發現:通過網關訪問內部各個微服務,網關要找到所需服務的過程稱為服務發現
服務註冊:既然有服務發現,前提是要把所需服務提前“錄入”,這個錄入的過程稱為服務註冊。服務註冊可配置文件(人肉方式不推薦),也可用服務註冊組件如Consul或者Eureka等等(推薦)
搭建Consul集群(Windows)
官網下載Consul程式,https://www.consul.io/downloads.html
下載下來就是一個可執行文件Consul.exe
Consul有兩種代理模式,一種server,一種client,官方建議Server端達到3台以上才可高可用,但不要太多,太多會給集群間數據同步造成壓力,client數量不限。
多個server端之間會選擇出一個leader,當一個server的leader宕機則會從其他server端”投票“選擇新的leader
實踐
這裡server我們用2台實驗
192.168.74.55
192.168.74.54
1台Client
192.168.74.161
consul啟動有兩種方式一種是命令行,一種是配置文件的方式。
命令行方式啟動一個consul的server端
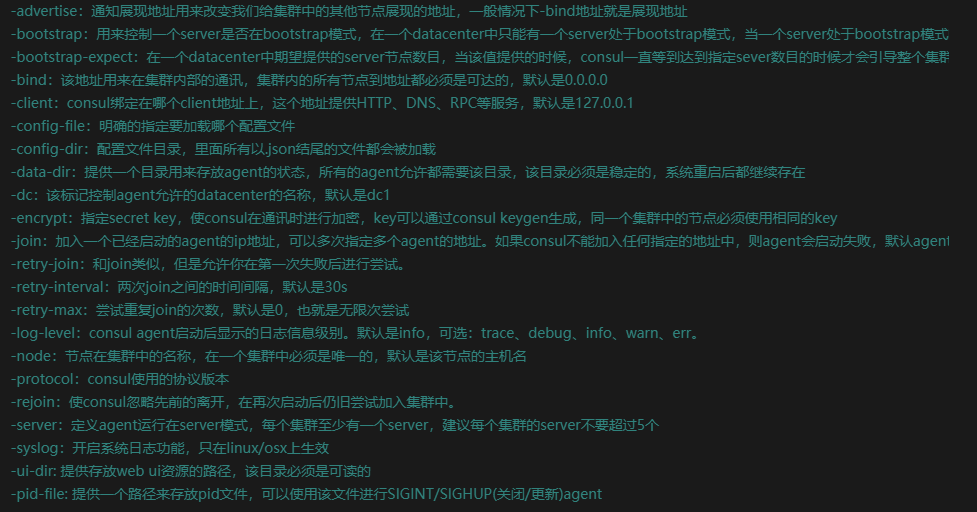
consul agent -server -ui -bootstrap-expect 2 -data-dir opt/consul/data -node ServerMaster -bind 192.168.74.55 -client 192.168.74.55 關鍵參數說明 -server:server模式啟動 -ui :開啟ui界面(consul.exe內部帶了GUI圖形界面操作) -bootstrap-expect 2:server端到2個時集群生效 -data-dir:consul產生的文件路徑(consul自己會產生一下數據存儲的位置) -node:此節點名稱 -bind:集群內部通信地址,預設0.0.0.0 -client:此節點綁定的通訊地址 以上只是關鍵參數,以下是完整參數說明:
但是命令啟動很繁瑣,所以推薦下麵的配置文件的方式啟動
在consul同文件夾下建立一個server.json的配置文件
{
  "datacenter": "dc1",
  "data_dir": "opt/consul/data",
  "node_name": "consul-server01",
  "server": true,
  "bootstrap_expect": 2,
  "bind_addr": "192.168.74.55",
  "client_addr": "192.168.74.55",
  "ui":true
}
為了快速啟動,再建立一個bat批處理文件runconsul.bat
consul agent -config-dir server.json
pause
雙擊runconsul.bat啟動consul
在192.168.74.54伺服器開啟一個server端繼續以上操作。
命令方式啟動
consul agent -server -ui -data-dir opt/consul/data -node Server01 -bind 192.168.74.54 -client 192.168.74.54 -join=192.168.74.55
-join將192.168.74.54加入到192.168.74.55伺服器
配置文件方式:
{
  "datacenter": "dc1",
  "data_dir": "opt/consul/data",
  "node_name": "consul-server2",
  "server": true,
  "bind_addr": "192.168.74.54",
  "client_addr": "192.168.74.54",
  "ui":true,
  "retry_join": ["192.168.74.55"],
  "retry_interval": "30s",
  "rejoin_after_leave": true,
  "start_join":["192.168.74.55"]
  }
在192.168.74.161伺服器開啟一個consul的client端
命令方式:
consul agent -ui -data-dir opt/consul/data -node ServerSlave -bind 192.168.74.161 -client 192.168.74.161 -join 192.168.74.55
配置文件方式:
{
  "datacenter": "dc1",
  "data_dir": "opt/consul/data",
  "node_name": "consul-client01",
  "server": false,
  "bind_addr": "192.168.74.161",
  "client_addr": "192.168.74.161",
  "ui":true,
  "retry_join": ["192.168.74.55"],
  "retry_interval": "30s",
  "rejoin_after_leave": true,
  "start_join":["192.168.74.55"]
}
效果
簡單Consul集群到這裡就搭建成功,只要訪問三台伺服器任意一個都可數據同步,演示:


netcore集成Consul服務註冊
首先新建一個ConsulClient的類庫

ConsulRegister.csproj所需組件如下:
<Project Sdk="Microsoft.NET.Sdk">

  <PropertyGroup>
    <TargetFramework>netstandard2.0</TargetFramework>
  </PropertyGroup>
  <ItemGroup>
    <PackageReference Include="Consul" Version="0.7.2.6" />
    <PackageReference Include="Microsoft.AspNetCore.Hosting.Abstractions" Version="2.1.0" />
    <PackageReference Include="Microsoft.AspNetCore.Http.Abstractions" Version="2.1.0" />
    <PackageReference Include="Microsoft.Extensions.Configuration.Abstractions" Version="2.1.0" />
    <PackageReference Include="Microsoft.Extensions.DependencyInjection.Abstractions" Version="2.1.0" />
    <PackageReference Include="Microsoft.Extensions.Options.ConfigurationExtensions" Version="2.1.0" />
  </ItemGroup>

</Project>
服務發現自動註冊,無需手動綁定本機地址,會自動掃描本地ipv4地址和localhost地址,項目中無需再手動創建健康檢查介面
ServiceDiscoveryOptions.cs

using System;
using System.Collections.Generic;
using System.Text;

namespace ConsulRegister
{
    /// <summary>
    /// 服務治理第三方組件Consul相關配置參數
    /// </summary>
    public class ServiceDiscoveryOptions
    {
        public string ServiceName { get; set; }

        public ConsulOptions Consul { get; set; }
    }

    public class ConsulOptions
    {
        public string HttpEndPoint { get; set; }
    }
}
RegisterToConsulExtension.cs

using Consul;
using Microsoft.AspNetCore.Builder;
using Microsoft.AspNetCore.Hosting;
using Microsoft.AspNetCore.Hosting.Server.Features;
using Microsoft.AspNetCore.Http;
using Microsoft.AspNetCore.Http.Features;
using Microsoft.Extensions.Configuration;
using Microsoft.Extensions.DependencyInjection;
using Microsoft.Extensions.Options;
using System;
using System.Linq;
using System.Net;
using System.Net.NetworkInformation;
using System.Net.Sockets;

namespace ConsulRegister
{
    public static class RegisterToConsulExtension
    {
        /// <summary>
        /// Add Consul
        /// 添加consul
        /// </summary>
        /// <param name="services"></param>
        /// <param name="configuration"></param>
        /// <returns></returns>
        public static IServiceCollection AddConsul(this IServiceCollection services, IConfiguration configuration)
        {
            // configuration Consul register address
            //配置consul註冊地址
            services.Configure<ServiceDiscoveryOptions>(configuration.GetSection("ServiceDiscovery"));

            //configuration Consul client
            //配置consul客戶端
            services.AddSingleton<IConsulClient>(sp => new Consul.ConsulClient(config =>
            {
                var consulOptions = sp.GetRequiredService<IOptions<ServiceDiscoveryOptions>>().Value;
                if (!string.IsNullOrWhiteSpace(consulOptions.Consul.HttpEndPoint))
                {
                    config.Address = new Uri(consulOptions.Consul.HttpEndPoint);
                }
            }));

            return services;
        }

        /// <summary>
        /// use Consul
        /// 使用consul
        /// The default health check interface format is http://host:port/HealthCheck
        /// 預設的健康檢查介面格式是 http://host:port/HealthCheck
        /// </summary>
        /// <param name="app"></param>
        /// <returns></returns>
        public static IApplicationBuilder UseConsul(this IApplicationBuilder app)
        {
            IConsulClient consul = app.ApplicationServices.GetRequiredService<IConsulClient>();
            IApplicationLifetime appLife = app.ApplicationServices.GetRequiredService<IApplicationLifetime>();
            IOptions<ServiceDiscoveryOptions> serviceOptions = app.ApplicationServices.GetRequiredService<IOptions<ServiceDiscoveryOptions>>();
            var features = app.Properties["server.Features"] as FeatureCollection;

            var port = new Uri(features.Get<IServerAddressesFeature>()
                .Addresses
                .FirstOrDefault()).Port;
            Console.ForegroundColor = ConsoleColor.Blue;
            Console.WriteLine($"application port is :{port}");
            var addressIpv4Hosts = NetworkInterface.GetAllNetworkInterfaces()
            .OrderByDescending(c => c.Speed)
            .Where(c => c.NetworkInterfaceType != NetworkInterfaceType.Loopback && c.OperationalStatus == OperationalStatus.Up);

            foreach (var item in addressIpv4Hosts)
            {
                var props = item.GetIPProperties();
                //this is ip for ipv4
                //這是ipv4的ip地址
                var firstIpV4Address = props.UnicastAddresses
                    .Where(c => c.Address.AddressFamily == AddressFamily.InterNetwork)
                    .Select(c => c.Address)
                    .FirstOrDefault().ToString();
                var serviceId = $"{serviceOptions.Value.ServiceName}_{firstIpV4Address}:{port}";

                var httpCheck = new AgentServiceCheck()
                {
                    DeregisterCriticalServiceAfter = TimeSpan.FromMinutes(1),
                    Interval = TimeSpan.FromSeconds(30),
                    //this is default health check interface
                    //這個是預設健康檢查介面
                    HTTP = $"{Uri.UriSchemeHttp}://{firstIpV4Address}:{port}/HealthCheck",
                };

                var registration = new AgentServiceRegistration()
                {
                    Checks = new[] { httpCheck },
                    Address = firstIpV4Address.ToString(),
                    ID = serviceId,
                    Name = serviceOptions.Value.ServiceName,
                    Port = port
                };

                consul.Agent.ServiceRegister(registration).GetAwaiter().GetResult();

                //send consul request after service stop
                //當服務停止後想consul發送的請求
                appLife.ApplicationStopping.Register(() =>
                {
                    consul.Agent.ServiceDeregister(serviceId).GetAwaiter().GetResult();
                });

                Console.ForegroundColor = ConsoleColor.Blue;
                Console.WriteLine($"health check service:{httpCheck.HTTP}");
            }

            //register localhost address
            //註冊本地地址
            var localhostregistration = new AgentServiceRegistration()
            {
                Checks = new[] { new AgentServiceCheck()
                {
                    DeregisterCriticalServiceAfter = TimeSpan.FromMinutes(1),
                    Interval = TimeSpan.FromSeconds(30),
                    HTTP = $"{Uri.UriSchemeHttp}://localhost:{port}/HealthCheck",
                } },
                Address = "localhost",
                ID = $"{serviceOptions.Value.ServiceName}_localhost:{port}",
                Name = serviceOptions.Value.ServiceName,
                Port = port
            };

            consul.Agent.ServiceRegister(localhostregistration).GetAwaiter().GetResult();

            //send consul request after service stop
            //當服務停止後想consul發送的請求
            appLife.ApplicationStopping.Register(() =>
            {
                consul.Agent.ServiceDeregister(localhostregistration.ID).GetAwaiter().GetResult();
            });

            app.Map("/HealthCheck", s =>
            {
                s.Run(async context =>
                {
                    await context.Response.WriteAsync("ok");
                });
            });
            return app;
        }
    }
}
再新建一個.netcore的webapi項目WebA,並且引用ConsulRegister項目
在WebA項目中的Startup.cs文件中加入Consul服務
 public void ConfigureServices(IServiceCollection services)
        {
            services.AddConsul(Configuration);
            services.AddMvc().SetCompatibilityVersion(CompatibilityVersion.Version_2_1);
        }

        // This method gets called by the runtime. Use this method to configure the HTTP request pipeline.
        public void Configure(IApplicationBuilder app, IHostingEnvironment env)
        {
            if (env.IsDevelopment())
            {
                app.UseDeveloperExceptionPage();
            }

            app.UseConsul();
            app.UseMvc();
        }
在WebA項目的appsettings.json配置文件中加入以下Consul服務端配置
{
  "Logging": {
    "LogLevel": {
      "Default": "Warning"
    }
  },
  "AllowedHosts": "*",

  "ServiceDiscovery": {
    "ServiceName": "A",
    "Consul": {
      "HttpEndpoint": "http://192.168.74.161:8500"
    }
  }
}
這裡服務註冊就算完成
Ocelot網關搭建
接下來繼續Ocelot藉助於Consul實現服務發現
新建項目Ocelot.Gateway

將以下依賴加入Ocelot.Gateway.csproj中:
<Project Sdk="Microsoft.NET.Sdk.Web">

  <PropertyGroup>
    <TargetFramework>netcoreapp2.1</TargetFramework>
  </PropertyGroup>

  <ItemGroup>
    <PackageReference Include="Microsoft.AspNetCore.App" />
    <PackageReference Include="Ocelot" Version="12.0.1" />
    <PackageReference Include="Ocelot.Provider.Consul" Version="0.1.2" />
  </ItemGroup>

  <ItemGroup>
    <Content Update="ocelot.json">
      <CopyToOutputDirectory>PreserveNewest</CopyToOutputDirectory>
    </Content>
  </ItemGroup>

</Project>
新建ocelot.json文件
{
  "ReRoutes": [
    {
      "UseServiceDiscovery": true,
      "DownstreamPathTemplate": "/{url}",
      "DownstreamScheme": "http",
      "ServiceName": "A",
      "LoadBalancerOptions": {
        "Type": "RoundRobin"
      },
      "UpstreamPathTemplate": "/a/{url}",
      "UpstreamHttpMethod": [ "Get", "Post" ],
      "ReRoutesCaseSensitive": false
    }
  ],
  "GlobalConfiguration": {
    // 使用Consul服務治理
    "ServiceDiscoveryProvider": {
      "Host": "192.168.74.161",
      "Port": 8500,
      "ConfigurationKey": "Oceolot_A" //存儲在Consul上的Key
    }
  }
}
修改Startup.cs文件如下:
   public class Startup
    {
        public Startup(IConfiguration configuration)
        {
            Configuration = configuration;
        }

        public IConfiguration Configuration { get; }

        // This method gets called by the runtime. Use this method to add services to the container.
        public void ConfigureServices(IServiceCollection services)
        {
            services.AddMvc().SetCompatibilityVersion(CompatibilityVersion.Version_2_1);


            services.AddOcelot(
                 new ConfigurationBuilder()
                 .AddJsonFile("ocelot.json", optional: false, reloadOnChange: true).Build())
                 .AddConsul()
                 .AddConfigStoredInConsul();
        }

        // This method gets called by the runtime. Use this method to configure the HTTP request pipeline.
        public void Configure(IApplicationBuilder app, IHostingEnvironment env)
        {
            if (env.IsDevelopment())
            {
                app.UseDeveloperExceptionPage();
            }
            else
            {
                app.UseHsts();
            }

            app.UseHttpsRedirection();
            app.UseOcelot().Wait();
        }
    }
發佈WebA後複製兩份分別啟動
dotnet WebA.dll --urls="http://0.0.0.0:2001"
dotnet WebA.dll --urls="http://0.0.0.0:2002"
到這裡相當於2001和2002程式簡單集群了一下
可以發現日誌中有 http://192.168.74.161:2002/HealthCheck調用信息:

這其實是consul進行健康檢查進行的調用。
啟動多個程式後,打開瀏覽器打開Consuld界面會發現註冊了兩個服務


這裡ocelot網關和consul的服務註冊和發現就算初步集成。
如果生成環境是windows的情況,將consul做成windwos服務即可
sc create "ConsulServer" binPath="F:\XXX\consul.exe agent -config-dir XXX.json"
生產環境是linux則藉助systemd做成守護進程即可
目前集群搭建成功,但是連接的話如果指定某個端點的ip進行連接,端點宕機,就會導致網關一樣無法連接consul進行服務發現。所以還需進行配置暴露一個端點讓客戶端連接,配置詳情:https://www.consul.io/docs/connect/configuration.html
不過也可以做成虛擬ip進行多台consul的負載。客戶端連接虛擬ip即可
項目地址:


