" 【.NET Core項目實戰 統一認證平臺】開篇及目錄索引 " 上篇文章介紹瞭如何使用 持久化 的信息,並實現了 和`mysql ids4`進行客戶端授權。 .netcore項目實戰交流群(637326624),有興趣的朋友可以在群里交流討論。 一、如何添加客戶端授權? 在瞭解如何進行客戶端授權 ...
【.NET Core項目實戰-統一認證平臺】開篇及目錄索引
上篇文章介紹瞭如何使用
Dapper持久化IdentityServer4(以下簡稱ids4)的信息,並實現了sqlserver和mysql兩種方式存儲,本篇將介紹如何使用ids4進行客戶端授權。.netcore項目實戰交流群(637326624),有興趣的朋友可以在群里交流討論。
一、如何添加客戶端授權?
在瞭解如何進行客戶端授權時,我們需要瞭解詳細的授權流程,在【.NET Core項目實戰-統一認證平臺】第八章 授權篇-IdentityServer4源碼分析一篇中我大概介紹了客戶端的授權方式,本篇再次回憶下客戶端的授權方式,老規則,上源碼。
首先查看獲取token的方式,核心代碼如下。
private async Task<IEndpointResult> ProcessTokenRequestAsync(HttpContext context)
{
    _logger.LogDebug("Start token request.");

    // 1、驗證客戶端及授權信息結果
    var clientResult = await _clientValidator.ValidateAsync(context);

    if (clientResult.Client == null)
    {
        return Error(OidcConstants.TokenErrors.InvalidClient);
    }

    // 2、驗證請求結果
    var form = (await context.Request.ReadFormAsync()).AsNameValueCollection();
    _logger.LogTrace("Calling into token request validator: {type}", _requestValidator.GetType().FullName);
    var requestResult = await _requestValidator.ValidateRequestAsync(form, clientResult);

    if (requestResult.IsError)
    {
        await _events.RaiseAsync(new TokenIssuedFailureEvent(requestResult));
        return Error(requestResult.Error, requestResult.ErrorDescription, requestResult.CustomResponse);
    }

    // 3、創建輸出結果
    _logger.LogTrace("Calling into token request response generator: {type}", _responseGenerator.GetType().FullName);
    var response = await _responseGenerator.ProcessAsync(requestResult);

    await _events.RaiseAsync(new TokenIssuedSuccessEvent(response, requestResult));
    LogTokens(response, requestResult);

    // 4、返回結果
    _logger.LogDebug("Token request success.");
    return new TokenResult(response);
}
我們需要詳細分析下第一步客戶端授權信息是如何驗證的?核心代碼如下。
/// <summary>
        ///驗證客戶端授權結果
        /// </summary>
        /// <param name="context">請求上下文</param>
        /// <returns></returns>
        public async Task<ClientSecretValidationResult> ValidateAsync(HttpContext context)
        {
            _logger.LogDebug("Start client validation");

            var fail = new ClientSecretValidationResult
            {
                IsError = true
            };
            //通過請求上下文和配置信息獲取校驗方式,從這裡我們可以知道客戶端請求的幾種方式。
            var parsedSecret = await _parser.ParseAsync(context);
            if (parsedSecret == null)
            {
                await RaiseFailureEventAsync("unknown", "No client id found");

                _logger.LogError("No client identifier found");
                return fail;
            }

            // 根據客戶端ID獲取客戶端相關信息。(配合持久化篇查看)
            var client = await _clients.FindEnabledClientByIdAsync(parsedSecret.Id);
            if (client == null)
            {
                await RaiseFailureEventAsync(parsedSecret.Id, "Unknown client");

                _logger.LogError("No client with id '{clientId}' found. aborting", parsedSecret.Id);
                return fail;
            }

            SecretValidationResult secretValidationResult = null;
            if (!client.RequireClientSecret || client.IsImplicitOnly())
            {
                _logger.LogDebug("Public Client - skipping secret validation success");
            }
            else
            {
                //校驗客戶端授權和請求的是否一致
                secretValidationResult = await _validator.ValidateAsync(parsedSecret, client.ClientSecrets);
                if (secretValidationResult.Success == false)
                {
                    await RaiseFailureEventAsync(client.ClientId, "Invalid client secret");
                    _logger.LogError("Client secret validation failed for client: {clientId}.", client.ClientId);

                    return fail;
                }
            }

            _logger.LogDebug("Client validation success");

            var success = new ClientSecretValidationResult
            {
                IsError = false,
                Client = client,
                Secret = parsedSecret,
                Confirmation = secretValidationResult?.Confirmation
            };

            await RaiseSuccessEventAsync(client.ClientId, parsedSecret.Type);
            return success;
        }
這裡幾個方法可以從寫的說明備註里就可以知道什麼意思,但是 var parsedSecret = await _parser.ParseAsync(context);這句話可能不少人有疑問,這段是做什麼的?如何實現不同的授權方式?
這塊就需要繼續理解Ids4的實現思路,詳細代碼如下。
/// <summary>
/// 檢查上下文獲取授權信息
/// </summary>
/// <param name="context">The HTTP context.</param>
/// <returns></returns>
public async Task<ParsedSecret> ParseAsync(HttpContext context)
{
    // 遍歷所有的客戶端授權獲取方式,提取當前哪一個滿足需求
    ParsedSecret bestSecret = null;
    foreach (var parser in _parsers)
    {
        var parsedSecret = await parser.ParseAsync(context);
        if (parsedSecret != null)
        {
            _logger.LogDebug("Parser found secret: {type}", parser.GetType().Name);

            bestSecret = parsedSecret;

            if (parsedSecret.Type != IdentityServerConstants.ParsedSecretTypes.NoSecret)
            {
                break;
            }
        }
    }

    if (bestSecret != null)
    {
        _logger.LogDebug("Secret id found: {id}", bestSecret.Id);
        return bestSecret;
    }

    _logger.LogDebug("Parser found no secret");
    return null;
}就是從註入的預設實現里檢測任何一個實現ISecretParser介面方法,通過轉到實現,可以發現有PostBodySecretParser、JwtBearerClientAssertionSecretParser、BasicAuthenticationSecretParser三種方式,然後再查看下註入方法,看那些實現被預設註入了,這樣就清楚我們使用Ids4時支持哪幾種客戶端授權方式。
/// <summary>
/// 添加預設的授權分析
/// </summary>
/// <param name="builder">The builder.</param>
/// <returns></returns>
public static IIdentityServerBuilder AddDefaultSecretParsers(this IIdentityServerBuilder builder)
{
builder.Services.AddTransient<ISecretParser, BasicAuthenticationSecretParser>();
builder.Services.AddTransient<ISecretParser, PostBodySecretParser>();

return builder;
}
從上面代碼可以發現,預設註入了兩種分析器,我們就可以通過這兩個方式來做客戶端的授權,下麵會分別演示兩種授權方式的實現。
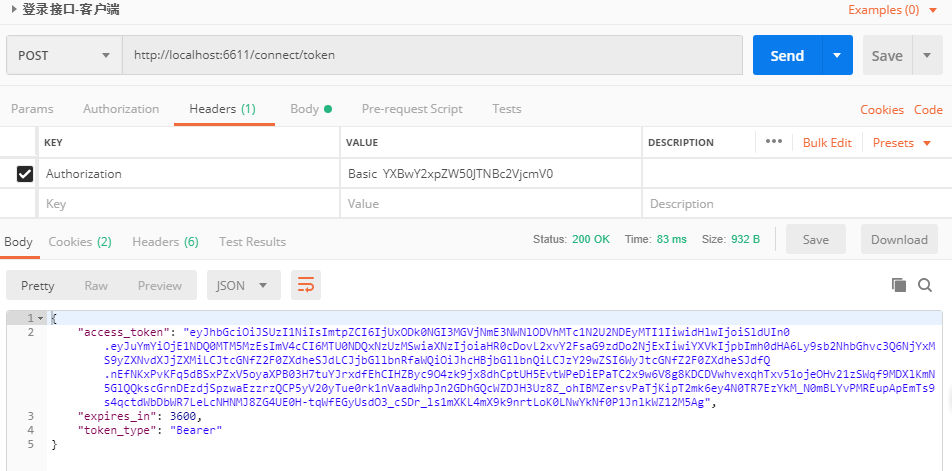
BasicAuthenticationSecretParserpublic Task<ParsedSecret> ParseAsync(HttpContext context) { _logger.LogDebug("Start parsing Basic Authentication secret"); var notfound = Task.FromResult<ParsedSecret>(null); var authorizationHeader = context.Request.Headers["Authorization"].FirstOrDefault(); if (authorizationHeader.IsMissing()) { return notfound; } if (!authorizationHeader.StartsWith("Basic ", StringComparison.OrdinalIgnoreCase)) { return notfound; } var parameter = authorizationHeader.Substring("Basic ".Length); string pair; try { pair = Encoding.UTF8.GetString( Convert.FromBase64String(parameter)); } catch (FormatException) { _logger.LogWarning("Malformed Basic Authentication credential."); return notfound; } catch (ArgumentException) { _logger.LogWarning("Malformed Basic Authentication credential."); return notfound; } var ix = pair.IndexOf(':'); if (ix == -1) { _logger.LogWarning("Malformed Basic Authentication credential."); return notfound; } var clientId = pair.Substring(0, ix); var secret = pair.Substring(ix + 1); if (clientId.IsPresent()) { if (clientId.Length > _options.InputLengthRestrictions.ClientId || (secret.IsPresent() && secret.Length > _options.InputLengthRestrictions.ClientSecret)) { _logger.LogWarning("Client ID or secret exceeds allowed length."); return notfound; } var parsedSecret = new ParsedSecret { Id = Decode(clientId), Credential = secret.IsMissing() ? null : Decode(secret), Type = IdentityServerConstants.ParsedSecretTypes.SharedSecret }; return Task.FromResult(parsedSecret); } _logger.LogDebug("No Basic Authentication secret found"); return notfound; }由於代碼比較簡單,就不介紹了,這裡直接模擬此種方式授權,打開
PostMan,在Headers中增加Authorization的Key,並設置Value為Basic YXBwY2xpZW50JTNBc2VjcmV0,其中Basic後為client_id:client_secret值使用Base64加密。然後請求後顯示如圖所示結果,奈斯,得到我們授權的結果。
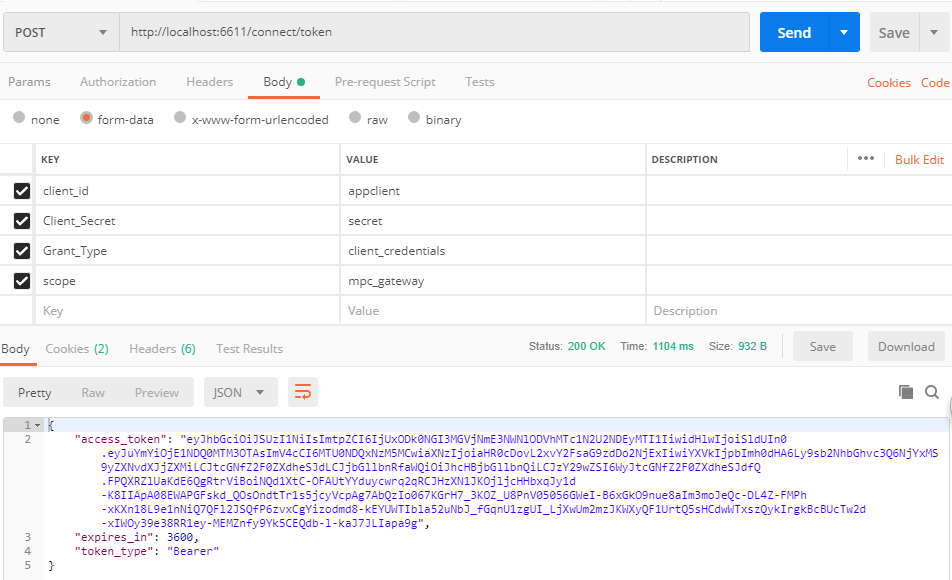
PostBodySecretParserpublic async Task<ParsedSecret> ParseAsync(HttpContext context) { _logger.LogDebug("Start parsing for secret in post body"); if (!context.Request.HasFormContentType) { _logger.LogDebug("Content type is not a form"); return null; } var body = await context.Request.ReadFormAsync(); if (body != null) { var id = body["client_id"].FirstOrDefault(); var secret = body["client_secret"].FirstOrDefault(); // client id must be present if (id.IsPresent()) { if (id.Length > _options.InputLengthRestrictions.ClientId) { _logger.LogError("Client ID exceeds maximum length."); return null; } if (secret.IsPresent()) { if (secret.Length > _options.InputLengthRestrictions.ClientSecret) { _logger.LogError("Client secret exceeds maximum length."); return null; } return new ParsedSecret { Id = id, Credential = secret, Type = IdentityServerConstants.ParsedSecretTypes.SharedSecret }; } else { // client secret is optional _logger.LogDebug("client id without secret found"); return new ParsedSecret { Id = id, Type = IdentityServerConstants.ParsedSecretTypes.NoSecret }; } } } _logger.LogDebug("No secret in post body found"); return null; }此種認證方式就是從
form_data提取client_id和client_secret信息,我們使用PostMan繼續模擬客戶端授權,測試結果如下,也可以得到我們想要的結果。
有了前面的兩個授權方式,我們清楚了首先驗證客戶端的授權信息是否一致,再繼續觀察後續的執行流程,這時會發現TokenRequestValidator中列出了客戶端授權的其他信息驗證,詳細定義代碼如下。
switch (grantType)
{
    case OidcConstants.GrantTypes.AuthorizationCode:
        return await RunValidationAsync(ValidateAuthorizationCodeRequestAsync, parameters);
        //客戶端授權
    case OidcConstants.GrantTypes.ClientCredentials:
        return await RunValidationAsync(ValidateClientCredentialsRequestAsync, parameters);
    case OidcConstants.GrantTypes.Password:
        return await RunValidationAsync(ValidateResourceOwnerCredentialRequestAsync, parameters);
    case OidcConstants.GrantTypes.RefreshToken:
        return await RunValidationAsync(ValidateRefreshTokenRequestAsync, parameters);
    default:
        return await RunValidationAsync(ValidateExtensionGrantRequestAsync, parameters);
}
詳細的授權驗證代碼如下,校驗客戶端授權的一般規則。
private async Task<TokenRequestValidationResult> ValidateClientCredentialsRequestAsync(NameValueCollection parameters)
{
    _logger.LogDebug("Start client credentials token request validation");

    /////////////////////////////////////////////
    // 校驗客戶端Id是否開啟了客戶端授權
    /////////////////////////////////////////////
    if (!_validatedRequest.Client.AllowedGrantTypes.ToList().Contains(GrantType.ClientCredentials))
    {
        LogError("{clientId} not authorized for client credentials flow, check the AllowedGrantTypes of the client", _validatedRequest.Client.ClientId);
        return Invalid(OidcConstants.TokenErrors.UnauthorizedClient);
    }

    /////////////////////////////////////////////
    // 校驗客戶端是否有請求的scopes許可權
    /////////////////////////////////////////////
    if (!await ValidateRequestedScopesAsync(parameters, ignoreImplicitIdentityScopes: true, ignoreImplicitOfflineAccess: true))
    {
        return Invalid(OidcConstants.TokenErrors.InvalidScope);
    }

    if (_validatedRequest.ValidatedScopes.ContainsOpenIdScopes)
    {
        LogError("{clientId} cannot request OpenID scopes in client credentials flow", _validatedRequest.Client.ClientId);
        return Invalid(OidcConstants.TokenErrors.InvalidScope);
    }

    if (_validatedRequest.ValidatedScopes.ContainsOfflineAccessScope)
    {
        LogError("{clientId} cannot request a refresh token in client credentials flow", _validatedRequest.Client.ClientId);
        return Invalid(OidcConstants.TokenErrors.InvalidScope);
    }

    _logger.LogDebug("{clientId} credentials token request validation success", _validatedRequest.Client.ClientId);
    return Valid();
}
最終輸出詳細的校驗結果數據,現在整個客戶端授權的完整邏輯已經介紹完畢,那如何添加我們的自定義客戶端授權呢?比如我要給客戶端A開放一個訪問介面訪問許可權,下麵就開通客戶端A為案例講解。
開通客戶端授權
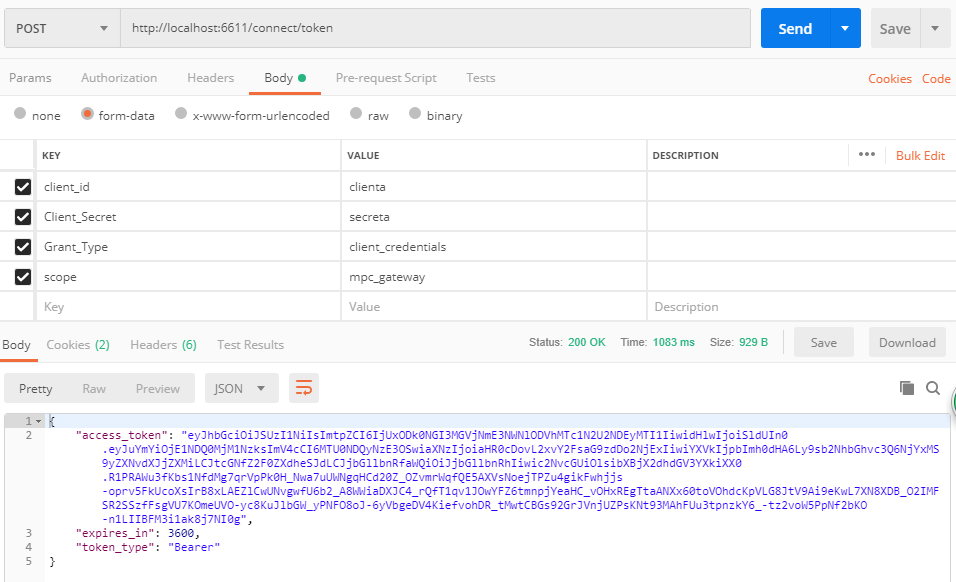
根據前面介紹的驗證流程,我們清楚首先需要增加客戶端信息,這裡起名叫clienta,密碼設置成secreta。上一篇我們介紹了Dapper持久化IdentityServer4的授權信息,所以這裡我就直接以SQL語句的方式來演示添加配置信息。詳細的語句如下:
/*
    添加客戶端腳本
*/
--1、添加客戶端信息
INSERT INTO Clients(AccessTokenLifetime,ClientId,ClientName,Enabled) VALUES(3600,'clienta','測試客戶端A',1);

--2、添加客戶端密鑰,密碼為(secreta) sha256
INSERT INTO ClientSecrets VALUES(21,'',null,'SharedSecret','2tytAAysa0zaDuNthsfLdjeEtZSyWw8WzbzM8pfTGNI=');

--3、增加客戶端授權許可權
INSERT INTO ClientGrantTypes VALUES(21,'client_credentials');

--4、增加客戶端能夠訪問scope
INSERT INTO ClientScopes VALUES(21,'mpc_gateway');
然後我們來測試下新開通的客戶端授權,如下圖所示,可以正常獲取授權信息了,另外一種Basic授權方式可自行測試。
二、如何配合網關認證和授權?
前面使用的是項目自己進行驗證的,正式項目運行時,我們會把請求放到網關中,統一由網關進行認證和授權等操作,內部api無需再次進行認證和授權,那如何實現網關認證和授權呢?
我們可以回憶下之前介紹網關篇時認證篇章,裡面介紹的非常清楚。這裡我們參照剛纔添加的客戶端A為案例增加網關授權,因為我們對外暴露的是網關地址,而不是內部具體認證項目地址。
1、添加網關授權路由
本項目的網關埠為7777,所以網關授權的地址為http://localhost:7777/connect/token,由於為添加網關路由,直接訪問報401,我們首先增加網關的路由信息。
-- 1、插入認證路由(使用預設分類)
insert into AhphReRoute values(1,'/connect/token','[ "POST" ]','','http','/connect/token','[{"Host": "localhost","Port": 6611 }]',
'','','','','','','',0,1);

--2、加入全局配置
INSERT INTO AhphConfigReRoutes VALUES(1,3)

--3、增加認證配置地址路由
insert into AhphReRoute values(1,'/.well-known/openid-configuration','[ "GET" ]','','http','/.well-known/openid-configuration','[{"Host": "localhost","Port": 6611 }]',
'','','','','','','',0,1);
--4、加入全局配置
INSERT INTO AhphConfigReRoutes VALUES(1,4);

--5、增加認證配置地址路由
insert into AhphReRoute values(1,'/.well-known/openid-configuration/jwks','[ "GET" ]','','http','/.well-known/openid-configuration/jwks','[{"Host": "localhost","Port": 6611 }]',
'','','','','','','',0,1);
--6、加入全局配置
INSERT INTO AhphConfigReRoutes VALUES(1,5);通過PostMan測試,可以得到我們預期的授權信息結果。
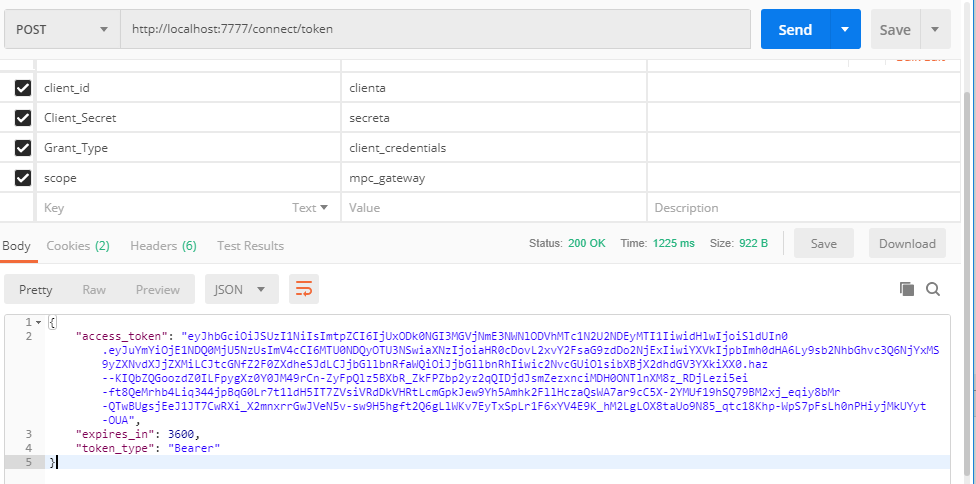
然後繼續訪問我們之前配置的授權路由,提示401未授權,這塊就涉及到前面網關篇的知識了,因為我們的網關增加了授權,所以需要增加客戶端授權才能訪問。
2、添加客戶端授權訪問
還記得是如何添加客戶端授權的嗎?詳細介紹參考[【.NET Core項目實戰-統一認證平臺】第六章 網關篇-自定義客戶端授權 ,我直接把授權的腳本編寫如下:
--7、插入把客戶端加入測試路由組2
INSERT INTO AhphClientGroup  VALUES(21,2)
使用我們剛授權的信息,再次訪問之前配置的需要認證的路由,可以得到我們預期的結果,奈斯,和網關篇的內容完全一致。
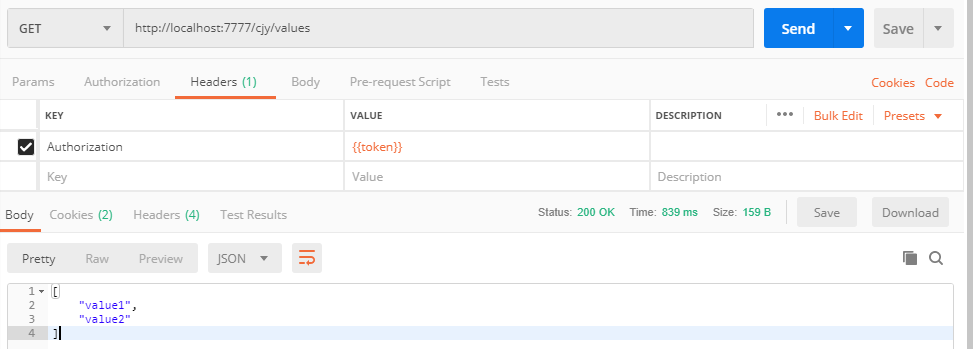
註意:在配置完信息後需要清理緩存,因為我們之前做網關時,很多配置信息的讀取使用了緩存。
三、如何統一輸出結果?
作為一塊準備應用到生產環境的產品,可能為各種第三方提供應用支持,那麼統一的輸出結果是必須要實現的,比如我們使用微信sdk或其他第三方sdk時,會發現它們都會列出出現錯誤的統一提示,由標識代碼和說明組成,這裡我們就需要解決如何標準化輸出問題,自己業務系統輸出標準結果很容易,因為都是自己控制的結果輸出,那麼我們網關集成Ocelot、認證集成IdentityServer4,這兩塊如何進行標準化輸出呢?
那開始我們的改造之旅吧,首先我們要明確如果遇到錯誤如何進行輸出,我們定義一個輸出基類BaseResult,詳細的定義如下:
/// <summary>
/// 金焰的世界
/// 2018-12-10
/// 信息輸出基類
/// </summary>
public class BaseResult
{
    public BaseResult(int _errCode,string _errMsg)
    {
        errCode = _errCode;
        errMsg = _errMsg;
    }
    public BaseResult()
    {

    }
    /// <summary>
    /// 錯誤類型標識
    /// </summary>
    public int errCode { get; set; }

    /// <summary>
    /// 錯誤類型說明
    /// </summary>
    public string errMsg { get; set; }
}

/// <summary>
/// 金焰的世界
/// 2018-12-10
/// 預設成功結果
/// </summary>
public class SuccessResult : BaseResult
    {
        public SuccessResult() : base(0, "成功")
        {

        }
    }
1、網關預設輸出改造
網關這段需要改造錯誤提示的代碼和內容以及異常的輸出結果,首先改造錯誤情況的輸出結果,使用BaseResult統一輸出,這裡就需要重寫輸出中間件ResponderMiddleware,下麵就開始重寫之旅吧。
新增自定義輸出中間件CzarResponderMiddleware,詳細代碼如下:
using Czar.Gateway.Configuration;
using Microsoft.AspNetCore.Http;
using Ocelot.Errors;
using Ocelot.Logging;
using Ocelot.Middleware;
using Ocelot.Responder;
using System.Collections.Generic;
using System.Net;
using System.Threading.Tasks;

namespace Czar.Gateway.Responder.Middleware
{
    /// <summary>
    /// 金焰的世界
    /// 2018-12-10
    /// 統一輸出中間件
    /// </summary>
    public class CzarResponderMiddleware: OcelotMiddleware
    {
        private readonly OcelotRequestDelegate _next;
        private readonly IHttpResponder _responder;
        private readonly IErrorsToHttpStatusCodeMapper _codeMapper;

        public CzarResponderMiddleware(OcelotRequestDelegate next,
            IHttpResponder responder,
            IOcelotLoggerFactory loggerFactory,
            IErrorsToHttpStatusCodeMapper codeMapper
           )
            : base(loggerFactory.CreateLogger<CzarResponderMiddleware>())
        {
            _next = next;
            _responder = responder;
            _codeMapper = codeMapper;
        }

        public async Task Invoke(DownstreamContext context)
        {
            await _next.Invoke(context);

            if (context.IsError)
            {//自定義輸出結果
                var errmsg = context.Errors[0].Message;
                int httpstatus = _codeMapper.Map(context.Errors);
                var errResult = new BaseResult() { errcode = httpstatus, errmsg = errmsg };
                var message = errResult.ToJson();
                context.HttpContext.Response.StatusCode = (int)HttpStatusCode.OK;
                await context.HttpContext.Response.WriteAsync(message);
                return;
            }
            else if (context.HttpContext.Response.StatusCode != (int)HttpStatusCode.OK)
            {//標記失敗,不做任何處理,自定義擴展時預留

            }
            else if (context.DownstreamResponse == null)
            {//添加如果管道強制終止,不做任何處理,修複未將對象實例化錯誤

            }
            else
            {//繼續請求下游地址返回
                Logger.LogDebug("no pipeline errors, setting and returning completed response");
                await _responder.SetResponseOnHttpContext(context.HttpContext, context.DownstreamResponse);
            }
        }

        private void SetErrorResponse(HttpContext context, List<Error> errors)
        {
            var statusCode = _codeMapper.Map(errors);
            _responder.SetErrorResponseOnContext(context, statusCode);
        }
    }
}
然後添加中間件擴展,代碼如下。
using Ocelot.Middleware.Pipeline;

namespace Czar.Gateway.Responder.Middleware
{
    /// <summary>
    /// 金焰的世界
    /// 2018-12-10
    /// 應用輸出中間件擴展
    /// </summary>
    public static class CzarResponderMiddlewareExtensions
    {
        public static IOcelotPipelineBuilder UseCzarResponderMiddleware(this IOcelotPipelineBuilder builder)
        {
            return builder.UseMiddleware<CzarResponderMiddleware>();
        }
    }
}
最後使用此擴展來接管預設的輸出中間件,詳細代碼如下。
//builder.UseResponderMiddleware();
builder.UseCzarResponderMiddleware();好了,網關統一輸出中間件就完成了,是不是很簡單呢?我們來測試下效果吧,PostMan閃亮登場,

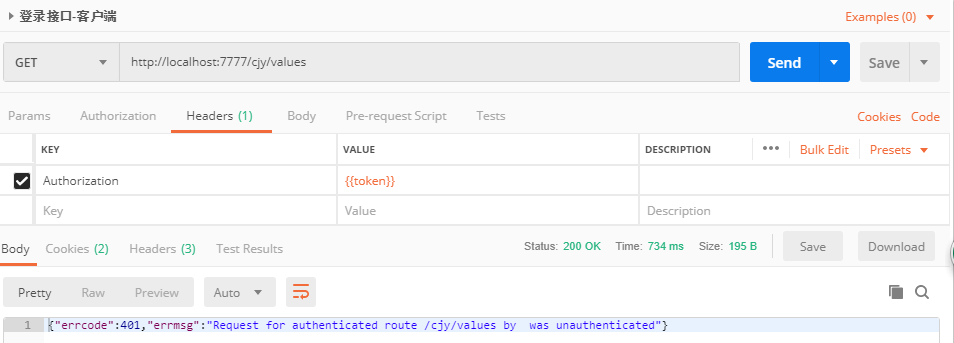
奈斯,這才是我們需要的結果,那如何異常會輸出什麼呢??我們來模擬下結果,我直接在服務端拋出異常測試。
預設情況會支持輸出異常的堆棧信息。那如何捕獲服務端異常信息呢?我們需要瞭解在哪裡發送了後端請求,通過源碼分析,發現是由HttpRequesterMiddleware中間件做後端請求,這時我們只需要改造下此中間件即可完成統一異常捕獲。改造核心代碼如下:
public async Task Invoke(DownstreamContext context)
{
    var response = await _requester.GetResponse(context);

    if (response.IsError)
    {
        Logger.LogDebug("IHttpRequester returned an error, setting pipeline error");

        SetPipelineError(context, response.Errors);
        return;
    }
    else if(response.Data.StatusCode != System.Net.HttpStatusCode.OK)
    {//如果後端未處理異常,設置異常信息,統一輸出,防止暴露敏感信息
        var error = new InternalServerError($"請求服務異常");
        Logger.LogWarning($"路由地址 {context.HttpContext.Request.Path} 請求服務異常. {error}");
        SetPipelineError(context, error);
        return;
    }
    Logger.LogDebug("setting http response message");

    context.DownstreamResponse = new DownstreamResponse(response.Data);
}
修改測試後端服務代碼如下,
// GET api/values/5
[HttpGet("{id}")]
public ActionResult<string> Get(int id)
{
    throw new Exception("測試異常");
}然後通過網關訪問路由地址http://localhost:7777/ctr/values/1,輸出為{"errcode":500,"errmsg":"請求服務異常"},得到了預期的所有目標,網關統一輸出全部改造完畢。
2、認證的統一輸出改造
這裡為了統一風格,我們先查看下Ids4的錯誤提示方式和輸出結果,然後配合源碼可以發現到輸出都是繼承IEndpointResult介面,並定義了各種方式的輸出,且校驗失敗時,輸出的狀態碼都不是200,那麼我們可以從這裡下手,在網關層增加獨立的判斷,來相容自定義的輸出。改造代碼如下:
using Czar.Gateway.Errors;
using Newtonsoft.Json.Linq;
using Ocelot.Logging;
using Ocelot.Middleware;
using Ocelot.Requester;
using System.Threading.Tasks;

namespace Czar.Gateway.Requester.Middleware
{
    /// <summary>
    /// 金焰的世界
    /// 2018-12-10
    /// 自定義請求中間件
    /// </summary>
    public class CzarHttpRequesterMiddleware : OcelotMiddleware
    {
        private readonly OcelotRequestDelegate _next;
        private readonly IHttpRequester _requester;

        public CzarHttpRequesterMiddleware(OcelotRequestDelegate next,
            IOcelotLoggerFactory loggerFactory,
            IHttpRequester requester)
                : base(loggerFactory.CreateLogger<CzarHttpRequesterMiddleware>())
        {
            _next = next;
            _requester = requester;
        }

        public async Task Invoke(DownstreamContext context)
        {
            var response = await _requester.GetResponse(context);

            if (response.IsError)
            {
                Logger.LogDebug("IHttpRequester returned an error, setting pipeline error");

                SetPipelineError(context, response.Errors);
                return;
            }
            else if(response.Data.StatusCode != System.Net.HttpStatusCode.OK)
            {//如果後端未處理異常,設置異常信息,統一輸出,防止暴露敏感信息
                if (response.Data.StatusCode == System.Net.HttpStatusCode.BadRequest)
                {//提取Ids4相關的異常(400)
                    var result = await response.Data.Content.ReadAsStringAsync();
                    JObject jobj = JObject.Parse(result);
                    var errorMsg = jobj["error"]?.ToString();
                   var error = new IdentityServer4Error(errorMsg??"未知異常");
                    SetPipelineError(context, error);
                    return;
                }
                else
                {
                    var error = new InternalServerError($"請求服務異常");
                    Logger.LogWarning($"路由地址 {context.HttpContext.Request.Path} 請求服務異常. {error}");
                    SetPipelineError(context, error);
                    return;
                }
            }
            Logger.LogDebug("setting http response message");

            context.DownstreamResponse = new DownstreamResponse(response.Data);
        }
    }
}
改造完成後,我們隨時請求認證記錄,最終顯示效果如下。
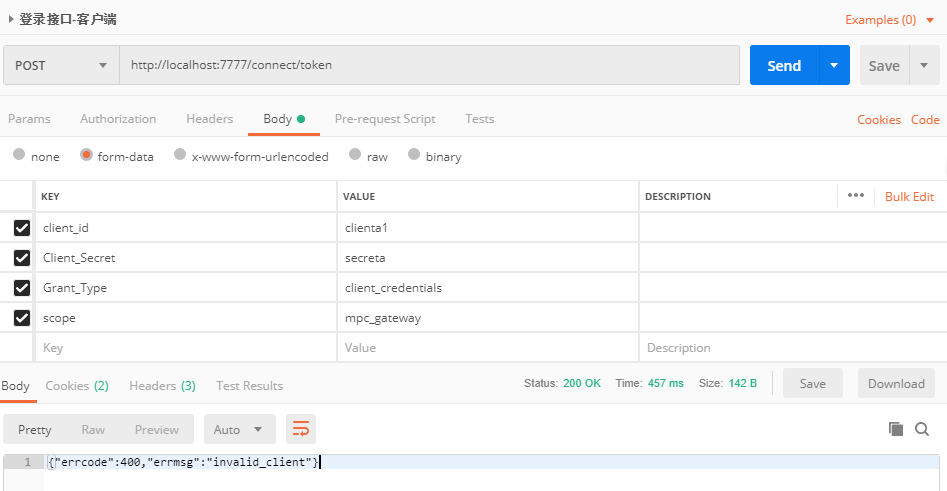
奈斯,輸出風格統一啦,這樣就完美的解決了兩個組件的輸出問題,終於可以開心的使用啦。
四、內容總結
本篇我們詳細的介紹了客戶端授權的原理和支持的兩個授權的方式,並各自演示了調用方式,然後知道瞭如何在資料庫端新開通一個客戶端的信息,然後介紹了配合網關實現客戶端的授權和認證,並再次介紹了網關端的路由配置情況,最後介紹瞭如何把網關和認證統一輸出格式,便於我們在正式環境的使用,涉及內容比較多,如果中間實現的有不對的地方,也歡迎大家批評指正。


