【Python3爬蟲】使用雲打碼識別驗證碼

来源:https://www.cnblogs.com/TM0831/archive/2018/10/06/9747207.html
-Advertisement-
Play Games

本來是學著使用tesserocr來識別驗證碼的,但是由於tesserocr的識別率不高,還是學了一下使用雲打碼來識別驗證碼== 具體步驟如下: 1、首先是註冊賬號,然後進入這個網址(http://www.yundama.com/apidoc/YDM_SDK.html)選擇PythonHTTP示例下載 ...


本來是學著使用tesserocr來識別驗證碼的,但是由於tesserocr的識別率不高,還是學了一下使用雲打碼來識別驗證碼==


具體步驟如下:

1、首先是註冊賬號,然後進入這個網址(http://www.yundama.com/apidoc/YDM_SDK.html)選擇PythonHTTP示例下載:
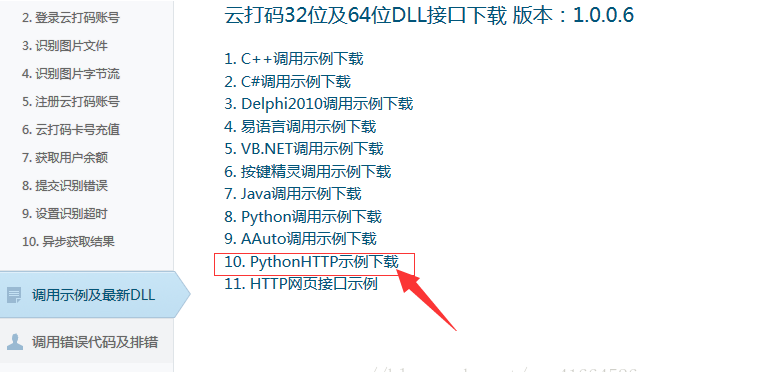
2、下載後解壓,可以看到有如下幾個文件,因為我使用的Python版本是3.5,所以打開YDMHTTPDemo3.x:

3、打開之後修改如下幾個部分,用戶名和密碼就是你的用戶名和密碼,而appid和appkey需要進入開發者後臺查看,第一次使用的時候還需要新建一個軟體,才能有appid和appkey:
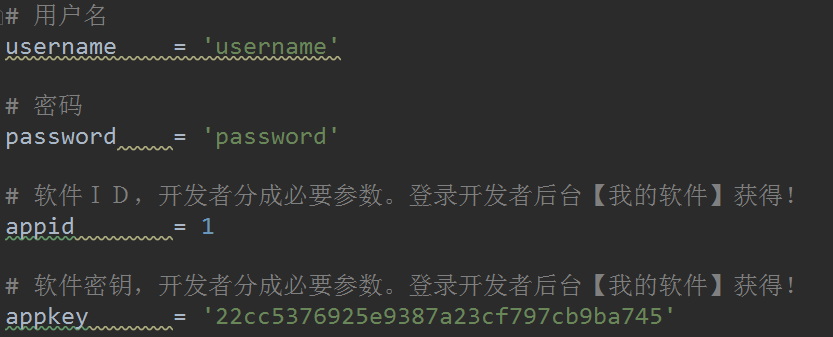
 

下圖中的軟體代碼就是appid,通訊密鑰就是appkey:

4、把信息都添加進去後運行代碼,不出意外會返回一個1007,進入錯誤代碼及排錯(http://www.yundama.com/apidoc/YDM_ErrorCode.html)查找原因,原來是因為賬戶沒有餘額


然後進入用戶後臺充值就行了,充值完以後再次運行代碼,就可以看到識別結果了。


進行完如上步驟之後,我們就可以使用雲打碼平臺來識別驗證碼了,不過為了使用方便,可以建一個YDMDemo.py,把賬號密碼等信息寫進去,調用的時候只需要傳入驗證碼圖片就行了。


  1 import json
  2 import time
  3 import requests
  4 
  5 
  6 class YDMHttp:
  7     apiurl = 'http://api.yundama.com/api.php'
  8     username = ''
  9     password = ''
 10     appid = ''
 11     appkey = ''
 12 
 13     def __init__(self, username, password, appid, appkey):
 14         self.username = username
 15         self.password = password
 16         self.appid = str(appid)
 17         self.appkey = appkey
 18 
 19     def request(self, fields, files=[]):
 20         response = self.post_url(self.apiurl, fields, files)
 21         response = json.loads(response)
 22         return response
 23 
 24     def balance(self):
 25         data = {'method': 'balance', 'username': self.username, 'password': self.password, 'appid': self.appid,
 26                 'appkey': self.appkey}
 27         response = self.request(data)
 28         if response:
 29             if response['ret'] and response['ret'] < 0:
 30                 return response['ret']
 31             else:
 32                 return response['balance']
 33         else:
 34             return -9001
 35 
 36     def login(self):
 37         data = {'method': 'login', 'username': self.username, 'password': self.password, 'appid': self.appid,
 38                 'appkey': self.appkey}
 39         response = self.request(data)
 40         if response:
 41             if response['ret'] and response['ret'] < 0:
 42                 return response['ret']
 43             else:
 44                 return response['uid']
 45         else:
 46             return -9001
 47 
 48     def upload(self, filename, codetype, timeout):
 49         data = {'method': 'upload', 'username': self.username, 'password': self.password, 'appid': self.appid,
 50                 'appkey': self.appkey, 'codetype': str(codetype), 'timeout': str(timeout)}
 51         file = {'file': filename}
 52         response = self.request(data, file)
 53         if response:
 54             if response['ret'] and response['ret'] < 0:
 55                 return response['ret']
 56             else:
 57                 return response['cid']
 58         else:
 59             return -9001
 60 
 61     def result(self, cid):
 62         data = {'method': 'result', 'username': self.username, 'password': self.password, 'appid': self.appid,
 63                 'appkey': self.appkey, 'cid': str(cid)}
 64         response = self.request(data)
 65         return response and response['text'] or ''
 66 
 67     def decode(self, filename, codetype, timeout):
 68         cid = self.upload(filename, codetype, timeout)
 69         if cid > 0:
 70             for i in range(0, timeout):
 71                 result = self.result(cid)
 72                 if result != '':
 73                     return cid, result
 74                 else:
 75                     time.sleep(1)
 76             return -3003, ''
 77         else:
 78             return cid, ''
 79 
 80     def report(self, cid):
 81         data = {'method': 'report', 'username': self.username, 'password': self.password, 'appid': self.appid,
 82                 'appkey': self.appkey, 'cid': str(cid), 'flag': '0'}
 83         response = self.request(data)
 84         if response:
 85             return response['ret']
 86         else:
 87             return -9001
 88 
 89     def post_url(self, url, fields, files=[]):
 90         for key in files:
 91             files[key] = open(files[key], 'rb')
 92         res = requests.post(url, files=files, data=fields)
 93         return res.text
 94 
 95 
 96 def use_ydm(filename):
 97     username = ''  # 用戶名
 98     password = ''  # 密碼
 99     app_id = 1  # 軟體ID
100     app_key = ''  # 軟體密鑰
101     code_type = 1004  # 驗證碼類型
102     timeout = 60  # 超時時間,秒
103     yundama = YDMHttp(username, password, app_id, app_key)  # 初始化
104     balance = yundama.balance()  # 查詢餘額
105     print('您的題分餘額為{}'.format(balance))
106     cid, result = yundama.decode(filename, code_type, timeout)  # 開始識別
107     print('識別結果為{}'.format(result))
108     return result


您的分享是我們最大的動力!

-Advertisement-
Play Games
更多相關文章
  • 1003 我要通過! (20 分) “ 答案正確 ”是自動判題系統給出的最令人歡喜的回覆。本題屬於 PAT 的“ 答案正確 ”大派送 —— 只要讀入的字元串滿足下列條件, 系統就輸出“ 答案正確 ”,否則輸出“ 答案錯誤”。 得到“ 答案正確 ”的條件是: 字元串中必須僅有 P 、 A 、 T 這三 ...
  • 前面提及過,音頻指紋演算法的思路。 也梳理開源了兩個比較經典的演算法。 https://github.com/cpuimage/shazam https://github.com/cpuimage/AudioFingerprinter 後來一段時間,稍微看了下這兩個演算法,還有不少可以精簡優化的空間。 例 ...
  • 前言 字元串基礎(String) python中字元的定義使用單引號或者雙引號都可以,例如: 註意:在python3中input獲取鍵盤輸入的數據,都以字元串的方式進行保存,即使輸入的是數字。 下標&切片 1.下標 下標:可以理解為數組類數據類型內元素的索引。列表與元組支持下標索引,字元串是字元的數 ...
  • yield表達式用於generator function 調用generator function時,返回一個iterator(函數內語句不被會執行),調用iterator函數時,執行到yield表達式, 當前函數暫停執行,返回表達式的值到調用者,繼續調用iterator函數,從暫停處恢復執行。、 ...
  • 筆者近期在工作之中編程實現一個Cache結構的封裝,需要使用到C++之中的 互斥量Mutex ,於是花了一些時間進行了調研。( 結果對C++標準庫很是絕望.... )最終還是通過利用了Boost庫的 shared_mutex 解決了問題。借這個機會來聊聊在C++之中的多線程編程的一些 “坑” 。 1 ...
  • 本文將主要分為4大部分,分別介紹Python核心編程中的迭代器、生成器 、閉包以及裝飾器。 生成器 生成器是生成一個值的特殊函數,它具有這樣的特點:第一次執行該函數時,先從頭按順序執行,在碰到yield關鍵字時該函數會暫停執行該函數後續的代碼,並且返回一個值;在下一次調用該函數執行時,程式將從上一次 ...
  • socket 函數 system Call socket 函數原型: 參數adressfamily 舉例 | adress family種類 | 功能描述 | | | | | AF_INET | IPV4用socket | | AF_INET6 | IPV6用socket | | AF_UNIX | ...
  • 1 下載smarty3並將libs文件放在框架libraries目錄下重命名為smarty 2 在libraries下創建Ci_smarty.php文件,代碼如下 <?php if ( ! defined('BASEPATH')) exit('No direct script access allo ...
一周排行
    -Advertisement-
    Play Games
  • 移動開發(一):使用.NET MAUI開發第一個安卓APP 對於工作多年的C#程式員來說,近來想嘗試開發一款安卓APP,考慮了很久最終選擇使用.NET MAUI這個微軟官方的框架來嘗試體驗開發安卓APP,畢竟是使用Visual Studio開發工具,使用起來也比較的順手,結合微軟官方的教程進行了安卓 ...
  • 前言 QuestPDF 是一個開源 .NET 庫,用於生成 PDF 文檔。使用了C# Fluent API方式可簡化開發、減少錯誤並提高工作效率。利用它可以輕鬆生成 PDF 報告、發票、導出文件等。 項目介紹 QuestPDF 是一個革命性的開源 .NET 庫,它徹底改變了我們生成 PDF 文檔的方 ...
  • 項目地址 項目後端地址: https://github.com/ZyPLJ/ZYTteeHole 項目前端頁面地址: ZyPLJ/TreeHoleVue (github.com) https://github.com/ZyPLJ/TreeHoleVue 目前項目測試訪問地址: http://tree ...
  • 話不多說,直接開乾 一.下載 1.官方鏈接下載: https://www.microsoft.com/zh-cn/sql-server/sql-server-downloads 2.在下載目錄中找到下麵這個小的安裝包 SQL2022-SSEI-Dev.exe,運行開始下載SQL server; 二. ...
  • 前言 隨著物聯網(IoT)技術的迅猛發展,MQTT(消息隊列遙測傳輸)協議憑藉其輕量級和高效性,已成為眾多物聯網應用的首選通信標準。 MQTTnet 作為一個高性能的 .NET 開源庫,為 .NET 平臺上的 MQTT 客戶端與伺服器開發提供了強大的支持。 本文將全面介紹 MQTTnet 的核心功能 ...
  • Serilog支持多種接收器用於日誌存儲,增強器用於添加屬性,LogContext管理動態屬性,支持多種輸出格式包括純文本、JSON及ExpressionTemplate。還提供了自定義格式化選項,適用於不同需求。 ...
  • 目錄簡介獲取 HTML 文檔解析 HTML 文檔測試參考文章 簡介 動態內容網站使用 JavaScript 腳本動態檢索和渲染數據,爬取信息時需要模擬瀏覽器行為,否則獲取到的源碼基本是空的。 本文使用的爬取步驟如下: 使用 Selenium 獲取渲染後的 HTML 文檔 使用 HtmlAgility ...
  • 1.前言 什麼是熱更新 游戲或者軟體更新時,無需重新下載客戶端進行安裝,而是在應用程式啟動的情況下,在內部進行資源或者代碼更新 Unity目前常用熱更新解決方案 HybridCLR,Xlua,ILRuntime等 Unity目前常用資源管理解決方案 AssetBundles,Addressable, ...
  • 本文章主要是在C# ASP.NET Core Web API框架實現向手機發送驗證碼簡訊功能。這裡我選擇是一個互億無線簡訊驗證碼平臺,其實像阿裡雲,騰訊雲上面也可以。 首先我們先去 互億無線 https://www.ihuyi.com/api/sms.html 去註冊一個賬號 註冊完成賬號後,它會送 ...
  • 通過以下方式可以高效,並保證數據同步的可靠性 1.API設計 使用RESTful設計,確保API端點明確,並使用適當的HTTP方法(如POST用於創建,PUT用於更新)。 設計清晰的請求和響應模型,以確保客戶端能夠理解預期格式。 2.數據驗證 在伺服器端進行嚴格的數據驗證,確保接收到的數據符合預期格 ...