1、什麼是RabbitMQ工作隊列 我們在應用程式使用消息系統時,一般情況下生產者往隊列里插入數據時速度是比較快的,但是消費者消費數據往往涉及到一些業務邏輯處理導致速度跟不上生產者生產數據。因此如果一個生產者對應一個消費者的話,很容易導致很多消息堆積在隊列里。這時,就得使用工作隊列了。一個隊列有多個 ...
1、什麼是RabbitMQ工作隊列
我們在應用程式使用消息系統時,一般情況下生產者往隊列里插入數據時速度是比較快的,但是消費者消費數據往往涉及到一些業務邏輯處理導致速度跟不上生產者生產數據。因此如果一個生產者對應一個消費者的話,很容易導致很多消息堆積在隊列里。這時,就得使用工作隊列了。一個隊列有多個消費者同時消費數據。
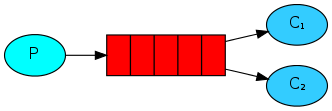
下圖取自於官方網站(RabbitMQ)的工作隊列的圖例

P:消息的生產者
C1:消息的消費者1
C2:消息的消費者2
紅色:隊列
生產者將消息發送到隊列,多個消費者同時從隊列中獲取消息。
工作隊列有兩種分發數據的方式:輪詢分發(Round-robin)和 公平分發(Fair dispatch)。輪詢分發:隊列給每一個消費者發送數量一樣的數據。公平分發:消費者設置每次從隊列中取一條數據,並且消費完後手動應答,繼續從隊列取下一個數據。下麵分別是兩種分發方式不同的寫法。
2、輪詢分發(Round-robin)
生產者(Send)生產10條數據,消費者1(Receive1)接收數據並假設處理業務邏輯1s,消費者2(Receive2)接收數據並假設處理業務邏輯2s(生產者先運行,兩個消費者同時運行)。
2.1、生產者(Send)代碼
public class Send
{
    //隊列名稱
    private static final String QUEUE_NAME = "test_work_round_robin_queue";

    public static void main(String[] args)
    {
        try
        {
            //獲取連接
            Connection connection = ConnectionUtil.getConnection();
            //從連接中獲取一個通道
            Channel channel = connection.createChannel();
            //聲明隊列
            channel.queueDeclare(QUEUE_NAME, false, false, false, null);
            for (int i = 0; i < 10; i++)
            {
                String message = "this is work_round_robin queue message" + i;
                System.out.println("[send]:" + message);
                //發送消息
                channel.basicPublish("", QUEUE_NAME, null, message.getBytes("utf-8"));
                Thread.sleep(20 * i);
            }
            channel.close();
            connection.close();
        }
        catch (IOException | TimeoutException | InterruptedException e)
        {
            e.printStackTrace();
        }
    }
}

運行結果:
[send]:this is work_round_robin queue message0
[send]:this is work_round_robin queue message1
[send]:this is work_round_robin queue message2
[send]:this is work_round_robin queue message3
[send]:this is work_round_robin queue message4
[send]:this is work_round_robin queue message5
[send]:this is work_round_robin queue message6
[send]:this is work_round_robin queue message7
[send]:this is work_round_robin queue message8
[send]:this is work_round_robin queue message9
2.2、消費者1(Receive1)代碼
public class Receive1
{
    //隊列名稱
    private static final String QUEUE_NAME = "test_work_round_robin_queue";

    public static void main(String[] args)
    {
        try
        {
            //獲取連接
            Connection connection = ConnectionUtil.getConnection();
            //從連接中獲取一個通道
            Channel channel = connection.createChannel();
            //聲明隊列
            channel.queueDeclare(QUEUE_NAME, false, false, false, null);
            //定義消費者
            DefaultConsumer consumer = new DefaultConsumer(channel)
            {
                //當消息到達時執行回調方法
                @Override
                public void handleDelivery(String consumerTag, Envelope envelope, BasicProperties properties,
                        byte[] body) throws IOException
                {
                    String message = new String(body, "utf-8");
                    System.out.println("[1] Receive message:" + message);
                    try
                    {
                        //消費者休息1s處理業務
                        Thread.sleep(1000);
                    }
                    catch (InterruptedException e)
                    {
                        e.printStackTrace();
                    }
                    finally
                    {
                        System.out.println("[1] done");
                    }
                }
            };
            //監聽隊列
            channel.basicConsume(QUEUE_NAME, true, consumer);
        }
        catch (IOException e)
        {
            e.printStackTrace();
        }

    }
}

運行結果:
[1] Receive message:this is work_round_robin queue message0
[1] done
[1] Receive message:this is work_round_robin queue message2
[1] done
[1] Receive message:this is work_round_robin queue message4
[1] done
[1] Receive message:this is work_round_robin queue message6
[1] done
[1] Receive message:this is work_round_robin queue message8
[1] done
2.3、消費者2(Receive2)代碼
public class Receive2
{
    //隊列名稱
    private static final String QUEUE_NAME = "test_work_round_robin_queue";

    public static void main(String[] args)
    {

        try
        {
            //獲取連接
            Connection connection = ConnectionUtil.getConnection();
            //從連接中獲取一個通道
            Channel channel = connection.createChannel();
            //聲明隊列
            channel.queueDeclare(QUEUE_NAME, false, false, false, null);
            //定義消費者
            DefaultConsumer consumer = new DefaultConsumer(channel)
            {
                //當消息到達時執行回調方法
                @Override
                public void handleDelivery(String consumerTag, Envelope envelope, BasicProperties properties,
                        byte[] body) throws IOException
                {
                    String message = new String(body, "utf-8");
                    System.out.println("[2] Receive message:" + message);
                    try
                    {
                        //消費者休息2s處理業務
                        Thread.sleep(2000);
                    }
                    catch (InterruptedException e)
                    {
                        e.printStackTrace();
                    }
                    finally
                    {
                        System.out.println("[2] done");
                    }
                }
            };
            //監聽隊列
            channel.basicConsume(QUEUE_NAME, true, consumer);
        }
        catch (IOException e)
        {
            e.printStackTrace();
        }

    }
}

運行結果:
[2] Receive message:this is work_round_robin queue message1
[2] done
[2] Receive message:this is work_round_robin queue message3
[2] done
[2] Receive message:this is work_round_robin queue message5
[2] done
[2] Receive message:this is work_round_robin queue message7
[2] done
[2] Receive message:this is work_round_robin queue message9
[2] done
總結:兩個消費者得到的數據量一樣的。從運行時可以看到消費者1會先執行完,消費者2會後執行完。並不會因為兩個消費者處理數據速度不一樣使得兩個消費者取得不一樣數量的數據。並且當隊列數量大的時候通過觀察RabbitMQ的管理後臺,可以看到管理界面隊列中的數據很快就沒了,但是這個時候兩個消費者其實並沒有消費完數據。這種分發方式存在著很大的隱患。
3、公平分發(Fair dispatch)
生產者(Send)生產10條數據,消費者1(Receive1)接收數據並假設處理業務邏輯1s,消費者2(Receive2)接收數據並假設處理業務邏輯2s(生產者先運行,兩個消費者同時運行)。
消費者設置每次從隊列里取一條數據,並且關閉自動回覆機制,每次取完一條數據後,手動回覆並繼續取下一條數據。
3.1、生產者(Send)代碼
public class Send
{
    //隊列名稱
    private static final String QUEUE_NAME = "test_work_fair_dispatch_queue";

    public static void main(String[] args)
    {
        try
        {
            //獲取連接
            Connection connection = ConnectionUtil.getConnection();
            //從連接中獲取一個通道
            Channel channel = connection.createChannel();
            //聲明隊列
            channel.queueDeclare(QUEUE_NAME, false, false, false, null);
            for (int i = 0; i < 10; i++)
            {
                String message = "this is work_fair_dispatch queue message" + i;
                System.out.println("[send]:" + message);
                //發送消息
                channel.basicPublish("", QUEUE_NAME, null, message.getBytes("utf-8"));
                Thread.sleep(20 * i);
            }
            channel.close();
            connection.close();
        }
        catch (IOException | TimeoutException | InterruptedException e)
        {
            e.printStackTrace();
        }
    }
}

運行結果:
[send]:this is work_fair_dispatch queue message0
[send]:this is work_fair_dispatch queue message1
[send]:this is work_fair_dispatch queue message2
[send]:this is work_fair_dispatch queue message3
[send]:this is work_fair_dispatch queue message4
[send]:this is work_fair_dispatch queue message5
[send]:this is work_fair_dispatch queue message6
[send]:this is work_fair_dispatch queue message7
[send]:this is work_fair_dispatch queue message8
[send]:this is work_fair_dispatch queue message9
3.2、消費者1(Receive1)代碼
public class Receive1
{
    //隊列名稱
    private static final String QUEUE_NAME = "test_work_fair_dispatch_queue";

    public static void main(String[] args)
    {

        try
        {
            //獲取連接
            Connection connection = ConnectionUtil.getConnection();
            //從連接中獲取一個通道
            final Channel channel = connection.createChannel();
            //聲明隊列
            channel.queueDeclare(QUEUE_NAME, false, false, false, null);
            //設置每次從隊列里取一條數據
            int prefetchCount = 1;
            channel.basicQos(prefetchCount);
            //定義消費者
            DefaultConsumer consumer = new DefaultConsumer(channel)
            {
                //當消息到達時執行回調方法
                @Override
                public void handleDelivery(String consumerTag, Envelope envelope, BasicProperties properties,
                        byte[] body) throws IOException
                {
                    String message = new String(body, "utf-8");
                    System.out.println("[1] Receive message:" + message);
                    try
                    {
                        //消費者休息1s處理業務
                        Thread.sleep(1000);
                    }
                    catch (InterruptedException e)
                    {
                        e.printStackTrace();
                    }
                    finally
                    {
                        System.out.println("[1] done");
                        //手動應答
                        channel.basicAck(envelope.getDeliveryTag(), false);
                    }
                }
            };
            //設置手動應答
            boolean autoAck = false;
            //監聽隊列
            channel.basicConsume(QUEUE_NAME, autoAck, consumer);
        }
        catch (IOException e)
        {
            e.printStackTrace();
        }

    }
}

運行結果:
[1] Receive message:this is work_fair_dispatch queue message1
[1] done
[1] Receive message:this is work_fair_dispatch queue message2
[1] done
[1] Receive message:this is work_fair_dispatch queue message4
[1] done
[1] Receive message:this is work_fair_dispatch queue message5
[1] done
[1] Receive message:this is work_fair_dispatch queue message7
[1] done
[1] Receive message:this is work_fair_dispatch queue message8
[1] done
3.3、消費者2(Receive2)代碼
public class Receive2
{
    //隊列名稱
    private static final String QUEUE_NAME = "test_work_fair_dispatch_queue";

    public static void main(String[] args)
    {

        try
        {
            //獲取連接
            Connection connection = ConnectionUtil.getConnection();
            //從連接中獲取一個通道
            final Channel channel = connection.createChannel();
            //聲明隊列
            channel.queueDeclare(QUEUE_NAME, false, false, false, null);
            //保證一次只分發一個
            int prefetchCount = 1;
            channel.basicQos(prefetchCount);
            //定義消費者
            DefaultConsumer consumer = new DefaultConsumer(channel)
            {
                //當消息到達時執行回調方法
                @Override
                public void handleDelivery(String consumerTag, Envelope envelope, BasicProperties properties,
                        byte[] body) throws IOException
                {
                    String message = new String(body, "utf-8");
                    System.out.println("[2] Receive message:" + message);
                    try
                    {
                        //消費者休息2s處理業務
                        Thread.sleep(2000);
                    }
                    catch (InterruptedException e)
                    {
                        e.printStackTrace();
                    }
                    finally
                    {
                        System.out.println("[2] done");
                        //手動應答
                        channel.basicAck(envelope.getDeliveryTag(), false);
                    }
                }
            };
            //設置手動應答
            boolean autoAck = false;
            //監聽隊列
            channel.basicConsume(QUEUE_NAME, autoAck, consumer);
        }
        catch (IOException e)
        {
            e.printStackTrace();
        }

    }
}

運行結果:
[2] Receive message:this is work_fair_dispatch queue message0
[2] done
[2] Receive message:this is work_fair_dispatch queue message3
[2] done
[2] Receive message:this is work_fair_dispatch queue message6
[2] done
[2] Receive message:this is work_fair_dispatch queue message9
[2] done
總結:消費者1處理了6條數據,消費者2處理了4條數據
與輪詢分發不同的是,當每個消費都設置了每次只會從隊列取一條數據時,並且關閉自動應答,在每次處理完數據後手動給隊列發送確認收到數據。這樣隊列就會公平給每個消息費者發送數據,消費一條再發第二條,而且可以在管理界面中看到數據是一條條隨著消費者消費完從而減少的,並不是一下子全部分發完了。顯然公平分發更符合系統設計。
註意:本文僅代表個人理解和看法喲!和本人所在公司和團體無任何關係!


