在早期Bootstrap框架介紹中,我的隨筆《結合bootstrap fileinput插件和Bootstrap-table表格插件,實現文件上傳、預覽、提交的導入Excel數據操作流程》中介紹了利用Bootstrap FieInput插件上傳Excel文件到伺服器,然後利用Bootstrap-ta... ...
在早期Bootstrap框架介紹中,我的隨筆《結合bootstrap fileinput插件和Bootstrap-table表格插件,實現文件上傳、預覽、提交的導入Excel數據操作流程》中介紹了利用Bootstrap FieInput插件上傳Excel文件到伺服器,然後利用Bootstrap-table表格插件進行展示數據,最後導入到系統裡面中,這個導入過程中可以預覽到要導入的數據,而且可以選擇性的導入。在實際使用過程中,發現使用Ajax導入大批量(幾百條記錄數據)的情況下,頁面就會罷工,估計和提交的數據大小限制有關,為瞭解決這個問題,並結合導入數據一般都是全部導入的情況下,我們修改下數據導入的過程,從而實現大量數據量的Excel數據導入。
1、使用預覽數據,並勾選導入的處理方式
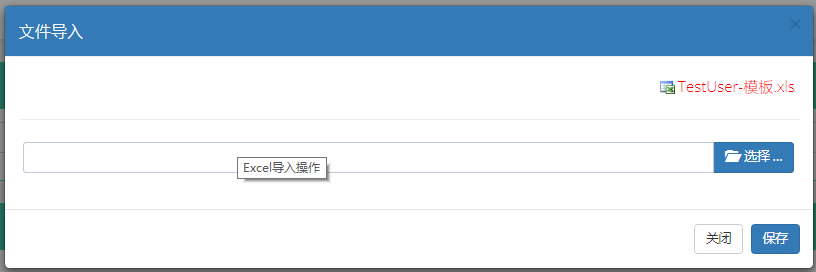
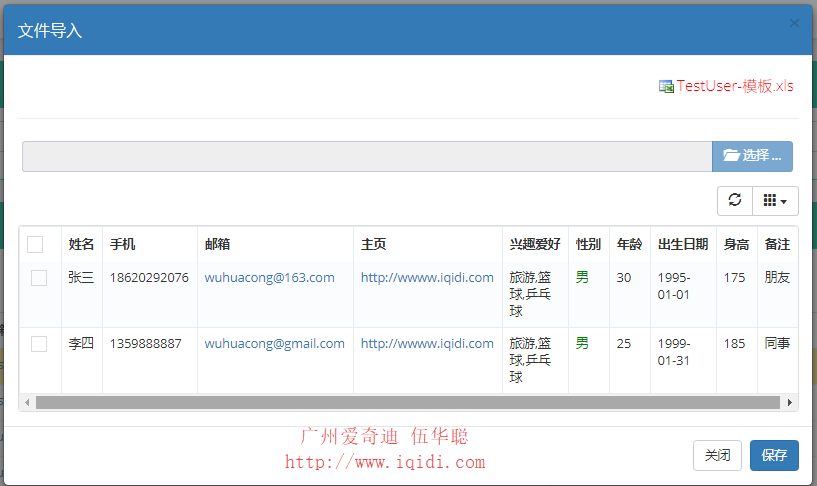
Excel導入的的界面展示如下所示。

上傳文件後,數據直接展示在彈出層的列表裡面,這裡直接使用了 Bootstrap-table表格插件進行展示。

這樣我們就可以把Excel的記錄展示出來,實現了預覽的功能,勾選必要的記錄,然後保存即可提交到伺服器進行保存,實現了Excel數據的真正導入資料庫處理。
實際的代碼就比較多一點點,詳細可以參考下隨筆《結合bootstrap fileinput插件和Bootstrap-table表格插件,實現文件上傳、預覽、提交的導入Excel數據操作流程》,這裡就主要簡要介紹下導入的處理邏輯即可,由於是在客戶端組裝列表數據,然後通過ajax提交的,它的的代碼如下所示。(這個也就是後面需要解決的問題)。
        //保存導入的數據
        function SaveImport() {

            var list = [];//構造集合對象
            var rows = $import.bootstrapTable('getSelections');
            for (var i = 0; i < rows.length; i++) {
                list.push({
                    'Name': rows[i].Name, 'Mobile': rows[i].Mobile, 'Email': rows[i].Email, 'Homepage': rows[i].Homepage,
                    'Hobby': rows[i].Hobby, 'Gender': rows[i].Gender, 'Age': rows[i].Age, 'BirthDate': rows[i].BirthDate,
                    'Height': rows[i].Height, 'Note': rows[i].Note
                });
            }

            if (list.length == 0) {
                showToast("請選擇一條記錄", "warning");
                return;
            }

            var postData = { 'list': list };//可以增加其他參數,如{ 'list': list, 'Rucanghao': $("#Rucanghao").val() };
            postData = JSON.stringify(postData);

            $.ajax({
                url: '/TestUser/SaveExcelData',
                type: 'post',
                dataType: 'json',
                contentType: 'application/json;charset=utf-8',
                traditional: true,
                success: function (data) {
                    if (data.Success) {
                        //保存成功  1.關閉彈出層,2.清空記錄顯示 3.刷新主列表
                        showToast("保存成功");

                        $("#import").modal("hide");
                        $(bodyTag).html("");
                        Refresh();
                    }
                    else {
                        showToast("保存失敗:" + data.ErrorMessage, "error");
                    }
                },
                data: postData
            });
        }
在實際使用過程中,發現數據幾百條的時候,頁面就罷工了,不能正常插入,搜索下解決問題說是大小受限的問題,但是我在Web.Config裡面也設置了上傳文件的大小,最終沒有找到配置解決思路。
<httpRuntime executionTimeout="600" maxRequestLength="951200"
   useFullyQualifiedRedirectUrl="true" minFreeThreads="8"
   minLocalRequestFreeThreads="4" appRequestQueueLimit="100"  enableVersionHeader="true"/>
最終這個配置項也無法解決,那麼我們只能找其他方式來避免數據大量提交了。
2、使用在控制器後臺讀取Excel文件導入資料庫
以上的數據導入方式,在一般數據比較少的時候,體驗還是不錯的,不過它的過程也是先上傳Excel文件,然後讀取Excel裡面的記錄,轉換為對應的List<T>類型,在序列號JSON列表在前端界面展示。
既然我們文件在伺服器上,並且也可以通過把Excel文件轉換為對應的List<T>,那麼我們減少用戶勾選的步驟,確認後直接讀取導入即可,這樣處理應該就沒有這樣的受限於頁面數據大小的問題的。
這樣我們以設備信息導入為案例,介紹這個處理過程,如下前端代碼是在文件上傳到伺服器後,用戶確認後負責導入的邏輯的。
             //保存導入的數據
        function SaveImport() {
            var postData = { 'guid': importGuid };
            postData = JSON.stringify(postData);

            $.ajax({
                url: '/Device/SaveExcelByGuid',
                type: 'post',
                dataType: 'json',
                contentType: 'application/json;charset=utf-8',
                traditional: true,
                success: function (data) {
                    if (data.Success) {
                        Refresh();
                        //保存成功  1.關閉彈出層,2.清空記錄顯示 3.刷新主列表
                        showToast("保存成功");

                        $("#import").modal("hide");
                        $(bodyTag).html("");
                    }
                    else {
                        showToast("保存失敗:" + data.ErrorMessage, "error");
                    }
                },
                data: postData
            });
最終我們是看到處理方式是在SaveExcelByGuid的控制器方法裡面的,這個方法根據伺服器的GUID,獲取對應Excel文件的信息,然後進行讀取和導入操作。
這個方法的詳細代碼如下所示。
        /// <summary>
        /// 在服務端保存Excel
        /// </summary>
        /// <param name="guid"></param>
        /// <returns></returns>
        public ActionResult SaveExcelByGuid(string guid)
        {
            CommonResult result = new CommonResult();
            if(!string.IsNullOrEmpty(guid))
            {
                var list = GetDevice(guid);//根據guid獲取對應的Excel文件,並把內容轉換為對應的List<T>
                if (list != null)
                {
                    foreach (DeviceInfo detail in list)
                    {
                        var isExist = BLLFactory<Device>.Instance.IsExistKey("DeviceId", detail.DeviceId);
                        if (!isExist)
                        {
                            BLLFactory<Device>.Instance.Insert(detail);
                        }
                    }
                    //成功操作
                    result.Success = true;
                }
                else
                {
                    result.ErrorMessage = "導入信息不能為空";
                }
            }
            else
            {
                result.ErrorMessage = "導入信息不能為空";
            }

            return ToJsonContent(result);
        }
其中我們看到 GetDevice(guid) 就是獲取Excel文件內容並轉換為對應的實體類列表過程的。
其中的GetDevice就是轉換為對應實體類集合的過程,代碼如下所示。
        /// <summary>
        /// 獲取設備導入文件,轉換為對應的實體類集合
        /// </summary>
        /// <param name="guid">附件GUID</param>
        /// <returns></returns>
        private List<DeviceInfo> GetDevice(string guid)
        {
            List<DeviceInfo> list = new List<DeviceInfo>();

            DataTable table = ConvertExcelFileToTable(guid);
            if (table != null)
            {
                #region 數據轉換
                foreach (DataRow dr in table.Rows)
                {
                    DeviceInfo info = new DeviceInfo();
                    info.DeviceId = dr["設備ID"].ToString();
                    info.VersionInfo = dr["版本信息"].ToString();
                    info.MinitorInfo = dr["預留監控信息"].ToString();
                    info.DeviceMsisdn = dr["公話手機號"].ToString();

                    list.Add(info);
                }
                #endregion
            }
            return list;
        }
而 ConvertExcelFileToTable 就是利用aspose.Cell的Excel操作控制項,實現數據轉換的。
        /// <summary>
        /// 從附件列表中獲取第一個Excel文件,並轉換Excel數據為對應的DataTable返回
        /// </summary>
        /// <param name="guid">附件的Guid</param>
        /// <returns></returns>
        protected DataTable ConvertExcelFileToTable(string guid)
        {
            DataTable dt = null;
            if (!string.IsNullOrEmpty(guid))
            {
                //獲取上傳附件的路徑
                string serverRealPath = BLLFactory<FileUpload>.Instance.GetFirstFilePath(guid);

                if (!string.IsNullOrEmpty(serverRealPath))
                {
                    //轉換Excel文件到DatTable裡面
                    string error = "";
                    dt = new DataTable();
                    AsposeExcelTools.ExcelFileToDataTable(serverRealPath, out dt, out error);
                }
            }
            return dt;
        }
這樣實現效果,不考慮用戶勾選記錄的情況,確認後直接對整個Excel文件進行判斷導入操作,一般也是符合我們實際的導入過程的,這樣處理起來,再也不會有前面介紹的那種情況了,至少我們能夠順利上傳Excel文件,在後臺讀取Excel文件並轉換是沒有什麼壓力的,而且體驗效果也很不錯,非常快速。
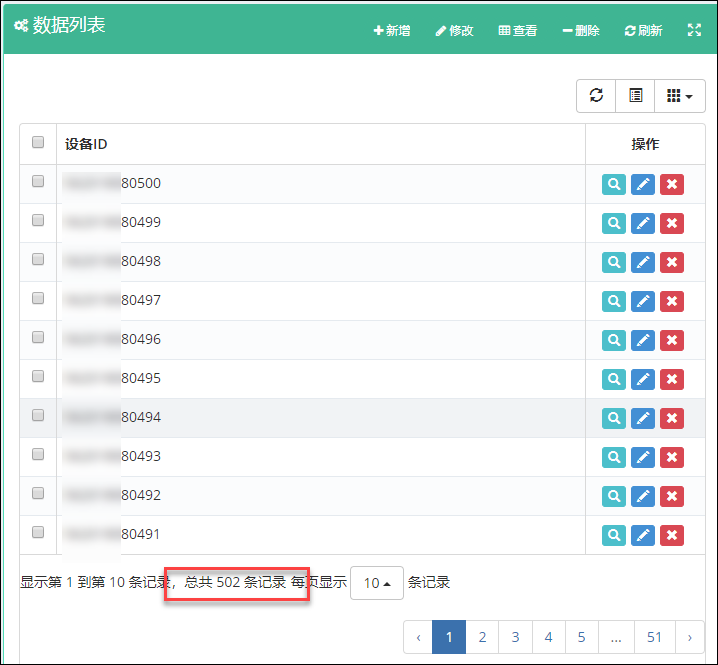
最後看看大量數據導入後,也能夠快速刷新,並能夠在分頁控制項進行展示了。


