概述 對於二進位安裝,優點是可以安裝到任何路徑下,靈活性好,一臺伺服器可以安裝多個mysql。缺點是已經繹過編譯,性能不如源碼編譯得好,不能靈活定製編譯參數。如果用戶即不想安裝最簡單卻不夠靈活的RPM包,又不想安裝複雜費時的源碼包,那麼已編譯好的二進位包將是最好的選擇。 一.步驟1: 解壓glib包 ...
概述
對於二進位安裝,優點是可以安裝到任何路徑下,靈活性好,一臺伺服器可以安裝多個mysql。缺點是已經繹過編譯,性能不如源碼編譯得好,不能靈活定製編譯參數。如果用戶即不想安裝最簡單卻不夠靈活的RPM包,又不想安裝複雜費時的源碼包,那麼已編譯好的二進位包將是最好的選擇。
一.步驟1: 解壓glib包
-- 在 /usr/local 下創建一個mysql文件夾,用來存放
[root@hsr local]# mkdir mysql
[root@hsr local]# ls
bin  etc  games  include  lib  lib64  libexec  mysql  sbin  share  src

-- 在原有/usr/tool目錄將gz壓縮包解壓
[root@hsr tool]# tar -zxvf mysql-5.7.23-linux-glibc2.12-x86_64.tar.gz
mysql-5.7.23-linux-glibc2.12-x86_64/bin/myisam_ftdump
mysql-5.7.23-linux-glibc2.12-x86_64/bin/myisamchk
mysql-5.7.23-linux-glibc2.12-x86_64/bin/myisamlog
mysql-5.7.23-linux-glibc2.12-x86_64/bin/myisampack
mysql-5.7.23-linux-glibc2.12-x86_64/bin/mysql
mysql-5.7.23-linux-glibc2.12-x86_64/bin/mysql_client_test_embedded
mysql-5.7.23-linux-glibc2.12-x86_64/bin/mysql_config_editor
.....

--將解壓的文件複製到/usr/local/mysql目錄下
[root@hsr tool]# sudo cp -r mysql-5.7.23-linux-glibc2.12-x86_64 /usr/local/mysql

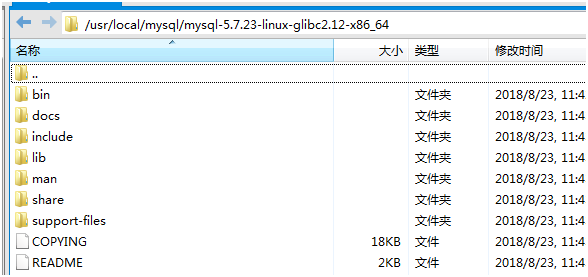
--在mysql-->mysql-5.7.23-linux-glibc2.12-x86_64路徑下 解壓的文件共9個 目錄如下:
[root@hsr mysql]# ls mysql-5.7.23-linux-glibc2.12-x86_64 bin COPYING docs include lib man README share support-files
註意:mysql-5.7.23-linux-glibc2.12-x86_64目錄層次要去掉,變為/usr/local/mysql 下的9個目錄,在文章後面會去掉這層。
二. 步驟2:
2.1 添加mysql用戶 useradd -r -g 用戶名 用戶組
[root@hsr mysql]# groupadd mysql
[root@hsr mysql]# useradd -r -g mysql mysql
2.2 切換到 /usr/local/mysql 目錄下,改變目錄擁有者為mysql
[root@hsr mysql]# chown -R mysql.mysql /usr/local/mysql
2.3 新環境安裝libaio包 mysql 依賴於libaio
[root@hsr mysqld]# yum search libaio
三 步驟3:
安裝mysql,使用 --initialize,basedir 基礎目錄,datadir 為數據目錄。
[root@hsr ~]# cd /usr/local/mysql/mysql-5.7.23-linux-glibc2.12-x86_64/bin
[root@hsr bin]# ./mysqld  --initialize --user=mysql --basedir=/usr/local/mysql --datadir=/usr/local/mysql/data
2018-08-23T06:56:21.157088Z 0 [Warning] TIMESTAMP with implicit DEFAULT value is deprecated. Please use --explicit_defaults_for_timestamp server option (see documentation for more details).
2018-08-23T06:56:21.157246Z 0 [ERROR] Can't find error-message file '/usr/local/mysql/share/errmsg.sys'. Check error-message file location and 'lc-messages-dir' configuration directive.
2018-08-23T06:56:26.287087Z 0 [Warning] InnoDB: New log files created, LSN=45790
2018-08-23T06:56:27.059913Z 0 [Warning] InnoDB: Creating foreign key constraint system tables.
2018-08-23T06:56:27.138616Z 0 [Warning] No existing UUID has been found, so we assume that this is the first time that this server has been started. Generating a new UUID: a7e28575-a6a1-11e8-af13-000c29affb65.
2018-08-23T06:56:27.154064Z 0 [Warning] Gtid table is not ready to be used. Table 'mysql.gtid_executed' cannot be opened.
2018-08-23T06:56:27.155635Z 1 [Note] A temporary password is generated for root@localhost: ro0ssOGT?ocf
四步驟4:
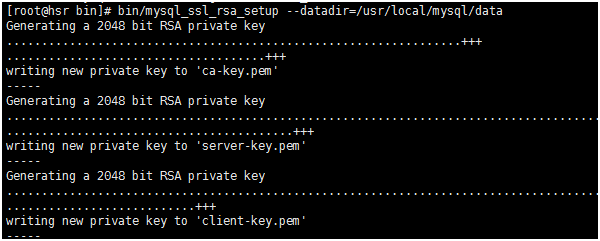
4.1 創建RSA private key。
[root@hsr bin]# bin/mysql_ssl_rsa_setup --datadir=/usr/local/mysql/data
4.2 修改當前目錄擁有者為 root 用戶,修改data 目錄擁有者為 mysql
[root@hsr bin]# chown -R root:root /usr/local/mysql
[root@hsr bin]# chown -R mysql:mysql /usr/local/mysql/data
五.步驟5 配置mysql(mysql.server)和my.cnf文件
--檢查 etc/my.cnf文件是否存在 (二進位安裝,預設配置文件在/etc/my.cnf)
    [root@hsr etc]# find -name  my.cnf
    ./my.cnf

 --將support-files 目錄下的mysql.server文件複製到etc/init.d下
    [root@hsr ~]# cd /usr/local/mysql/mysql-5.7.23-linux-glibc2.12-x86_64/support-files
    [root@hsr support-files]# cp mysql.server /etc/init.d/mysql

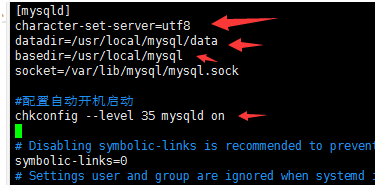
 -- 配置/etc/init.d/mysql服務文件 添加basedir和datadir
    [root@hsr support-files]# vim /etc/init.d/mysql

修改my.cnf 配置以下四個參數(註意:chkconfig -- level 35 mysqld on 不要加上,後面報錯,又得去掉)
六.步驟6 啟動mysql
[root@hsr bin]# service mysql start
/etc/init.d/mysql: line 239: my_print_defaults: command not found
    Starting MySQL ERROR! Couldn't find MySQL server (/usr/local/mysql/bin/mysqld_safe)

--提示未找到路徑,需要把"mysql-5.7.23-linux-glibc2.12-x86_64" 文件夾去掉,使用mv 將裡面的文件移到/usr/locl/mysql下,共9個文件
[root@hsr bin]# mv /usr/local/mysql/mysql-5.7.23-linux-glibc2.12-x86_64/README /usr/local/mysql
[root@hsr bin]# mv /usr/local/mysql/mysql-5.7.23-linux-glibc2.12-x86_64/COPYING /usr/local/mysql
[root@hsr bin]# mv /usr/local/mysql/mysql-5.7.23-linux-glibc2.12-x86_64/support-files /usr/local/mysql
[root@hsr bin]# mv /usr/local/mysql/mysql-5.7.23-linux-glibc2.12-x86_64/share /usr/local/mysql
[root@hsr bin]# mv /usr/local/mysql/mysql-5.7.23-linux-glibc2.12-x86_64/man /usr/local/mysql
[root@hsr bin]# mv /usr/local/mysql/mysql-5.7.23-linux-glibc2.12-x86_64/lib /usr/local/mysql
[root@hsr bin]# mv /usr/local/mysql/mysql-5.7.23-linux-glibc2.12-x86_64/include /usr/local/mysql
[root@hsr bin]# mv /usr/local/mysql/mysql-5.7.23-linux-glibc2.12-x86_64/docs /usr/local/mysql
[root@hsr bin]# mv /usr/local/mysql/mysql-5.7.23-linux-glibc2.12-x86_64/bin /usr/local/mysql
-- 再啟動
[root@hsr bin]# service mysql start
Starting MySQL.2018-08-24T01:06:20.545225Z mysqld_safe error: log-error set to '/var/log/mariadb/mariadb.log', however file don't exists. Create writable for user 'mysql'.
 ERROR! The server quit without updating PID file (/usr/local/mysql/data/hsr.pid).

-- 提示/var/log/mariadb/mariadb.log 不存在, 打開my.cnf 能看到定義的預設路徑
[mysqld_safe]
log-error=/var/log/mariadb/mariadb.log
pid-file=/var/run/mariadb/mariadb.pid

--創建目錄 給許可權
[root@hsr bin]# mkdir /var/log/mariadb
[root@hsr bin]# touch /var/log/mariadb/mariadb.log
[root@hsr bin]# chown -R mysql:mysql  /var/log/mariadb/
-- 再啟動
[root@hsr bin]# service mysql start
Starting MySQL.... ERROR! The server quit without updating PID file (/usr/local/mysql/data/hsr.pid).

-- 錯誤信息是hsr.pid進程出問題,先查看下日誌
[root@hsr ~]# cat /var/log/mariadb/mariadb.log

在my.cnf中註釋上面參數(#chkconfig --level 35 mysqld on),再啟動

上圖意思是不能創建mysql.sock.lock 文件,一般是許可權不足,如下設置好許可權,啟動成功

七 登錄mysql
[root@hsr ~]# mysql -u root -p
bash: mysql: 未找到命令
未找到命令,是由於系統預設會查找/usr/bin下的命令,如果這個命令不在這個目錄下,就會找不到命令,需要映射一個鏈接到/usr/bin目錄下,相當於建立一個鏈接文件。
[root@hsr ~]#  ln -s /usr/local/mysql/bin/mysql /usr/bin
[root@hsr ~]# mysql -u -root -p
ERROR 2002 (HY000): Can't connect to local MySQL server through socket '/tmp/mysql.sock' (2)

--錯誤信息是不能連接到本地的socket ,系統預設找到了/tmp目錄下,需要設置鏈接文件
[root@hsr tmp]# ln -s /var/lib/mysql/mysql.sock /tmp/mysql.sock
[root@hsr ~]# mysql -u -root -p
Enter password:
八. 設置密碼
8.1 打開my.cnf文件,添加skip-grant-tables,來重置密碼,如下所示

8.2 啟動服務,再次登錄,在輸入密碼處按回車鍵進入。
[root@hsr ~]# vim /etc/my.cnf
[root@hsr ~]# service mysql restart
Shutting down MySQL.. SUCCESS!
Starting MySQL. SUCCESS!
[root@hsr ~]# mysql -u root -p
Enter password:
Welcome to the MySQL monitor.  Commands end with ; or \g.
Your MySQL connection id is 2
Server version: 5.7.23
8.3 進入mysql後,修改密碼
mysql> use mysql;
Reading table information for completion of table and column names
You can turn off this feature to get a quicker startup with -A

Database changed

mysql> update user set authentication_string=password('123456') where user='root';
Query OK, 1 row affected, 1 warning (0.00 sec)
Rows matched: 1  Changed: 1  Warnings: 1
退出mysql>quit; 編輯 my.cnf 註釋掉#skip-grant-tables
8.4 重啟mysql服務,輸入修改後的密碼(123456)進入
[root@hsr ~]# service mysql restart
Shutting down MySQL.. SUCCESS!
Starting MySQL. SUCCESS!
[root@hsr ~]# mysql -u root -p
Enter password:
Welcome to the MySQL monitor.  Commands end with ; or \g.
Your MySQL connection id is 2
Server version: 5.7.23
九 遠程登錄
-- 登錄到mysql後設置許可權
mysql> GRANT ALL PRIVILEGES ON *.* TO 'root'@'%' IDENTIFIED BY '123456' WITH GRANT OPTION;
ERROR 1820 (HY000): You must reset your password using ALTER USER statement before executing this statement.
--  再設置密碼
mysql> SET PASSWORD = PASSWORD('123456');
Query OK, 0 rows affected, 1 warning (0.00 sec)
-- 設置許可權
mysql> ALTER USER 'root'@'localhost' PASSWORD EXPIRE NEVER;
Query OK, 0 rows affected (0.00 sec)
-- 刷新許可權
mysql>  flush privileges;
Query OK, 0 rows affected (0.01 sec)
-- 設置遠程登錄許可權
mysql> GRANT ALL PRIVILEGES ON *.* TO 'root'@'%' IDENTIFIED BY '123456' WITH GRANT OPTION;
Query OK, 0 rows affected, 1 warning (0.00 sec)
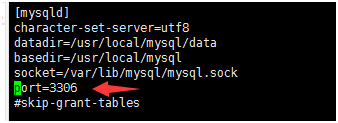
-- 在my.cnf中 添加埠,重啟服務
-- 測試埠是否打開
[root@hsr ~]#  firewall-cmd    --query-port=3306/tcp
no
-- 防火牆設置
[root@hsr ~]# firewall-cmd --zone=public --add-port=3306/tcp --permanent
success
-- 重新載入
[root@hsr ~]# firewall-cmd --reload
success
-- 再次測試埠
[root@hsr ~]# firewall-cmd    --query-port=3306/tcp
yes
-- 在windows端拼通成功

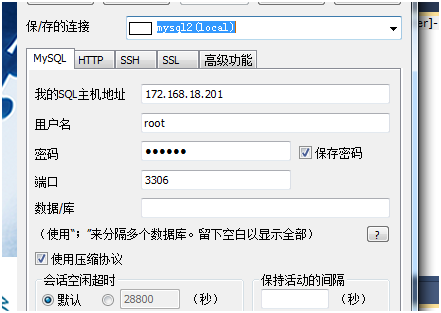
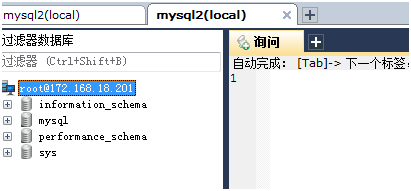
--- 最後使用SQLyog連接成功
